Decors, edge tape and materials
In this chapter you give boards decors from the library, one board at a time or a whole group at once. You set the grain direction and the edge tape on each edge. Decor and edge tape are not only looks: they go into the cutting list, the cut size, the cost estimate, the quote and the order.
Show me in the program
The interactive tour Decors and materials (2 min) shows you in the program where to click and what to type, step by step. In the EFS tab, open the Interactive tours panel and click Start next to the tour. The AI assistant also offers it when you ask how to do this.
Before you start
- An open project with at least one cabinet. How to add a cabinet is in the chapter The interface and your first cabinet.
- The texture pack with the decors, added as a library. If you haven't added it yet, start with the section Add the texture pack as a library.
- The sidebar with the EFS tabs turned on (press N with the pointer over the 3D viewport).
Every new board gets the Default white material: a white board without a texture. This material has a price in the default price list, so the cost estimate works even before you assign decors.
Material preview in the viewport
By default the viewport draws in Solid mode. In this mode the viewport shows no textures: all boards are plain grey, whatever their decor. To see the decors, switch the viewport to material preview.
- In the right part of the 3D viewport header, find the four round buttons for the shading mode.
- Click the third button, Material Preview.

Boards without a decor are now white (Default white), and the legs are black. Boards with a decor show the texture.
| Button | What you see |
|---|---|
| Wireframe (first) | Only the edges of the boards |
| Solid (second) | Grey boards without textures. The fastest display for drawing |
| Material Preview (third) | The decors and colours of the boards. You use this mode in this chapter |
| Rendered (fourth) | A lit view, like a render. See One-click render |
Tip
Z opens the same choice (Blender's pie menu for the shading mode). On a large project, draw in Solid mode and switch to Material Preview when you check the decors.
Note
The first time a new decor is shown, Optimizing shaders appears briefly at the top left of the viewport. Wait a few seconds for the texture to appear.
The decor library
What the texture pack is
The decors come in the texture pack. You get the pack free with the licence: the download link is on the page that opens after the purchase (under Bonus) and in the welcome e-mail. The file is called efs_assets_egger.zip and is about 1.6 GB.
The pack contains:
- four Blender files,
egger-F.blend,egger-H.blend,egger-U.blendandegger-W.blend, in which the decors are stored as materials; - the
eggerfolder with the decor images (259 images).
The code of every decor starts with the letter of its Egger series:
| Series | What it contains | Example |
|---|---|---|
| F | Stone, concrete, marble, metal | F186 ST9 Chicago beton svijetlo sivi |
| H | Wood | H1180 ST37 Halifax hrast natur |
| U | Plain colours | U702 ST9 Kašmir siva |
| W | White decors | W1000 ST9 Premium bijela |
A decor name has three parts: the code (U702), the structure (ST9) and the name (Kašmir siva). The code and the structure together pick the row in the price list, so the same decor in two structures (e.g. H1180 ST22 and H1180 ST37) has two prices.
Note
In the app, Blender's own names are only partly translated into Croatian. Where Blender has a Croatian name, the Croatian manual writes it with the English name in brackets, e.g. Preglednik zbirki (Asset Browser). This English page uses Blender's English names, e.g. Asset Browser.
Add the texture pack as a library
You do this once on each computer. The library stays remembered for all projects.
- Unzip
efs_assets_egger.zipinto a folder where it will stay for good, e.g.Documents/EFS decors. The folder must contain the four.blendfiles and theeggerfolder. - Open Edit → Preferences….
- On the left, select the Asset Libraries section.
- Click + next to the list of libraries.
- Select the folder you unzipped the pack into and confirm.
- Double-click the name of the new library and type a name you will recognise, e.g.
EFS decors. - Leave Import Method at the default (Append (Reuse Data)): the decor is then copied into the project.
- Close the preferences window. The preferences save themselves when you close the app.
Watch out
Don't move or rename the pack folder after adding it. Projects look for the decor images at the path where they were when you added the decor. If you do move the folder, the decors in old projects disappear until you link them again (see Common problems).
Open the Asset Browser
You choose decors in the Asset Browser. The handiest place to open it is the right column, which normally holds Scene elements and Cabinet elements.
- In the header of the right column, click the editor type icon, at the far left.
- Select Asset Browser.
- Widen the column: grab its left edge with the mouse and drag it to the left.
Find a decor
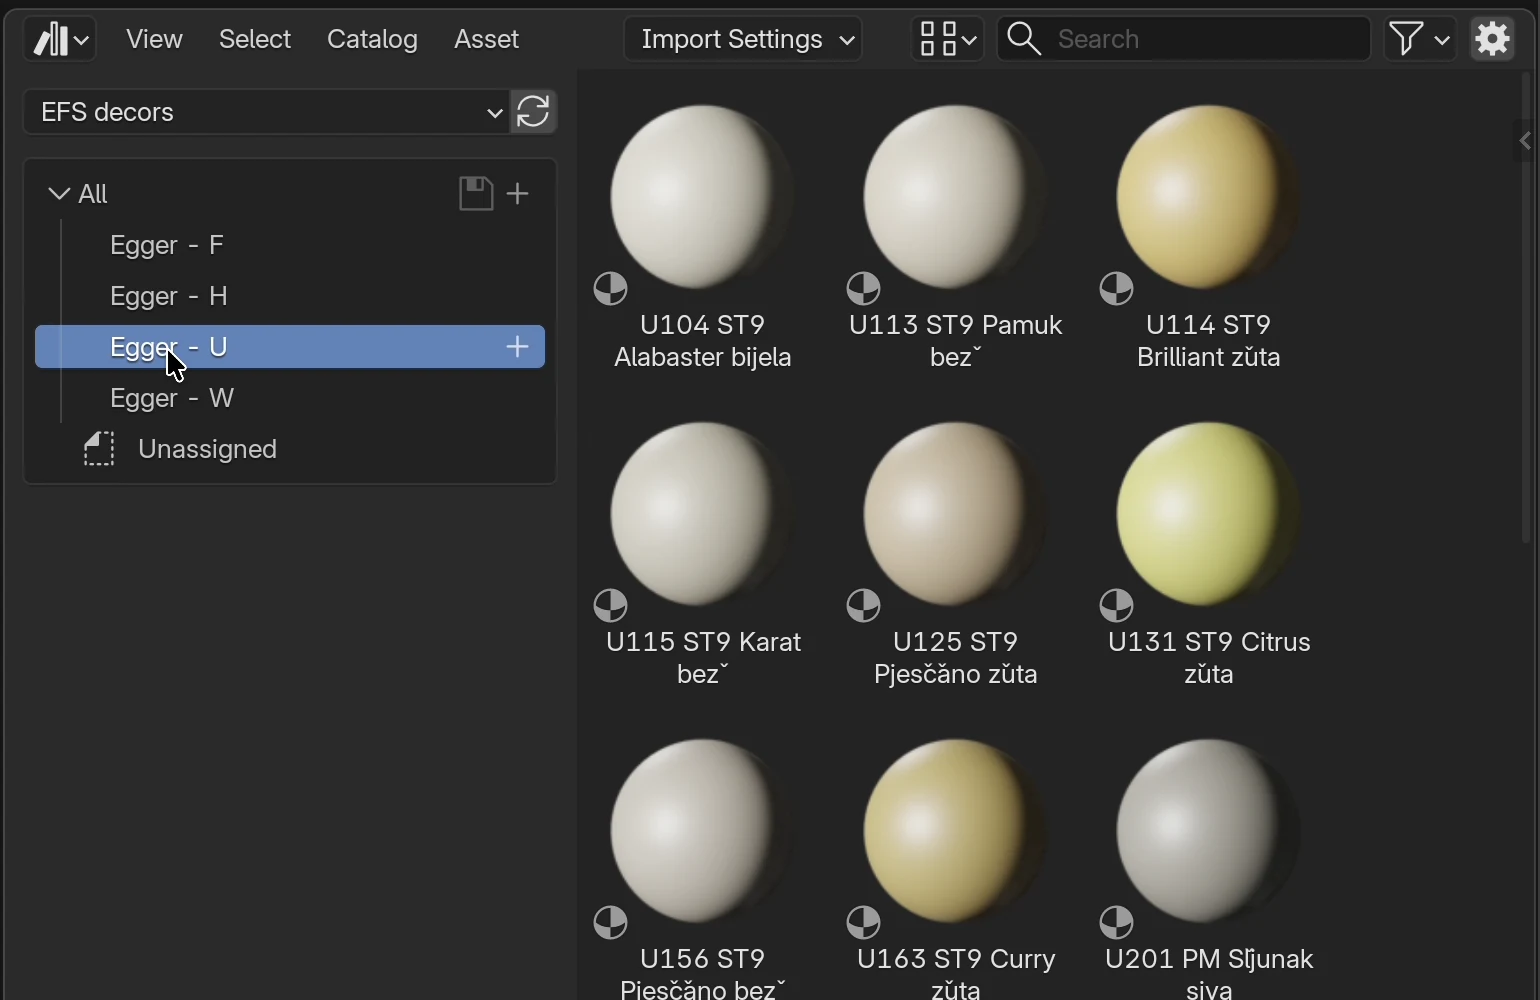
- At the top left of the Asset Browser is the library menu, which at first shows All Libraries. Select your decor library, e.g. EFS decors.
- Below the menu, click a catalog, e.g. Egger - U. If the library has no catalogs, click All: all decors are there.
- Click the Search field at the top right, type the decor code, e.g.
U702, and press Enter.
Tip
Searching by code is the fastest. The search looks only in the selected catalog: for wood, click Egger - H first, and to search all decors at once, click All.
Note
If you don't see the Egger - F, Egger - H, Egger - U and Egger - W catalogs in the library, all decors are under Unassigned and in All. The decors, dragging and searching by code work the same.
Drag a decor onto a board
- Grab the decor thumbnail with the left mouse button.
- Drag it onto a board in the 3D viewport and let go.
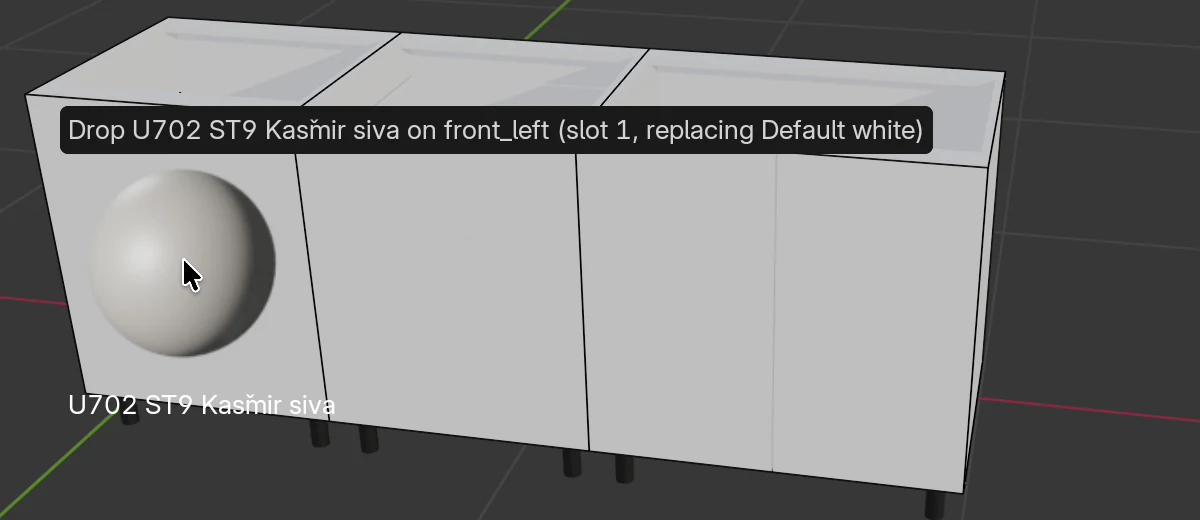
While you drag, a tooltip says which board the decor will drop on (e.g. Drop U702 ST9 Kasmir siva on front_left). Only the board under the pointer gets the decor.
What the program does by itself:
- The decor is copied into the project. From then on it is in the list in Material assignment, so you can give it to a whole group without dragging it again.
- The texture aligns itself on the board: at real size, with the grain in the direction from the Grain field (see Grain direction).
- You undo a wrong decor with Ctrl+Z.
Material groups
So that you don't drag a decor onto every front separately, EFS puts every board in one material group. With a button in the Material assignment panel, all boards of one group in the whole project get the decor. The groups also serve the web: in the web preview the customer picks the decor of each group (see Web preview and QR).
| Group (button on the board) | Button in Material assignment | Which boards are in the group by default |
|---|---|---|
| Shelf | Select material for Shelves | Carcass: left and right sides, top and bottom, cross boards (rails), shelves and dividers. Drawer sides, back and bottom. Corner cabinet boards except the fronts |
| F 1 | Select material for Front 1 | Doors, flaps and drawer fronts of base and tall units. Fronts and corner boards of the corner cabinet. Sliding door leaves |
| F 2 | Select material for Front 2 | Doors, flaps and drawer fronts of wall units |
| F 3 | Select material for Front 3 | Free boards and the worktop |
| F 4 | Select material for Front 4 | None. A spare group for boards you want to keep apart |
| None | Select material for None | Backs and legs. On the web the customer doesn't change the decor of these boards |
The kickboard, filler, end panel and cornice get the decor and the front group of the cabinet you add them to (see Kickboard, fillers, end panels and cornice). A cabinet without fronts gives them the F 3 group.
Rules the program applies by itself:
- When you switch a cabinet to a wall unit with U, its fronts move to F 2. When you switch it back to a base unit, the fronts move to F 1. A group you changed by hand on that cabinet's fronts is then lost.
- A wall unit imported from a template comes with its fronts in F 2.
- A new shelf or divider gets the decor of the boards of the same group in that cabinet, not white.
- When you change the front type (F) or the drawer layout (D), the new fronts get the decor and the group of the cabinet's first previous front.
Material assignment
Material assignment offers only materials that are already in the project. So first drag the decor onto any board once, then give it to the group.
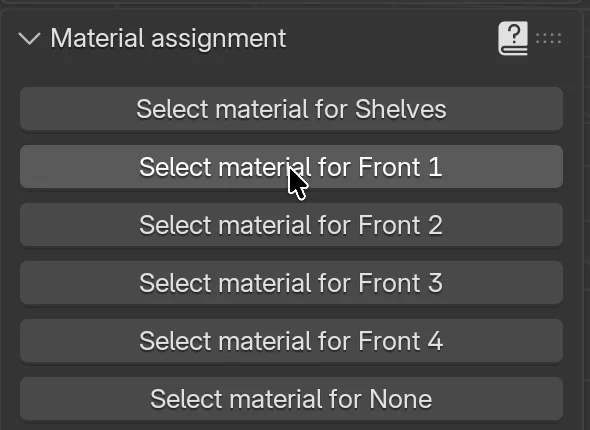
- In the EFS tab, open the Material assignment panel.
-
Click the group's button, e.g. Select material for Front 1.
-
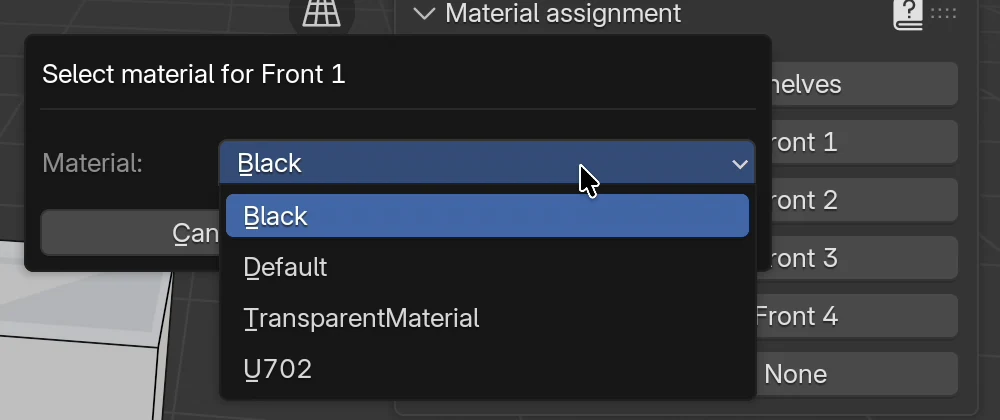
In the dialog, open the Material list and select the decor by its code, e.g. U702.
-
Click OK.
All boards of the F 1 group in the project get the U702 decor, in all cabinets at once.
Options
| Option | What it does | Values |
|---|---|---|
| Select material for Shelves | All boards of the Shelf group get the chosen material. Hidden boards, the room, Gola profiles, LED strips and legs are skipped | Opens a dialog |
| Select material for Front 1 … 4 | All boards of the F 1, F 2, F 3 or F 4 group get the chosen material | Opens a dialog |
| Select material for None | All boards of the None group get the chosen material | Opens a dialog |
| Material (in the dialog) | The material the group gets | All materials in the project, shown only by the first word of the name (the code). Empty project: No Materials |
| OK / Cancel | Assign the material or cancel |
The Material list also shows the program's technical materials: Black (legs), Default (Default white, white without a texture) and TransparentMaterial (the cabinet's transparent frame). Give boards only decors and Default.
Watch out
The None group also holds the legs, not only the backs, so Select material for None gives the chosen material to the legs too. If you want different backs, move them to another group (e.g. F 4) or drag the decor onto them one by one.
Note
The assignment applies to the boards that are in the group at the moment you click OK. A new cabinet (C) and a cabinet from a template come in white. When you add new cabinets, repeat the assignment for their groups.
Change the group of one board
- Click a board, e.g. one door.
- Open the EFS - Board tab on the edge of the sidebar.
- At the bottom of the Board properties panel, in the Material group box, click a group: Shelf, F 1, F 2, F 3, F 4 or None.
The button that is on shows the board's current group. The decor doesn't change: only which board the next assignment reaches and what the customer can pick on the web.
When you don't see the Material group box:
- several boards are selected: you change the group one board at a time;
- the Enable material selection setting in the Web publish → Settings panel is off.
A decor for one board or a whole group
A decor is only the board's material. A group doesn't remember "its" decor. So there is no priority rule: the last action counts.
- You drag a decor onto a board: only that board changes.
- You click the assignment for a group: all boards of that group get the same decor, including those you gave another one before.
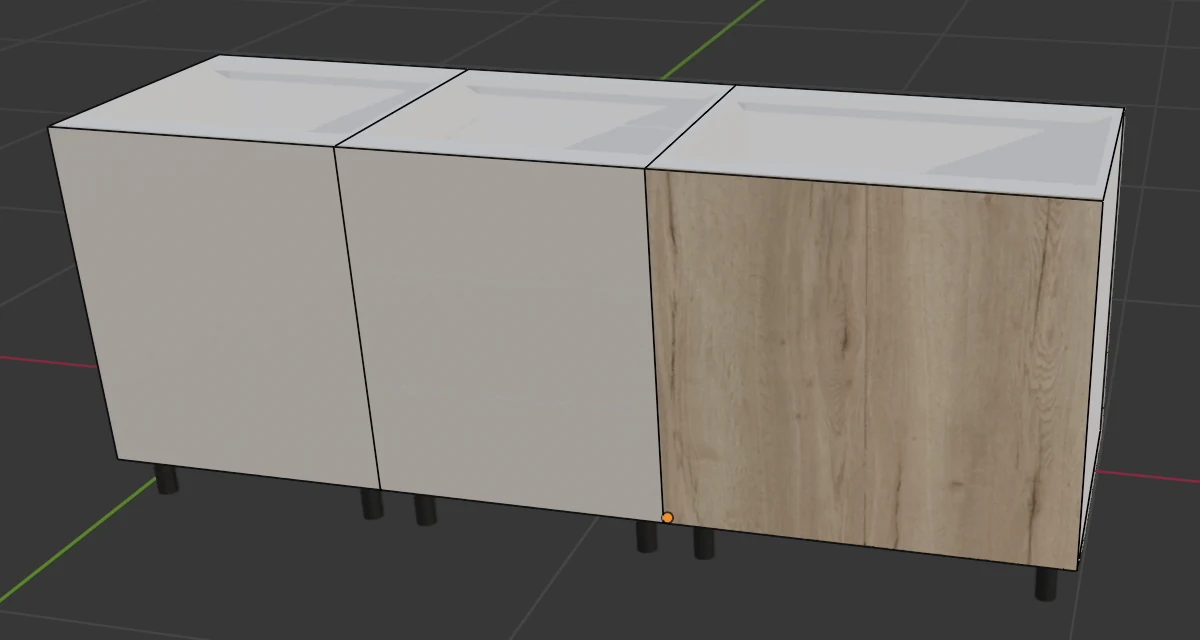
Example from the video: the fronts are in U702, and the two doors of the right cabinet must be in oak.
- In the Asset Browser, click the Egger - H catalog.
- In the Search field, type
H1180and press Enter. - Drag H1180 ST37 Halifax hrast natur onto the left door.
- Drag the same decor onto the right door.
Watch out
The oak doors are still in the F 1 group. If you later click Select material for Front 1 again, they get U702 too.
Tip
Move boards with a special decor to the F 4 group, then give them the decor with the assignment for front 4. That way the assignment for F 1 doesn't touch the oak doors, and on the web the customer picks the oak separately.
Grain direction
The EFS - Board tab
You set the grain, edge tape and group of a board in the EFS - Board tab. The tab appears when you click one board.
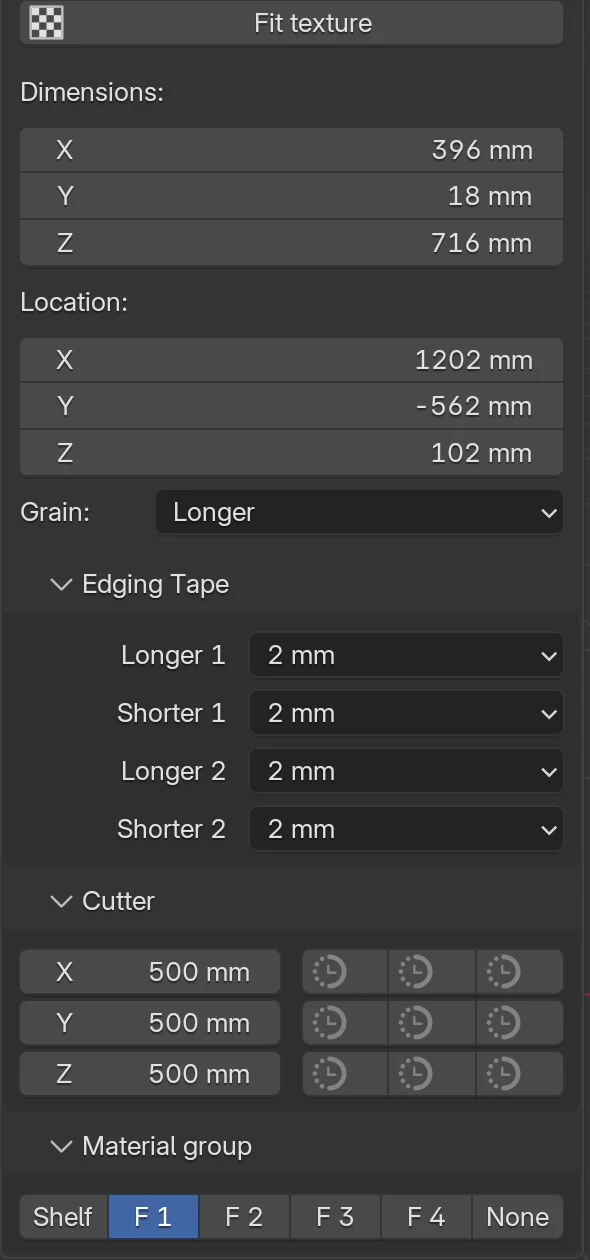
| Field | What it does | Default | Values |
|---|---|---|---|
| Fit texture | Realigns the decor on the active board | Button | |
| Grain | The grain direction on the board | Longer | Longer, Shorter |
| Edging Tape | Edge tape on each of the four edges | Depends on the board (see Default edge tape) | None, 0.4 mm, 0.8 mm, 1 mm, 2 mm |
| Material group | The board's group | Depends on the board (see Material groups) | Shelf, F 1, F 2, F 3, F 4, None |
The other fields of the panel (Name, Note, Dimensions, Location and the Cutter box for cut-outs in the board) don't change the decor or the edge tape.
Grain
- Click a board, e.g. the left oak door.
- In the EFS - Board tab, open the Grain list.
- Select Longer or Shorter.
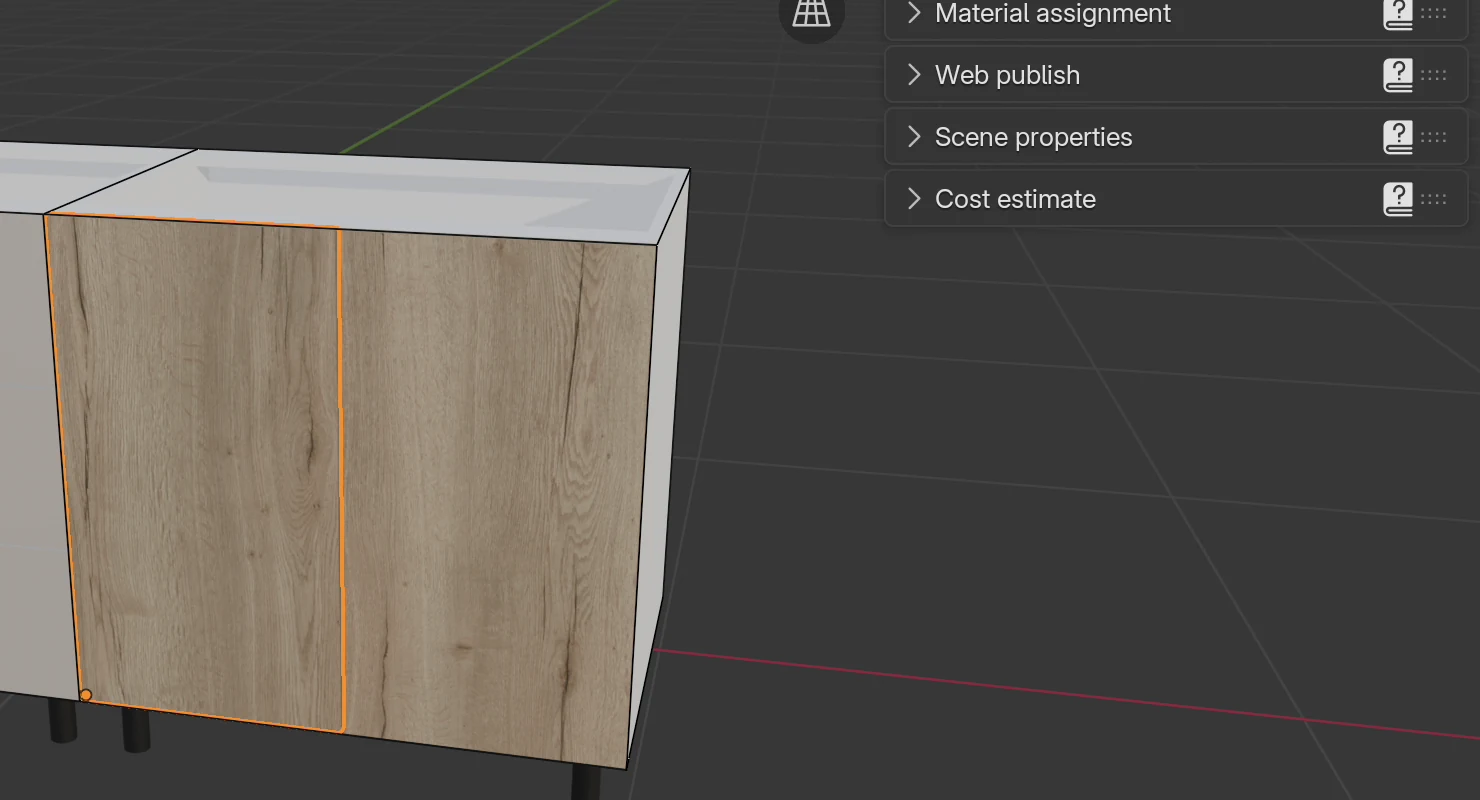
The texture turns at once. In the picture the left door is switched to Shorter: its grain runs horizontally, while on the right door it still runs vertically.
What Grain changes besides the looks:
- Cutting list. The first size, Length, is always the size along the grain. With Longer it is the longer side of the board, with Shorter the shorter one. A door 716 mm high and 396 mm wide with the grain along the shorter side has the finished size 396 × 716 mm in the list (Length × Width).
- Nesting. A part with a grain direction is laid on the sheet with its Length along the length of the sheet (e.g. 2800 mm), and it is not turned. See Nesting and board prices.
The carcass (sides, top and bottom, back), shelves and dividers, doors, flaps, drawer fronts, corner cabinet boards and free boards have a grain direction. Drawer sides, back and bottom and the cross boards have no Grain field: in nesting they may be turned to fit best.
Tip
A drawer front 600 mm wide and 140 mm high with Longer has horizontal grain. If you want vertical grain on the drawer fronts, like on the doors next to them, select Shorter on each drawer front.
Note
The program doesn't know which decor has a grain. The direction is respected for plain colours too, so they aren't turned in nesting either.
Fit texture
Fit texture places the decor on the active board at real size, with the grain in the direction from the Grain field, the same on the face and on the edges. Every board gets its own piece of the decor, so neighbouring boards don't look like copies of each other.
The program does this by itself when:
- a board gets a new decor (by dragging or by the assignment for a group);
- you change Grain;
- new fronts are made (F and D) or a copy of the cabinet (Shift+D).
The program doesn't do it when you change the cabinet's sizes: the board only stretches or shrinks, and the decor with it. So after you change the width, height or depth, click Fit texture on the boards where the decor looks stretched. The button works only on the active board: for several boards, click it for each one separately.
For advanced users
Fit texture takes the longer side of the decor image to cover 2800 mm of the board along the grain, like Egger's decor scans (1300 × 2800 mm). The piece of the decor a board gets depends on its name, so the same board looks the same after it is realigned.
Edge tape
The Edging Tape box
You set the edge tape for each edge of the board separately, in the Edging Tape box in the EFS - Board tab.
- Click a board.
- In the Edging Tape box, open the list next to an edge, e.g. Longer 1.
- Select a thickness, e.g. 1 mm.
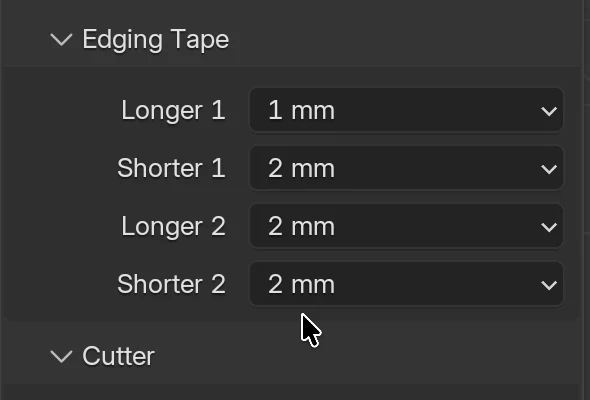
| Field | Edge | Values |
|---|---|---|
| Longer 1 | The first edge along the longer side of the board | None, 0.4 mm, 0.8 mm, 1 mm, 2 mm |
| Shorter 1 | The first edge along the shorter side | the same |
| Longer 2 | The second edge along the longer side | the same |
| Shorter 2 | The second edge along the shorter side | the same |
Longer and Shorter always refer to the actual longer and shorter side of the board, whatever the grain direction. On the board drawing in the PDF, the edge tape is a blue line along the edge, with its thickness: edge 1 is the bottom or left one, edge 2 the top or right one.
Rules the program applies by itself:
- Backs have no edge tape. When you click a back, the Edging Tape box is not shown.
- A change in the box applies only to the active board.
- When several boards are selected, there is a To selected boards button below the edges. It gives all selected boards the edge tape of the active board (the board you clicked last).
Tip
The same edge tape on all shelves of a cabinet: set the edge tape on one shelf. Select the other shelves (Shift + click), and click the shelf with the right edge tape last, so it is active. Click To selected boards.
Copy to selected cabinets copies the edge tape and grain between whole cabinets (the Edging tape and Materials and grain options). See Working faster.
Default edge tape
Every new board gets edge tape on all four edges:
| Board | Default edge tape |
|---|---|
| Left and right sides, top and bottom, cross boards | 0.4 mm |
| Shelves and dividers | 0.4 mm |
| Doors, flaps and drawer fronts | 2 mm |
| Drawer sides and back | 0.4 mm |
| Drawer bottom | no edge tape |
| Back | no edge tape |
| Fronts and corner boards of the corner cabinet | 2 mm |
| Other boards of the corner cabinet | 0.4 mm |
| Free board (B), worktop, kickboard, filler, end panel, cornice, sliding door leaves | 2 mm |
The worktop, kickboard, filler, end panel, cornice and sliding door leaves are made as free boards, so they also get 2 mm on all four edges, including the edge against the wall. Change the edge tape on edges that aren't seen by hand, in the Edging Tape box.
If you work with different edge tape, save it as My settings:
- On one cabinet, set the edge tape for each type of board (sides, shelves, fronts…).
- Click the cabinet.
- In the EFS tab, Easy Form Studio panel, in the My settings box, click Save as my settings.
From then on, new cabinets, fronts and shelves get that edge tape, by board type. Free boards still get 2 mm. My settings don't remember the decor or the grain. More in the chapter Working faster.
Watch out
When you change the front type (F) or the drawer layout (D), EFS makes new fronts. They keep the decor, but the edge tape and grain go back to the defaults (or to My settings). Set the edge tape and grain of the fronts only when the cabinet's layout is finished.
Edge tape and cut size
The cut size is the finished size less the edge tape on each edge. Edge tape on the longer edges shortens the shorter size, and edge tape on the shorter edges the longer one.
Example from the video, a door 716 × 396 mm:
| Edge tape | Cut size |
|---|---|
| 2 mm on all four edges | 712 × 392 mm |
| Longer 1 1 mm, other edges 2 mm | 712 × 393 mm |
Edge tape of 0.4 mm gives a cut size with a decimal, e.g. a 564 mm shelf with 0.4 mm edge tape on both shorter edges is cut to 563.2 mm. The cutting list has both sizes: Cut size and Finished size. The details are in the chapter Cutting list and cut size.
What decors and edge tape change in production and price
- The Cutting list has the full decor name in the Material column (e.g. U702 ST9 Kasmir siva), and the edge tape on each edge in the Edging tape columns. The cut size is already reduced by the edge tape. See Cutting list and cut size.
- The Cost estimate (EFS tab) shows the area in m² and the price for each decor and board thickness, and below that the metres of edge tape for each edge tape thickness, with the price. A green dot means the price list has a price, a red one that it doesn't.
- The Price list looks up the decor by code and structure (e.g.
U702-ST9). Edge tape is counted in the board's decor: 23 mm wide for boards thinner than 20 mm, 43 mm for thicker ones. - The Quote splits the cost of material and edge tape by cabinet. See A quote for the customer.
- Nesting lays out the parts by decor and thickness, and doesn't turn parts with a grain direction. See Nesting and board prices.
- The Supplier order lists the boards by decor and the edge tape by decor, width and thickness. See The production package and the supplier order.
Your own decors
EFS works with any material in the project, not only with the Egger decors from the pack. You make a decor that isn't in the pack (another manufacturer, veneer, coloured lacquer) yourself. EFS has no special button for this, so you make the decor with Blender's tools, once for each decor:
- you prepare the decor image;
- in a separate file in the library folder, you make a material with the image and mark it as an asset;
- you enter the price in your price list.
From then on you drag the decor from the Asset Browser like the Egger ones, in every project.
Prepare the decor image
- Format: JPEG or PNG.
- Direction: a portrait image, with the grain running vertically, along the longer side of the image.
- Real size: the longer side of the image shows 2800 mm of board. The shorter side shows as much as the image's aspect ratio gives it. Egger's images are 3685 × 7937 pixels, which is a board of 1300 × 2800 mm.
- Resolution: one to three pixels per millimetre are enough, e.g. 1300 × 2800 pixels. A larger image doesn't look better, and it slows the viewport down. For web publishing, EFS reduces images to at most 1024 pixels anyway.
- Edges: on large boards the image repeats, and each board starts at a different place in the image. The left and right edges, and the top and bottom edges, of the image should continue without a visible seam.
- Location: save the image in the library folder, e.g. in a new subfolder
minenext to theeggerfolder. Name the file after the decor, e.g.K001 SU Light oak.jpg.
If the image is a smaller cut-out of the board (e.g. a photo of a 300 × 600 mm sample), EFS still spreads it over 2800 mm, so the grain on the board is too large.
For a plain colour lacquer you don't need an image. Make the material as in the next section, and in the image step just click the colour field next to Base Color and pick the colour.
Make the decor file
Make the file with your own decors once, in the library folder. You add every further decor to the same file.
- Start EasyFormStudio. A new project opens.
- Select File → Save As... and save the project in the library folder, e.g. as
my-decors.blend. Save it before you add the image: that way the path to the image is stored relative to the file and stays correct when you drag the decor into another project. - Press B. The new board follows the mouse: click the left button to place it. The board stays selected.
- Switch the viewport to Material Preview.
- In the right column (Properties), click the Material tab: the icon with a red sphere, at the bottom of the icon column. The tab shows the board's material, Default white.
- To the right of the material name, click the new material button (the two-sheets icon). The board gets a copy of the white material, Default white.001.
- Click in the name field, type the decor name following the naming rule, e.g.
K001 SU Light oak, and press Enter. - In the Surface panel, find the Base Color row. Click the small round button to the left of the white colour field.
- In the menu, in the Texture column, click Image Texture.
- The image settings appear below the row. Click Open, find the decor image and confirm with Open Image.
- In the EFS - Board tab, click Fit texture. The board now shows the decor at real size. Check the grain direction.
- Right-click the material name field (in the Material tab) and choose Mark as Asset.
- Save the file: File → Save (Ctrl+S).
You add the next decor the same way: open my-decors.blend (File → Open...), press B for a new board and repeat steps 4 to 13.
Tip
If you need the decor in only one project, you don't need steps 1, 2 and 12. Make the material directly on a board in the project (steps 4 to 11), then give it to the other boards by dragging or with Material assignment.
The decor name
EFS reads the material name, so write the name the way Egger does:
- Three parts separated by spaces: code, structure, name, e.g.
K001 SU Light oak. If the structure has no code, type any short code, e.g.GLfor gloss. - At least two words. The first two words are the key in the price list (
K001-SU). A one-word name never finds a price. - Make the code (the first word) unique, different from Egger's codes. Material assignment shows only the first word and takes the first material that starts with it.
- Don't start the name with
Default,Black,TransparentMaterial,ChromeorEFS. The program's technical materials use these names.
Use the decor in a project
- Open the project.
- Open the Asset Browser and select your decor library.
- Click the refresh button (circular arrows) to the right of the library menu. The new decor then appears.
- Click Unassigned or All: your own decor isn't in any Egger catalog.
- Find the decor by its code and drag it onto a board. From there you work as with the Egger decors: Material assignment, Grain, edge tape.
Enter the price in the price list
Without a price, the cost estimate, the quote and the order don't know what the decor costs. You enter the price in your price list, in Excel.
- In the EFS tab, open the Cost estimate panel and click Get prices at the bottom.
- Select a folder and confirm with Get Price List. Your price list (
user_prices.xlsx) is saved in the folder, or the default price list (prices.xlsx) if you don't have one yet. - Open the file in Excel, sheet Boards.
- Add a new row. In column A, type the decor key: the code and the structure joined by a hyphen, e.g.
K001-SU. - In the board thickness column, type the board price in EUR per m². The columns are labelled by thickness:
16 (<17)for a 16 mm board,18 (<20)for 18 mm,25 (<28)for 25 mm. - In the edge tape columns, type the edge tape price in EUR per metre. The columns are labelled by the edge tape's width and thickness:
23 / 2,0is 2 mm edge tape for boards thinner than 20 mm,43 / 2,0for thicker ones. - Save the file.
- In the Cost estimate panel, click Upload prices, select the saved file and confirm with Upload Price List. The uploaded file replaces your current price list.
- Drag the decor onto a board in the project and look at the Cost estimate: there is a green dot and a price next to the decor. A red dot means there is no price yet for that board or edge tape thickness.
More about the price list is in the chapters A quote for the customer and Nesting and board prices.
Comparing decors
The Decor comparison panel makes the same project in two or three decors, with the price of each variant. It uses the material groups: the front decor goes into the F 1, F 2 and F 4 groups, the carcass decor into the Shelf group, and F 3 (the worktop) stays as it is. See Comparing decors.
Switch the right column back to Properties
When you have finished with the decors, switch the right column back:
- Click the editor type icon in the Asset Browser header.
- Select Properties.
The column shows Scene elements and Cabinet elements again.
Common problems and solutions
The boards are grey and the decor doesn't show. The viewport is in Solid mode. Click the third shading mode button, Material Preview.
My decors aren't in the Asset Browser. In the library menu at the top left, select the decor library instead of All Libraries. If it isn't in the list, add it (Add the texture pack as a library).
My own decor isn't in the Asset Browser. Click the refresh button to the right of the library menu, then Unassigned or All. Check that the decor is marked with Mark as Asset and that the file is saved in the library folder.
The decor isn't in the Material assignment list. The list offers only materials that are already in the project. Drag the decor once from the Asset Browser onto any board, then repeat the assignment.
The same code appears twice in the Material assignment list. The project has two decors with the same code, e.g. H1180 ST22 and H1180 ST37. The assignment takes the first. Keep only the one you order in the project, or drag it onto the boards directly from the Asset Browser.
The doors lost their decor. After you gave them a special decor, the assignment for their group was clicked. Bring the decor back with Ctrl+Z or drag it again, and move the doors to the F 4 group.
The fronts changed their decor after F or D. New fronts get the decor of the first previous front. If the fronts had different decors, drag the decors again onto the fronts that differ.
The wall unit's fronts are no longer in my group. U puts the fronts back in F 2 (wall unit) or F 1 (base unit). After switching, select the group again.
The new cabinet is white. New cabinets and cabinets from templates don't carry a decor. Repeat Material assignment for the groups, or make a duplicate with Shift+D: the copy gets the original's decors.
The texture is stretched. Most often after the cabinet's sizes change. Click the board and Fit texture in the EFS - Board tab.
The grain runs the wrong way. Click the board and select the other side in the Grain field. Drawer parts and cross boards don't have the field: they have no grain direction.
The front's edge tape and grain went back to 2 mm and Longer. The front type or the drawer layout was changed, so new fronts were made. Set them again.
I don't see the Edging Tape box. A back is selected, and backs have no edge tape.
I don't see the Material group box. Several boards are selected, or Enable material selection is off in the Web publish → Settings panel.
The legs got a decor. The Select material for None button was clicked, and the legs are in the None group. Undo with Ctrl+Z.
Boards are pink or white after moving the project. The project or the texture pack was moved to another folder, so the program doesn't find the decor images. The easiest fix is to put the folder back where it was. If that's not possible, link the images again:
- Select File → External Data → Find Missing Files....
- Select the texture pack folder (or the folder with your images) and confirm with Find Missing Files. The program looks for the images by name in that folder and all its subfolders.
- Save the project (Ctrl+S).
When you publish to the web, EFS warns which decor images are missing.
The Cost estimate has a red dot next to a decor or edge tape. The price list has no price for that decor, thickness or edge tape (e.g. 1 mm edge tape in a price list older than version 2.0.10015). Add the price to your price list, as in the section Enter the price in the price list.
Shortcuts in this chapter
| Key | Action |
|---|---|
| Z | Shading mode pie menu: Solid, Material Preview… |
| N | Turn the sidebar with the EFS tabs on / off |
| Enter | Confirm the search in the Asset Browser |
| Shift + click | Add a board to the selection (for To selected boards) |
| U | Upper / lower cabinet: the fronts move to F 2 or F 1 |
| F | Next front: new fronts keep the decor, edge tape and grain are the defaults |
| D | Next drawer layout: as with F |
| Shift+D | Duplicate the cabinet: the copy gets the original's decors |
| Ctrl+Z | Undo the last action, including a decor assignment |
Next
Next chapter: Templates and My templates