A wardrobe with compartments and a rail
A wardrobe in EFS is an ordinary cabinet: a tall carcass with doors, shelves, dividers and a clothes rail. In this chapter you place a wardrobe from the templates, choose the rail, split the wardrobe into compartments and build a wardrobe with a top box up to the ceiling. At the end come tall doors and the number of hinges.
Video: D01 A wardrobe with compartments and a rail
The same workflow in a video of just over a minute and a half.
Before you start
- Open the project. With a room, you see the corner and the ceiling straight away (see Room, openings and installations).
- Select the EFS tool and open the sidebar with N.
- How a template is placed and where it lands is described in the chapter Templates and My templates.
- The fields of the Shelves subpanel are described in the chapter How a cabinet is built. Here the focus is on the wardrobe.
- You see the inside of the wardrobe when you open the doors with O.
The workflow from the video
The video uses a bedroom of 3600 × 4000 × 2600 mm, with no cabinets.
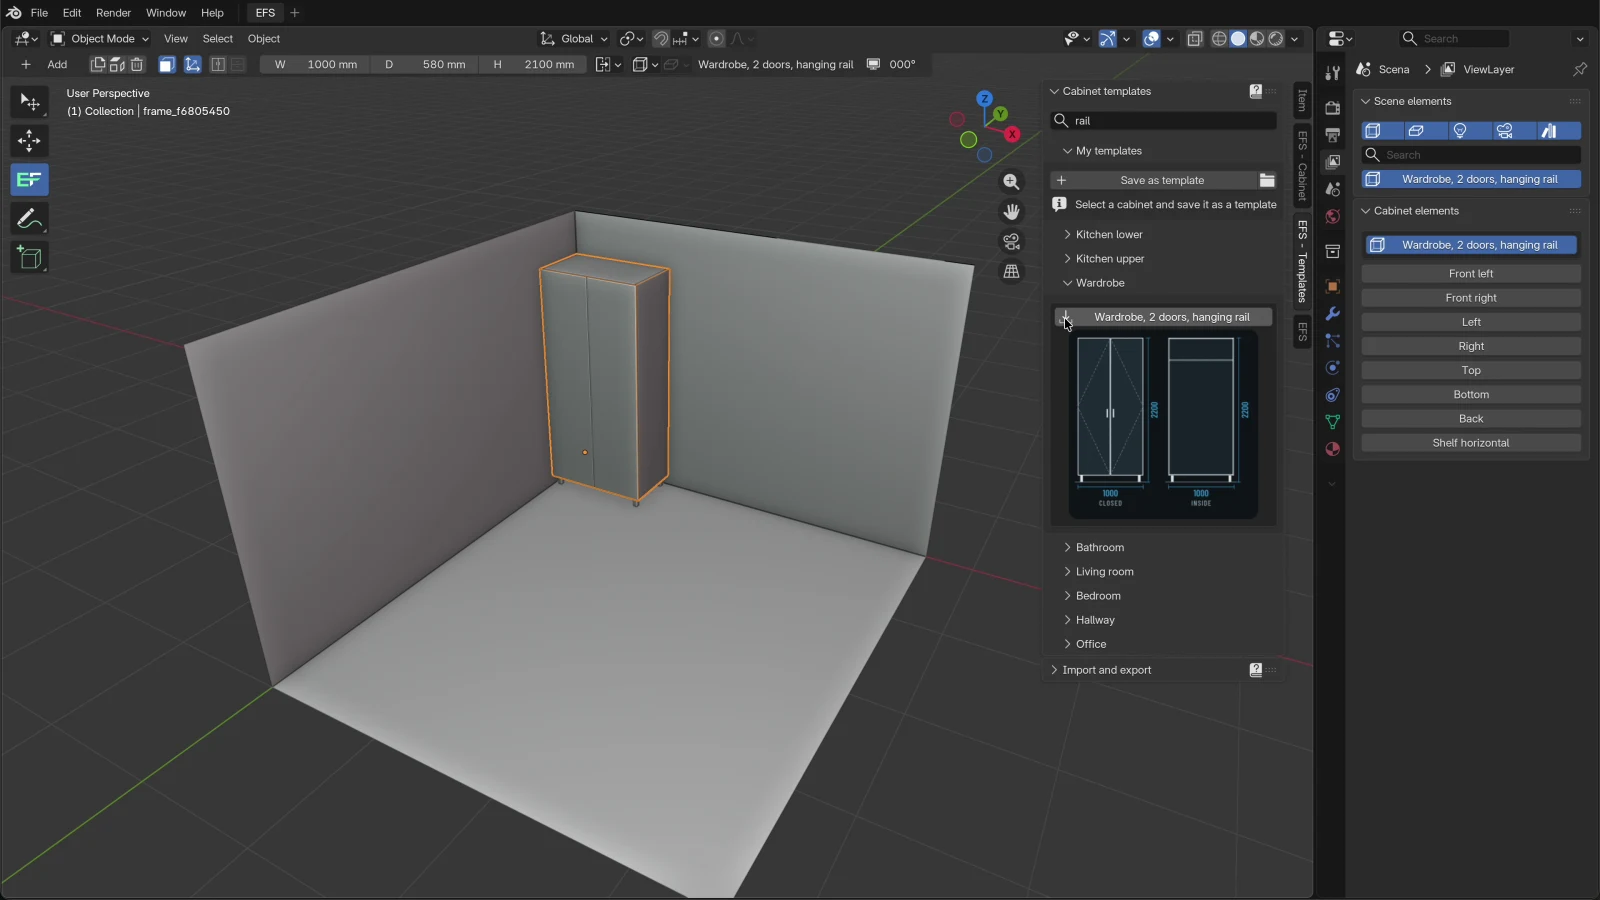
- In the EFS - Templates tab, open Cabinet templates, then the Wardrobe category.
- Make sure nothing is selected and click Wardrobe, 2 doors, hanging rail. The wardrobe lands in the back left corner of the room, on 100 mm legs. See Wardrobe templates.
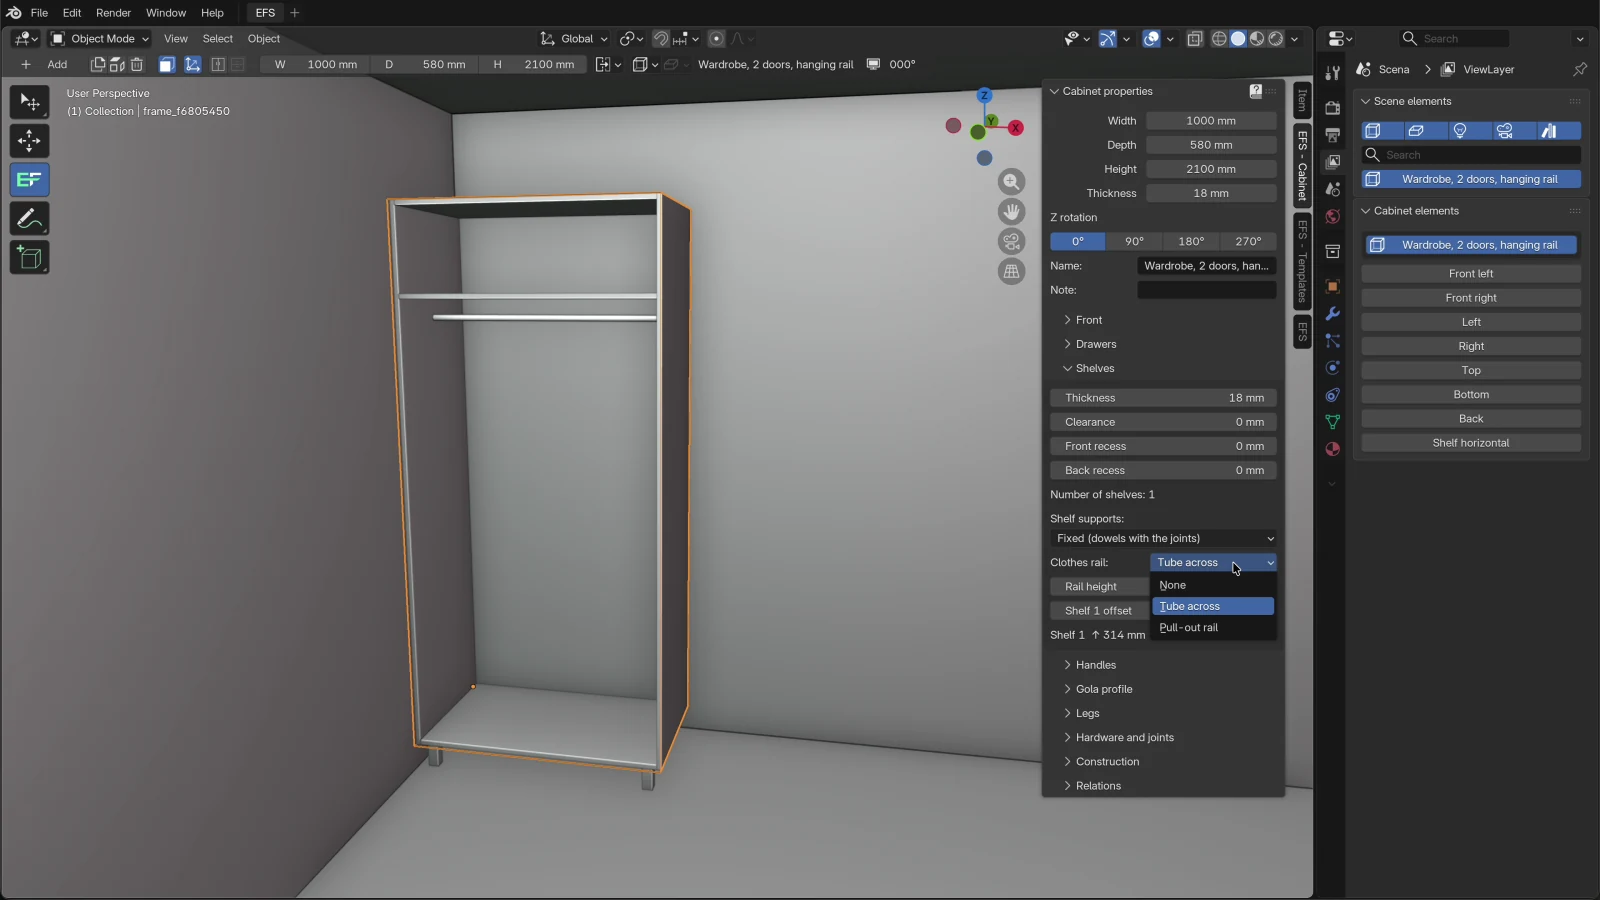
- Click a board of the wardrobe and press O to open the doors. Open the EFS - Cabinet tab and the Shelves subpanel. Under Clothes rail it says Tube across: the tube hangs 60 mm below the hat shelf.
- In Clothes rail, choose Pull-out rail, then switch back to Tube across. See Clothes rail.
- Press Shift+V. The wardrobe gets a divider and two compartments. The rail stays in the left compartment, below the hat shelf.
- In the New shelves in compartment field, type 2 and press Enter. Press Shift+H three times: three shelves go into the right compartment and are spaced out in it. See Dividers and compartments.
- With the wardrobe selected, click Wardrobe with top box in the Wardrobe category. The new wardrobe comes to the right of the first one.
- Click a board of the new wardrobe. In the header, set W to 800 and press Enter. The top box narrows with the wardrobe. See Wardrobe with a top box.
- Click a board of the top box. In the header, set H to 350 and press Enter. With its legs the wardrobe is 2550 mm tall, so 50 mm is left for fitting below the 2600 mm ceiling.
Wardrobe templates
The wardrobes are in the EFS - Templates tab, Wardrobe category. All of them stand on 100 mm square legs and are 580 mm deep (the open shelving 400 mm), and their doors have Auto hinge count turned on.
| Template | W × D × H (mm) | What it has | Rail | Shelf supports |
|---|---|---|---|---|
| Open wardrobe shelving | 800 × 400 × 2100 | no fronts, six shelves | none | from Project hardware |
| Wardrobe with drawers | 1000 × 580 × 2100 | below, a 700 mm carcass with three drawers; above, a 1400 mm carcass with two doors and a hat shelf | tube below the hat shelf | always fixed |
| Wardrobe with top box | 1000 × 580 × 2550 | two doors and five shelves, above them a 450 mm top box with two doors | none | from Project hardware |
| Wardrobe, 1 door | 500 × 580 × 2100 | a door, five shelves | none | from Project hardware |
| Wardrobe, 2 doors, hanging rail | 1000 × 580 × 2100 | two doors, a hat shelf 1750 mm above the bottom edge of the wardrobe | tube 60 mm below the hat shelf | always fixed |
| Wardrobe, 2 doors, shelves | 1000 × 580 × 2100 | two doors, five shelves | none | from Project hardware |
| Wardrobe, 3 doors | 1500 × 580 × 2100 | two related carcasses: on the left 500 mm with a door and five shelves, on the right 1000 mm with two doors and a hat shelf; a 36 mm double side panel in the middle | tube in the 1000 mm carcass | always fixed |
The height in the table is without legs. On the template thumbnail the dimension includes the legs: Wardrobe, 2 doors, hanging rail shows 2200, and Wardrobe with top box 2650.
Rules:
- A template is an ordinary cabinet. You change the sizes, shelves, dividers and rail as on any cabinet. See Templates and My templates.
- A wardrobe takes the hinge type, slides, carcass joint and handles from Project hardware. Not the number of hinges: wardrobes have their own Auto hinge count. See Tall doors and the number of hinges.
- Shelf supports from Project hardware do not change the wardrobes marked "always fixed" in the table. You turn on adjustable shelves for them in the Shelves subpanel. See Adjustable shelves, System 32.
- The rail goes into the template: your template saved from a wardrobe with a rail has the same rail. See My templates.
The list of all templates with thumbnails is in the chapter Templates and My templates.
Clothes rail
You choose the rail in the EFS - Cabinet tab, Shelves subpanel, Clothes rail field. A cabinet has at most one rail.
- Click a board of the wardrobe.
- Open the Shelves subpanel.
- In the Clothes rail field, choose Tube across or Pull-out rail.
- For a tube at a set height, type a Rail height.
| Option | What it does | Default | Values |
|---|---|---|---|
| Clothes rail | A rail for clothes. | None | None, Tube across, Pull-out rail |
| Rail height | Height of the tube's centre above the bottom (the top face of the bottom board). 0 means 60 mm below the shelf above or the top board. Shown only with Tube across. | 0 mm | 0–3000 mm |
| Rail | What you get | When to choose it |
|---|---|---|
| Tube across | A round Ø25 mm tube from left to right, in the middle of the carcass depth. | A wardrobe of the usual depth (e.g. 580 mm): the hangers hang across. |
| Pull-out rail | A 20 × 30 mm rail from front to back, in the middle of the width, right below the board above. | A shallow wardrobe (e.g. a hall wardrobe, 400 mm): the hangers hang lengthwise. |
Tube across
Where EFS puts the tube:
- Height. With Rail height 0, the top edge of the tube is 60 mm below the lowest shelf that is more than 900 mm above the bottom. If there is no such shelf, the tube is 60 mm below the top board. A shelf lower than 900 mm (e.g. for shoes) is ignored.
- Set height. With Rail height greater than 0, the centre of the tube is that far above the bottom. If the tube would go past the top board, EFS lowers it to 1 mm below it. EFS does not watch the shelves here: choose the height so that the tube does not pass through a shelf.
- Width. The tube runs from side panel to side panel, 2 mm shorter than the inside width. With dividers, it runs from a side panel to a divider or between two dividers.
- Depth. In the middle, between the front edge of the side panels and the back.
Example: in Wardrobe, 2 doors, hanging rail the hat shelf is 1750 mm above the bottom edge of the wardrobe. The top edge of the tube is at 1690 mm, which is 1790 mm from the floor on 100 mm legs. The tube is 1000 − 2 × 18 − 2 = 962 mm long.
Pull-out rail
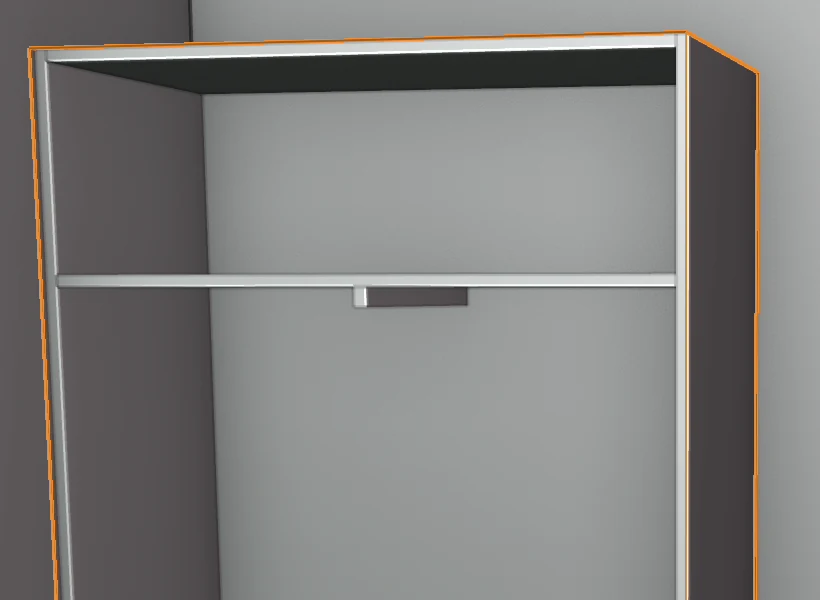
- The rail hangs right below the shelf above, by the same rule as the tube: below the lowest shelf that is more than 900 mm above the bottom, otherwise below the top board.
- It starts 10 mm behind the front edge of the side panels.
- Its length is the longest standard length (250, 300, 350, 400, 450, 500 or 550 mm) that fits into the depth from the front edge of the side panels to the back, less 20 mm. If not even 250 mm fits, EFS still puts in 250 mm.
- Rail height has no effect on the pull-out rail.
Examples: a wardrobe 580 mm deep with 18 mm doors and a 3 mm back has side panels 559 mm deep, so it gets a 500 mm rail. A hall wardrobe 400 mm deep gets a 350 mm rail.
The rail in a compartment
When the wardrobe has dividers, the rail goes into the widest compartment that has at least one shelf. When such compartments are equally wide, it goes into the left one. If no compartment has a shelf, it goes into the widest one. The height is then set only by the shelves of that compartment.
Watch out
The rail chooses the compartment by itself. If you move a divider so that another compartment with a shelf becomes wider, the rail moves into it and hangs below its shelf. If you need the rail in a narrower compartment, build the wardrobe from two related cabinets, like the Wardrobe, 3 doors template.
The rail in the hardware list
The rail is not a board, so it is not in the cutting list. It goes into the hardware list, the order, the cost estimate and the quote:
| Rail | Items in the hardware list | Price in the price list (Other sheet) |
|---|---|---|
| Tube across | Hanging rail tube, Ø25 and the length in mm, 1 pc; Rail support, Ø25, 2 pcs | RAIL_TUBE_M per metre (default 8 EUR), RAIL_SUPPORT per piece (default 1.50 EUR) |
| Pull-out rail | Pull-out wardrobe rail, length in mm, 1 pc | PULL_OUT_RAIL per piece (default 25 EUR) |
The hardware list is the Hardware sheet in the cutting list and the hardware page in the PDF. See Cutting list and cut size and The production package and the supplier order.
Rules:
- The rail follows the cabinet: when you change the width, depth, height or shelves, it rearranges itself.
- The rail needs both side panels. EFS does not place a rail in a cabinet without a left or right side panel.
- A corner cabinet has no rail.
- You transfer the rail and the shelf supports to several wardrobes at once with Copy to selected cabinets, group Hinges, slides and joints. See Working faster.
Dividers and compartments
A vertical shelf (divider) splits the wardrobe into compartments. Compartments are counted from the left: the left one is 1. Each horizontal shelf lies in one compartment and is spaced out only with the shelves of that compartment.
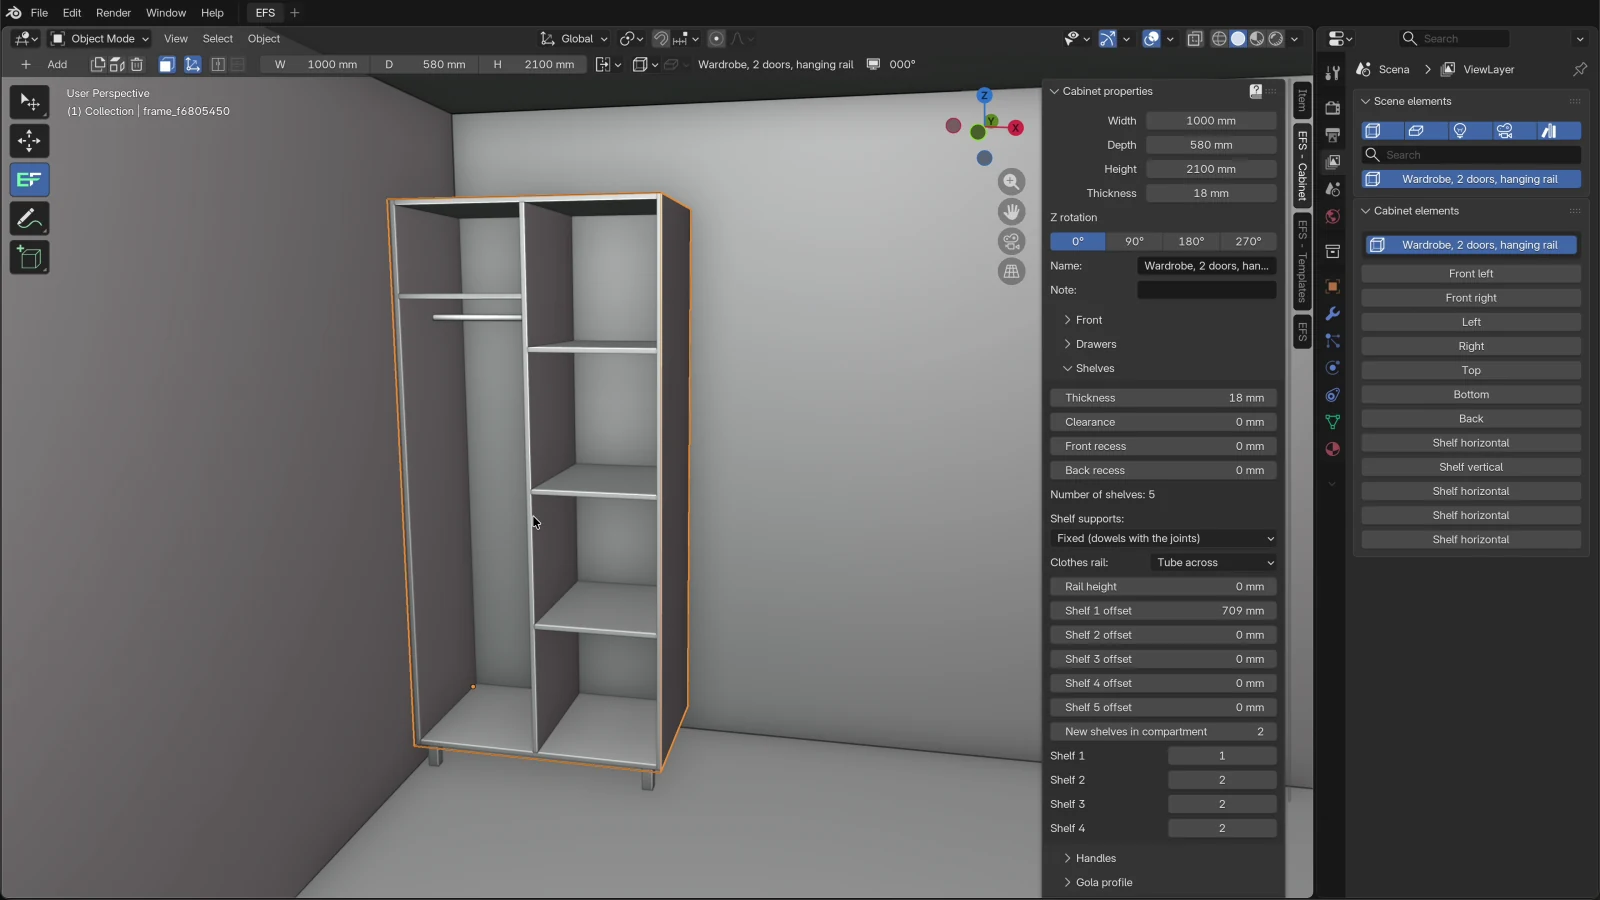
- Click a board of the wardrobe (not a shelf).
- Press Shift+V or click Add → Vertical shelf. For a second divider, press it again.
- In the Shelves subpanel, type the compartment number in New shelves in compartment and press Enter.
- Press Shift+H as many times as you need shelves in that compartment.
- Move a shelf that is already in the wardrobe to another compartment in the Shelf 1, Shelf 2… field.
| Option | What it does | Default | Values |
|---|---|---|---|
| New shelves in compartment | Which compartment the next horizontal shelf goes into, counting from the left. Does not change existing shelves. | 1 | 1–11 |
| Shelf 1, Shelf 2… | The compartment that horizontal shelf lies in. The shelves are numbered in the order they were added, without dividers. | the compartment the shelf was added to | 1–11 |
| Shelf 1 offset … Shelf 10 offset | Moves a shelf up (+) or down (−), and a divider right (+) or left (−). Counts shelves and dividers together, in the order they were added. | 0 mm | −2500 to 2500 mm |
New shelves in compartment and Shelf N only show once the cabinet has a divider.
How EFS arranges the compartments:
- The dividers are spaced equally across the width. They run from the bottom to the top board.
- The shelves of one compartment are spaced equally over the full height, independently of the other compartments.
- A shelf is as wide as its compartment, less the Clearance.
- If you type a compartment number greater than the number of compartments, the shelf goes into the rightmost one.
- A cabinet has at most 10 shelves and dividers together.
- While the cabinet has dividers and shelves, the Shelf 1 ↑ … mm ↓ … mm rows are not shown.
Example from the video: Wardrobe, 2 doors, hanging rail, 1000 mm wide, gets a divider in the middle. Both compartments are 473 mm wide. The three shelves in the right compartment are spaced at clear gaps of 502.5 mm.
Note
Each shelf remembers the number in the New shelves in compartment field at the moment it was added, and the default is 1. That is why the hat shelf and other shelves added before the first divider stand in the left compartment after it.
Watch out
The numbers in the Shelf offset and Shelf N fields are not the same. In the video the divider was added second, so you move the shelves of the right compartment (Shelf 2, 3 and 4) in the fields Shelf 3 offset, Shelf 4 offset and Shelf 5 offset. Shelf 2 offset moves the divider.
Watch out
In the templates, the hat shelf stands at 1750 mm because of its offset: in Wardrobe, 2 doors, hanging rail, Shelf 1 offset is 709 mm. When you add a shelf to its compartment, the shelves of that compartment are respaced equally, while the hat shelf keeps its 709 mm offset and jumps to another height. After a divider and one new shelf in the left compartment, the new shelf lands at 1388 mm and the hat shelf at 1403 mm, so they overlap. The same applies to a wardrobe without a divider. Add the shelves to another compartment, as in the video, or fix the offsets after adding them.
Tip
If you will take shelves out and move them around, turn on adjustable shelves: in the Shelves subpanel choose Shelf supports: Adjustable, System 32 around the shelves. The divider also gets holes, on the side of the compartment with the shelves. See Adjustable shelves, System 32.
Deleting: when you select one shelf or divider and press X, all shelves and dividers of the wardrobe are deleted. See How a cabinet is built.
Wardrobe with a top box
The top box is a separate cabinet placed on the wardrobe. In the wardrobe it is entered as the related cabinet Above, so it follows the wardrobe.
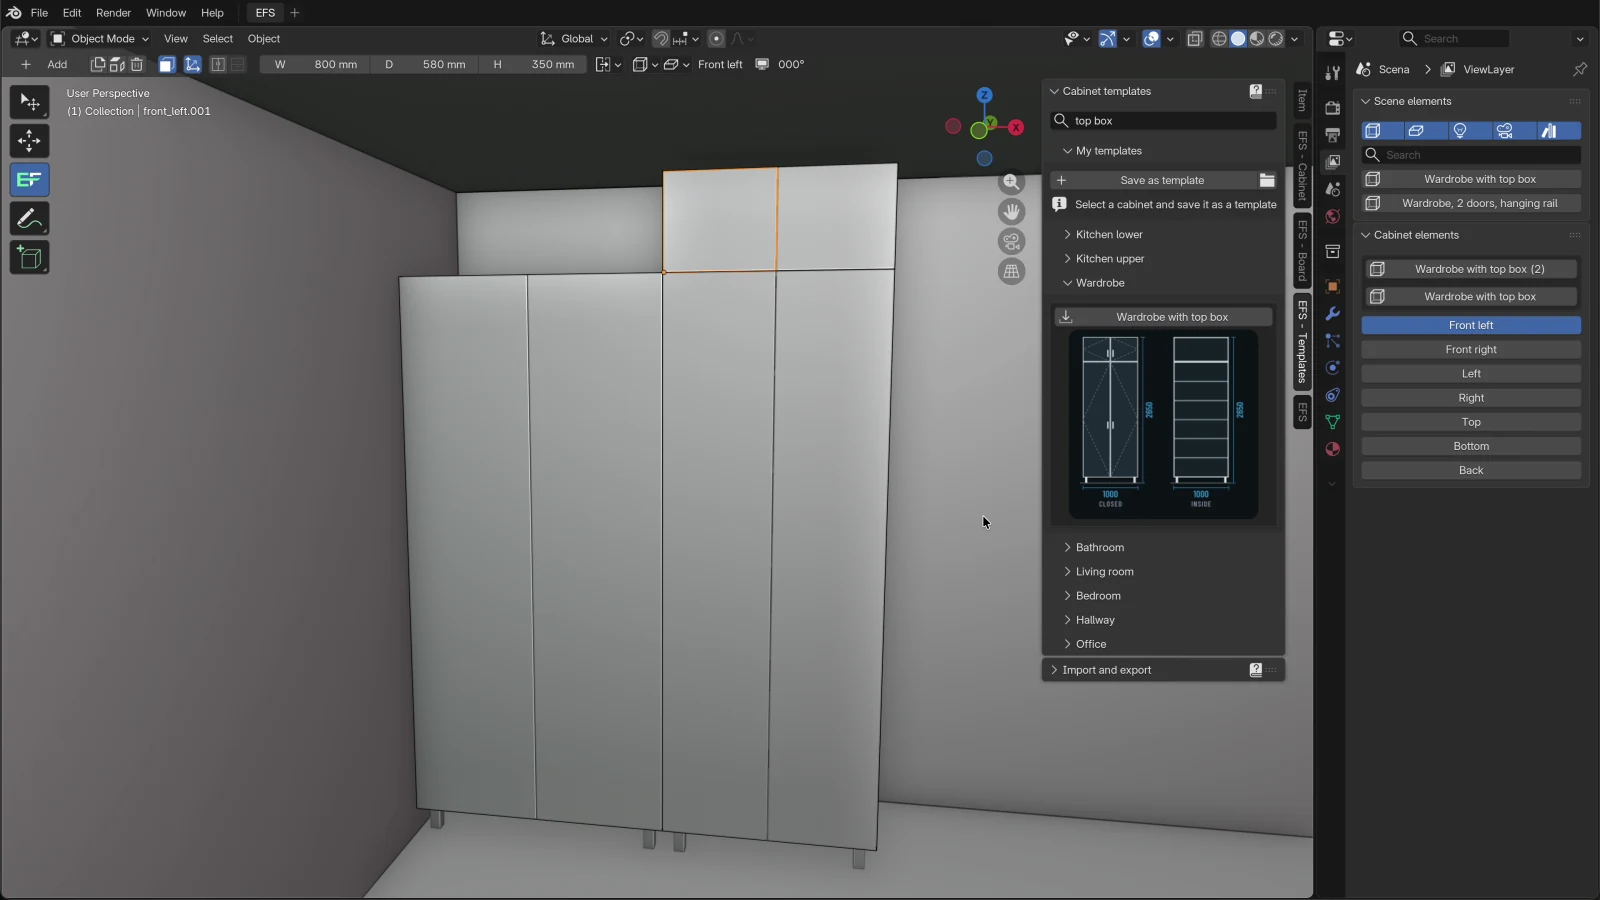
The Wardrobe with top box template has two cabinets:
| Cabinet | Size | What it has |
|---|---|---|
| Wardrobe with top box | 1000 × 580 × 2100 mm, 100 mm legs | two doors, five shelves |
| Wardrobe with top box (2) | 1000 × 580 × 450 mm, no legs | two doors |
The Relations subpanel of the lower wardrobe shows:
| Field | Value | What it means |
|---|---|---|
| Above | the top box (its internal name) | The top box always sits on top of the wardrobe. |
| Above offset | 0 mm | The gap between the wardrobe and the top box. |
| Include in scaling: Width | on | When you change the wardrobe's width, the top box gets the same width. |
| Include in scaling: Depth | on | The same for the depth. |
| Include in scaling: Height | off | You change the top box's height on its own. |
Rules:
- You change the sizes on the lower wardrobe. The top box follows the width and depth, and when you change the wardrobe's height, it stays on its top.
- The link goes only from the wardrobe to the top box. When you change the top box's width, the wardrobe stays as it is.
- Next to the wardrobe's Height it shows Joint height: the sum of the wardrobe height, the top box height and Above offset, without legs.
- You select the top box by clicking its board, or with the Wardrobe with top box (2) button at the top of the Cabinet elements list.
- The Scene elements list shows only the lower wardrobe. The top box is not a separate row.
- When the lower wardrobe is selected, O opens the doors of the wardrobe and the top box together.
Watch out
When you delete the lower wardrobe, the top box is deleted too. If you want to keep the top box, first empty the Above field in the Relations subpanel of the lower wardrobe.
A top box up to the ceiling
The total height is legs + wardrobe + top box. For the template that is 100 + 2100 + 450 = 2650 mm, so it does not fit into a room with a 2600 mm ceiling.
- Click a board of the top box.
- In the header, set H = ceiling − legs − wardrobe − fitting gap. In the video: 2600 − 100 − 2100 − 50 = 350 mm.
- Press Enter. The top edge of the top box comes down, and the top box stays on the wardrobe.
EFS does not check the ceiling height. Before ordering, check the lower wardrobe's Joint height and add the legs.
Your own top box
You can build the same on any wardrobe:
- Click a board of the wardrobe and press C. A new cabinet comes next to the wardrobe, with the same height and depth.
- In the header, set the new cabinet's H, for example to 450, and in the Legs subpanel set Type: None.
- Click a board of the wardrobe and open the Relations subpanel.
- In the Above field, choose the new cabinet. Show IDs shows the internal names of the cabinets in the scene. The new cabinet lands on top of the wardrobe.
- Turn on Include in scaling: Width and Depth.
- Type the wardrobe's width again. Only then does the top box get it: scaling works when a size changes.
Watch out
If Relate a new cabinet to the selected one is turned on in the add-on preferences, the new cabinet from step 1 is already entered in the wardrobe's Right or Left field. Empty that field before step 4. Otherwise the same cabinet is related twice.
Another way: with 1 and 3, put the new cabinet on the wardrobe (see Moving: 1, 2 and 3). Select both, the wardrobe last, and in the Relations subpanel click Relate to the selected cabinet. EFS reports Related on the above. See Working faster.
Tall doors and the number of hinges
Tall doors need more hinges. With Auto hinge count, EFS chooses the number by the door height. The field is in the EFS - Cabinet tab, Hardware and joints subpanel.
| Door height | Hinges per door |
|---|---|
| up to 900 mm | 2 |
| up to 1600 mm | 3 |
| up to 2000 mm | 4 |
| over 2000 mm | 5 |
Hinges in the wardrobe templates:
| Doors | Door height | Hinges |
|---|---|---|
| Wardrobe 2100 mm high | 2096 mm | 5 per door |
| Upper carcass of Wardrobe with drawers (1400 mm) | 1396 mm | 3 per door |
| Top box 450 mm (and 350 mm) | 446 mm (346 mm) | 2 per door |
Rules:
- All wardrobe templates with doors come with Auto hinge count turned on, regardless of Project hardware.
- A wardrobe from Add → Cabinet takes Auto hinge count from Project hardware. If it is off, the doors have the number from the Hinges field (default 2). For a wardrobe, turn it on in the Hardware and joints subpanel or in Project hardware.
- With a catalogue hinge (Hinge type, e.g. Blum Clip top 110 or Generic clip-on 35 mm), the end hinges are 96 mm from the top and bottom edges of the door, and the others are equally spaced between them. With No drilling (count only), EFS only counts the hinges.
- With a catalogue hinge, EFS moves a hinge that would land on a shelf by 32 mm (at most 96 mm). Below the field it then says how many hinges were moved. See Hardware and joints.
- The number of hinges goes into the cutting list (the hinges column next to the doors), the hardware list, the cost estimate and the quote. See Project hardware.
Common problems and solutions
The rail is in the wrong compartment. The rail goes into the widest compartment with a shelf. Move the divider so that the compartment with the rail is the widest, or build the wardrobe from two related cabinets.
The tube is below the top board, not below the shelf. The shelf is lower than 900 mm above the bottom, so EFS ignores it. Raise the shelf (Shelf offset) or type a Rail height.
I can't see the Rail height field. It shows only with Tube across. The pull-out rail always hangs below the board above.
There is no rail although I chose one. The cabinet has no left or right side panel. In the Construction subpanel, set the side panel back to Standard.
The new shelf did not go into the compartment I wanted. New shelves in compartment applies only to shelves added after you change it. Move an existing shelf in the Shelf N field.
The hat shelf jumped lower or overlaps the new shelf. The new shelf was added to the compartment with the hat shelf. The shelves of that compartment were respaced equally, and the hat shelf kept its Shelf 1 offset of 709 mm. Undo with Ctrl+Z and add the shelves to another compartment, or fix Shelf 1 offset. See the Watch out box in Dividers and compartments.
The top box did not follow the wardrobe's width. Include in scaling: Width is off in the Relations subpanel of the lower wardrobe. Turn it on and type the width again.
I changed the top box's width, and the wardrobe did not change. The link goes only from the wardrobe to the top box. Change the width on the lower wardrobe.
The wardrobe with a top box does not fit under the ceiling. Reduce the height of the top box or of the legs. The total height is Joint height plus the legs.
I deleted the wardrobe, and the top box disappeared too. The top box is the related cabinet Above. Undo with Ctrl+Z, empty the Above field and delete again.
A wardrobe from a template has no adjustable shelves although I have them in Project hardware. The templates Wardrobe, 2 doors, hanging rail, Wardrobe with drawers and Wardrobe, 3 doors always come with fixed shelves. In the Shelves subpanel, choose an adjustable option.
Tall doors have only two hinges. Auto hinge count is off. Turn it on in the Hardware and joints subpanel.
Shortcuts in this chapter
| Key | Action |
|---|---|
| N | Sidebar on / off |
| Shift+V | New vertical shelf (divider) in the selected cabinet |
| Shift+H | New horizontal shelf in the compartment from New shelves in compartment |
| C | Create new: a new cabinet next to the selected one |
| O | Open / close doors and drawers of the selected cabinet and its related cabinets |
| Enter | Confirms the number typed in a field |
| X | Delete: the cabinet with its related cabinets, or all shelves of the cabinet if a shelf is selected |
| Ctrl+Z | Undoes the last action |
All shortcuts are in the chapter Keyboard shortcuts.
Next
Next chapter: Sliding doors