The worktop: cut-outs and the corner joint
The worktop is made with one click over the selected base units: from the wall to the fronts, with an overhang, one for each wall. In this chapter you join two worktops in the corner at 45° with connectors, cut the openings for the sink and the hob, give the worktop a decor and see its price per metre. The end of the chapter shows how the worktop goes into the cutting list, the hardware list and DXF.
Video: B04 The worktop: cut-outs and the corner joint
The same workflow in a video of just under three minutes.
Show me in the program
The interactive tour The worktop (3 min) shows you in the program where to click and what to type, step by step. In the EFS tab, open the Interactive tours panel and click Start next to the tour. The AI assistant also offers it when you ask how to do this.
Before you start
- Open a project with base units along the wall. The kitchen from the video was made in the chapters Base units and the corner and Wall units, tall units and flaps. On wall A there are the corner cabinet, an 800 mm sink unit, a space for the dishwasher, a three-drawer unit and a filler to the wall. On wall D there are a four-drawer unit and the fridge.
- Base units under a worktop usually have two rails instead of a full top. See Cross boards instead of a top board.
- Add the filler at the wall before the worktop. The worktop then runs across it to the wall. See Kickboard, fillers, end panels and cornice.
- The worktop is a free board: it belongs to no cabinet. When you click it, you set it up in the EFS - Board tab, like other boards. See The EFS - Board tab.
Note
In this chapter, corner joint means the joint between two worktops in the corner. The narrow boards of the corner cabinet, which the interface calls Corner post, are described in the chapter How a cabinet is built.
The workflow from the video
- Click the first base unit. Add the other base units with Shift + click. Do not select the fridge. See Worktop over selected.
- In the header, click Add → Worktop over selected.
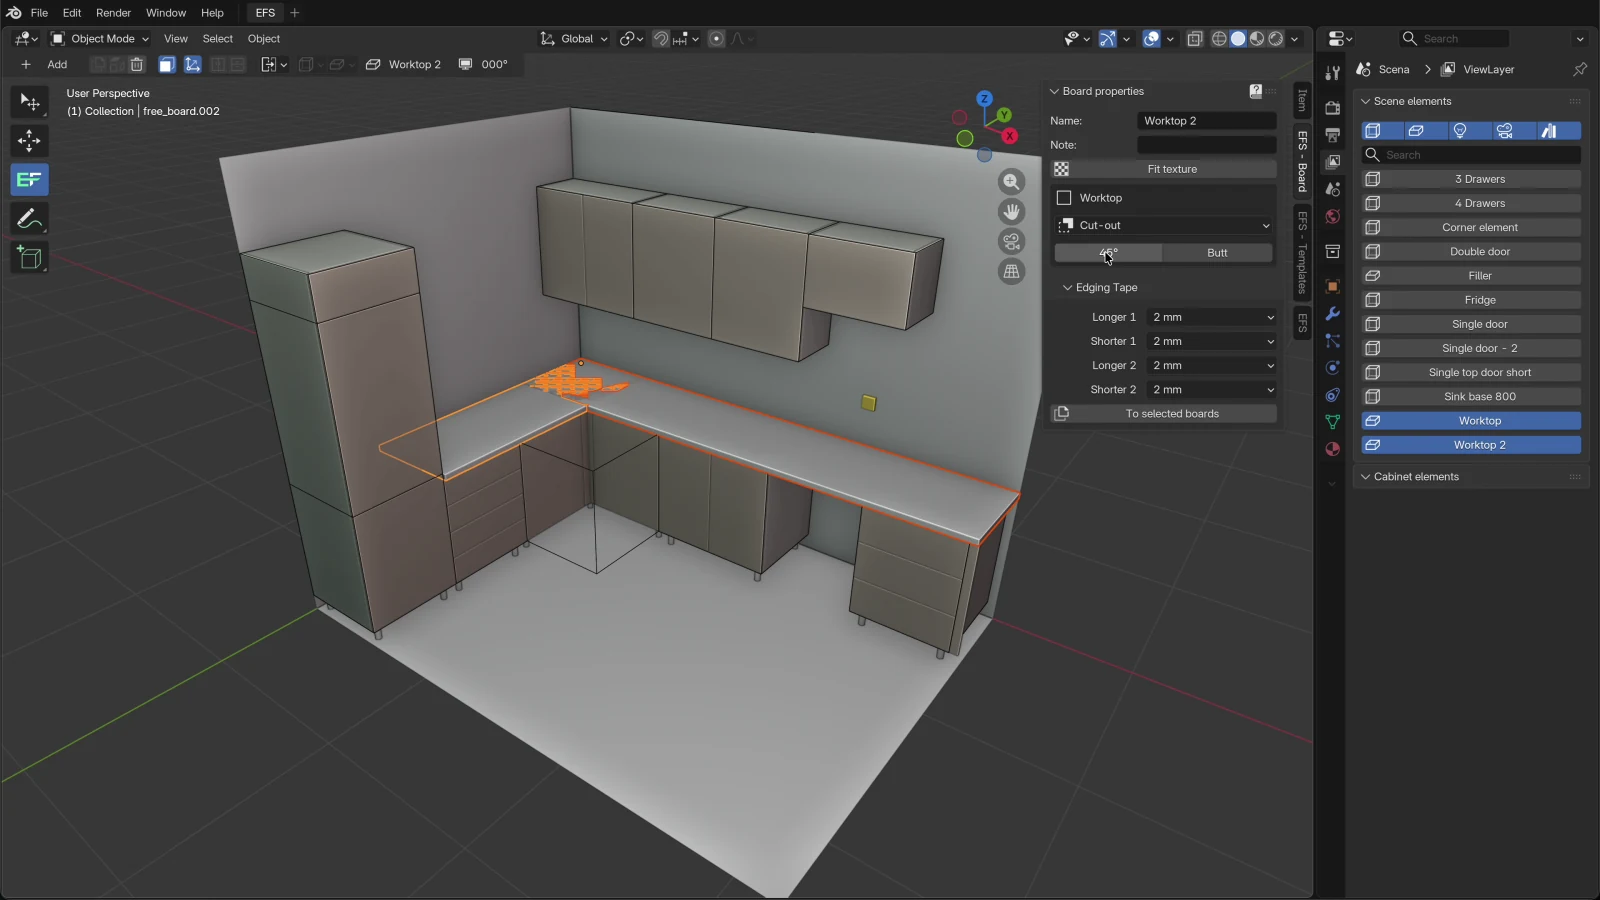
- Two worktops appear: Worktop on wall A and Worktop 2 on wall D. Both are selected, and they overlap in the corner.
- Open the EFS - Board tab. In the Worktop box, click 45°. See The corner joint.
- Press Alt+Z for the X-ray view. You see three connectors from below. Alt+Z again returns the normal view.
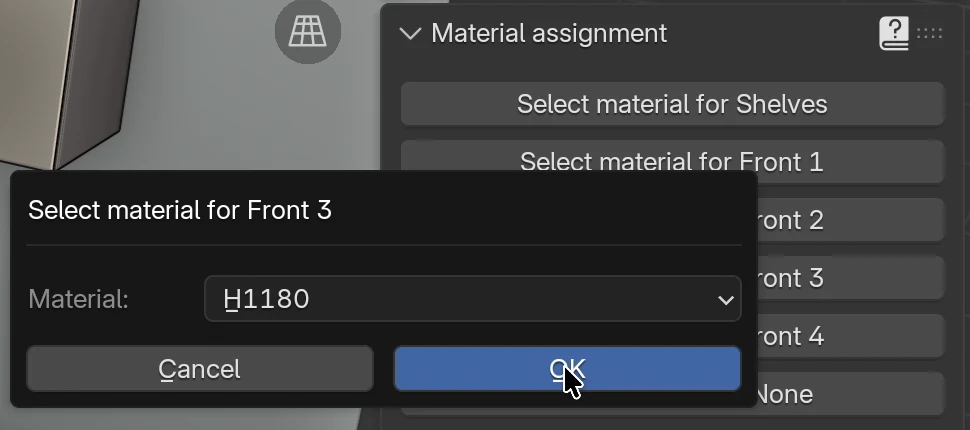
- In the EFS tab, Material assignment panel, click Select material for Front 3. Choose the decor H1180 and click OK. See Worktop decor.
- Click the sink unit, then Shift + click the worktop above it. The worktop must be selected last.
- In the EFS - Board tab, Worktop box, click Cut-out and choose Sink for an 80 cm cabinet. See Sink and hob cut-outs.
- Click the three-drawer unit, Shift + click the worktop, then click Cut-out → Hob 60 cm.
- The cut-outs are listed in the Worktop box, with their sizes.
- In the EFS tab, open Cost estimate. The worktop is priced per metre, the cut-outs, the joint and the connectors per piece. See Price per metre.
Worktop over selected
- Click a board of the first base unit.
- Hold Shift and click the other base units that get the worktop. For an L-shaped kitchen, select the cabinets on both walls at once.
- In the header, click Add → Worktop over selected. The same item is in the Shift+A menu and in the right-click menu, under Add to the cabinet.
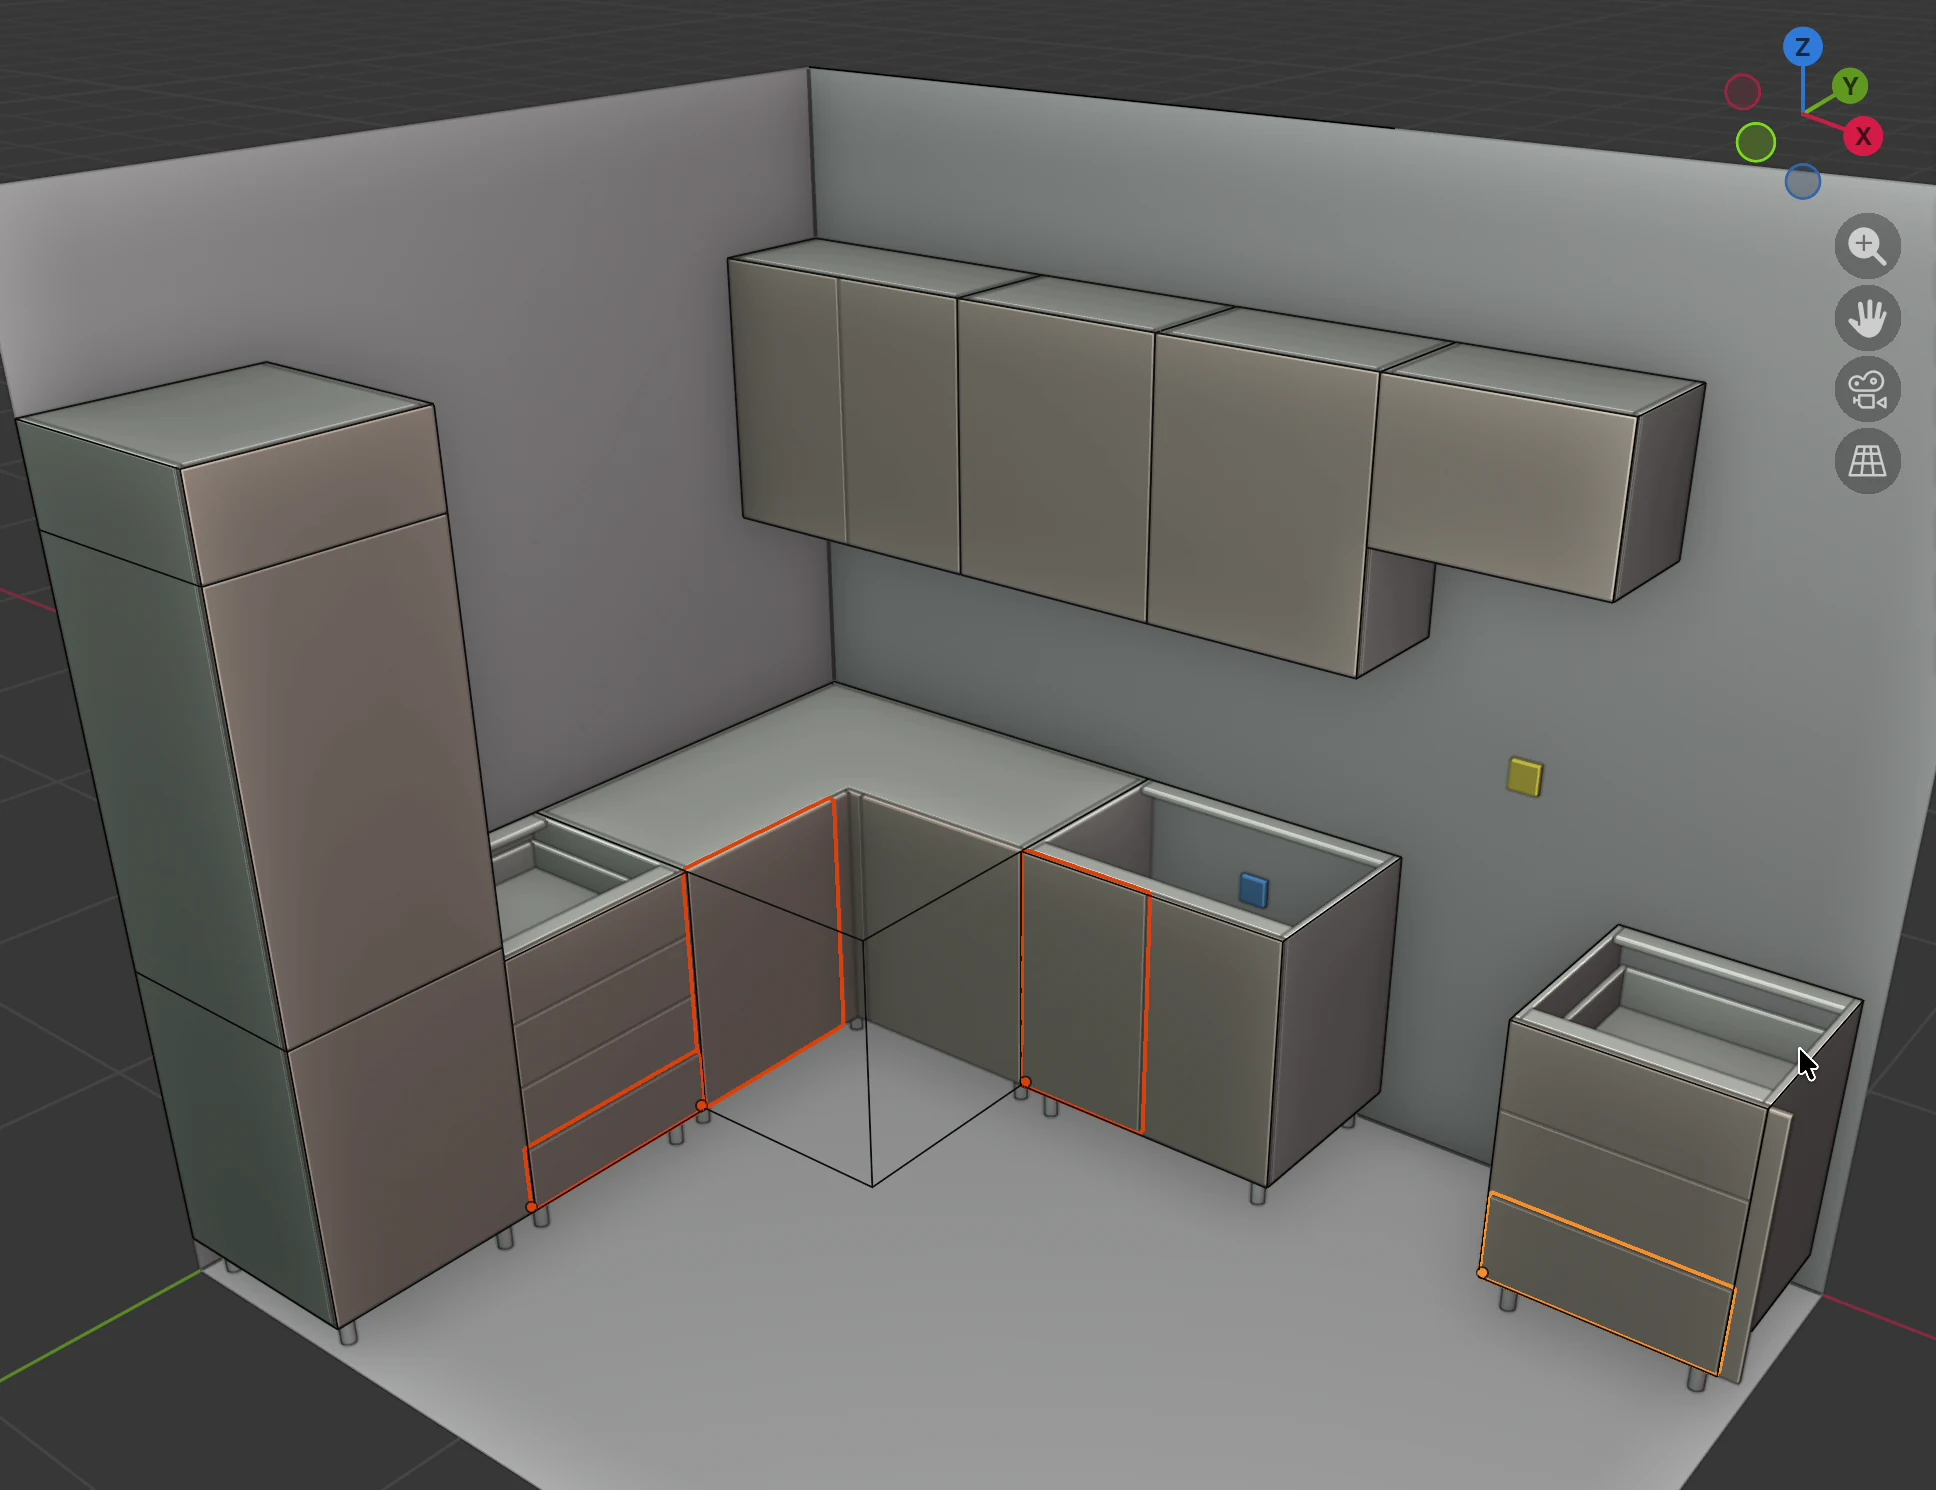
EFS makes the worktops and leaves them selected. The last one made is active: its name is shown in the header, and Worktop and Worktop 2 appear in the Scene elements list.
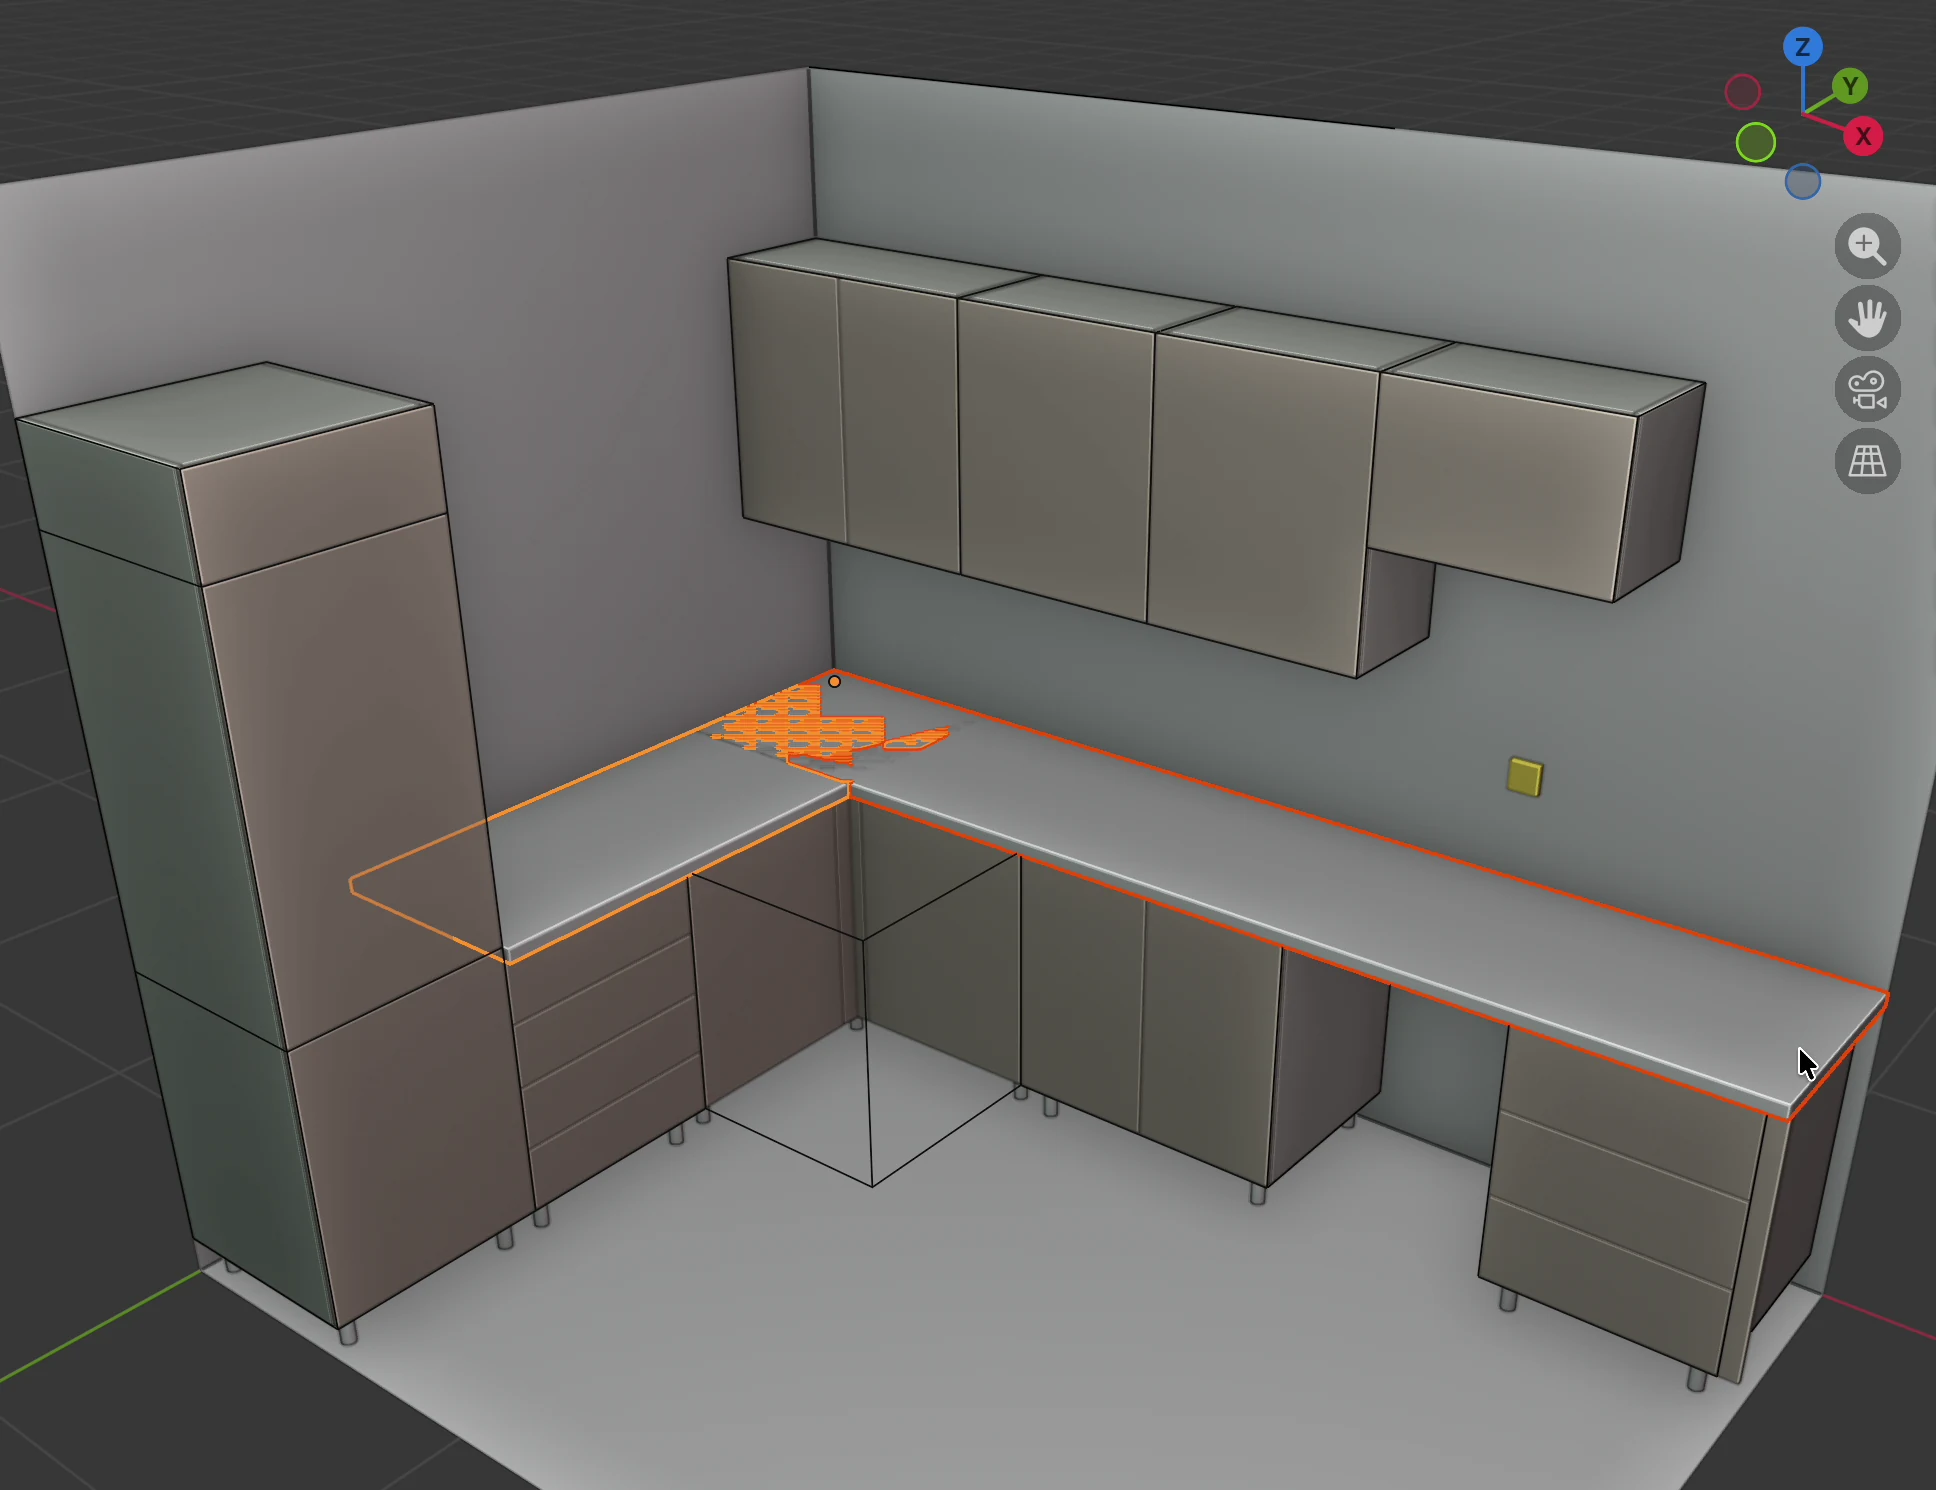
In the video, the run on wall A gets a 3232 × 600 × 38 mm worktop and the run on wall D an 1800 × 600 × 38 mm worktop. Both sit at 820 mm: the cabinets are 720 mm high and stand on 100 mm legs.
How EFS lays out the worktop
| What | Rule |
|---|---|
| Number of worktops | One worktop per direction. Cabinets turned the same way (Z rotation 0°, 90°, 180° or 270°) share one worktop. An L-shaped kitchen gets two, a U-shaped kitchen three. |
| Length | From the start of the first to the end of the last selected cabinet in that direction. An empty space between them, for example for the dishwasher, is covered. If a cabinet has a filler added with Filler ← or Filler →, the worktop also runs across the filler, to the wall. |
| Depth | From the back edge of the cabinets to the face of the fronts, plus Front overhang. A cabinet 580 mm deep (with fronts) and a 20 mm overhang give a worktop 600 mm deep. With cabinets of different depths, it is measured from the back edge of the deepest cabinet to the front that sits furthest forward. |
| Height | The worktop sits on the top edge of the carcass: the side panels, the top or the rails. If the selected cabinets are not equally high, it sits on the highest. |
| Thickness | Thickness, 38 mm by default. |
| Corner | When you select two runs that meet in a corner, each worktop is extended to the wall of the other run. The worktops then overlap in the corner, and the corner cabinet is covered. This applies when the end of a run is at most 1300 mm from the other run. The corner joint removes the overlap. |
| Name | Worktop, Worktop 2… The same name is in the Scene elements list, in the cutting list and in the quote. You change it in the Name field. |
| Material | A white board (Default white) in the material group F 3. See Worktop decor. |
| Edge tape | 2 mm on all four edges. See Worktop edge tape. |
| Grain | Longer: the grain runs along the worktop. |
Which cabinets EFS takes:
- Wall units are skipped automatically. They may be in the selection.
- The corner cabinet is not taken into account. It is covered only when you select both runs next to it, because the worktops then extend into the corner by themselves.
- Tall units are taken. So do not select the fridge or a tall column: the worktop would run over them too and sit on their top. Without the tall unit in the selection, the worktop stops next to it.
Rules:
- The button is greyed out until a base unit is selected. The corner cabinet alone, wall units alone or a free board alone are not enough.
- Every click makes new worktops, even when a worktop already exists. If you make the worktop again, delete the old one first (click it and press X).
- The overhang is only at the front. At the ends of the run, the worktop ends flush with the side of the last cabinet, even when an end panel stands next to it.
- The worktop is not linked to the cabinets. When you move a cabinet or change its width, the worktop stays as it is. When you delete a cabinet, the worktop stays.
- If two runs do not overlap in the corner because you made the worktops one by one, delete them and make them together, with one click, with the cabinets of both runs selected.
Tip
Two separate parts of a run on the same wall, for example left and right of a tall unit, get one worktop across the whole gap if you select them together. For two worktops, select and add each part separately.
Options
| Option | What it does | Default | Values |
|---|---|---|---|
| Thickness | The thickness of the worktop. | 38 mm | 10–100 mm |
| Front overhang | How far the worktop reaches past the face of the fronts. | 20 mm | 0–100 mm |
The program does not ask for them before adding. You change them right after adding: in the Edit menu, click Adjust Last Operation... or press F9, type the value and move the mouse off the pop-up. EFS makes the worktops again with the new sizes. If you have done something else in the meantime, the pop-up no longer offers these fields.
The Worktop box
When you click a worktop, the EFS - Board tab has a Worktop box below the Fit texture button.
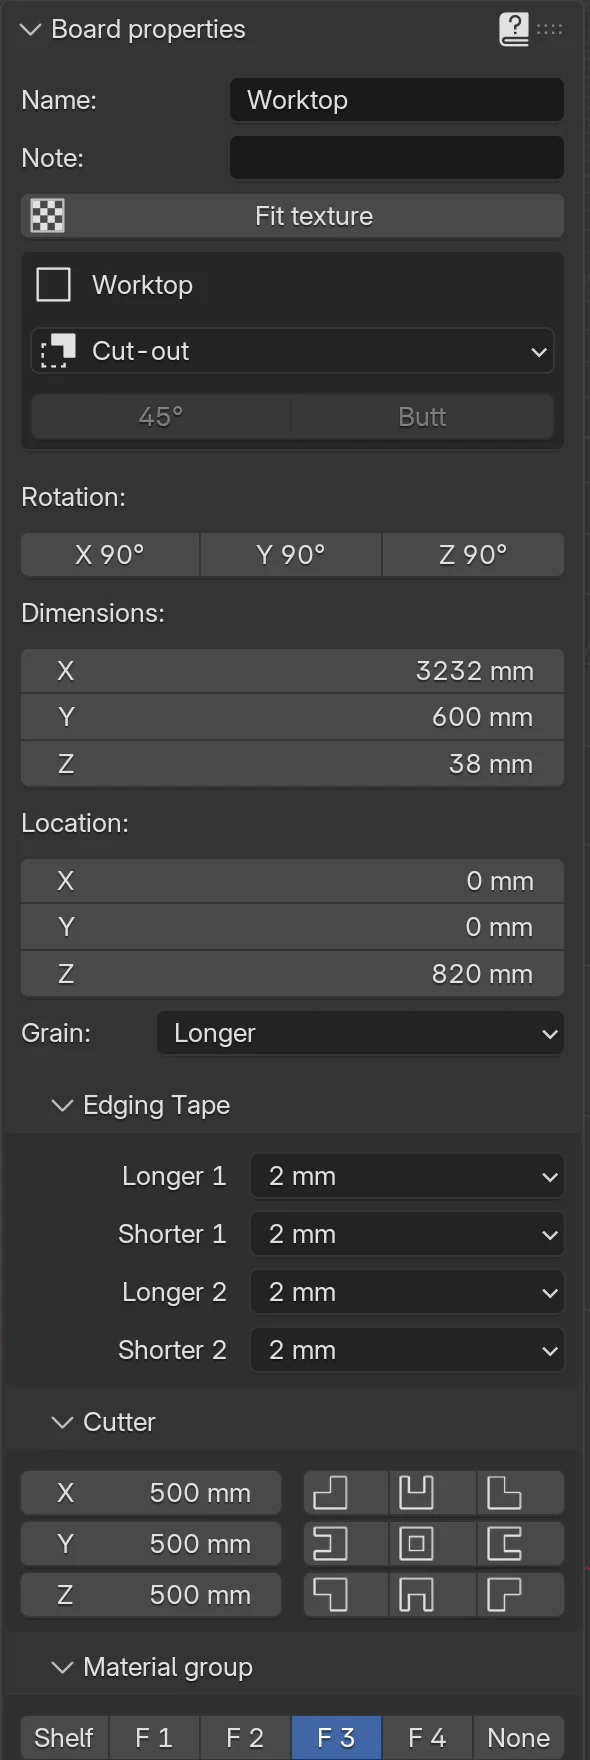
| Field | What it does | When it is greyed out |
|---|---|---|
| Cut-out | A menu of cut-outs from the catalogue. Choosing one cuts the opening at once. See Cut-outs. | Never while the box is visible. |
| 45° | Joins two worktops along the diagonal of the corner. | Not exactly two worktops are selected, or the active object is not one of them. |
| Butt | Butt joint: the active worktop runs its full length, the other stops at its front edge. | As for 45°. |
| Cut-out list | Below the buttons, one line per cut-out: name, width and depth, e.g. Sink for an 80 cm cabinet, 760 × 480 mm. | — |
The small square before the label Worktop is an icon, not a checkbox.
The other fields of the panel apply to every free board:
| Field | What it does |
|---|---|
| Name, Note | The name in lists and exports, your note. |
| Rotation | The X 90°, Y 90° and Z 90° buttons turn the board. Do not turn the worktop. |
| Dimensions | Length, depth and thickness along the scene axes. On wall A the length is X, on wall D it is Y. |
| Location | The position of the board's origin. On wall A this is the back left bottom corner. |
| Grain, Edging Tape, Material group | As on every board. See Decors, edge tape and materials. |
| Cutter | A cut in the corner, on the edge or in the middle of the board. See Cutter. |
Rotation, Dimensions, Location and the Cutter box show only while a single board is selected.
Watch out
Change Dimensions only before the cut-outs and the joint. If you change the length or depth afterwards, EFS stretches the whole board, and the openings and the mitre cut with it. The board grows from its origin (the Location field). Check that it grew in the right direction.
The corner joint
Two worktops in an L-shaped kitchen overlap in the corner. The joint removes the overlap and drills the holes for the connectors.
- Select both worktops: click one, then Shift + click the other. Right after adding, both are already selected.
- For a butt joint, the worktop that runs the full length must be active. Click it last.
- In the EFS - Board tab, Worktop box, click 45° or Butt.
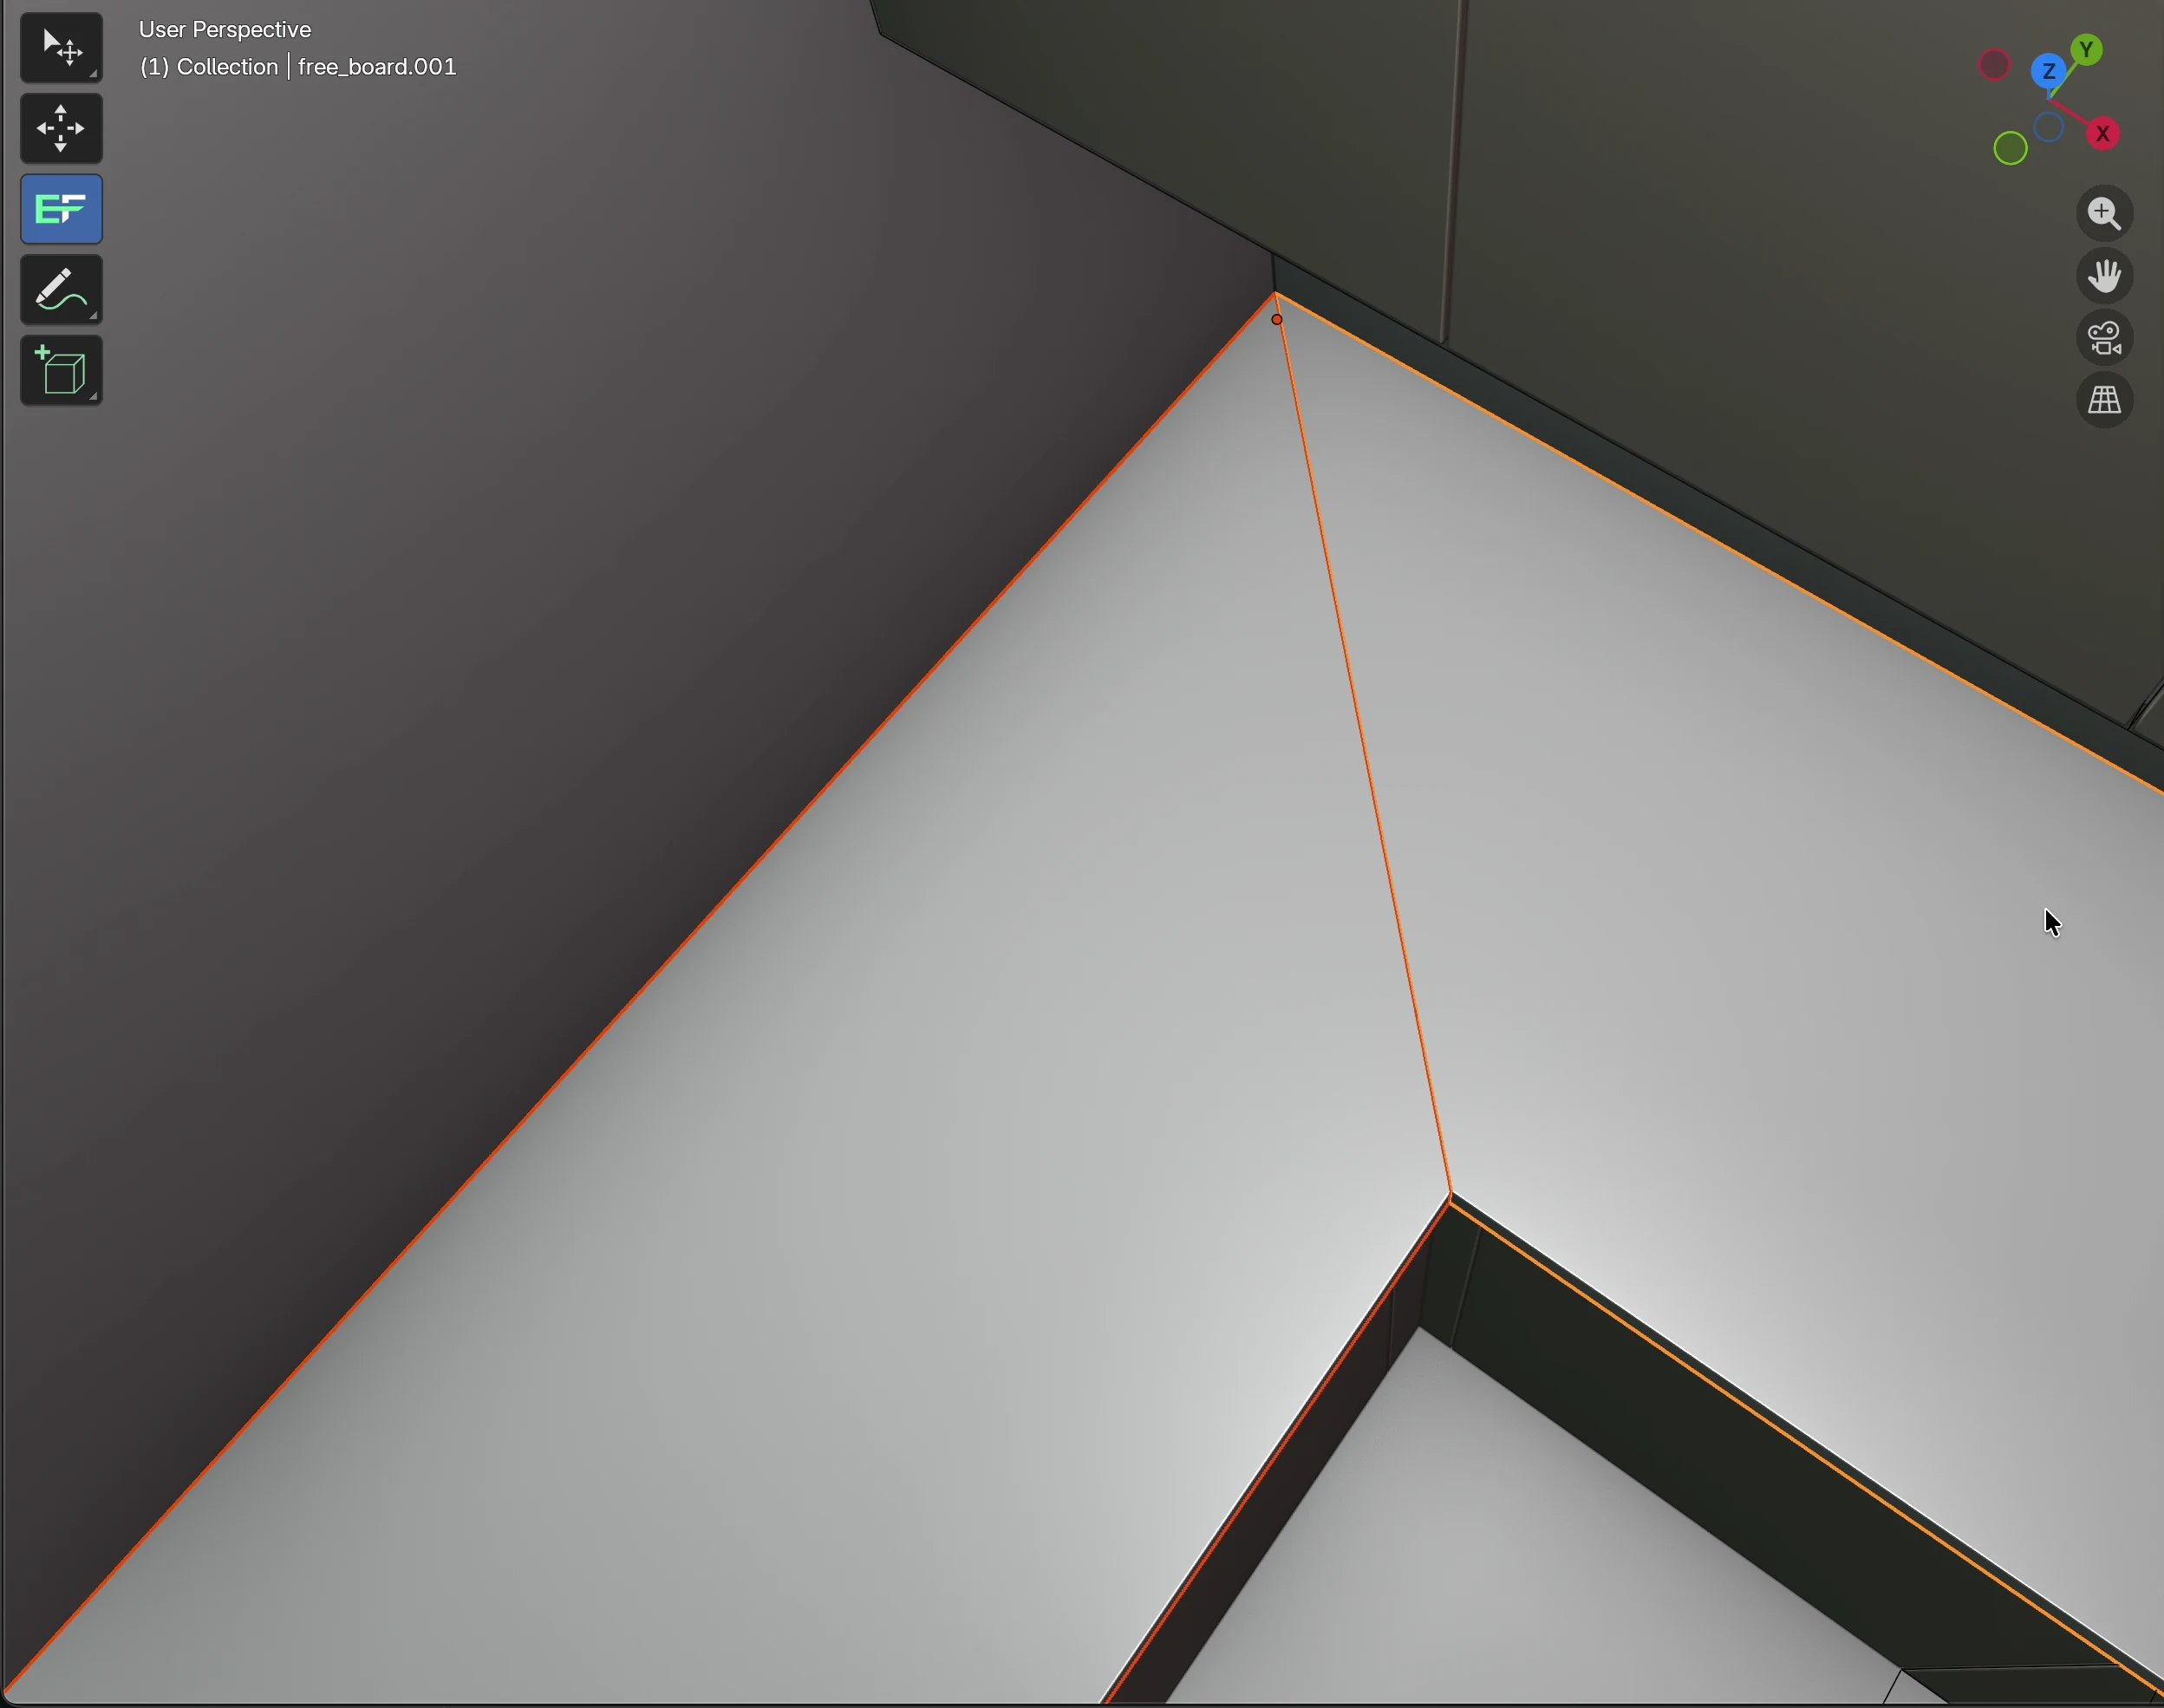
45° or butt
| Joint | What it does | Connectors |
|---|---|---|
| 45° | Both worktops are cut along the diagonal, from the inner corner (where the front edges meet) to the outer corner at the walls. | The joint is as long as the diagonal. For 600 mm deep worktops that is 849 mm, so there are 3 connectors. |
| Butt | The active worktop stays whole and runs to the wall. The other is shortened to the front edge of the active one. | The joint is as long as the depth of the active worktop. At 600 mm there are 2 connectors. |
Connectors
In the X-ray view (Alt+Z) you see the connector holes from below, two for each connector, on both sides of the joint.
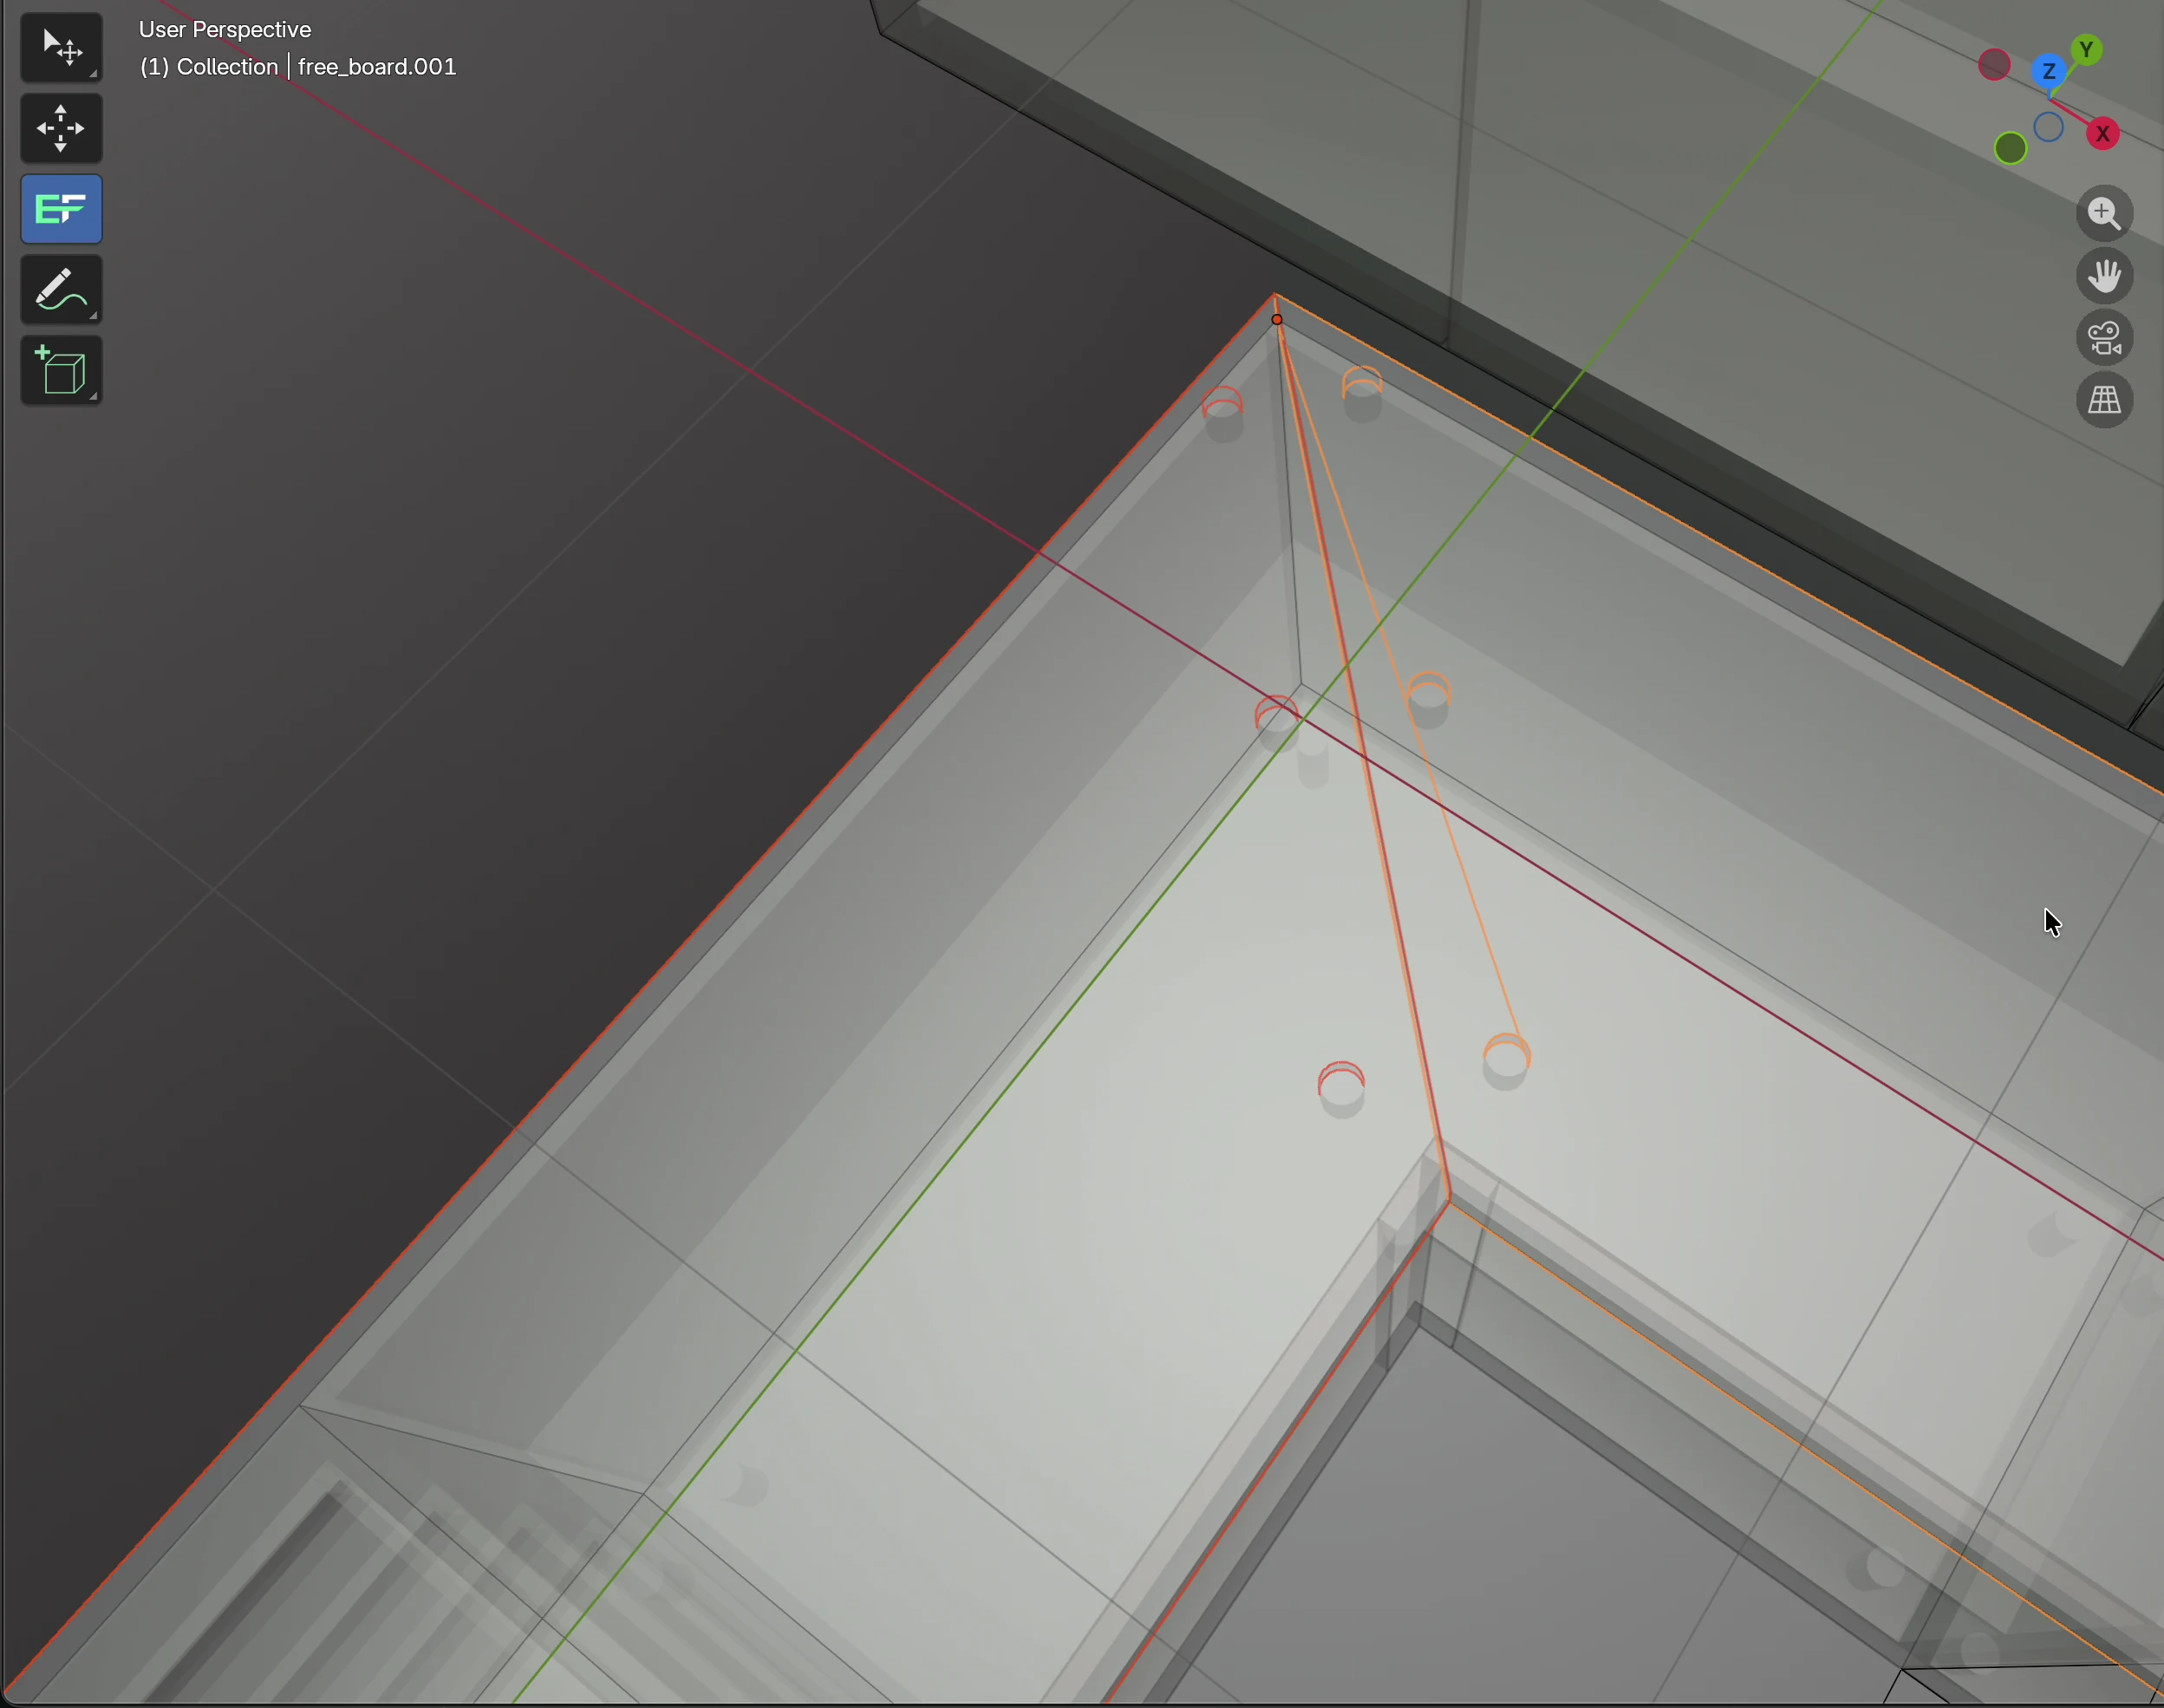
- Number: 2 connectors, 3 when the joint is longer than 650 mm.
- Position: the first and last 100 mm from the ends of the joint, the others evenly spaced between them.
- Holes: for each connector, two holes 35 mm in diameter and 20 mm deep, from below. Each is 65 mm from the joint line, so the holes of one connector are 130 mm apart.
- EFS drills nothing into the edge of the joint: no channel for the bolt between the holes and no holes for dowels or biscuits for alignment. You add those in the CNC program or by hand.
- Hardware: the connectors go into the hardware list as Worktop connector, 150 mm, per piece. In the Cost estimate they are Worktop joint (one per joint) and Worktop connector (per piece).
Joint rules
- The worktops must overlap by at least 10 mm in both directions. Otherwise the program reports The worktops do not overlap in a corner. Worktops overlap by themselves when you make them together (see How EFS lays out the worktop).
- Worktops that run in the same direction are not joined. The program reports The worktops run the same way: nothing to join.
- The joint is cut into the worktops at once. Only Ctrl+Z undoes it. If you want a different joint, undo it or delete the worktops and make them again.
- After the joint, only one worktop is selected. For a new joint, select both again.
- The joint is counted on the worktop that was active, so the Cost estimate counts it once.
Tip
Keep to this order: first the worktop sizes, then the corner joint, the cut-outs last. Do not change the sizes after the joint and the cut-outs.
Worktop decor
Worktops are in the material group F 3, so you give them a decor together. How the assignment works is described in the chapter Decors, edge tape and materials.
- The decor must already be in the project. If it is not, first drag it from the Asset Browser onto any board.
- In the EFS tab, open the Material assignment panel.
- Click Select material for Front 3.
- In the Material field, choose the decor, e.g. H1180 (Halifax oak).
- Click OK.
Rules:
- Group F 3 also holds new free boards (B) and the filler that Fill the gap adds. The assignment for Front 3 gives them the worktop decor too. If you don't want that, move them to another group (see Change the group of one board).
- The kickboard, filler, end panel and cornice are not in F 3: they get the front decor. See Kickboard, fillers, end panels and cornice.
- Decor comparison does not change group F 3: the worktop keeps its decor in all variants.
- You can also drag a decor straight onto one worktop. Then only that worktop changes.
Sink and hob cut-outs
- Click the cabinet the sink goes on. Any of its boards will do.
- Hold Shift and click the worktop above it. The worktop must be selected last, as the active object.
- In the EFS - Board tab, Worktop box, click Cut-out.
- Choose a cut-out, e.g. Sink for an 80 cm cabinet. EFS cuts the opening at once.
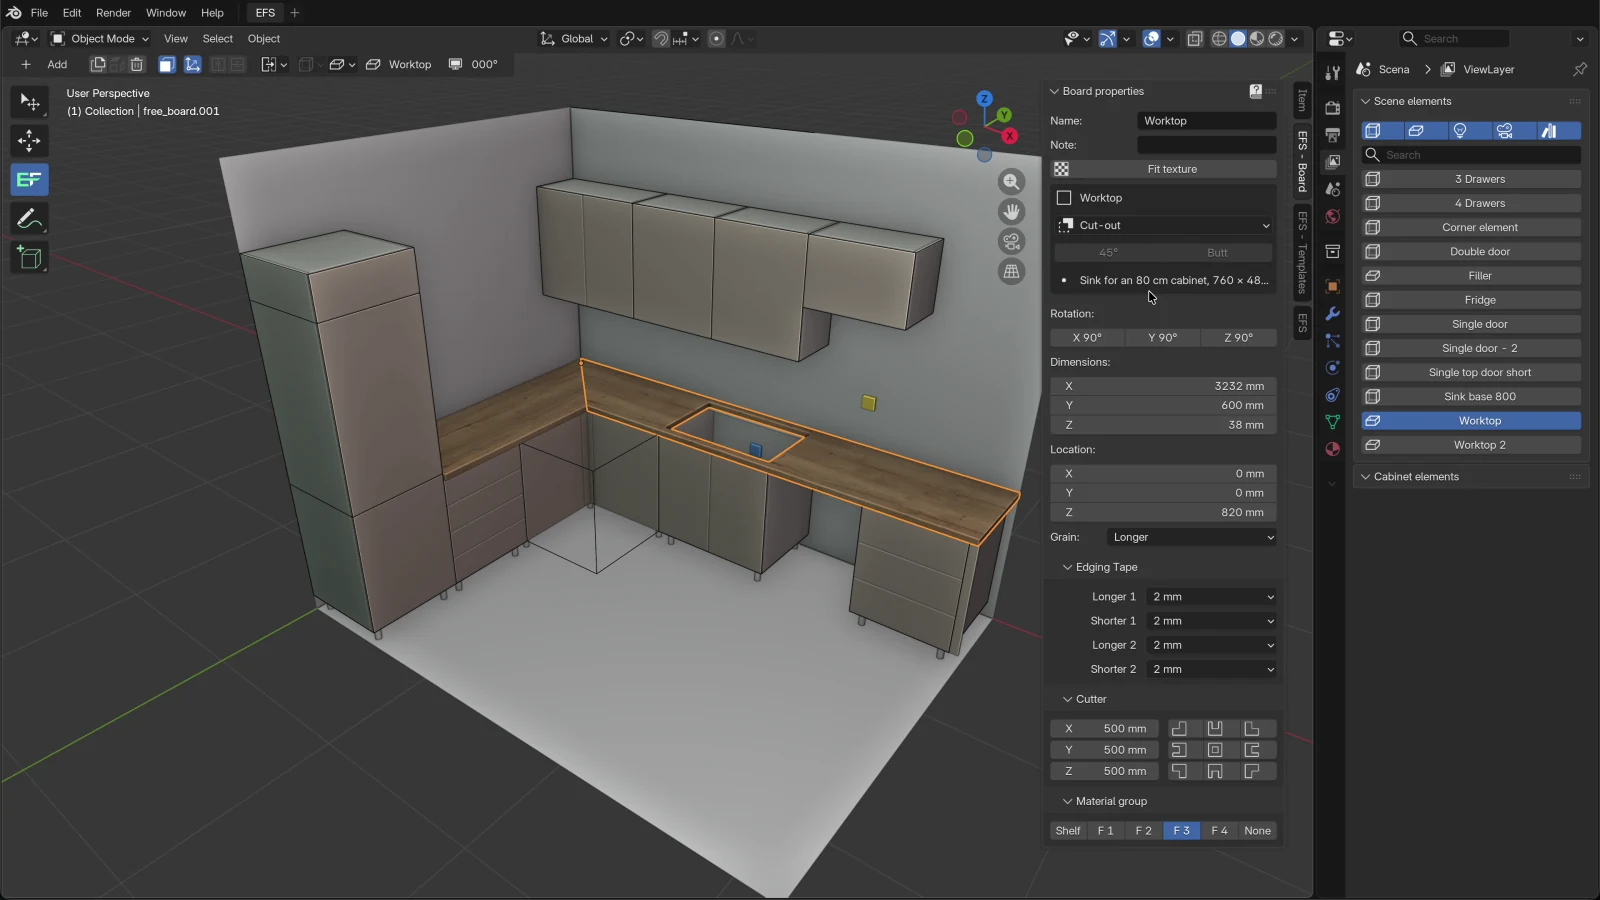
You add the hob the same way: click the drawer unit, Shift + click the worktop, then Cut-out → Hob 60 cm.
If you clicked the cabinet last and not the worktop, the EFS - Board tab shows the cabinet's board and there is no Worktop box. Click the worktop once more with Shift.
Cut-outs from the catalogue
| Cut-out | Width × depth | Corner radius | From the front edge |
|---|---|---|---|
| Sink for a 45 cm cabinet | 410 × 480 mm | 10 mm | 60 mm |
| Sink for a 60 cm cabinet | 560 × 480 mm | 10 mm | 60 mm |
| Sink for an 80 cm cabinet | 760 × 480 mm | 10 mm | 60 mm |
| Hob 60 cm | 560 × 490 mm | 0 (sharp corners) | 50 mm |
| Hob 80 cm | 750 × 490 mm | 0 | 50 mm |
| Hob 90 cm | 860 × 490 mm | 0 | 50 mm |
The width runs along the worktop, the depth across it. The sizes are approximate. For the actual sink and hob, take the sizes from the manufacturer's instructions and enter them in your catalogue (see Your own cut-out sizes).
Where EFS places the cut-out
- Along the worktop: the centre of the opening is at the centre of the selected cabinet. With no cabinet selected, the opening goes to the centre of the worktop.
- Across: the distance from the front edge of the worktop to the opening is the value in the From the front edge column.
- Example from the video: an 80 cm sink above an 800 mm wide cabinet, a 600 mm deep worktop. The opening is 760 × 480 mm, 20 mm from each side of the cabinet, 60 mm from the front edge and 60 mm from the back edge of the worktop.
- A 60 cm hob above a 600 mm cabinet: the opening is 560 × 490 mm, 50 mm from the front edge and 60 mm from the back edge of the worktop.
- Only a regular base unit counts. With a corner cabinet or a wall unit, the opening goes to the centre of the worktop.
- If several cabinets are selected together with the worktop, EFS takes one of them. Select only one cabinet.
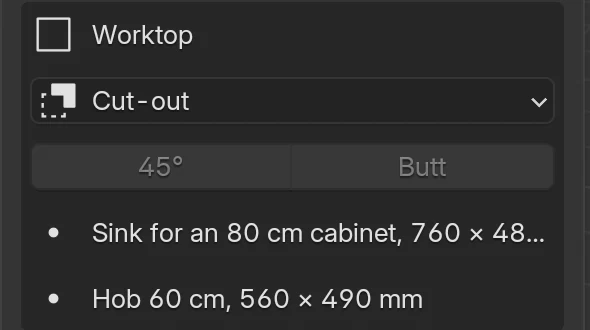
Rules:
- If the opening does not fit on the worktop, the program reports The cut-out does not fit on the worktop. and cuts nothing. This happens when the cabinet is right at the end of the worktop and the opening is wider than the cabinet, or when the worktop is too shallow for the opening.
- EFS does not check whether the opening clashes with another opening, with the corner joint or with the cabinet below. Check them yourself.
- After the cut-out, only the worktop is selected. For the next cut-out, click the cabinet again, then the worktop with Shift.
- A cut-out cannot be moved or deleted. Undo it with Ctrl+Z or make the worktop again.
- The opening goes through the full thickness. In the cutting list the worktop gets a CNC mark, and the opening goes into the drawing and the DXF.
Your own cut-out sizes
The Cut-out menu offers only the cut-outs from the catalogue. You enter the sizes of your own sink and hob in your catalogue, in a file.
For advanced users
The cut-out catalogue is the file worktop_cutouts.json. Write your own cut-outs into a file with the same name in the user_hardware folder, in your EFS user folder (see Where your data is). If the folder does not exist, create it. Updating the program does not touch that folder.
{
  "SINK_80": {
    "name": "My sink 80",
    "width": 780,
    "depth": 480,
    "radius": 10,
    "from_front": 60
  },
  "HOB_83": {
    "name": "Hob 83 cm",
    "width": 810,
    "depth": 490,
    "radius": 5,
    "from_front": 50
  }
}
widthis the width along the worktop,depththe depth,radiusthe corner radius,from_frontthe distance from the front edge, all in mm. You may leave outradius.- A cut-out with the same key as a default one (
SINK_45,SINK_60,SINK_80,HOB_60,HOB_80,HOB_90) replaces the default one. A new key adds the cut-out to the end of the menu. - The menu shows the name from
nameexactly as you type it. - EFS treats a key that starts with
SINKas a sink, all others as a hob. From this, the documentation for the fitters draws the centre line of the sink or of the hob. - The catalogue is read once. After a change, close the program and open it again.
- If the file is not valid JSON, EFS skips it and offers only the default cut-outs.
Cutter
The Cutter box in the EFS - Board tab cuts a rectangle out of a corner of the board, a notch in the middle of an edge or an opening in the middle. It works on every board, not only on the worktop. On the worktop it is used, for example, for a notch around a pillar or a pipe at the wall.
- Click the board. It must be the only one selected.
- In the EFS - Board tab, open the Cutter box.
- In the fields of the two axes that lie in the plane of the board, type the size of the cut. For a worktop these are X and Y, for a board that faces forward on wall A X and Z.
- Leave the field of the axis that goes through the thickness of the board at 500 mm. The cut then goes through the full thickness.
- Click the button with the shape you want.
Fields
| Field | What it does | Default | Values |
|---|---|---|---|
| X | Size of the cut along the scene's X axis (red axis). | 500 mm | 5–5000 mm |
| Y | Size of the cut along the scene's Y axis (green axis). | 500 mm | 5–5000 mm |
| Z | Size of the cut along the scene's Z axis (blue axis). On a horizontal board, like the worktop, this is the depth of the cut through the thickness. | 500 mm | 5–5000 mm |
Every board remembers its own X, Y and Z values. The axes are the scene's axes, not the board's: on a board on wall D, the length of the board runs along the Y axis.
Buttons
The buttons are laid out like the board: the icon shows the shape of the board after the cut.
| Button | What it cuts | On a worktop along wall A |
|---|---|---|
| Top left | A rectangle in the corner. | Back right corner: X × Y |
| Top right | A rectangle in the corner. | Front right corner: X × Y |
| Bottom left | A rectangle in the corner. | Back left corner: X × Y |
| Bottom right | A rectangle in the corner. | Front left corner: X × Y |
| U top | A notch in the middle of the edge. | Right end of the board: a notch Y wide and X deep |
| U bottom | A notch in the middle of the edge. | Left end of the board: a notch Y wide and X deep |
| U left | A notch in the middle of the edge. | Back edge: a notch X wide and Y deep |
| U right | A notch in the middle of the edge. | Front edge: a notch X wide and Y deep |
| Center | An opening in the middle of the board. | An X × Y opening in the middle of the board |
Left and right in the third column are as seen from the front. On a board that faces forward (a door, a back, a kickboard on wall A), the button names match the view from the front. On a horizontal board, top is the end towards the +X axis, and left the edge towards the +Y axis. So the direction does not depend on how you look at the scene. After the cut, look at the board, and if the cut is in the wrong place, undo it with Ctrl+Z.
Rules:
- The cut is part of the board: it goes into the outline on the drawing and into the DXF, and the board gets a CNC mark in the cutting list.
- A cut in the worktop is not a Cut-out. The Cost estimate does not count it as a Worktop cut-out, it is not in the cut-out list and it does not go into the documentation for the fitters.
- After the cut, the measures of that board disappear.
- Only Ctrl+Z undoes the cut.
- On a cabinet's board, cut only when the cabinet's sizes are final. If you change the cabinet afterwards, the board stretches together with the cut.
Watch out
The Cutter puts a free board that is turned around the vertical axis back into its unturned position. These are boards turned with the Z 90° button and the kickboard, filler, end panel and cornice next to cabinets that are not turned 0°, for example on wall D. Such a board lies wrong after the cut. Undo with Ctrl+Z. The worktop is not turned, so this does not happen to it.
Measures
M or the Measures button in the header turns the measures on. On a worktop they show when it is selected.
- A new worktop has measures of its length, depth and thickness.
- After a cut-out or a joint, EFS draws the measures again: the length and depth of the worktop and the width and depth of each opening. The thickness measure is gone.
- After a cut with the Cutter, the measures of that board disappear.
The measures do not show the position of the sink and the hob from the corner of the wall (their centre line). The centre line is in the documentation for the fitters: the wall elevation and the installation plan draw it from the cut-outs in the worktop. See Room documentation for the fitters.
Price per metre
- In the EFS tab, open the Cost estimate panel.
- Scroll down to the worktop rows, below the hinges, drawers, holes and legs.
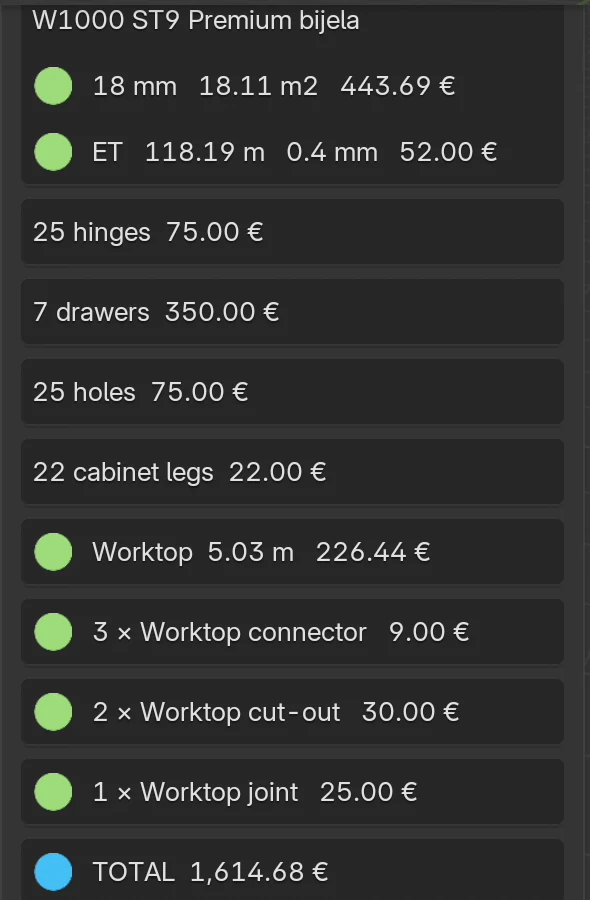
| Row | What it counts | Code in the price list | In the default price list |
|---|---|---|---|
| Worktop x m | The length of all worktops, each at its full length | WORKTOP_M |
45 € per metre |
| n × Worktop cut-out | Openings for the sink and the hob | WORKTOP_CUTOUT |
15 € per piece |
| n × Worktop joint | Corner joints, 45° and butt | WORKTOP_JOINT |
25 € per piece |
| n × Worktop connector | Connectors | WORKTOP_CONNECTOR |
3 € per piece |
In the video: 3232 mm + 1800 mm = 5.03 m, which is 226.44 €. The two cut-outs are 30 €, the joint 25 €, the three connectors 9 €.
Rules:
- The corner is counted twice: both worktops are measured at full length, because that is how you order them.
- The worktop is not in the board rows by decor (m²), and its edge tape is not in the edge tape metres. So the price per metre must include the board, the edge tape and the edge finishing.
- A green dot means the price list has a price. A red dot and the code in brackets mean it does not. The codes and prices are in your price list, on the Other sheet. See Nesting and board prices.
- The panel writes amounts in the interface language: 5.03 m and 226.44 € in English, 5,03 m and 226,44 € in Croatian.
- In the customer quote, each worktop is its own line, with its cut-outs, joint and connectors. See A quote for the customer.
Worktop edge tape
The worktop gets 2 mm edge tape on all four edges, the edge at the wall included. You change the edge tape in the Edging Tape box, as on every board (see Edge tape).
- Click the worktop.
- In the EFS - Board tab, Edging Tape box, set the edge at the wall to None.
- Also set None on the edge in the corner, at the joint, and on the edge next to a tall unit.
You can see which edge is Longer 1 and which is Longer 2 on the board drawing in the PDF: the edge tape is a blue line along the edge. The slanted edge of the 45° joint has no field of its own. The edge at the joint is not taped, so set the shorter edge at that end of the worktop to None.
Rules:
- The cut size in the cutting list is the finished size minus the edge tape (see Edge tape and cut size). If you buy the worktop with a finished edge, set None on all four edges. The cut size then equals the finished size.
- The worktop's edge tape does not go into the Cost estimate, the quote or the edge tape order. If you apply it yourself, include it in the price per metre.
Cutting list, hardware and DXF
| Export | What goes in |
|---|---|
| Cutting list (Excel, sheet Cutting Sheet) | One line per worktop: decor, thickness, finished size of the rectangle (e.g. 3232 × 600 mm), cut size without edge tape, and the edge tape. A worktop with anything cut out of it (cut-out, joint, Cutter) gets a CNC mark. |
| Hardware list (Excel, sheet Hardware) | Worktop with decor, thickness and size, one piece. Worktop connector, 150 mm, with the number of pieces. |
| Nesting | The worktop is not nested on the stock sheets. |
| Supplier order | The worktop is not among the boards or in the edge tape. It is ordered as a piece with its size, with the connectors, from the hardware list. |
| DXF | One file per board. The outline (and the mitre cut) is on the CONTOUR layer, the cut-out openings on the CUTOUT layer, the connector holes on the DRILL_D35_P20 layer. How holes on the underside are drawn is described in the chapter Drillings, DXF, MPR and CIX. |
| Documentation for the fitters | The height of the top edge of the worktop and the centre line of the sink and the hob, taken from the cut-outs. See Room documentation for the fitters. |
| Quote | Its own line per worktop. See A quote for the customer. |
The worktop can also go into your template, together with the cabinet. See Saving with a worktop.
Common problems and solutions
The Worktop over selected button is greyed out. No regular base unit is selected. The corner cabinet, wall units and free boards do not count. Click a board of a base unit.
The worktop sits high, on top of the fridge. A tall unit was in the selection. Delete the worktop (X), select only the base units and add it again.
The corner cabinet has no worktop. Only one run was selected. Delete the worktop, select the cabinets of both runs at the corner and add the worktops with one click.
The program reports The worktops do not overlap in a corner. The worktops were made one by one, or the end of a run is more than 1300 mm from the other run. Delete them and make them together. If the run really does not reach the corner, you don't need a joint.
The 45° and Butt buttons are greyed out. Not exactly two worktops are selected. Click one, then Shift + click the other.
With a butt joint, the wrong worktop was shortened. The other worktop was active. Undo with Ctrl+Z, select both so that you click the worktop that runs to the wall last, and click Butt.
The Worktop box is missing from the EFS - Board tab. A cabinet was clicked last, so the tab shows its board. Click the worktop with Shift.
The cut-out is in the middle of the worktop, not above the sink. The cabinet was not selected, or the corner cabinet was selected. Undo with Ctrl+Z, click the sink unit, then the worktop with Shift, and repeat the cut-out.
The program reports The cut-out does not fit on the worktop. The opening would go past the end or the edge of the worktop. Choose a smaller cut-out or place it above a cabinet further from the end.
The opening is stretched. The worktop's Dimensions field was changed after the cut-out. Undo the change or make the worktop again: sizes first, then the joint, then the cut-outs.
Another board has the worktop decor, and I didn't want that. That board is in group F 3. Move it to another group and give it its decor again.
After moving a cabinet, the worktop stayed in place. The worktop is not linked to the cabinet. When you move the cabinet, select the worktop too (Shift + click), or make it again.
After the Cutter, the board lies crosswise. It was turned by 90°, and the Cutter undid the turn. Undo with Ctrl+Z.
Shortcuts in this chapter
| Key | Action |
|---|---|
| Shift + click | Add a cabinet or worktop to the selection; the last one clicked is active |
| Shift+A | The Add menu |
| Alt+Z | X-ray view: the connector holes show |
| M | Measures on / off |
| F9 | Adjust Last Operation: Thickness and Front overhang right after adding |
| 1 2 3 | Move the selection along X, Y or Z |
| X | Delete the selected worktop |
| Ctrl+Z | Undo the joint, cut-out or cut |
All shortcuts are in the chapter Keyboard shortcuts.
Next
Next chapter: Kickboard, fillers, end panels and cornice