Web preview and QR
You publish the project on the web with one click, and the customer looks at it in 3D on a phone, tablet or computer, without any program. They rotate and zoom the kitchen, open the doors and drawers, turn on the lights and choose decors. In this chapter you will learn how to publish a project, give the customer the link and connect the web preview with the QR codes on the labels and in the assembly instructions.

Show me in the program
The interactive tour Web preview and QR (2 min) shows you in the program where to click and what to type, step by step. In the EFS tab, open the Interactive tours panel and click Start next to the tour. The AI assistant also offers it when you ask how to do this.
Before you start
- The project is saved (File → Save). Until it is, the Publish button is greyed out, and the panel says To publish on web, please save project.
- The computer is connected to the internet, and the licence is active (When the free trial or the subscription ends).
- The boards have decors assigned and the program finds their images (Decors, edge tape and materials).
- The fronts are visible, and the doors and drawers are closed (see What to prepare in the project).
- If the customer should be able to turn on the lights, there are LED strips under the wall units (LED strip).
The Web publish panel
The Web publish panel is in the EFS tab, below the Material assignment panel. Click its title to open it.
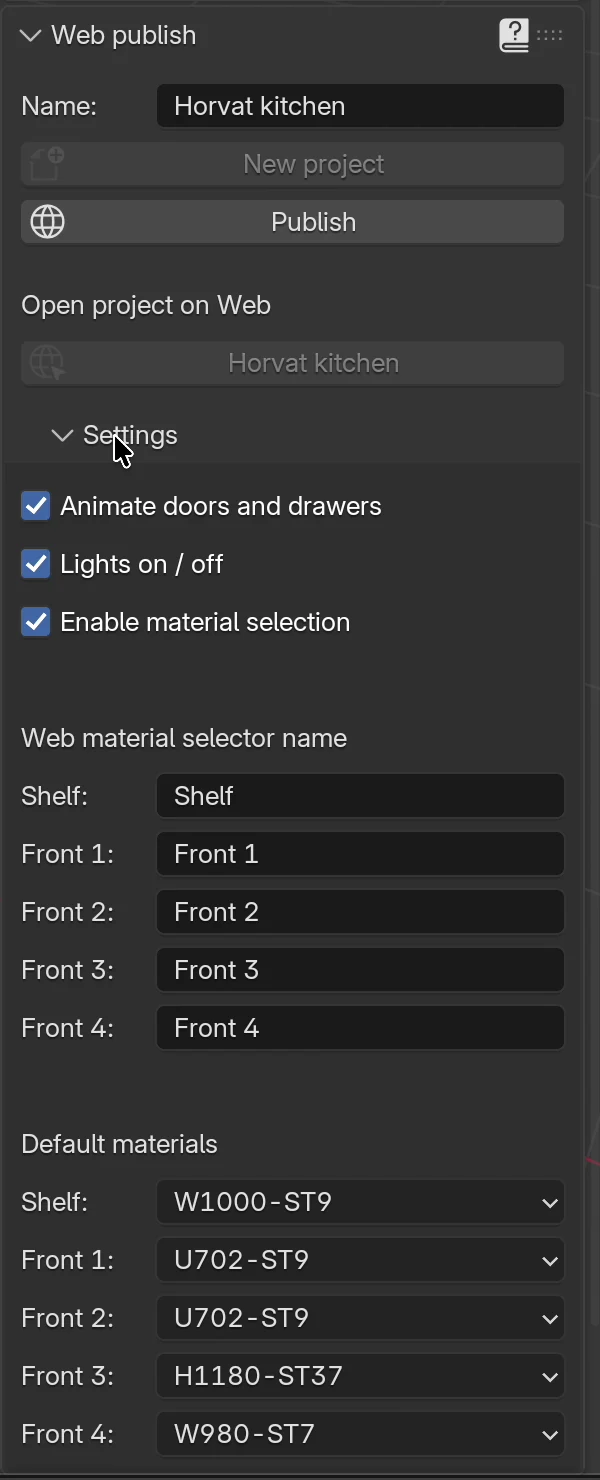
| Field or button | What it does | When it is greyed out or not visible |
|---|---|---|
| Name | The project's name. On the web it is shown in the top bar of the preview, and in the panel on the button below Open project on Web. The default is Project name | Visible only before the first publish. Afterwards that place shows Project name: and the name |
| New project | The next publish goes under a new link, and the current one stays on the web (see New link) | Greyed out until the project is published |
| Publish | Saves the project, exports it and sends it to projects.easyformstudio.com | Greyed out until the project is saved |
| Open project on Web | The button with the project's name opens the web preview in the browser | Greyed out until the project is published |
| Buttons of earlier publishes | Below the project button, one for each publish separated with New project, newest first | Visible only after the first click on New project |
| Bin | Next to the project button and next to each button of an earlier publish. Deletes that publish from the web (see Deleting from the web) | Next to the project button it is not visible until the project is published, nor after a click on New project |
| Settings | Box with the publish settings (see Publish settings) | Folded; a click opens it |
Note
Name is not only a name for the web. The names of exported files start with it, and it is printed on the PDFs and labels. While it says Project name, the names of exported files start with the name of the project file, and the place for the name on the PDFs and labels stays empty.
Watch out
After the first publish, Name can no longer be changed. If you need another name, click New project: the field comes back, but the next publish gets a new link.
Publish settings
In the Settings box you choose what the customer can do in the preview.
| Option | What it does | Default |
|---|---|---|
| Animate doors and drawers | The preview gets buttons that open all the doors (and flaps) and all the drawers | On |
| Lights on / off | The preview gets a bulb button: the main light dims and the LED strips light up | On |
| Enable material selection | The preview gets a decor selection button: the customer chooses the decor of each material group | On |
When Enable material selection is on, two more sets of fields are below it.
Web material selector name is the label the customer sees on the web for each material group:
| Field | Material group | Default |
|---|---|---|
| Shelf | Shelf (carcass, shelves, drawers) | Shelf |
| Front 1 | F 1 (fronts of base and tall units) | Front 1 |
| Front 2 | F 2 (fronts of wall units) | Front 2 |
| Front 3 | F 3 (free boards, worktop) | Front 3 |
| Front 4 | F 4 (boards you separated yourself) | Front 4 |
Default materials are the decors a group has when the customer opens the decor selection:
| Field | Values | Default |
|---|---|---|
| Shelf, Front 1 … Front 4 | 259 Egger decors by code and texture, e.g. U702-ST9 | W980-ST7 for every group |
Which board is in which group is in the chapter Decors, edge tape and materials. The None group has no field: its boards (backs, legs) keep the decor from the project on the web, and the customer doesn't change it.
Tip
The default labels are generic (Shelf, Front 1…). Before publishing, type your own, e.g. Carcass, Base fronts, Wall fronts, Worktop. In Default materials choose the same decors as in the project, so that the decor selection starts from what you offered the customer.
What else Enable material selection changes:
- When it is off, the EFS - Board tab has no Material group box (Change the group of one board).
- When it is off, the Shelves box of the EFS - Cabinet tab has no Thickness, Clearance, Front recess and Back recess fields (Shelves). If you need those fields, turn it on.
Publishing
What to prepare in the project
What goes to the web is what is visible in the view, in the state it is in in the project:
- Fronts. Fronts hidden with Shift+F don't go to the web. Click Show fronts in the EFS tool header.
- Doors and drawers closed. The animation on the web starts from the state in the project. If the doors are open, they stand open on the web, and the button closes them.
- Room turned off. The room's walls look dark on the web, and the installation marks go along with the room. Turn off Room properties → Show room, and turn it back on after publishing.
- Cabinet names. On the web the customer and the fitter see the cabinet's name next to each part (e.g. Sink base 800). Give the cabinets names they will recognise (Cabinet properties).
Publish
- Save the project (Ctrl+S).
- In the EFS tab, open the Web publish panel.
- In the Name field, type the project's name, e.g.
Kuhinja Horvat. - Open Settings and check the options, the labels and the default decors.
- Click Publish.
- Wait. While the export and upload run, the program doesn't respond to the mouse and keys. The kitchen from the video took about a minute and a half to publish. Don't close the program.
- When it is done, the program reports Publish completed.
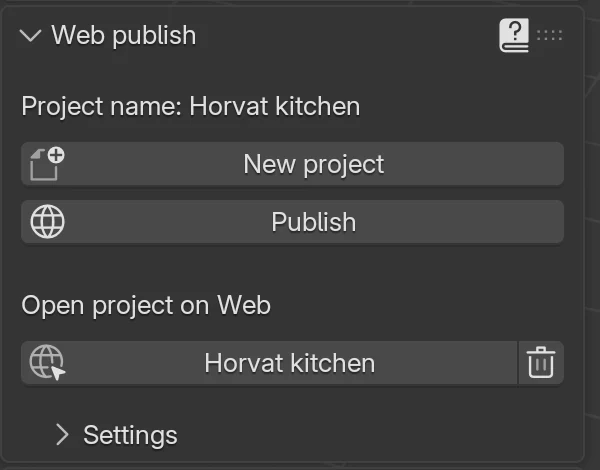
After publishing, the panel looks different: instead of the Name field it says Project name: Kuhinja Horvat, the New project button is active, and the button with the project's name opens the web preview.
What EFS does when publishing
- Saves the project.
- Checks that the decor images are on the disk.
- On the first publish, creates the project on projects.easyformstudio.com and gets the link. It writes the link into the project and saves it again.
- Exports the 3D model with decors. It scales the decor images for the web down to at most 1024 pixels, so that the preview loads quickly on a phone. The images in the project stay the same.
- Exports the parts list with the same numbers as the cutting list and labels.
- When Enable material selection is on, it also exports a second model, for the decor selection.
- Sends all the files to the server.
- Opens the project from the disk again.
Watch out
Because of step 8, Ctrl+Z after publishing doesn't undo steps made before publishing. If you want to try something and then undo it, publish only when you are done.
When decor images are missing
If the program doesn't find a decor image, the publish still completes, but instead of Publish completed it reports:
Published, but these decor images were not found, so their boards are plain on the web: and the list of images. Open the project from its own folder or relink the images, then publish again
This most often happens when the project was copied to another folder or the texture pack was moved.
- Relink the images: File → External Data → Find Missing Files... (Common problems in the Decors chapter).
- Save the project.
- Click Publish again. The link stays the same.
Error messages
When publishing fails, the program shows a message that starts with Publish: and ends with (details in the EFS log, Easy Form Studio panel). You open the log in the Easy Form Studio panel, with the Open log button.
| Message | Cause | Solution |
|---|---|---|
| the web server did not return your account data | No internet, or the API key is not valid | Check the connection and the status in the Account panel |
| the web server did not create the project | The server did not open a new project | Try again in a few minutes. If it keeps happening, contact support with the log |
| the web server refused … (over the server's size limit, … MB) | The model is too big for the server | Contact support with the log |
| the web server refused … (the licence does not allow publishing) | The licence has expired | When the free trial or the subscription ends |
Support: easyformstudio@gmail.com.
The link and the QR code
Where the link is
- In the Web publish panel, below Open project on Web, click the button with the project's name.
- The web preview opens in the browser.
- Copy the address from the browser's address bar.
The address looks like this: https://projects.easyformstudio.com/, then two long strings of letters and digits separated by a slash. The first string is your account, the second the project.
How to give it to the customer
- Send the link by e-mail, text message or chat, e.g. with the quote (A quote for the customer) and the render (One-click render).
- EFS doesn't make a QR code of the whole project for the customer. If you want one, e.g. on a printed quote, make it from the link with any QR code generator. Chrome offers one in the page's share menu.
QR codes on labels and in assembly instructions
When the project is published, the QR codes in the production documents lead to the web preview:
| Document | Where the QR code leads | What you see |
|---|---|---|
| Part label | To that part in the preview | The part glows blue, the others are transparent, and a card shows the number, name, cabinet, dimensions, material and hardware |
| Cabinet page in the assembly instructions | To all the parts of that cabinet | All the cabinet's parts glow, the card has their list. Next to the code it says 3D view of this cabinet and scan the code, or click a part number |
If the project is not published, the QR code on the label is not a link. It holds text: project, number, cabinet, part, dimensions and material. The details are in the chapter Labels and assembly instructions.
Watch out
Print the labels and assembly instructions after publishing. The part number in the QR code is the number from the cutting list. If you add or delete a part later, the numbers shift: publish again and print the labels again.
What the customer sees
Opening
The preview opens in any browser, on a phone, tablet and computer. The customer needs no app and no login. While the model loads, a circle spins in the middle; on mobile internet the first load takes a few seconds.
The preview shows the project with the decors from the project, the way you see it in Material Preview. On a computer, the project's name is on the right of the top bar.
Controls
| Action | Mouse | Fingers |
|---|---|---|
| Rotate | Left button | One finger |
| Pan | Right button | Two fingers |
| Zoom | Wheel | Spreading and pinching two fingers |
The bar at the bottom says the same, in the language EFS was in when you published the project: Rotate, Move, Zoom (in Croatian Okreni, Pomakni, Zumiraj).
Toolbar buttons
The buttons are icons in the dark bar at the top. A blue button is on.
| Icon | What it does | Visible when |
|---|---|---|
| Paint roller | Opens the decor selection in a new browser tab (see Decor selection) | Enable material selection is on |
| Sun and moon | Light or dark background. The preview always opens with the dark one | Always |
| Wardrobe | Opens and closes all the doors and flaps in the project | Animate doors and drawers is on |
| Drawers | Opens and closes all the drawers | Animate doors and drawers is on |
| Bulb | Evening lighting: the main light dims, the LED strips light up. A second click brings back daylight | Lights on / off is on |
| List with ticks | The Parts menu (see The Parts menu) | The project was published with this version of EFS |
When you move the mouse over an icon, its name appears, in the language EFS was in when you published the project: e.g. Modify, Change background, Open doors, Open drawers, Turn off the lights, and after a click Close doors. In projects published before version 2.0.10018 the names are in English before the first click (Open doors, Open drawers) and in Croatian after it (Zatvori vrata, "Close doors"; Ugasi svjetla, "Turn off the lights").
Note
The bulb is there even when the project has no LED strips. It then only dims the light. Without LED strips, turn off Lights on / off before publishing.
The part card
The card opens when the customer or the fitter scans the QR code on a label or picks a part in the Parts menu. The part glows blue, the other parts are transparent, and the view turns towards the part.
| Card line | Example |
|---|---|
| Number (blue badge) and part name | 12 Front left |
| Cabinet | Sink base 800 |
| Dimensions: length × width × thickness | 716 x 396 x 18 mm |
| Material | U702 ST9 Kašmir siva |
| Hardware: hinges and number of dowels | 2 hinges on longer side |
The number is the same as in the cutting list and on the label. The cross at the top right closes the card: the part stops being highlighted, and the view goes back to where it was.
The texts on the card and in the Parts menu are in the language EFS was in when you published the project.
The Parts menu
The button with the list and ticks opens a list of all the project's parts, by cabinet.
| Part of the menu | What it does |
|---|---|
| Find a part or cabinet field | Narrows the list to parts and cabinets whose name or number contains what you type |
| Clear | Clears the selection of all parts |
| Tick next to a cabinet | Selects all the parts of that cabinet. The number on the right is the number of parts |
| Tick next to a part | Selects that part. The blue badge is the number |
The selected parts glow together, and the card shows their list. On a phone the list in the card is folded so that it doesn't cover the model; it opens with Part list ▾.
Tip
The address in the browser remembers the selection: at the end it says e.g. #part-12 for one part or #parts-12-18 for several. Copy that address and send it to the fitter or the customer: it opens the preview with the same parts highlighted.
Projects published with an older version of EFS have no Parts menu and no part card. Publish them again.
Decor selection
The roller button opens the decor selection in a new browser tab:
- The model loads with the decors from Default materials, not with the decors from the project.
- At the top there is one button for each material group that has at least one board in the project. The label on the button comes from Web material selector name.
- A click on a button opens the list of Egger decors, with a thumbnail and the name.
- A click on a decor: all the boards of that group get that decor at once.
- The floppy-disk button saves the selection. The preview reports Postavke iverala spremljene. (Croatian for "Board settings saved.")
What you need to know:
- The saved selection stays only in that browser, for 90 days. It doesn't come to you. Ask the customer to send you the decor names or a screenshot.
- If the browser doesn't allow cookies, the selection is not saved and the preview says so.
- Boards of the None group keep the decor from the project.
- The list has only Egger decors. Your own decors are not on the list.
- The decor selection has the buttons for the background, doors, drawers and lights, but no Parts menu and no part card.
Publishing again
The same link
When you change the project, click Publish again. The link stays the same, and the new model replaces the old one on the server. The customer only refreshes the page.
The QR codes on labels already printed still lead to the preview. They lead to the same number, so check whether the part numbers have changed (see QR codes on labels).
A new link: New project
- Click New project.
- The current publish stays on the web. Its button moves below the project button, into the list of earlier publishes.
- The Name field comes back. Change the name if needed.
- Click Publish. The project gets a new link.
When to use New project:
- You send the customer two variants: publish the first, click New project, change the project and publish the second. Both links work.
- The project is a copy of another customer's project (see the warning below).
The New project button doesn't open a new project in the program. You open a new project from the File menu (Working with a project).
Watch out
The link is written in the project file. When you save the project under another name (File → Save As...) and turn it into a project for another customer, the copy carries the same link. Before the copy's first publish, click New project. Otherwise the publish overwrites the first customer's web preview.
Note
Between a click on New project and the next publish, the buttons of earlier publishes are greyed out. After publishing they work again.
Privacy
- Anyone who has the link or the QR code can see the preview. There is no password and no login.
- The projects are not on a public list. Only the people you give the link to know it.
- The preview shows the 3D model, the decors, the project's name and the parts list with dimensions, material and hardware. Prices, the customer's details from the quote and the project file don't go to the web.
- The QR code on a label is a link to the whole project. Anyone who has the board can open the preview.
Tip
Anyone with the link sees the project's name. Type a name the customer will recognise you by, but without an address or phone number.
A published project stays on the web until you delete it, even when your trial or subscription ends.
Deleting from the web
You delete a publish with the bin icon in the Web publish panel. The bin is next to the button of the current publish and next to each button of an earlier publish.
- In the Web publish panel, click the bin next to the publish you are deleting.
- The program asks Delete from the web? and says: "The link and the QR codes on the labels will stop working. The project file on this computer stays."
- Click Delete. If you change your mind, click Cancel.
- The program reports Deleted from the web. and the link disappears from the panel: an earlier publish disappears from the list, and for the current publish the bin disappears and the button with the project's name is greyed out.
What happens:
- The server deletes the project with all its files.
- The link and the QR codes on the labels and in the assembly instructions stop working.
- The project on your computer stays as it was.
- Deleting works even when the trial or subscription has ended.
- When you delete the current publish, the Name field comes back as after New project. The next click on Publish creates a project with a new link.
Watch out
Deleting cannot be undone, not even with Ctrl+Z. A deleted link no longer works: a new publish always gets a new link, so export and print the labels again after it. A copy of the project saved with Save As... carries the same link as the original project (see New link), so the bin in the copy also deletes the original project's preview.
| Message | Cause | Solution |
|---|---|---|
| The web server could not be reached. Check the internet connection. | No connection to the server | Check the connection and click the bin again |
| The web server cannot delete projects yet. | The server can't delete projects yet | Try later. If it keeps happening, contact support |
| The web server did not delete the project (…). | The server refused the deletion. The brackets hold the error number | Try again. If it keeps happening, contact support with that number |
With these messages the project stays on the web, and its link stays in the panel.
Common problems and solutions
Publish is greyed out. The project is not saved. Save it with Ctrl+S.
New project is greyed out. The project is not published yet.
The button with the project's name is greyed out. The project is not published yet, or New project was clicked, or the current publish was deleted with the bin, and a new publish hasn't been made yet.
I can't change the name. The project is already published. For another name, click New project; the next publish has a new link.
The program doesn't respond after clicking Publish. Publishing is running. Wait for the Publish completed message.
Ctrl+Z doesn't undo what I did before publishing. Publishing opens the project from the disk again. The changes are saved, but the undo history starts afresh.
The boards are white on the web. The program didn't find the decor images. See When decor images are missing.
The customer sees the old state. They should refresh the page in the browser.
There are no fronts on the web. The fronts were hidden with Shift+F. Click Show fronts and publish again.
The doors are open on the web, and the button closes them. The doors or drawers were open in the project. Close them (O on the cabinet) and publish again.
The walls are dark or block the kitchen, and there are grey squares on the wall. The room was turned on. Turn off Show room and publish again.
There are no buttons for the doors, drawers or lights. Those options are turned off in Settings. Turn them on and publish again.
The bulb doesn't light anything. The project has no LED strips. Add them (LED strip) or turn off Lights on / off.
There is no roller button. Enable material selection is off.
The web shows Shelf and Front 1. Those are the default labels. Type your own in Web material selector name and publish again.
In the decor selection the kitchen is in other decors than in the project. The decor selection starts from Default materials. Set them to the decors from the project.
There is no Parts menu, and the QR code from the label opens the preview without a card. The project was published with an older version of EFS. Publish it again.
The QR code on the label doesn't open the web. The labels were printed before publishing, so the code holds text. Print them again.
The QR code on the label shows the wrong part. Parts were added or deleted after printing, so the numbers shifted. Publish again and print new labels.
The background goes back to dark every time. The preview always opens with the dark background. The customer changes it with the sun and moon button.
Shortcuts in this chapter
| Key | Action |
|---|---|
| Ctrl+S | Save the project before publishing |
| Shift+F | Hide the fronts; hidden fronts don't go to the web |
| O | Open or close the doors and drawers of the selected cabinet (close them before publishing) |
| Ctrl+Z | Undo; doesn't undo steps before publishing |
Next
Next chapter: Comparing decors