Kickboard, fillers, end panels and cornice
The kickboard, fillers, end panels and cornice close and finish a run of cabinets. EFS lays them out by itself: the kickboard along the whole run against the front legs, the filler flush with the fronts, the end panel on the side of the cabinet and the cornice on top. For each of these boards, this chapter tells you how to add it, which sizes it gets, what edge tape and decor, how it is linked to the cabinet, and how to change and delete it.
Video: B05 Kickboard, fillers, end panels and cornice
The same workflow in a video of a minute and a half.

Before you start
- Open a project with cabinets. The kitchen from the video is the one from the chapter The worktop: cut-outs and the corner joint: base units with a worktop on walls A and D, wall units on wall A and the fridge on wall D.
- The kickboard needs cabinets on legs. You add legs in the Legs box or with the L key. See Legs.
- You add the filler and the end panel from the right-click menu, under Add to the cabinet. How to open the menu is described in the chapter Working faster.
- Add the filler at the wall before the worktop and the kickboard. The worktop and the kickboard then run across it to the wall.
The workflow from the video
- Click the fridge, then Shift + click to add the base units: four drawers, the sink and three drawers. The fridge stands on legs, so it gets a kickboard too.
- In the header, click Add → Kickboard over selected.
- Two kickboards appear, Kickboard and Kickboard 2, one for each wall. They stand against the front legs, from the floor to the carcass. In the corner they are joined, and on wall A they run across the filler to the wall. See Kickboard over selected.
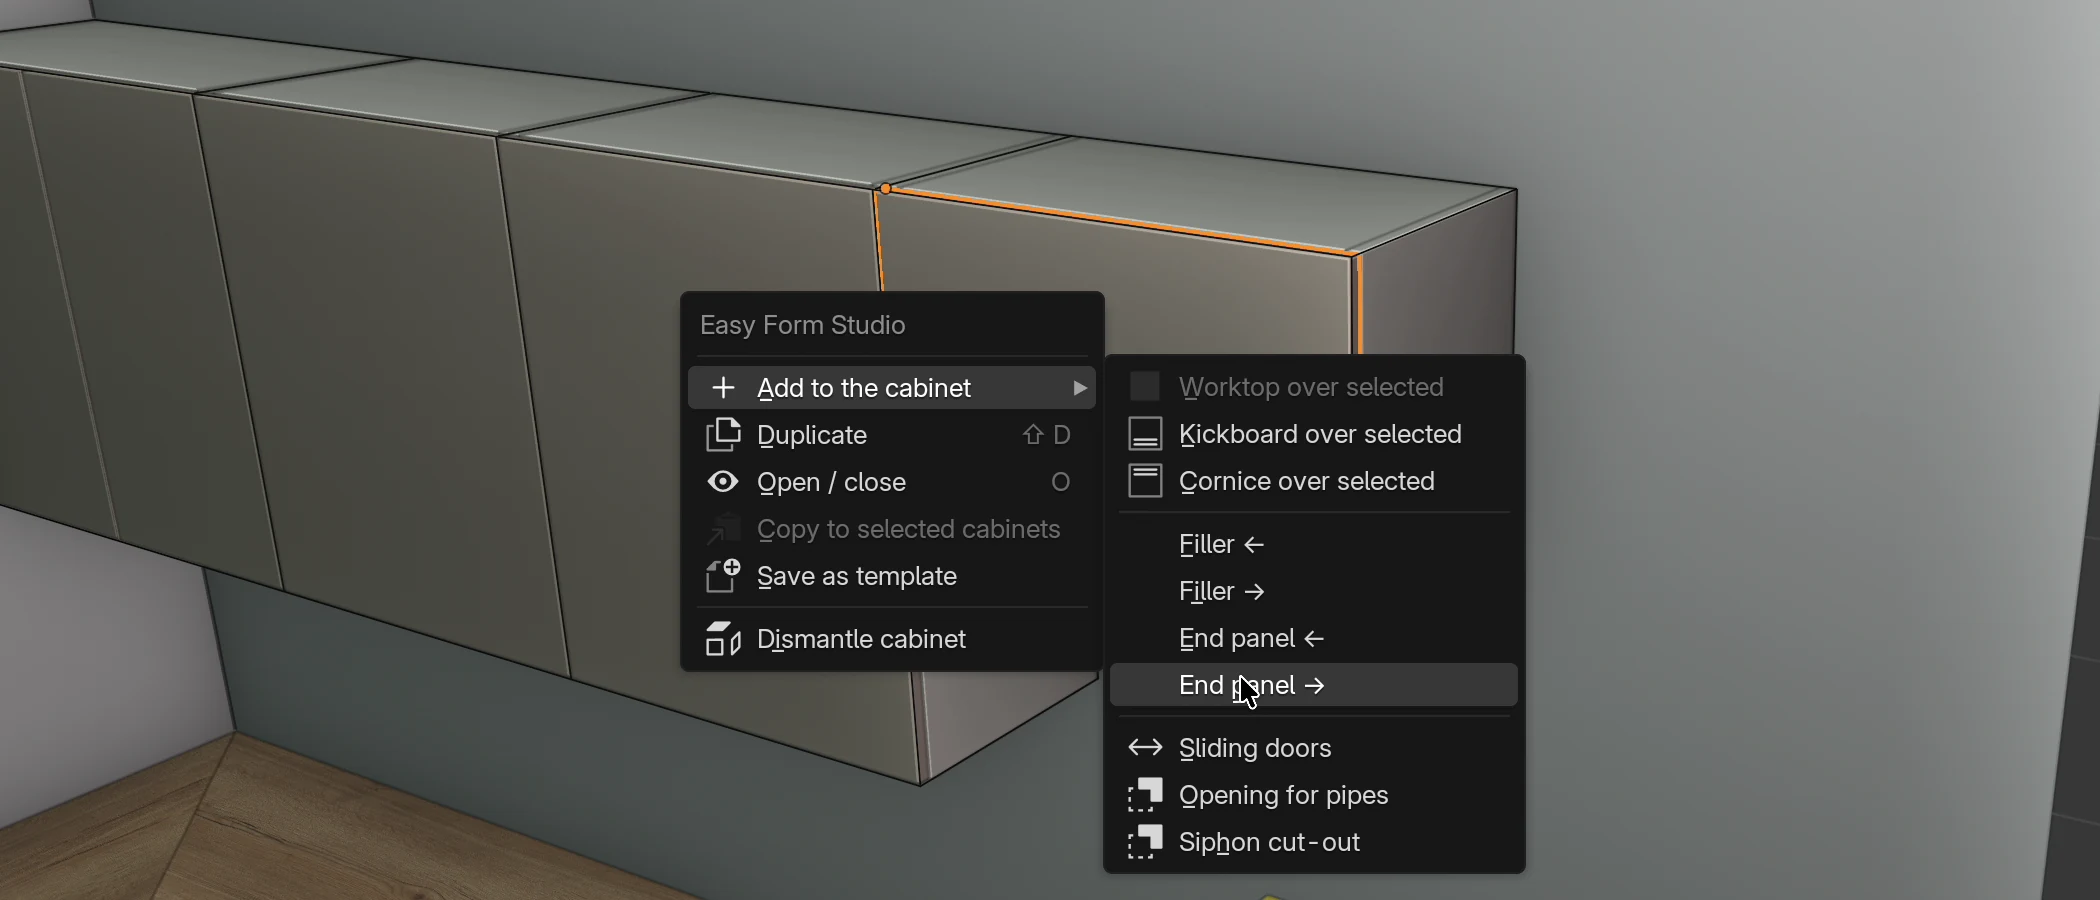
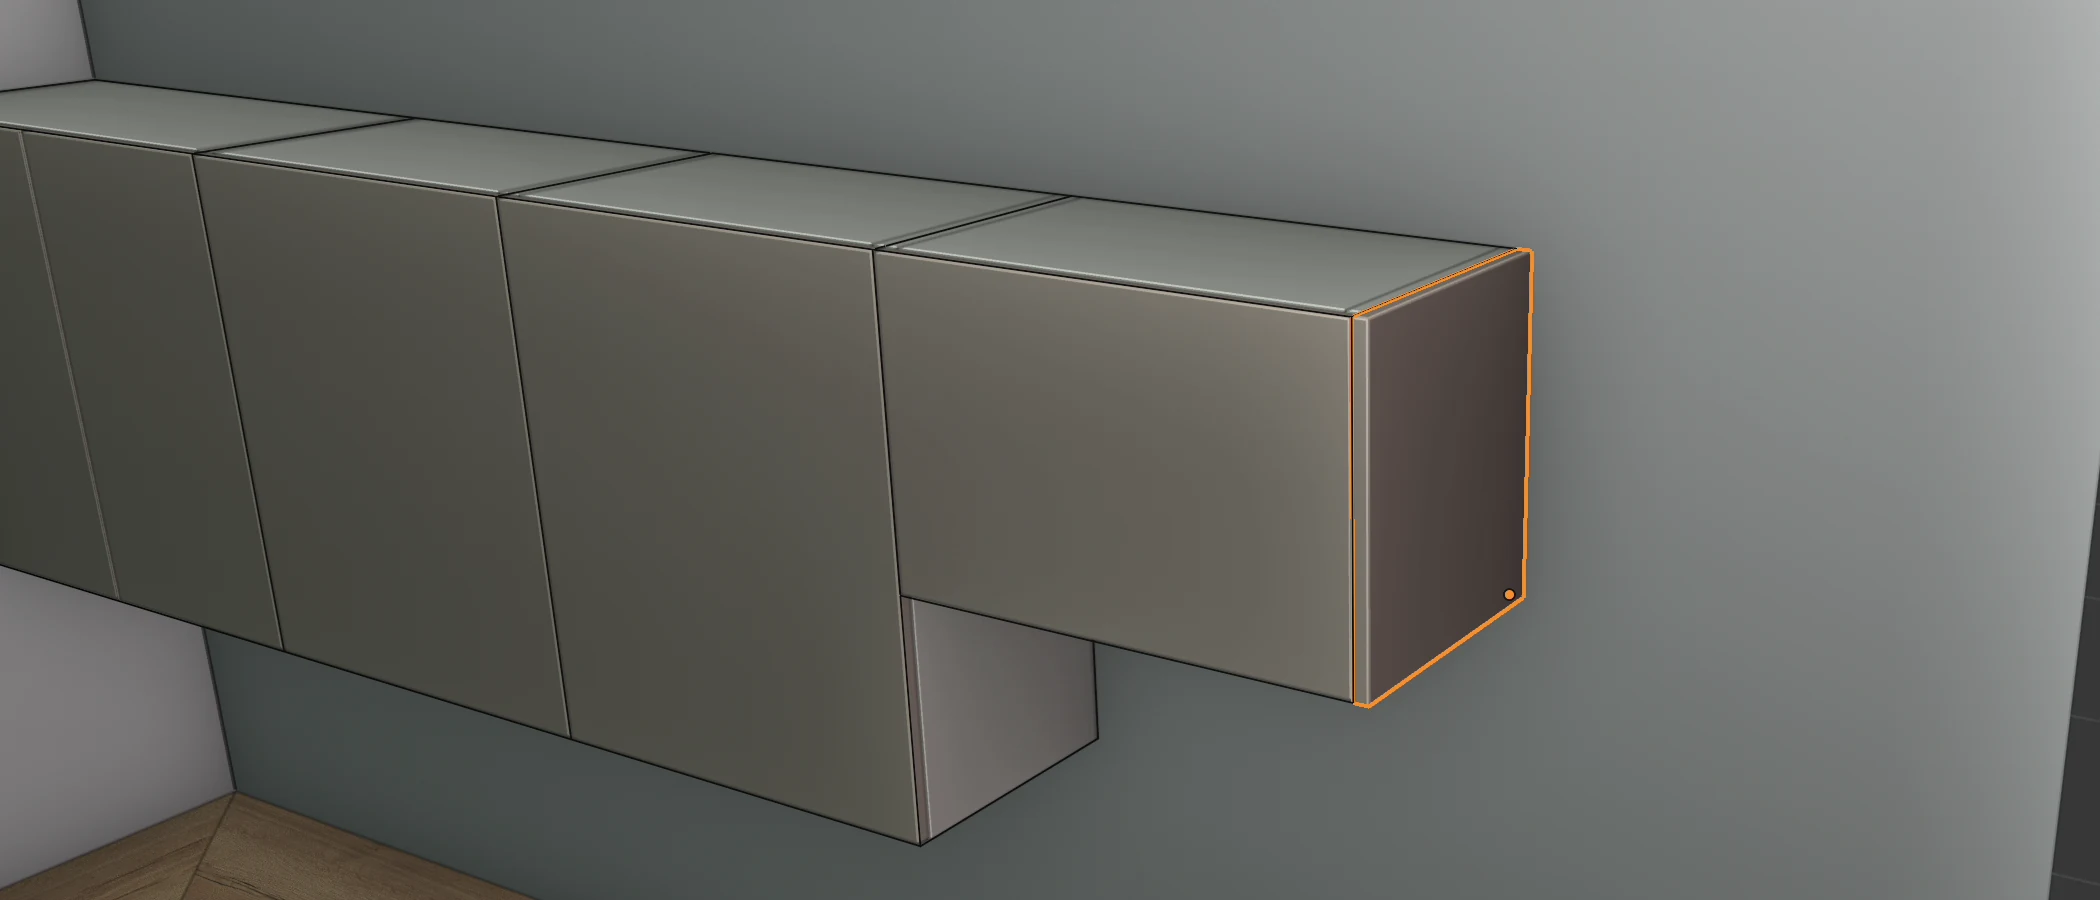
- Click the last wall unit on wall A. Right-click, then Add to the cabinet → End panel →. The panel covers the side from the fronts to the wall. See End panel.
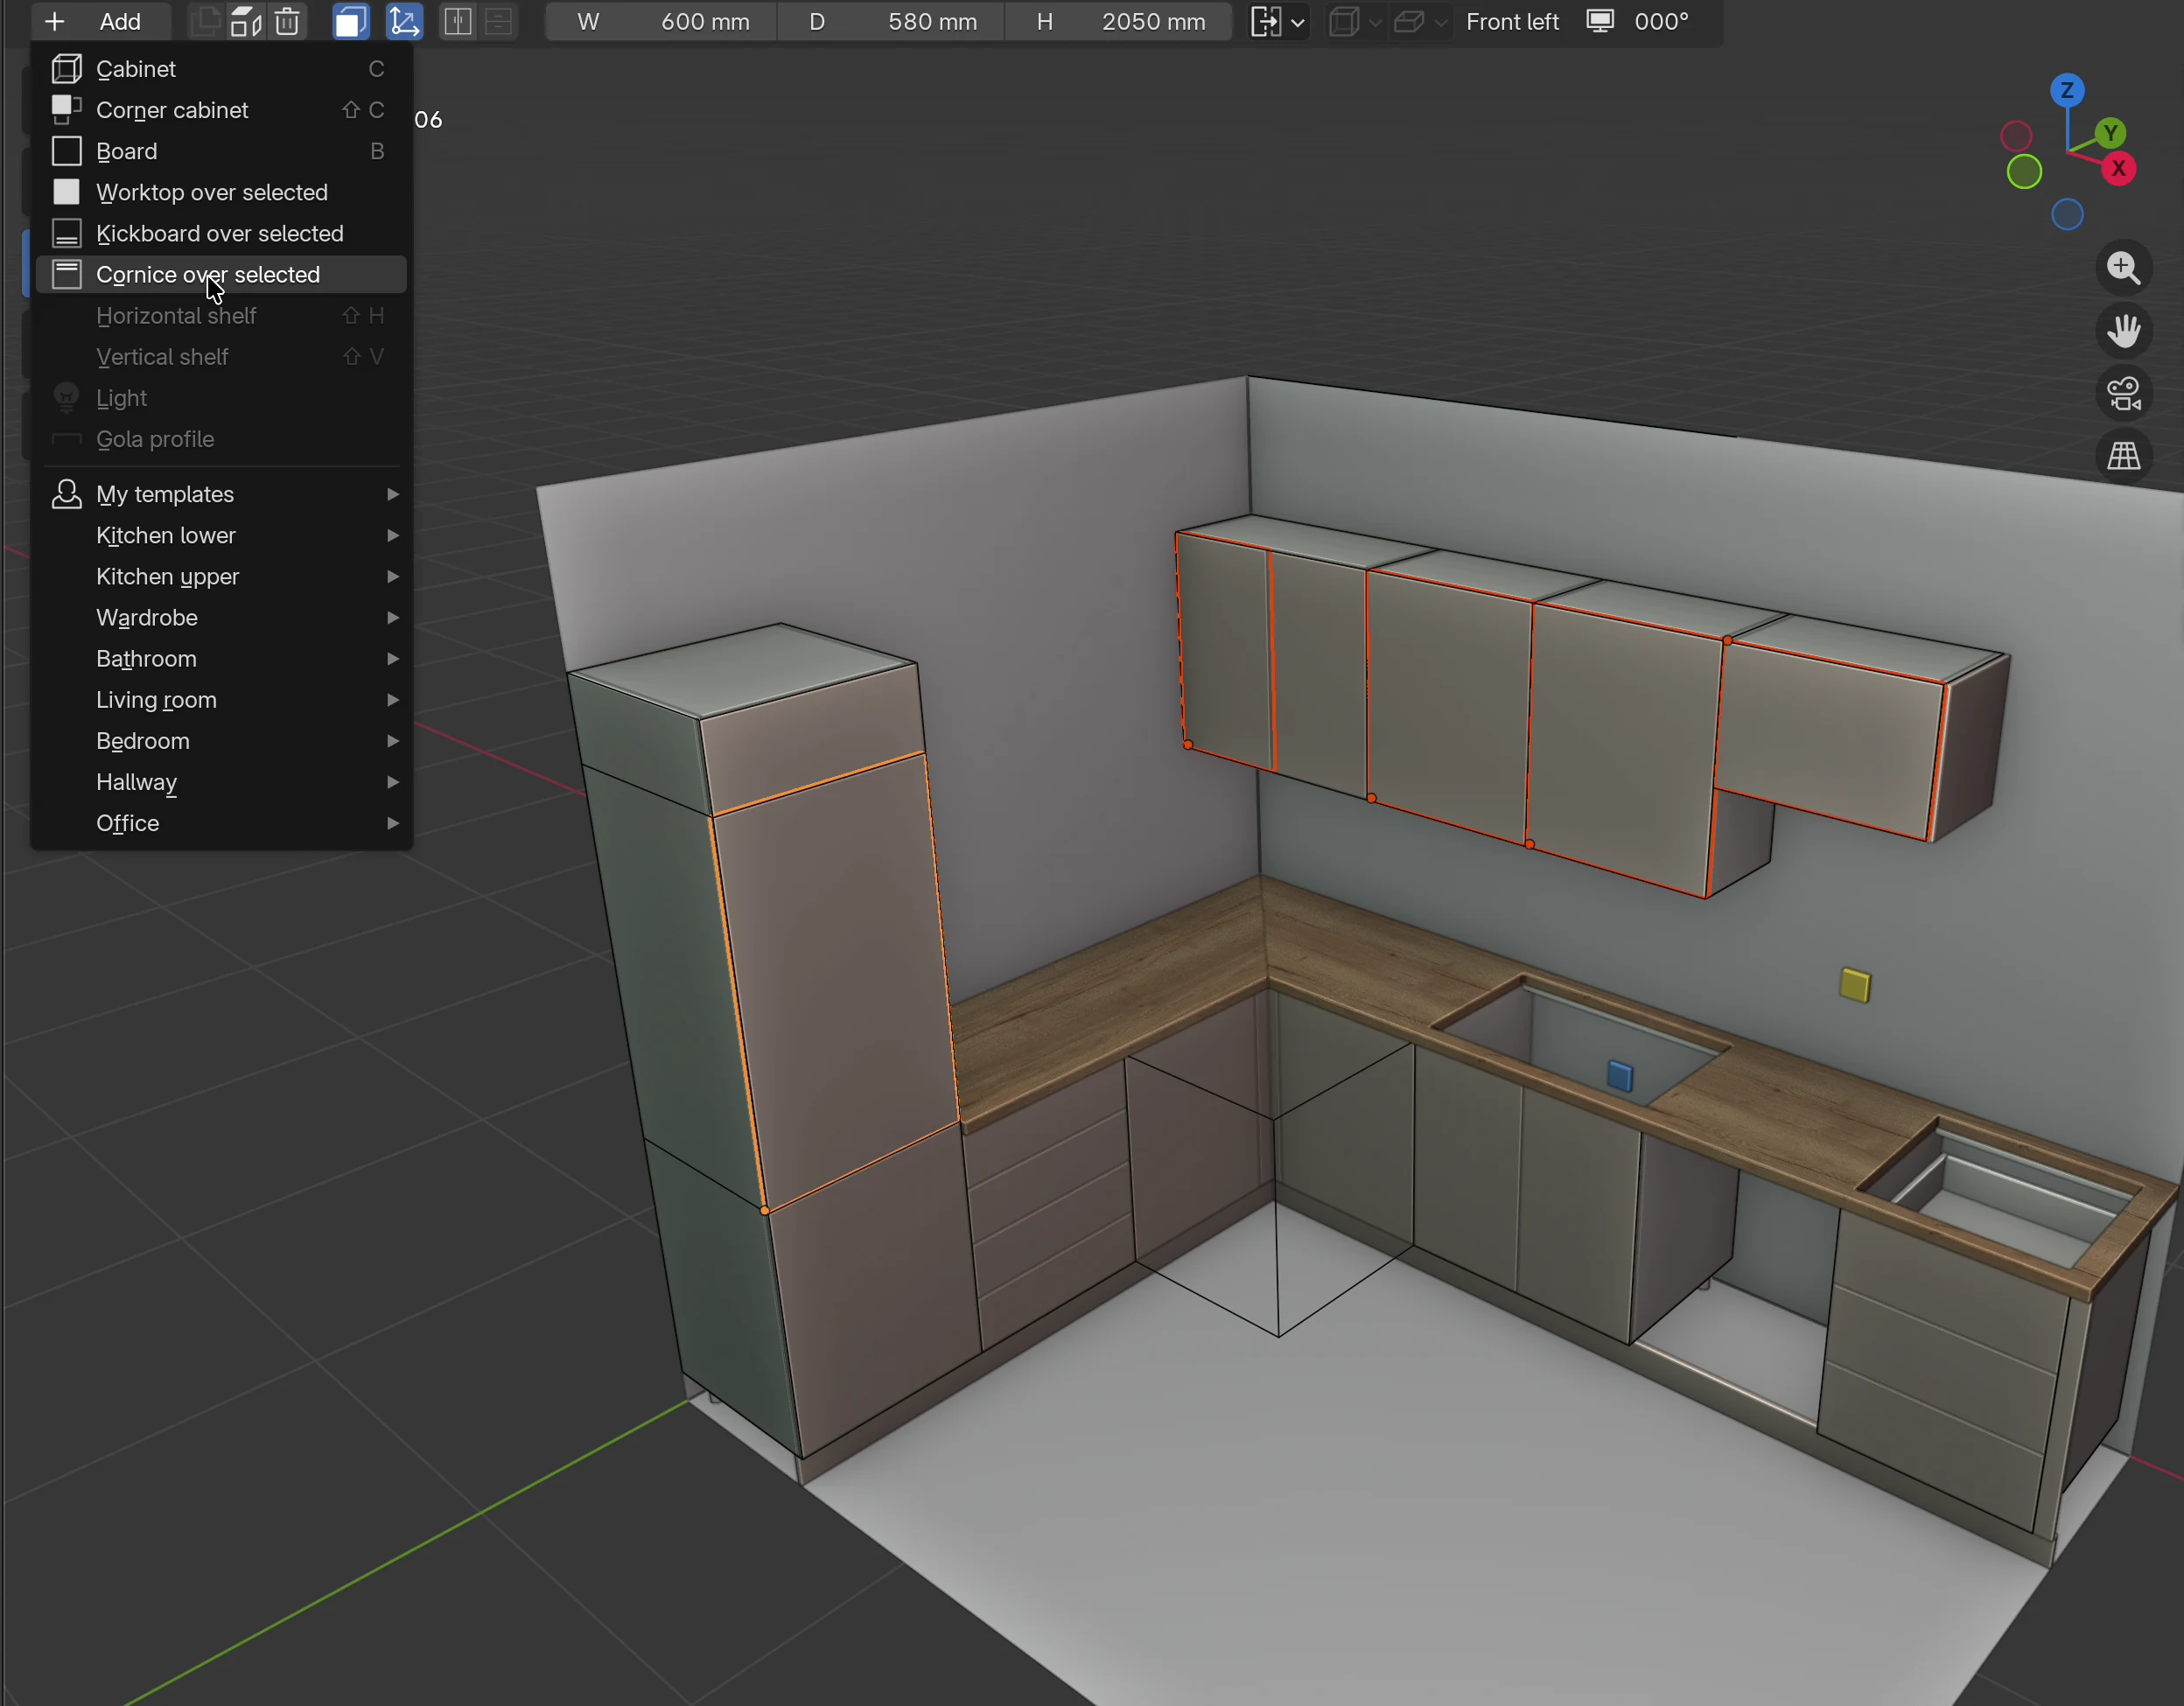
- Click the first wall unit, then Shift + click to add the other wall units and the fridge. In the header, click Add → Cornice over selected. See Cornice over selected.
- The filler at the wall was added in the chapter Base units and the corner: right-click the three-drawer unit, Add to the cabinet → Filler →. The same menu also offers Filler ←. See Fillers.
Overview
| Board | How you add it | Name in the Scene elements list | Thickness | Linked to the cabinet |
|---|---|---|---|---|
| Kickboard | Add → Kickboard over selected | Kickboard, Kickboard 2… | 18 mm | no |
| Filler | Right-click → Add to the cabinet → Filler ← or Filler → | Filler, Filler 2… | the thickness of the cabinet's front, 18 mm by default | yes |
| Filler from a gap | The Fill the gap button | Filler… | 18 mm | no |
| End panel | Right-click → Add to the cabinet → End panel ← or End panel → | End panel… | 18 mm | yes |
| Cornice | Add → Cornice over selected | Cornice, Cornice 2… | 18 mm | no |
Kickboard over selected and Cornice over selected are also in the Shift+A menu and in the right-click menu, under Add to the cabinet.
What applies to all
All these boards are free boards: they do not belong to a cabinet, they stand next to it. When you click such a board, you set it up in the EFS - Board tab (see The EFS - Board tab).
Decor and material group
- The board gets the decor and the material group of the fronts of the cabinet you add it to. The fronts of base and tall units are in group F 1, those of wall units in F 2. For the kickboard and the cornice, this is the first cabinet of the run that has fronts.
- If the cabinet has neither doors nor drawers, the board gets white (Default white) and group F 3, like the worktop.
- The decor is copied once, when you add the board. If you later drag another decor onto the fronts, the board does not follow. If you give a decor to the whole group in the Material assignment panel, the board gets it too, because it is in the same group.
- For the same reason, Decor comparison and the customer on the web change the decor of these boards together with the fronts.
- The filler from the Fill the gap button is the exception: it is always white and in group F 3. See Fill the gap.
You change the group of one board in the EFS - Board tab, Material group box. See Material groups.
Edge tape
Each of these boards gets 2 mm edge tape on all four edges. Set the edges that are not visible to None in the Edging Tape box (see Edge tape):
- kickboard: the top edge under the carcass, the bottom edge on the floor and the end that stops against the other kickboard in the corner;
- filler: the edge at the wall and the edge next to the cabinet;
- end panel: the back edge at the wall and the bottom edge on the floor;
- cornice: the back edge at the wall.
If you select several boards, the To selected boards button gives them all the edge tape of the active board.
Linked and unlinked boards
The filler and the end panel from the Add to the cabinet menu remember the cabinet they were added to. So:
- they go into My templates and into the cabinet's JSON export by themselves, without being selected (see What goes into a template);
- the worktop and the kickboard of the run go across a linked filler to the wall, if the filler was added before them;
- when you place a template with them, they come to the same place next to the new cabinet.
The kickboard, the cornice, the worktop and the filler from Fill the gap are not linked. They go into a template only if you select them together with the cabinet.
Even a linked board does not follow the cabinet while you work in the project:
- When you move a cabinet, the board stays in place. When you move with the 1, 2 and 3 keys, also select the cabinet's boards with Shift + click: the keys move everything that is selected.
- When you change a cabinet's width, height or depth, the board keeps its old size and position. Delete it and add it again.
- When you delete a cabinet, the boards next to it stay. Delete them separately.
Changing and deleting
- Click the board in the 3D view or its name in the Scene elements list.
- In the EFS - Board tab, change what you need:
| Field | What it changes |
|---|---|
| Name, Note | The name in lists and exports, your note. |
| Dimensions | The board's sizes in its own directions: on the kickboard and the cornice X is the length, on the filler X is the width, and on the end panel X is the thickness. Z is the height, except on the cornice, where Z is the thickness. |
| Location | The position of the board's origin: the left back bottom corner, seen from the front. |
| Rotation | X 90°, Y 90°, Z 90°. Do not turn these boards. |
| Grain, Edging Tape, Material group | As on every board. |
When you change Dimensions, the board grows from its origin: a larger X extends it to the right, a larger Z upwards. If it needs to grow to the left, also correct Location after the change, or move it with the 1, 2 and 3 keys.
To delete, click the board and press X (or the bin in the header). The cabinet stays.
Watch out
The Cutter in the EFS - Board tab puts a turned free board back into its unturned position. The kickboard, filler, end panel and cornice next to cabinets that are not turned 0° (for example on wall D) lie wrong after the cut. Undo with Ctrl+Z. See Cutter.
In the exports
These boards are ordinary boards: they go into the cutting list, nesting, drawings, DXF and labels. The Cost estimate counts them in the m² of their decor and thickness, with edge tape. In the customer quote, each is its own line (see A quote for the customer).
Kickboard over selected
- Click a board of the first cabinet on legs.
- Hold Shift and click the other cabinets that get the kickboard in front of them. For an L-shaped kitchen, select the cabinets on both walls at once. A tall unit on legs, like the fridge, may be in the selection.
- In the header, click Add → Kickboard over selected.
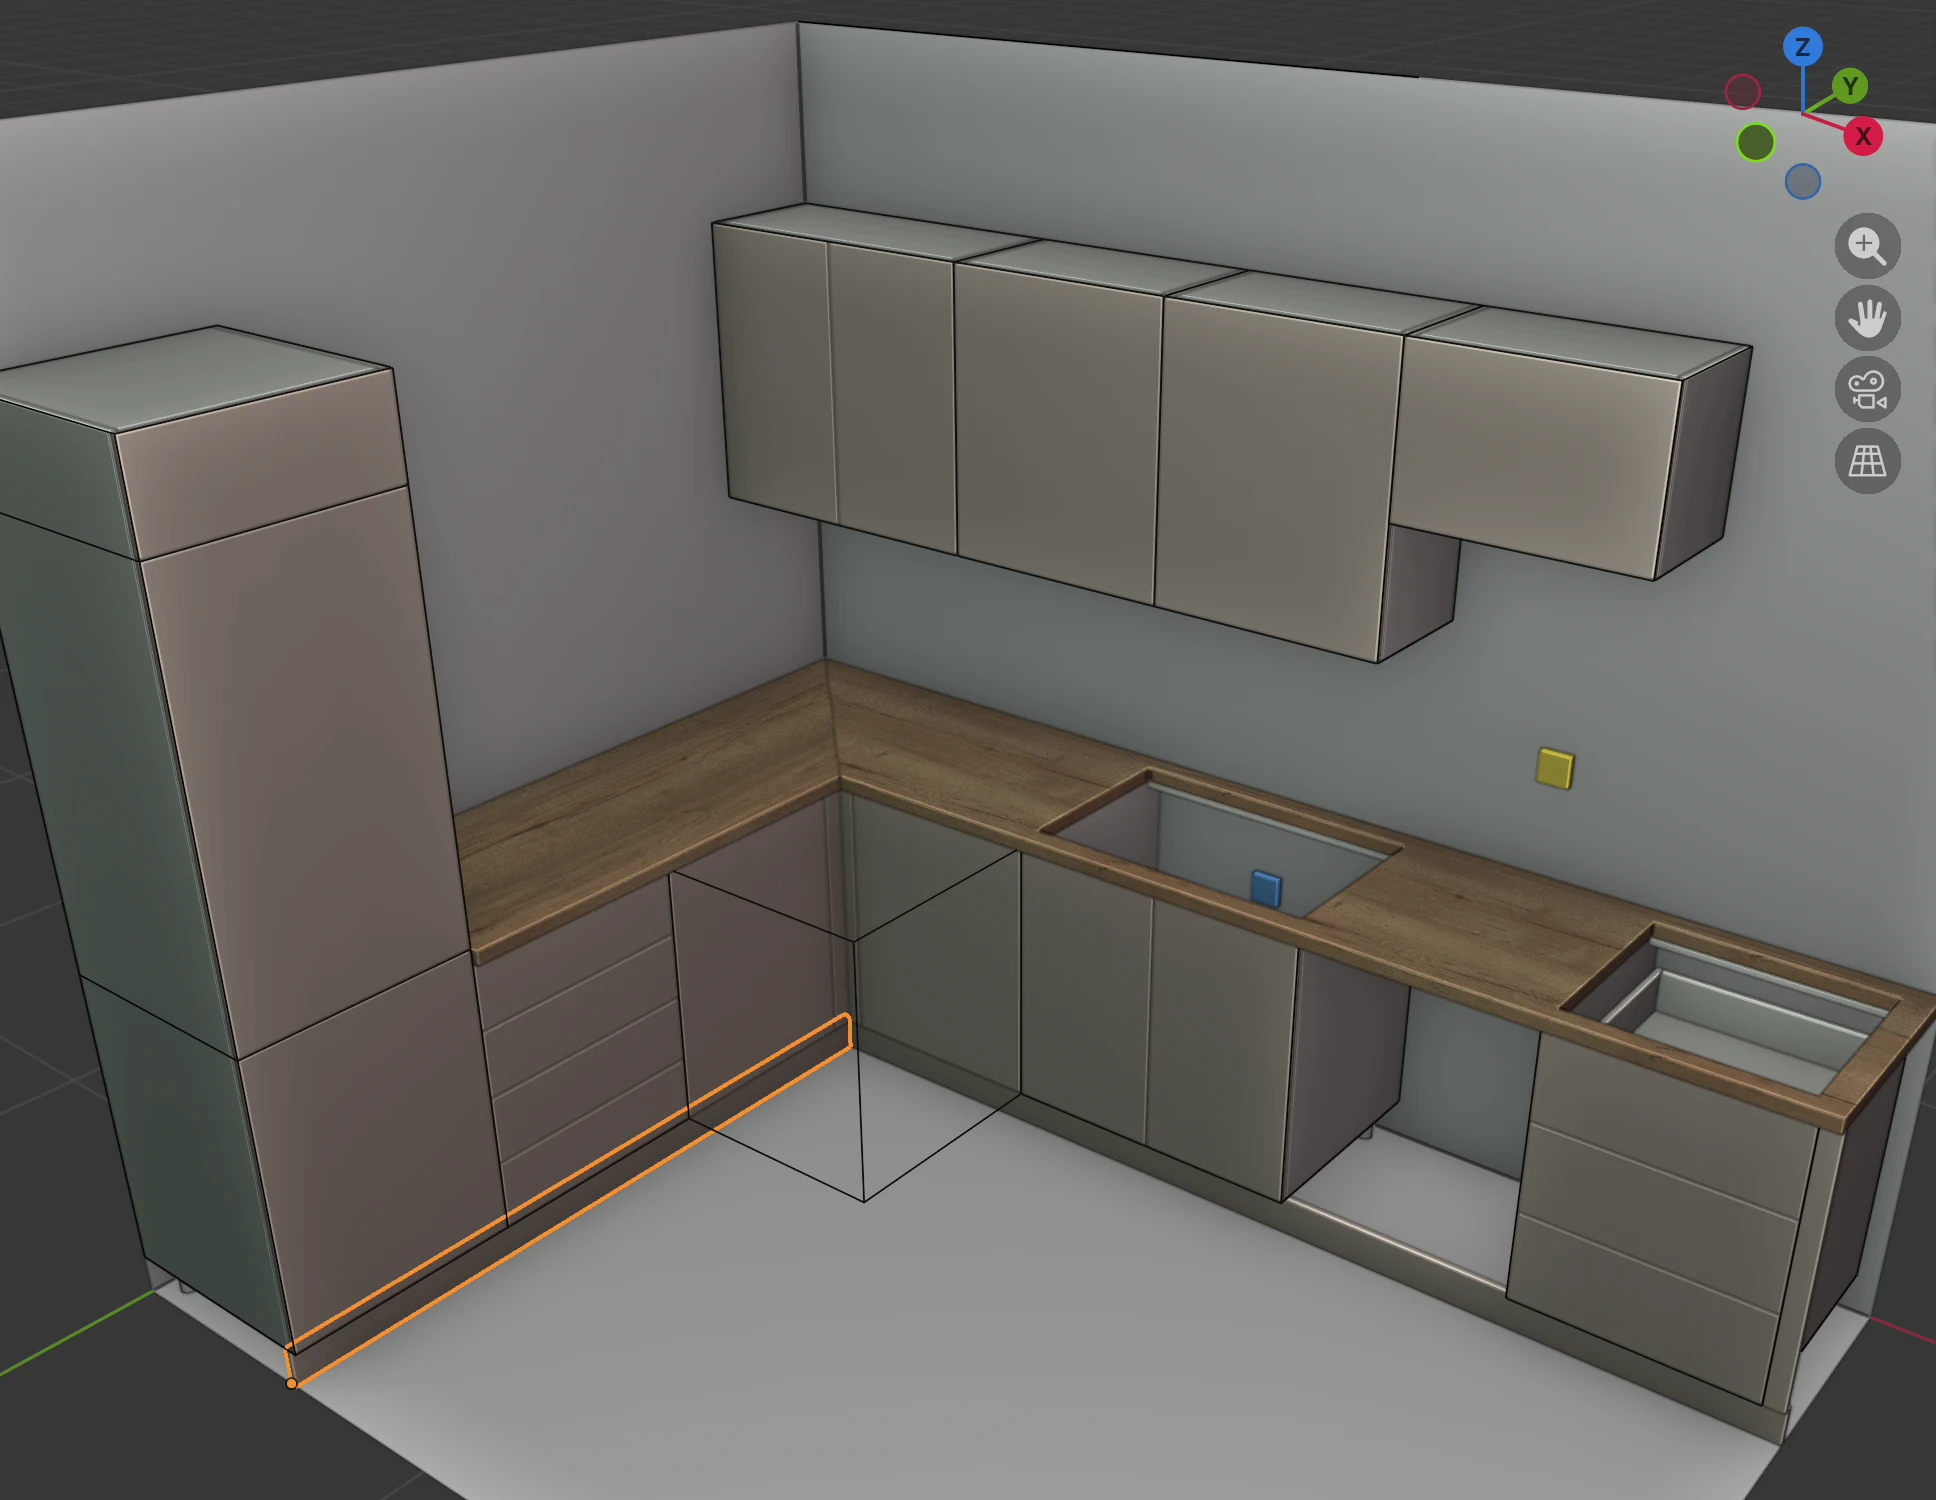
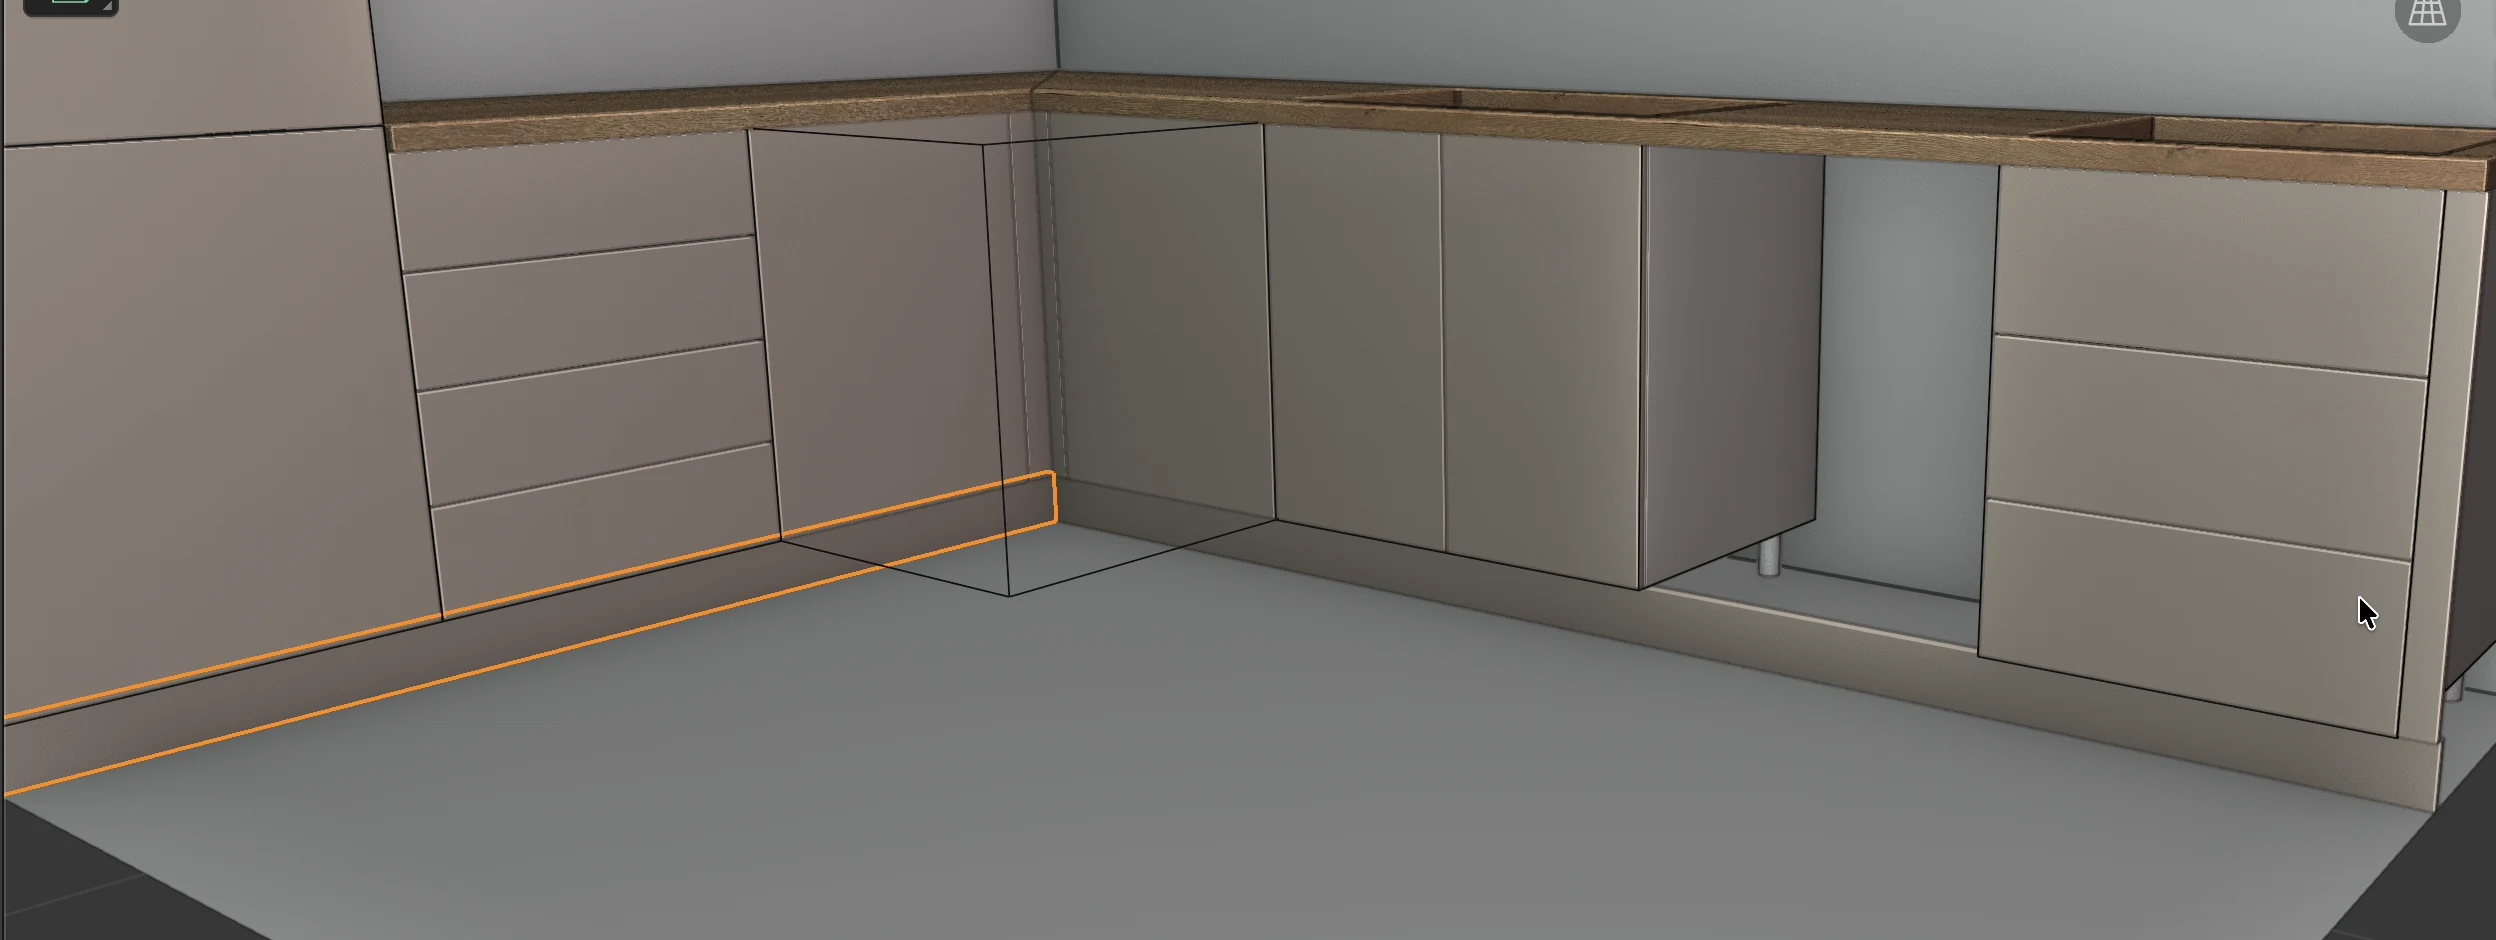
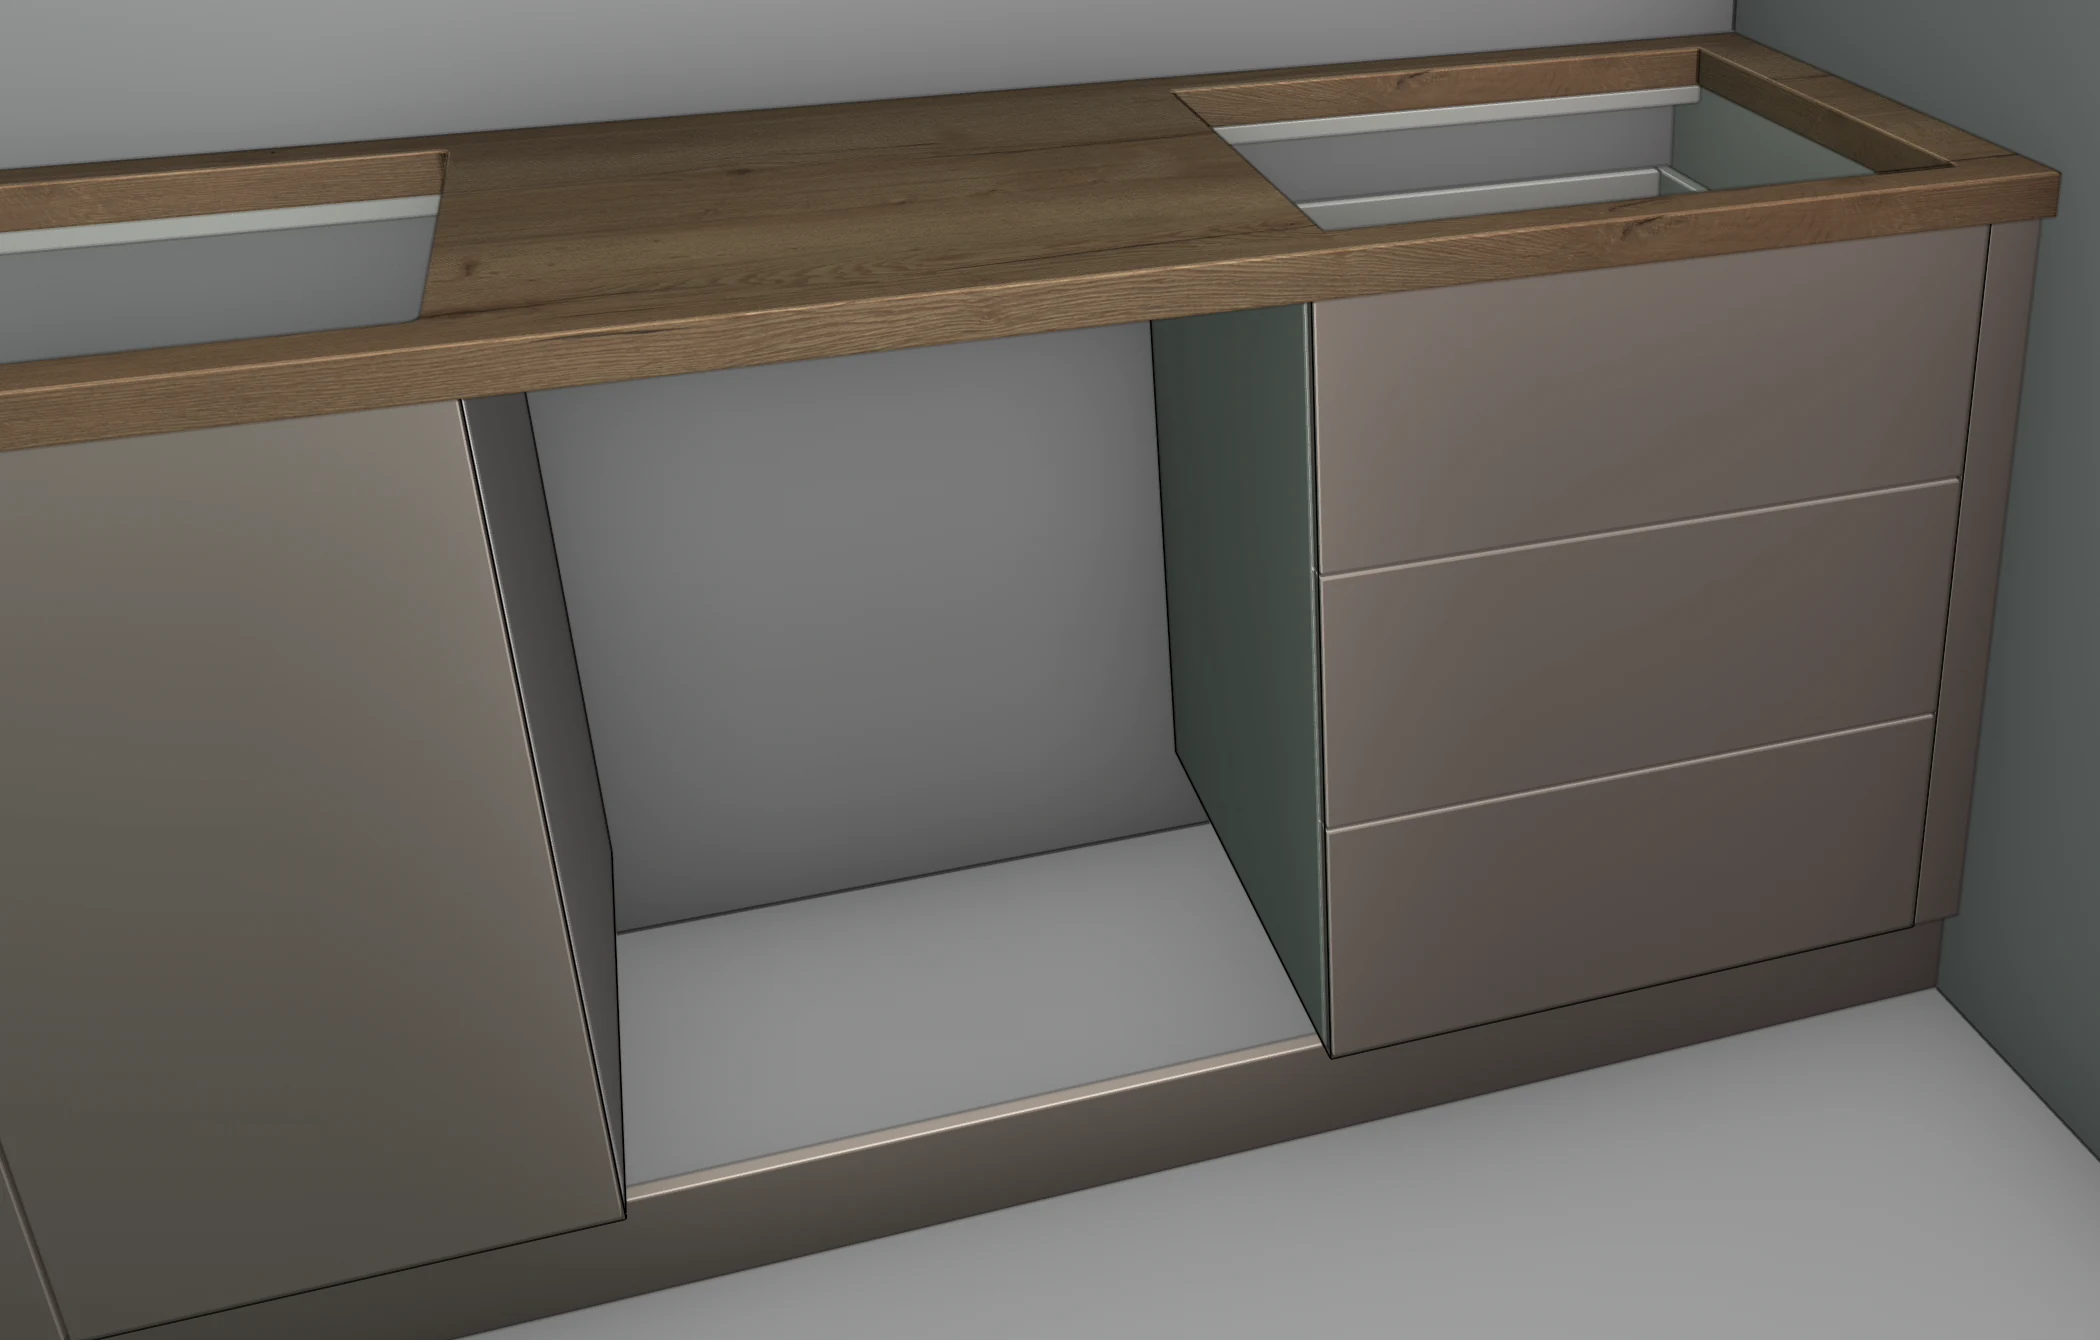
How EFS lays out the kickboard
| What | Rule |
|---|---|
| Number | One kickboard per direction: cabinets turned the same way share one kickboard. |
| Length | From the start of the first to the end of the last selected cabinet in that direction. The kickboard runs on in front of an empty space, for example for the dishwasher. If a cabinet has a linked filler, the kickboard also runs under it, to the wall. |
| Height | From the floor to the bottom edge of the carcass, that is, the height of the legs: 100 mm by default. |
| Position | The back of the kickboard touches the front legs. The centre of the legs is 60 mm behind the edge of the cabinet, so the kickboard is set back behind the face of the fronts. It never sticks out past the face of the fronts. |
| Thickness | 18 mm. |
| Corner | When two runs that meet in a corner are selected, one kickboard runs through the corner to the back of the other, and the other stops against its front. The joint is a butt joint, with no overlap. This applies when the end of a run is at most 1300 mm from the other kickboard. |
| Name | Kickboard, Kickboard 2… |
| Decor and group | Those of the fronts of the first cabinet in the run that has fronts. |
Rules:
- Wall units are skipped: even when they are in the selection, they get no kickboard.
- The corner cabinet is not taken into account. In an L-shaped kitchen the kickboards cover it anyway, because they extend to the corner.
- Without legs, no kickboard is made, and the program says nothing. Add legs to the cabinets (L) and repeat.
- After adding, only the last kickboard is selected.
- The kickboard has no options. The 18 mm thickness and the position against the legs are fixed. If you change the height of the legs, delete the kickboard and add it again.
- Every click makes new kickboards, even when a kickboard already exists. Delete the old one.
- At the end of a run, the kickboard ends flush with the side of the last cabinet. An end panel that goes down to the floor then closes it at the side.
For advanced users: which kickboard runs through the corner
EFS lays out the kickboards by the direction of the cabinets, in the order 0°, 180°, 270°, 90°. The kickboard of the direction that comes first in this order runs through the corner. In the kitchen from the video this is the wall A kickboard (0°), and the wall D kickboard stops against it. If you need it the other way round, change the sizes in the Dimensions field and the position in the Location field.
Tip
If the dishwasher has its own kickboard on the door, make a kickboard for each part of the run separately: select the cabinets left of the dishwasher and add a kickboard, then the cabinets right of it and add a kickboard.
Kickboard clips
The kickboard clips onto the legs. EFS adds the clips to the hardware list (the Excel cutting list, sheet Hardware) and to the order by itself, as Kickboard clip.
- It counts 2 clips per cabinet on legs.
- Only cabinets on legs with a kickboard made with Kickboard over selected in front of them get clips. A cabinet without a kickboard in front of it gets no clips.
- The name of the kickboard does not affect the clips, so you may rename the kickboard.
- When you delete a kickboard, the clips of the cabinets behind it also disappear from the list.
- The Cost estimate does not count the clips.
Note
A kickboard made with an older version of EFS, and a free board you made yourself and named “Sokl”, “Podnožje” or “Kickboard”, give 2 clips to every cabinet on legs in the project. Delete such a kickboard and make it again with Kickboard over selected.
For advanced users: the number of clips per cabinet
The number of clips per cabinet is in the catalogue fasteners.json, under kickboard_clip, field per_cabinet (2 by default). Copy the file from the add-on's hardware folder to the user_hardware folder in your EFS user folder (see Where your data is), change the number and restart the program.
Fillers
A filler closes the gap between a cabinet and the wall or between two cabinets. EFS makes it in two ways: from the Add to the cabinet menu, next to one cabinet, or with the Fill the gap button, between two cabinets.
Filler ← and Filler →
- Click the cabinet that gets the filler.
- Right-click.
- Point to Add to the cabinet and click Filler ← (left) or Filler → (right). The side is as seen from the front.
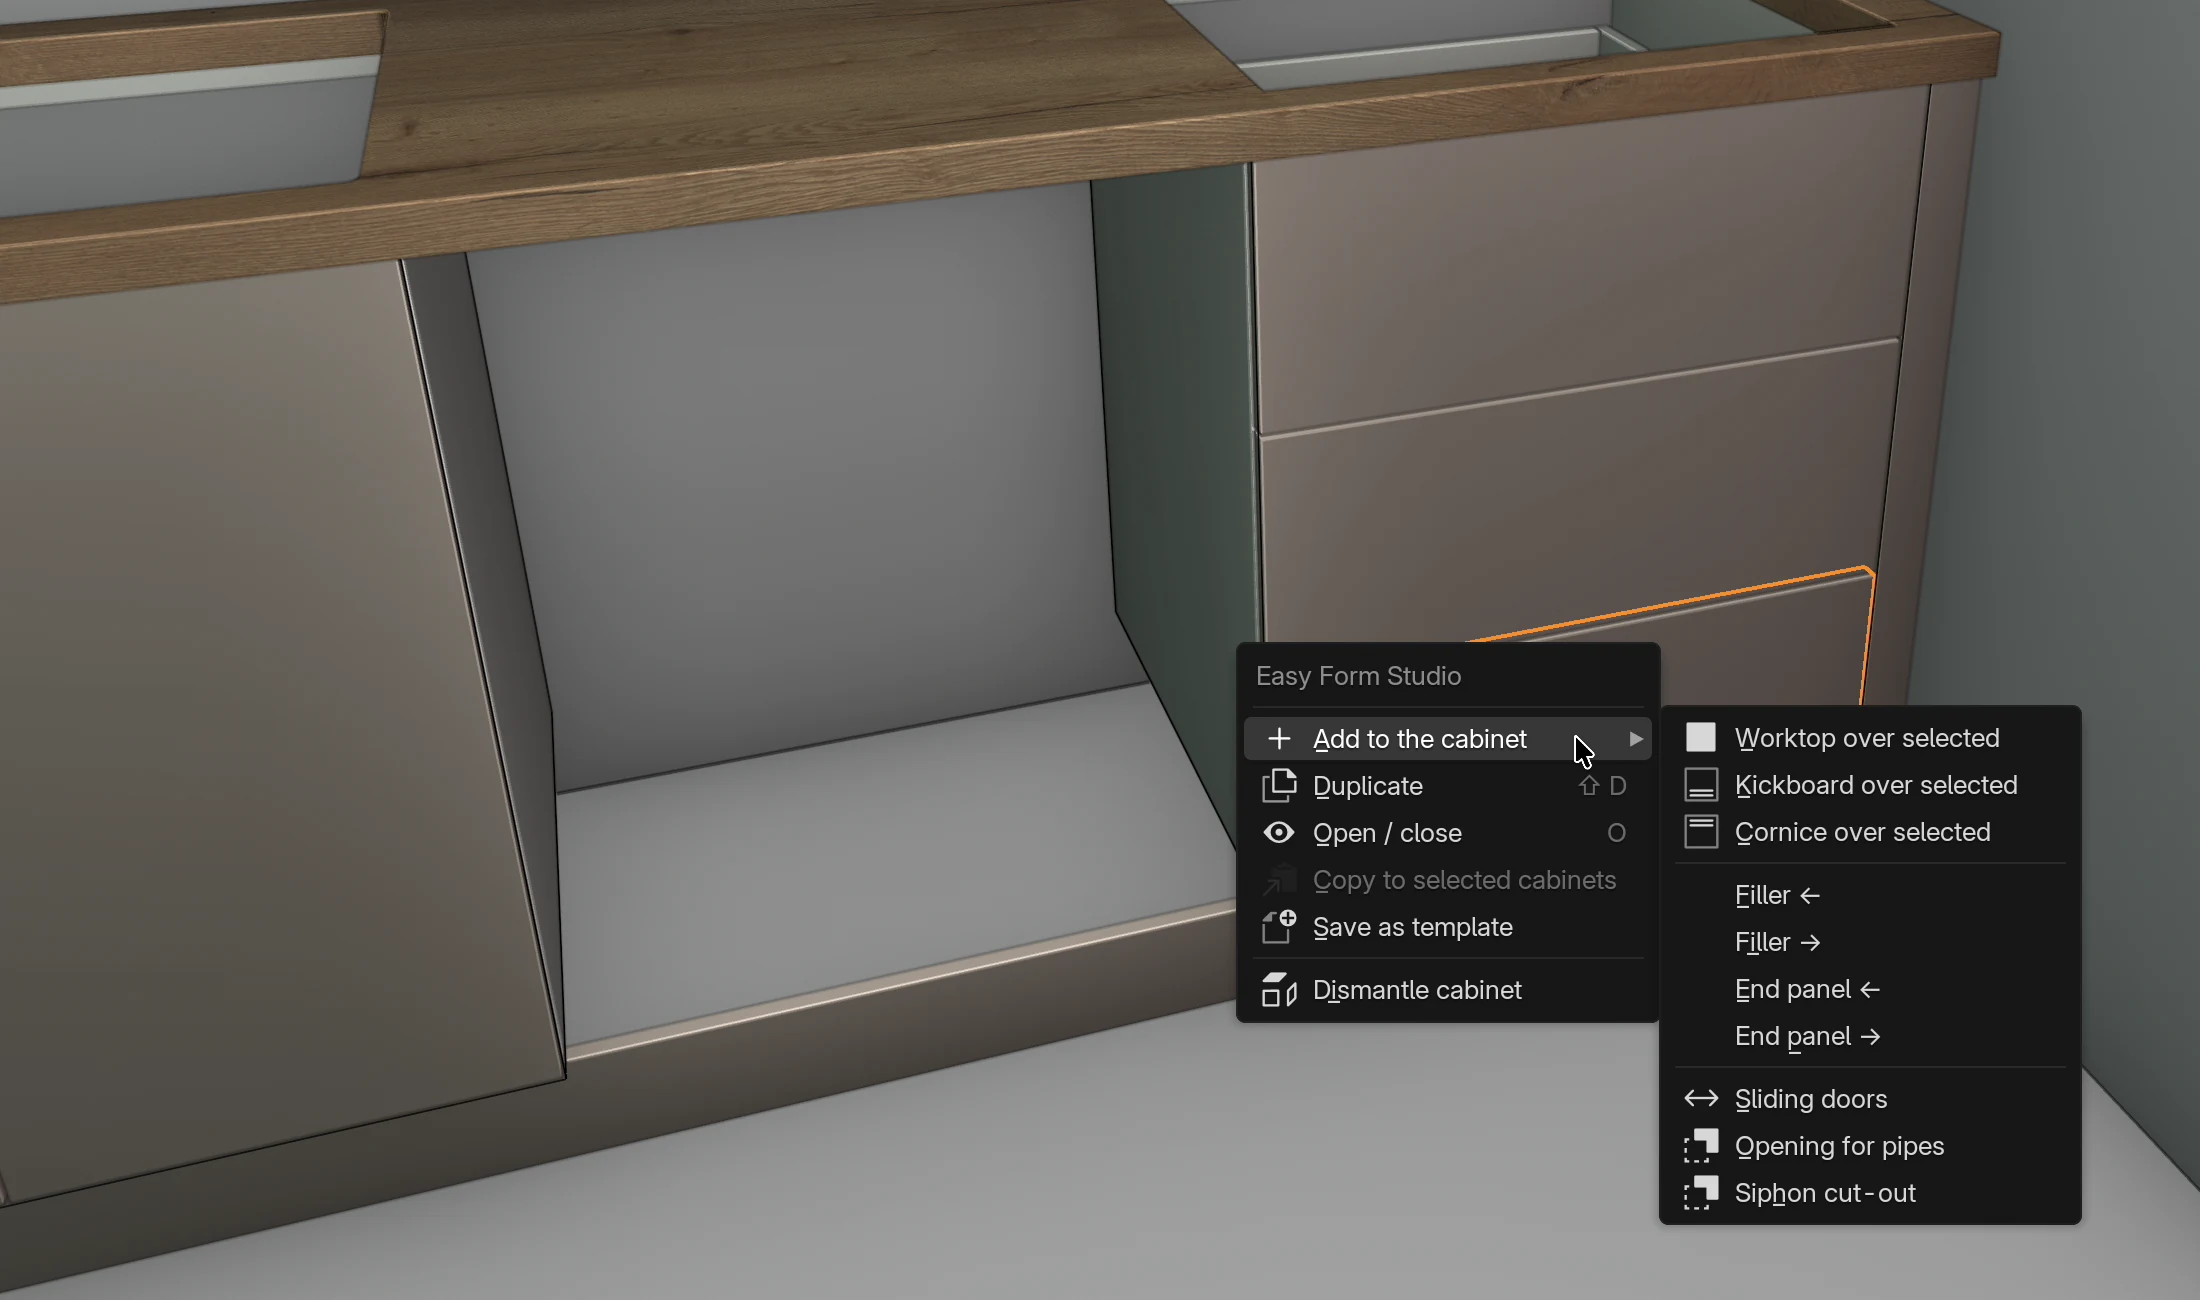
| What | Rule |
|---|---|
| Width | 50 mm. |
| Thickness | The Thickness of the cabinet's front from the Front box, 18 mm by default. |
| Height | As the cabinet's fronts: from the bottom edge of the lowest front to the top edge of the highest. A cabinet without fronts: the height of the carcass. |
| Position | Next to the left or right side of the cabinet. The face of the filler is flush with the face of the fronts. |
| Decor and group | Those of the cabinet's fronts. |
| Name | Filler, Filler 2… |
| Link | Linked to the cabinet. |
Rules:
- A filler goes next to wall, base and tall units. The corner cabinet does not take one: the items are greyed out while only the corner cabinet is selected.
- If several cabinets are selected, only the active cabinet gets the filler.
- On a cabinet made of several related carcasses (e.g. a fridge from a template), the filler takes the sizes of the whole composite cabinet. Click the main carcass, the one whose name has no number in brackets.
- The filler covers only the height of the fronts. Below it, in front of the legs, is the kickboard.
You change the width and the side right after adding: in the Edit menu, click Adjust Last Operation... or press F9. The pop-up has Side (Left, Right) and Width (5–300 mm).
Tip
When the cabinet is not 50 mm from the wall, measure the gap, add the filler and type the exact Width right away through F9. The face then stays flush with the fronts, and the filler stays linked to the cabinet.
Fill the gap
- Click the first cabinet, then Shift + click the second. Exactly two cabinets must be selected.
- In the EFS - Cabinet tab, at the top of the Cabinet properties panel, click Fill the gap.
What EFS makes depends on the gap between the cabinets, measured along the run of the active cabinet:
| Gap | What is made | Message |
|---|---|---|
| less than 20 mm | Nothing. | The gap is … mm: too narrow to fill |
| 20 to 149 mm | A filler exactly as wide as the gap. | Filler … mm |
| 150 mm and more | A new cabinet exactly as wide as the gap, next to the left cabinet. See Working faster. | Cabinet … mm wide |
The filler from a gap:
- is 18 mm thick, and its face is flush with the front that sticks out furthest of the two cabinets;
- is as high as the left cabinet (without legs) and starts at its bottom edge;
- is named Filler;
- is white (Default white) and in group F 3, like the worktop;
- is not linked to the cabinets.
The button shows only while exactly two regular cabinets are selected. With a corner cabinet it is not there.
Watch out
The filler from Fill the gap is in group F 3. When you give the worktop a decor through Select material for Front 3, the filler gets the worktop decor too. Move it right away to a front group (F 1 or F 2) in the Material group box, then give it the front decor: drag the decor onto the filler or repeat the assignment for that group.
End panel
The end panel covers the visible side of the cabinet at the end of a run.
- Click the cabinet at the end of the run.
- Right-click.
- Point to Add to the cabinet and click End panel ← (left side) or End panel → (right side), as seen from the front.
| What | Rule |
|---|---|
| Thickness | 18 mm. |
| Depth | From the face of the fronts to the back edge of the cabinet. |
| Height | From the floor to the top of the cabinet. On a cabinet on legs, it also covers the legs. On a wall unit, it runs from its bottom edge to its top edge. |
| Position | On the outside of the side, so the run becomes 18 mm wider. |
| Decor and group | Those of the cabinet's fronts. |
| Name | End panel, End panel 2… |
| Link | Linked to the cabinet. |
Rules:
- The corner cabinet does not take one. If several cabinets are selected, only the active one gets the end panel.
- On a cabinet made of several related carcasses, it covers the whole composite cabinet. On a fridge from a template, click the main carcass (the name without a number in brackets), so that the panel covers the full height.
- The worktop, the kickboard and the cornice do not run over the end panel: they end at the side of the cabinet.
- On a base unit, the end panel runs to the top of the carcass, below the level of the worktop.
Tip
If the worktop or the cornice needs to run over the end panel, extend it by 18 mm in the Dimensions field. Extend the worktop before the cut-outs and the joint (see Worktop).
Cornice over selected
- Click the first cabinet that gets the cornice.
- Hold Shift and click the others. In the video these are four wall units and the fridge.
- In the header, click Add → Cornice over selected.
| What | Rule |
|---|---|
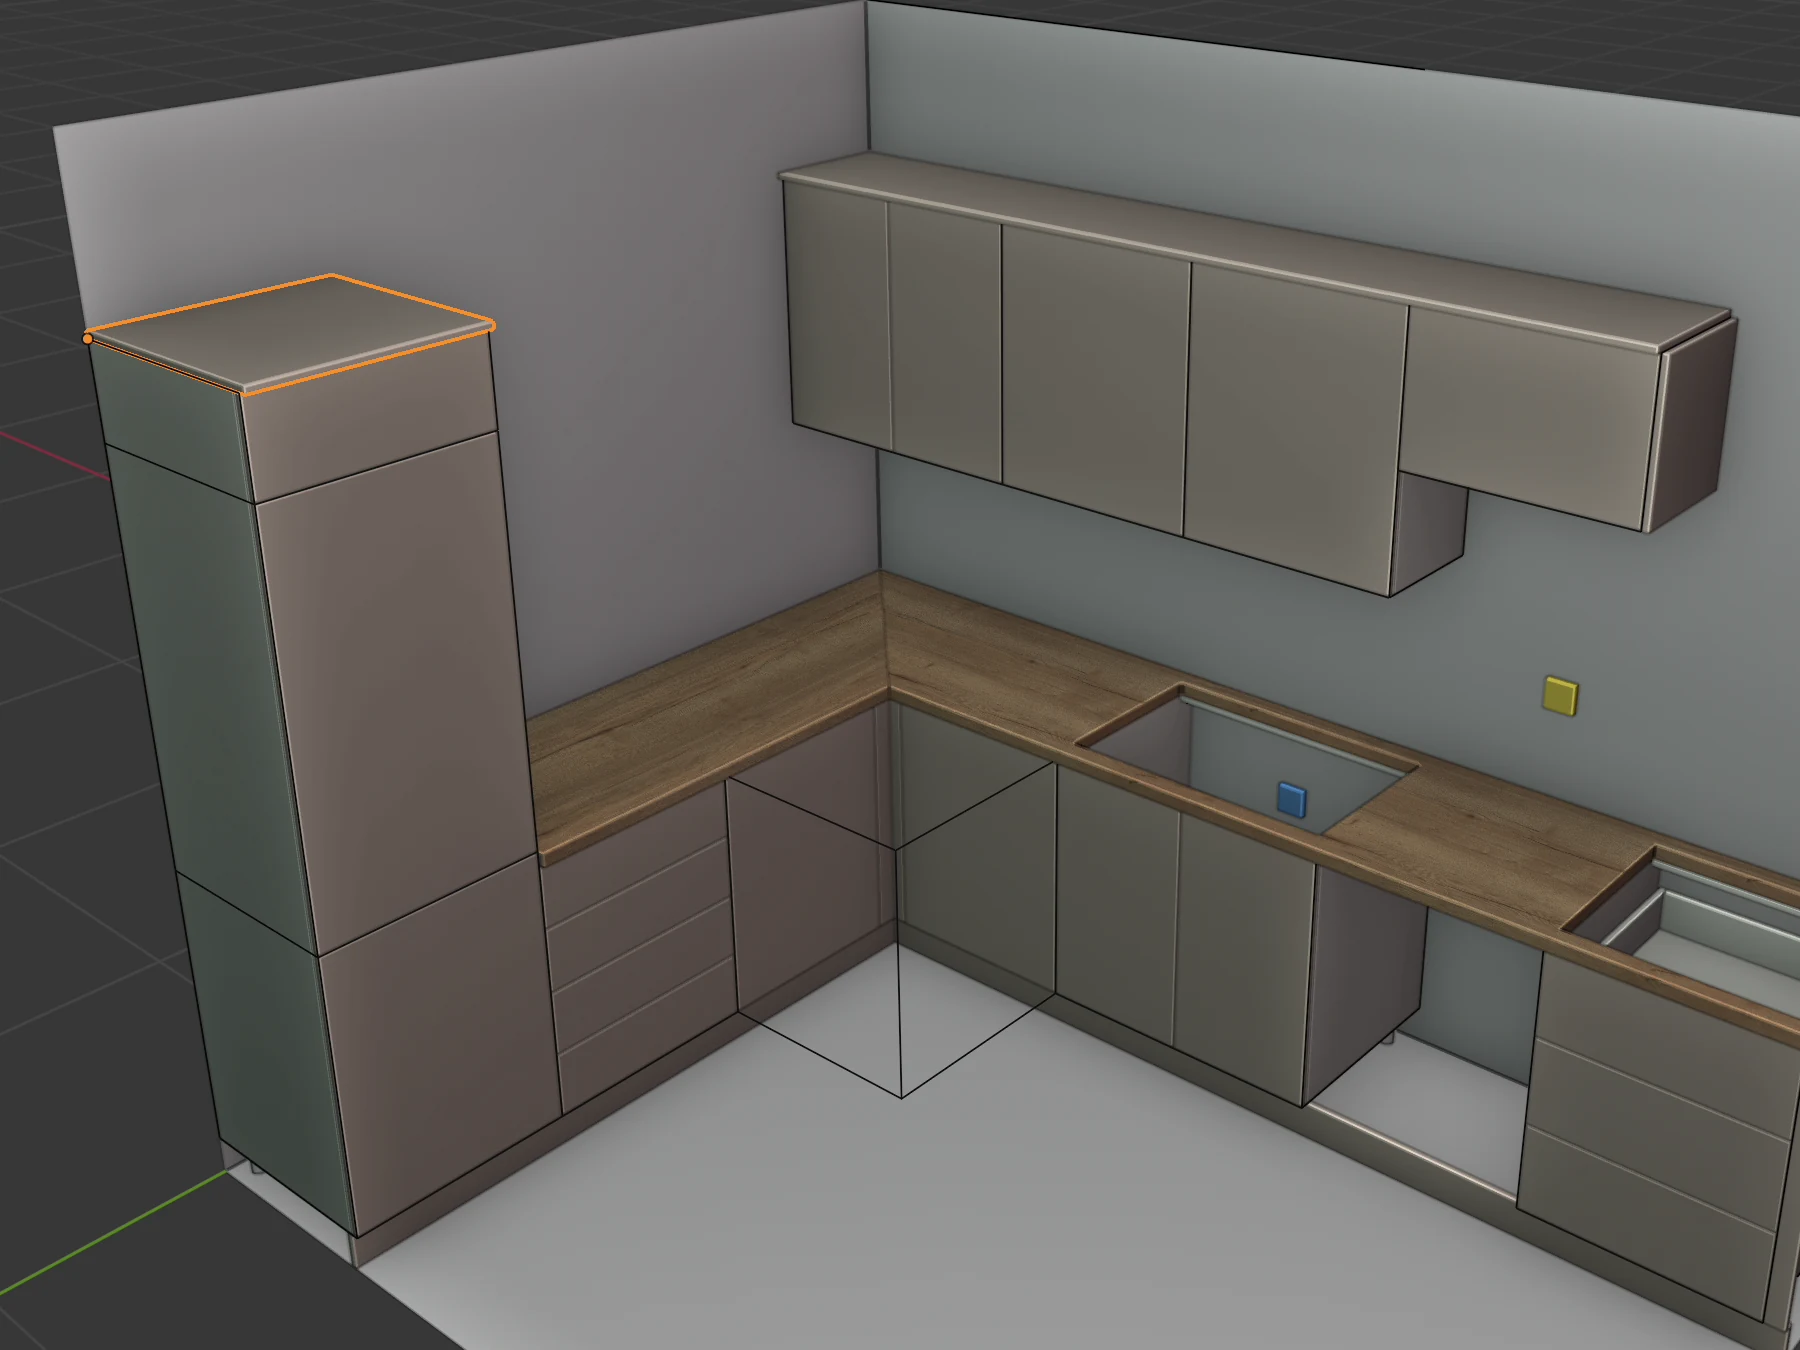
| Number | One cornice per direction. In the video, the wall units on wall A get Cornice, and the fridge on wall D gets Cornice 2. |
| Length | From the start of the first to the end of the last selected cabinet in that direction. It does not cover fillers or end panels. |
| Depth | From the back edge of the cabinets to 20 mm in front of the face of the fronts. With cabinets of different depths, from the deepest cabinet. |
| Position | Sits on top of the highest selected cabinet in that direction. |
| Thickness | 18 mm. |
| Decor and group | Those of the fronts of the first cabinet in the run that has fronts. |
| Name | Cornice, Cornice 2… |
| Link | Not linked. |
Rules:
- A cornice goes on wall, base and tall units. The corner cabinet is not taken into account.
- The 20 mm overhang is only at the front. At the ends, the cornice ends flush with the sides of the end cabinets.
- The cornice has no options: the 18 mm thickness and the 20 mm overhang are fixed.
- After adding, only the last cornice is selected.
- On a cabinet made of several related carcasses (a fridge), the cornice sits on the highest carcass.
Watch out
The cornice sits on the highest cabinet in its direction. If the selection has cabinets of different heights, a gap remains above the lower ones. If you select both base and wall units on the same wall, you get one cornice over both, as deep as the base units. Select only the cabinets of one row with the same height, and add a cornice for the other row separately.
Common problems and solutions
No kickboard was made. The selected cabinets have no legs, or only wall units or the corner cabinet are selected. Add legs (L), select the base units and repeat.
The kickboard runs in front of the dishwasher space. The kickboard runs from the first to the last cabinet in the run. Delete it and make a kickboard separately for the cabinets left and right of the dishwasher.
The kickboards do not join in the corner. The runs were added one by one, or the end of a run is more than 1300 mm from the other kickboard. Delete the kickboards and add them with one click, with the cabinets of both runs selected.
The kickboard does not reach the wall. The filler was added after the kickboard, or it was added with Fill the gap. Delete the kickboard and add it again, after the filler from the Add to the cabinet menu.
The kickboard clips disappeared from the hardware list. The kickboard was deleted, the cabinets behind it have no legs, or the kickboard was not made with Kickboard over selected. Add a kickboard with that item.
The hardware list has more clips than needed. The project has a kickboard made with an older version of EFS, or a free board with the word “sokl”, “podnožje” or “kickboard” in its name. EFS then counts 2 clips for every cabinet on legs. Delete such a kickboard and make it again with Kickboard over selected, and rename your own board.
The filler or end panel is white, in group F 3. The cabinet has no fronts. Give the board a decor by dragging it on, and move the board to a front group.
The filler from Fill the gap got the worktop decor. It is in group F 3. Move it to F 1 or F 2 and give it the front decor.
Fill the gap made a cabinet instead of a filler. The gap is 150 mm or more. Undo with Ctrl+Z and add a filler from the Add to the cabinet menu, then type its width through F9.
Fill the gap reports The gap is … mm: too narrow to fill. The gap is less than 20 mm. Move the cabinet or extend the front with an overhang (see Front).
The Fill the gap button is missing. Not exactly two regular cabinets are selected. With a corner cabinet, the button is not there.
Filler ← and End panel → are greyed out. Only the corner cabinet or only a free board is selected. Click a board of a regular cabinet.
I moved the cabinet, and the filler stayed behind. The boards do not follow the cabinet. Undo with Ctrl+Z and move the cabinet together with its boards: select them with Shift + click.
I changed the width of the cabinet, and the end panel is inside the cabinet. The board keeps its old position. Delete it and add it again.
I deleted the cabinet, and the filler and end panel stayed. The boards next to a cabinet are deleted separately. Click them and press X.
The cornice floats above a lower cabinet. The selection had cabinets of different heights. Delete the cornice and add it separately for each height.
The board lies wrong after a cut with the Cutter. It was turned by 90°. Undo with Ctrl+Z.
Shortcuts in this chapter
| Key | Action |
|---|---|
| Shift + click | Add a cabinet or board to the selection; the last one clicked is active |
| Shift+A | The Add menu: Kickboard over selected, Cornice over selected |
| right-click | The cabinet menu with the Add to the cabinet submenu |
| L | Next legs: the kickboard needs cabinets on legs |
| F9 | Adjust Last Operation: the filler's Width and Side right after adding |
| 1 2 3 | Move the selection along X, Y or Z |
| X | Delete the selected board |
| Ctrl+Z | Undo the last action |
All shortcuts are in the chapter Keyboard shortcuts.
Next
Next chapter: Project hardware