Nesting and board prices
In this chapter EFS lays out the parts from the cutting list on stock sheets (nesting, called Nesting in the UI). The layout gives cutting diagrams for the panel saw, the cut sequence, the number of sheets per decor and the price by whole sheets. The sheet sizes and the prices of boards, edge tape and hardware are in the price list, and EFS also saves offcuts for the next project into the same price list.
Before you start
- A project with cabinets that have decors, edge tape and grain direction assigned (see Decors, edge tape and materials).
- You know the cutting list: parts are laid out at the cut size, with the row number from the cutting list (see Cutting list and cut size).
- The fronts are visible. Fronts hidden with Shift+F do not go into nesting.
- The project has a name (Web publish panel, Name field) or has been saved. EFS keeps track of offcuts by that name.
The workflow from the video
- In the EFS tab, Export panel, open Settings and check that Nesting: cutting diagrams is turned on.
- Check the sheet sizes and sheet prices in the price list, on the Sheets worksheet.
- Select the cabinets and click Export selected to PDF. The cutting diagrams are at the end of the PDF.
- In the Cost estimate panel click Calculate sheet cost.
- Click Save offcuts to price list.
Each step is described below.
The price list
Where the price list is
EFS has two price lists:
| File | Where it is | What it is |
|---|---|---|
prices.xlsx |
In the add-on folder | The default price list. An update of the program replaces it with a new one |
user_prices.xlsx |
In the EFS user folder (see Where your data is) | Your price list. Updates do not touch it |
Until user_prices.xlsx exists, EFS calculates with the default price list. Your price list is created the first time you click Upload prices or Save offcuts to price list. From then on EFS reads only that one.
The price list is an Excel file with four worksheets. Do not change the worksheet names:
| Worksheet | What it holds |
|---|---|
| Boards | Board prices per m² and edge tape prices per metre, for each decor |
| Other | Prices of hardware and services per piece, set or metre |
| Sheets | Stock sheet sizes for nesting: sizes, trim, price of a whole sheet and stock |
| Offcuts | Offcuts in stock. The worksheet is created the first time you save offcuts |
Get prices and Upload prices
You do not edit the price list in the program. You download it, edit it in Excel and send it back.
- In the EFS tab open the Cost estimate panel and at the bottom click Get prices.
- Choose a folder, e.g. Documents, and confirm with Get Price List. Your price list
user_prices.xlsxis saved to the folder, or the defaultprices.xlsxif you do not have yours yet. The top right shows Price list saved. - Open the file in Excel, change the prices and save it as
.xlsx. - In the Cost estimate panel click Upload prices.
- Choose the saved file and confirm with Upload Price List. The top right shows Price list uploaded successfully.
Cost estimate calculates with the new prices straight away.
| Button | What it does |
|---|---|
| Get prices | Copies your price list (or the default one, while you have none) to the folder you choose. A file with the same name in that folder is replaced without asking |
| Upload prices | Copies the chosen .xlsx file to the user folder as your price list. The file name does not matter |
Watch out
Upload prices replaces your whole price list: all worksheets, the offcuts on the Offcuts worksheet too. EFS does not check the file's content. So:
- always start from a fresh file from Get prices, not from an old copy, because an old copy does not have the offcuts saved in the meantime;
- after Save offcuts to price list, do not upload a file you got before that;
- do not upload the wrong Excel file: without the Boards and Other worksheets, boards, edge tape and hardware get a red dot, and without the Sheets worksheet nesting uses a 2800 × 2070 mm sheet without a price.
Tip
Before uploading, save a copy of the price list under another name, e.g. price-list-2026-10.xlsx. If something goes wrong, upload the copy.
Note
Get prices is an export: when the trial or subscription ends, the button does not work (see When the free trial or the subscription ends). Upload prices works even then.
The Boards worksheet
Board prices per m² and edge tape prices per metre. The first two rows are headings, and the decors start from the third row. Each decor is one row.
| Column | Heading in the price list | What you enter |
|---|---|---|
| A | Decor key: code and texture joined with a hyphen, e.g. U702-ST9. For the white material without a texture, Default white |
|
| B | 3 (<6) |
EUR per m² for boards thinner than 6 mm |
| C | 10 (<11) |
for boards from 6 to 10 mm |
| D | 16 (<17) |
for boards from 11 to 16 mm |
| E | 18 (<20) |
for boards from 17 to 19 mm |
| F | 25 (<28) |
for boards from 20 to 27 mm |
| G | 38 (≥28) |
for boards of 28 mm and thicker |
| H, I, J, K | 23 / 0,4, 23 / 0,8, 23 / 1,0, 23 / 2,0 |
EUR per metre of 23 mm wide edge tape, 0.4, 0.8, 1 and 2 mm thick. For boards thinner than 20 mm |
| L, M, N, O | 43 / 0,4, 43 / 0,8, 43 / 1,0, 43 / 2,0 |
The same for 43 mm wide edge tape. For boards of 20 mm and thicker |
Rules the program applies on its own:
- The key is made from the first two words of the decor name: U702 ST9 Kašmir siva looks for the row
U702-ST9. The same decor in two textures has two rows. - The column is chosen by the board thickness, e.g. an 18 mm board takes column E. A board of 28 mm and thicker, and one of 40 mm and more as well, takes the last column G (38).
- Edge tape is looked up in the row of the decor of the board it is on, not in the row of another decor.
- An empty cell means there is no price: the row in Cost estimate gets a red dot.
- EFS reads the columns by position, not by heading. Do not move, delete or insert columns. You may rewrite the headings.
How to add your own decor to the price list is described in Enter the price in the price list.
Note
In the default price list the price of 1 mm edge tape (columns J and N) is an estimate: between the price for 0.8 mm and for 2 mm. If yours is different, enter it. A price list you got before version 2.0.10015 does not have these prices: enter them yourself.
The Other worksheet
Prices of hardware and services. The first row is the headings.
| Column | Heading | What you enter |
|---|---|---|
| A | Item |
Name of the service or hardware code |
| B | Unit |
Unit, only for you: EFS does not read it |
| C | Price per unit |
Price per piece, set or metre |
Services and hardware without a catalogue are looked up by the name in column A:
| Name in column A | Row in Cost estimate | Default price |
|---|---|---|
Hinge |
n hinges (hinges set to No drilling (count only)) | 3 |
Hole drilling |
n holes, drilling the hinge hole | 3 |
Cabinet leg |
n cabinet legs | 1 |
Drawer |
n drawers (slides set to No drilling (count only)), price per set | 50 |
CNC routing |
x m cnc routing for backs in a groove or rebate, per metre | 10 |
Gola cut |
n gola cuts | 3 |
Gola profile |
x m gola profiles, per metre | 25 |
Hardware from the catalogue is looked up by code. A code ending in _M is a price per metre.
| Code | What it is |
|---|---|
HINGE_GENERIC, HINGE_BLUM_CLIPTOP, HINGE_HETTICH_SENSYS |
Hinges from the catalogue, per piece |
SLIDE_BB, SLIDE_BLUM_TANDEM, SLIDE_BLUM_TANDEMBOX, SLIDE_BLUM_LEGRABOX, SLIDE_BLUM_MERIVOBOX |
Drawer slides, per set |
SHELF_PIN_5 |
Adjustable shelf support pin, per piece |
CONFIRMAT_7X50, MINIFIX_15 |
Connectors, per piece or set |
WORKTOP_M, WORKTOP_CUTOUT, WORKTOP_JOINT, WORKTOP_CONNECTOR |
Worktop per metre, cut-out, corner joint, connector |
LIFT_HK_TOP, LIFT_HK_S, LIFT_HK_XS, LIFT_HS, LIFT_HL |
Flap lift mechanisms, per set |
HANGER, HANGING_RAIL_M |
Wall unit hanger, wall rail per metre |
PUSH_LATCH |
Push latch |
LED_M |
LED strip per metre |
RAIL_TUBE_M, RAIL_SUPPORT, PULL_OUT_RAIL |
Hanging tube per metre, rail support, pull-out wardrobe rail |
SLIDING_TRACK_M, SLIDING_RUNNERS |
Set of sliding door tracks per metre, set of runners for a sliding door panel |
Rules the program applies on its own:
- The code is looked up exactly as it is written. When Cost estimate shows a red dot and a code in brackets next to a piece of hardware, add a row with that code.
- EFS looks up the service names (
Hinge,Drawer…) regardless of upper and lower case. If you translate them, EFS looks them up by position: they must then stay in rows 2 to 8, in the same order as in the default price list.
Tip
After a program update, new hardware has new codes that your price list does not have. The default prices.xlsx has them: when you see a red dot next to new hardware in Cost estimate, copy its row from the default price list into yours.
The Sheets worksheet
Stock sheet sizes for nesting. The first row is the headings.

| Column | Heading | What you enter | Empty means |
|---|---|---|---|
| A | Material |
Decor key, e.g. U702-ST9, or * for all decors |
the row is not read |
| B | Thickness |
Board thickness in mm | all thicknesses |
| C | Length |
Length of the sheet in mm, along the grain (e.g. 2800) | the row is not read |
| D | Width |
Width of the sheet in mm (e.g. 2070) | the row is not read |
| E | Trim |
Trim on each of the four sides, in mm | 10 mm |
| F | Price |
Price of a whole sheet | the decor is priced per m² |
| G | Stock |
Number of sheets in stock | no limit |
How EFS chooses the sheet size for a decor and thickness:
- It takes the rows with that decor's key whose thickness matches (or is empty).
- If there are none, it takes the rows with
*. - Rows with a thickness entered take precedence over rows without a thickness. Among them, the order in the table applies.
- When the stock of one row runs out, EFS moves on to the next row for the same decor and thickness.
The thickness is compared to within half a millimetre. A decor that has its own rows does not use * for that thickness, not even when its stock runs out.
The default worksheet has two rows: * for all thicknesses (2800 × 2070 mm, trim 10 mm, price 95) and * for 3 mm (price 40). If the Sheets worksheet has no valid row, EFS lays out on 2800 × 2070 mm with a 10 mm trim, without a price.
Note
The price in the * row (95) applies only to a decor that has no price per m² on the Boards worksheet. A decor that has one pays for the sheet as the price per m² times the sheet area: 18 mm U702 at 23.75 €/m² on a 2800 × 2070 mm sheet (5.8 m²) costs 137.66 €. Oak is thus dearer than a white board. For an exact sheet price, enter a row for the decor with a price. An empty price, in the decor's row or in the * row, means the decor is priced per m² (see Price per sheet or per m²).
Example of a Sheets worksheet for a workshop that prices oak per sheet and U702 per m²:
| Material | Thickness | Length | Width | Trim | Price | Stock |
|---|---|---|---|---|---|---|
* |
2800 | 2070 | 10 | 95 | ||
* |
3 | 2800 | 2070 | 10 | 40 | |
H1180-ST37 |
18 | 2800 | 2070 | 10 | 225 | |
U702-ST9 |
18 | 2800 | 2070 | 10 |
Note
Length is the size along the grain. Parts with a grain direction are laid out so that their Length from the cutting list runs along the sheet's Length. For Egger boards that is 2800 mm.
The Offcuts worksheet
Offcuts in stock. The worksheet is created the first time you click Save offcuts to price list. It is described in the section Offcuts in stock.
| Column | Heading | What it is |
|---|---|---|
| A | Material |
Decor key, e.g. W1000-ST9 |
| B | Thickness |
Thickness in mm |
| C | Length |
Length of the offcut in mm, along the grain |
| D | Width |
Width of the offcut in mm |
| E | Qty |
Number of pieces of that size |
| F | Source |
The project the offcut comes from |
| G | Saved |
Date it was saved |
| H | Used in |
The project that used the offcut. Empty: the offcut is free |
Nesting settings
- In the EFS tab open the Export panel.
- At the bottom of the panel open Settings.
- Scroll to the Sheet nesting group.
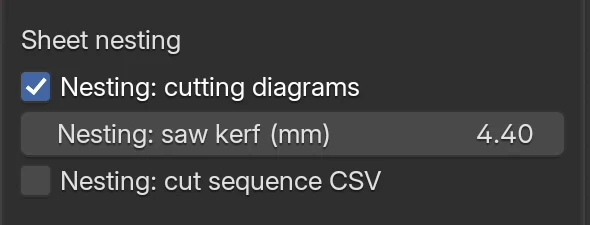
| Option | What it does | Default | Values |
|---|---|---|---|
| Nesting: cutting diagrams | Turns nesting on: the diagrams at the end of the PDF, the Nesting worksheet in Excel, the Calculate sheet cost button, pricing boards by the sheet in the quote and the number of sheets in the order | on | on / off |
| Nesting: saw kerf (mm) | Thickness of the saw blade: EFS leaves that much between parts | 4.4 mm | 0 to 20 mm |
| Nesting: cut sequence CSV | With Cutting list to Excel, also saves a file with all saw cuts in order | off | on / off |
The settings apply to the open project and are saved with it. You can also save them to My settings, and every new project gets them (see My settings).
How EFS lays out the parts
Which parts go on which sheet
- Parts are grouped by decor and thickness. Two decors never share a sheet.
- The parts from the cutting list are laid out at the cut size (finished size minus the edge tape).
- The worktop is not laid out: it is bought as a worktop and priced per running metre.
- Hidden boards of cabinets are left out, among them fronts hidden with Shift+F.
- For each group, EFS first takes free offcuts from stock (the Offcuts worksheet), and new sheets only when a part does not fit on an offcut.
Sheet size, trim and saw kerf
- The sheet size comes from the Sheets worksheet (see The Sheets worksheet).
- The trim is taken off all four sides of the sheet. With a 2800 × 2070 mm sheet and a 10 mm trim, 2780 × 2050 mm is usable. Offcuts from stock have no trim.
- The saw kerf is left after each part in a strip and between strips.
All cuts run from edge to edge (guillotine layout). The sheet is cut into strips, and the strips into parts. Such a layout is cut on a panel saw without cuts that stop halfway across the sheet.
Grain and rotating parts
A part with a grain direction is not rotated: its Length from the cutting list always runs along the length of the sheet (2800 mm). You set the grain direction with the Grain field (see Grain).
| Parts | Rotation |
|---|---|
| Left and right side, top and bottom, back | Not rotated |
| Shelves and dividers | Not rotated |
| Doors, flaps and drawer fronts | Not rotated |
| All boards of a corner cabinet | Not rotated |
| Free boards: kickboard, filler, end panel, cornice, a board added with the B key | Not rotated |
| Drawer sides, back and bottom | Rotated as they fit best |
| Cross boards (rails) | Rotated as they fit best |
On the cutting diagram a rotated part has the letter R after its size, e.g. 549x180 R.
Note
EFS does not know which decor has a grain. The rule applies to plain colour decors too: a shelf in a white decor is not rotated, even though it might fit better rotated.
Layout order
For each decor and thickness EFS tries six layouts:
- three part orders: by width, by length and by area, always from the largest;
- two strip directions: strips along the length of the sheet or along its width.
Of the six layouts it keeps the one with the fewest unplaced parts, then with the fewest sheets, then with the smallest total sheet area. Each part goes into the first strip it fits in. When it fits in none, EFS opens a new strip or a new sheet.
Offcuts on the sheet
A usable offcut is a piece of at least 200 × 100 mm (either way round): the end of a strip after the last part, or the space above the last strip. Smaller pieces are waste. Offcuts are green on the diagram, and Save offcuts to price list puts them into stock.
Parts that do not fit
A part that does not fit on any sheet size stays unplaced. The most common reasons:
- the part is longer than the usable length of the sheet and has a grain direction, so it must not be rotated (e.g. a 2790 mm tall unit side on a 2800 mm sheet with a 10 mm trim);
- the stock in the Stock column has run out, and there is no other row for that decor;
- there is no row at all in the Sheets worksheet for the decor and thickness, not even a
*row.
Unplaced parts are not on the diagrams. In Excel, on the Nesting worksheet, they have a NOT PLACED row. The Sheets (nesting) box shows Not placed, and the quote prices the material of the whole group per m².
Cutting diagrams in the PDF
- In the Export panel turn on Nesting: cutting diagrams (see Nesting settings).
- Select the cabinets: click the first, Shift + click the others. Clicking any board of a cabinet is enough: the whole cabinet is exported.
-
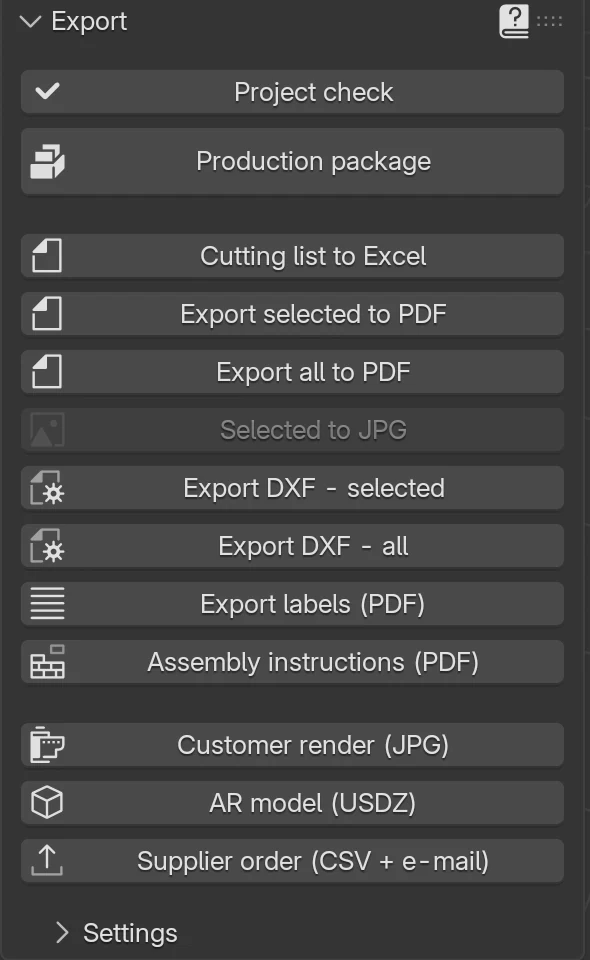
In the Export panel click Export selected to PDF.
-
EFS suggests the name
<project name>_drawings.pdf, e.g. Kuhinja Horvat_drawings.pdf. Confirm with Export selected to PDF. - Wait a few seconds. EFS renders the drawings of the cabinets and boards, and adds the cutting diagrams at the end of the PDF.
For diagrams of the whole project, click Export all to PDF. The Production package makes the same PDF (see The production package and the supplier order).
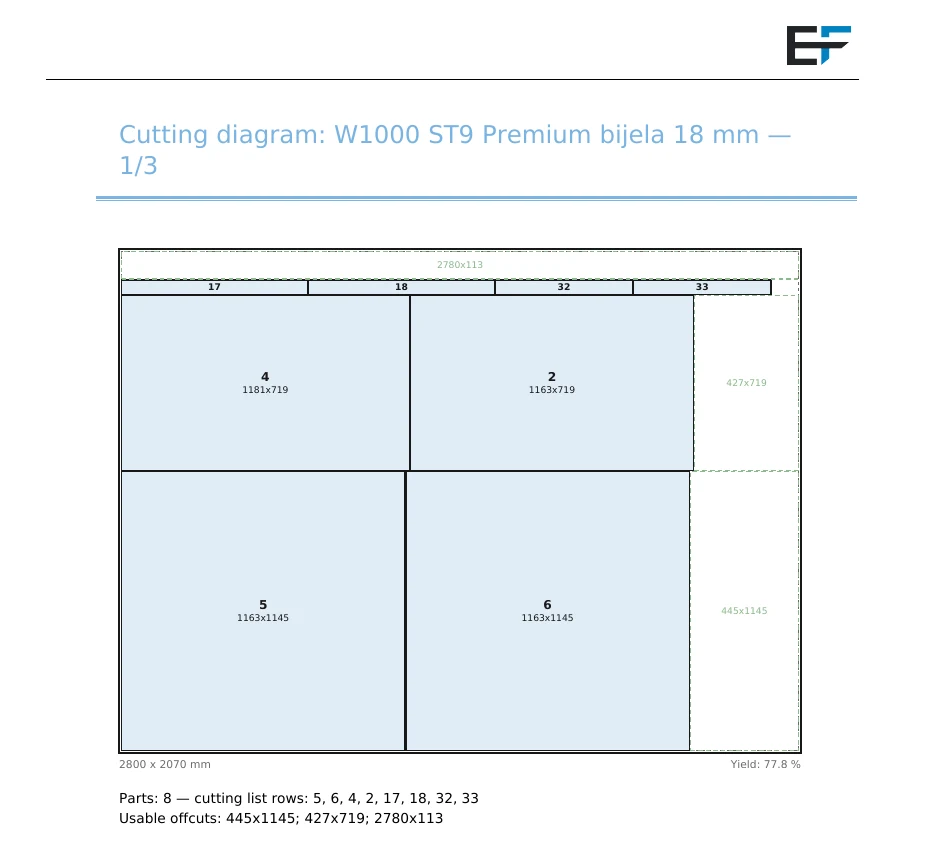
Each sheet is one page:
| Part of the page | What it shows |
|---|---|
| Title | Cutting diagram: decor, thickness and the number of the sheet of that decor, e.g. W1000 ST9 Premium bijela 18 mm — 1/3 |
| Solid frame | Edge of the sheet |
| Dashed grey frame | Trim |
| Blue rectangles | Parts: in bold, the row number from the cutting list, below it the cut size length × width. Small parts have only the number or nothing |
| R after the size | The part is rotated |
| Green dashed rectangles | Usable offcuts with their size |
| Below the drawing, left | Sheet size, e.g. 2800 x 2070 mm, and for an offcut from stock (offcut) |
| Below the drawing, right | Yield: area of the parts divided by the area of the whole sheet, e.g. 77.8 % |
| Below | Parts: the number of parts and the cutting list rows; Usable offcuts: sizes of the offcuts |
Watch out
The numbers on the diagram are the sequence numbers of the parts in the same export. Export selected to PDF counts only the parts of the selected cabinets and lays out only those, so the numbers do not match the cutting list and the labels of the whole project. For the workshop, export the whole project: Export all to PDF or Production package.
Nesting in Excel and the cut sequence
The Nesting worksheet
Cutting list to Excel gets a Nesting worksheet next to the cutting list when nesting is turned on. One row is one sheet:
| Column | What it is |
|---|---|
| Material | Decor |
| Thickness | Thickness in mm |
| Sheet | Sheet size, e.g. 2800x2070, for an offcut (offcut). For an unplaced part NOT PLACED |
| Parts | Number of parts on the sheet |
| Rows | Cutting list rows on the sheet |
| Yield % | As on the diagram |
| Offcuts | Sizes of the usable offcuts. For an unplaced part the reason, in English: does not fit any sheet (it fits on no sheet size) or no sheet defined (there is no sheet size for it) |
Cut sequence (CSV)
When Nesting: cut sequence CSV is turned on, Cutting list to Excel also saves <name>_cuts.csv next to the Excel file, e.g. Kuhinja Horvat_cutting_list_cuts.csv. The file holds every saw cut, sheet by sheet, in the order they are cut. The fields are separated by semicolons, and the column headings are in English.
| Column | What it is |
|---|---|
Sheet |
Sequence number of the sheet in the whole job |
Material, Thickness |
Decor and thickness |
Step |
Sequence number of the cut on that sheet |
Type |
Type of cut (table below) |
Axis |
Y: the position is measured across the width of the sheet; X: along its length |
Position mm |
Position of the cut from the bottom left corner of the sheet |
Length mm |
Length of the cut |
Rows |
Cutting list rows the cut belongs to |
| Type | Cut |
|---|---|
TRIM |
Trim: four cuts at the trim distance from the edge (bottom, left, top, right) |
RIP |
Cut of a strip from edge to edge of the sheet |
CROSS |
Cross cut in the strip, at the end of each part |
SIZE |
Trimming a part that is narrower than its strip |
For each strip RIP comes first, then CROSS and SIZE for its parts.
Note
The CSV is made only with Excel (Cutting list to Excel and Production package), not with the PDF.
Price per sheet or per m²
How EFS chooses
The quote chooses on its own for each decor and thickness:
- By sheet when Nesting: cutting diagrams is turned on, every new sheet of that group has a price and all parts of the group fit on the sheets. The sheet price comes from the decor's row on the Sheets worksheet. With a
*row that has a price, it is the price per m² from the Boards worksheet times the sheet area, and for a decor without a price per m², the price from the*row. The amount is the number of sheets times the sheet price. An offcut from stock is not charged: it was paid for in the project it was left over from. - Per m² in all other cases. The amount is the area of the parts, increased by Waste %, times the price per m² from the Boards worksheet.
The quote does not wait for a button: every quote export lays out the parts on its own. See A quote for the customer.
| You want | Do this |
|---|---|
| All boards per m² | Turn off Nesting: cutting diagrams (the diagrams disappear too) or delete the prices on the Sheets worksheet |
| All boards by the sheet | Nesting on, every row on the Sheets worksheet has a price |
| One decor per m², the others by the sheet | On the Sheets worksheet add a row for that decor and thickness with a sheet size, and leave the Price column empty |
| One decor by the sheet with its own price | On the Sheets worksheet add a row for that decor and thickness with a price |
The internal calculation shows what was chosen: a decor priced by the sheet has its quantity in the unit sheet, and a decor priced per m² in the unit m2.
Calculate sheet cost
In the Cost estimate panel the board rows are always per m². You see the price by sheets like this:
- In the EFS tab open the Cost estimate panel.
- Below TOTAL click Calculate sheet cost. The button shows only when nesting is turned on.
- The top right shows Sheet cost updated, and the Sheets (nesting) box appears below the button.
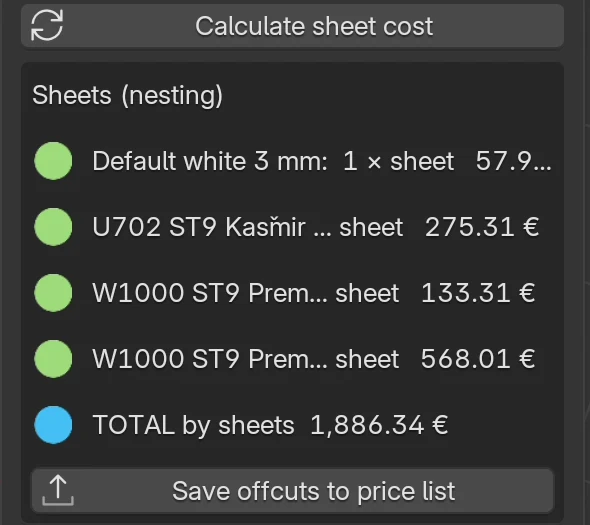
| Row | What it is |
|---|---|
| decor thickness mm: n × sheet amount € | Number of sheets and their price. Green dot: all sheets have a price. Red: they do not, and the amount is not shown. Offcuts from stock are in a separate row, at 0.00 € |
| Not placed: n | Number of parts that do not fit on any sheet (red dot) |
| TOTAL by sheets | The TOTAL from the panel, with the boards per m² replaced by the sheet price. Edge tape, hardware and machining stay the same. Shown only when all rows have a price. The material of unplaced parts is not included in it |
| Save offcuts to price list | The button for offcuts, see Offcuts in stock |
Watch out
The Sheets (nesting) box shows the state at the moment of the click and does not change on its own. After you change the project or the price list, click Calculate sheet cost again. This does not change the quote: the quote export always lays out anew.
Tip
Long decor names in the box are shortened (W1000 ST9 Prem…). Widen the sidebar: grab its left edge with the mouse and drag it to the left.
Offcuts in stock
Save offcuts to price list
Save the offcuts when the project goes into production, once the layout no longer changes.
- In the Cost estimate panel click Calculate sheet cost.
- In the Sheets (nesting) box click Save offcuts to price list.
- The top right shows, e.g., Saved 16 offcuts to user_prices.xlsx. If the project used offcuts from stock, the message also adds n used from stock. If there are no offcuts: No usable offcuts to save.
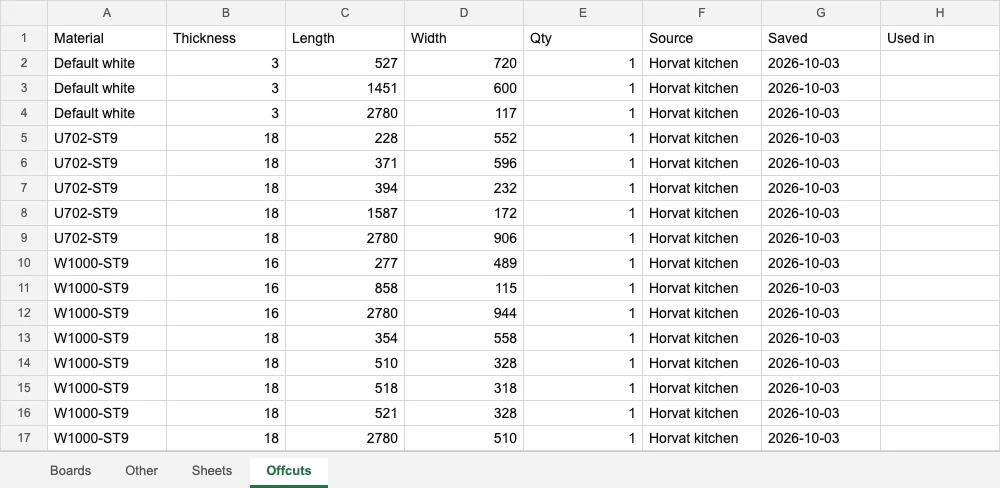
What the program does on its own:
- If your price list does not exist yet, it makes it from the default one.
- It writes the usable offcuts of all sheets to the Offcuts worksheet. Offcuts of the same size, decor and thickness are one row, with the number of pieces in the Qty column.
- In the Source column it writes the project name (the Name field in the Web publish panel, or without it the project's file name), and in Saved today's date.
- For offcuts from stock that this project used, it writes the project into the Used in column. From a row with several pieces it splits one piece off into a new row.
- Saving the same project again replaces its previous save: its unused offcuts are deleted and written again, and the offcuts it had taken from stock go back into stock and are then marked again. Saving twice doubles nothing.
Watch out
If the project has no name and has not been saved, the offcuts get the source Project. All such projects are then treated as the same project. Give the project a name before saving offcuts.
Note
Save offcuts to price list is an export: when the trial or subscription ends, the button does not work. Calculate sheet cost works even then.
Reuse
The next project uses the offcuts on its own, without a button:
- For each decor and thickness, nesting first lays out on the free offcuts of that decor and thickness, and only then on new sheets.
- An offcut is free when its Used in column is empty. A project is not offered its own offcuts.
- An offcut has no trim: its full size from the price list is used.
- Grain applies on an offcut too: the part's Length runs along the offcut's Length.
- In the price an offcut is free. In Sheets (nesting) it is in a row at 0.00 €, in the internal calculation it counts as a sheet without an amount, and on the diagram (offcut) is written below the drawing.
- When that project saves its offcuts, the used offcuts get its name in the Used in column and are no longer offered.
- The Supplier order does not count offcuts in the sheets to be ordered (see The production package and the supplier order).
Editing offcuts by hand
Remove from stock the offcuts you threw away or used outside EFS, and add the pieces you already have in the workshop:
- Click Get prices and open
user_prices.xlsx, the Offcuts worksheet. - Delete the row of the discarded offcut, or write anything in the Used in column, e.g.
discarded. - For your own piece, add a row: the decor key (e.g.
W1000-ST9), thickness, length along the grain, width, number of pieces and in Source, e.g.,Store. Leave Used in empty. - Save and click Upload prices.
For advanced users
You go back to the default price list by closing the program and deleting user_prices.xlsx from the EFS user folder. This also deletes all your prices and offcuts, so make a copy of the file first.
Common problems and solutions
There are no cutting diagrams in the PDF. Nesting: cutting diagrams is turned off in the Export → Settings panel. Turn it on and export again.
The Calculate sheet cost button does not show. Nesting is turned off. Turn on Nesting: cutting diagrams.
The Export selected to PDF button is greyed out. No cabinet or board is selected. Click a cabinet and try again.
The numbers on the diagram do not match the cutting list. The diagram comes from Export selected to PDF, which counts only the selected cabinets. Export the whole project.
A part does not fit on a sheet (NOT PLACED). The part is longer than the usable length of the sheet and has a grain direction. Check Grain on that part, reduce the trim or add a larger sheet size for that decor on the Sheets worksheet. If the reason is the stock, add one more row for that decor with an empty Stock column.
The Sheets (nesting) box shows old numbers. The box does not refresh on its own. Click Calculate sheet cost again.
TOTAL by sheets does not show. A row in the Sheets (nesting) box has no price (red dot). Enter a sheet price on the Sheets worksheet for that decor and thickness, or for *.
The sheet price is not as in the supplier's catalogue. Without a row for the decor on the Sheets worksheet, EFS prices the sheet as the price per m² times the sheet area. Enter a row for the decor with the sheet price.
The quote prices per m², but I wanted by the sheet. Nesting is turned off, a new sheet of that group has no price, or a part did not fit on a sheet. For unplaced parts the internal calculation has the note … fit on no stock sheet …. Check the Sheets worksheet and the Not placed row.
The offcuts have disappeared from the price list. After the offcuts were saved, an older price list was uploaded with Upload prices. If you have a newer copy, upload that. Otherwise click Save offcuts to price list again in each project.
A new project does not use the offcuts. Nesting is turned off, the offcut is of another decor or thickness, something is written in the Used in column, or the offcut is from the same project. Also check the decor key in the Material column: it must have the form W1000-ST9.
New hardware has a red dot and a code in brackets. The code is not on the Other worksheet. Add a row with the code and the price.
1 mm edge tape has a red dot. Your price list is from before version 2.0.10015 and has no prices for 1 mm edge tape. Enter them in columns J and N of the Boards worksheet.
After uploading the price list everything is red. The uploaded file does not have the Boards and Other worksheets, or the columns have moved. Click Get prices on a computer with a correct price list, or upload a correct copy.
Shortcuts in this chapter
| Key | Action |
|---|---|
| Shift + click | Add a cabinet to the selection, for Export selected to PDF |
| Shift+F | Hide or show the fronts. Hidden fronts do not go into nesting |
| B | New free board. It is not rotated in nesting |
| N | Show / hide the sidebar with the EFS tabs |
Next
Next chapter: Labels and assembly instructions