Cutting list and cut size
The cutting list is the list of all boards in the project. EFS exports it to Excel with one click: for each board the material and thickness, the cut size, the edge tape per edge, the hinges, the note, the CNC mark and the finished size. In this chapter you will see what each column shows, how EFS calculates the cut size and what goes into the PDF with the board drawings.

Before you start
- Open a project with cabinets that have decors and edge tape assigned. How to do that is in the chapter Decors, edge tape and materials.
- Save the project (Ctrl+S). The export then suggests the project folder and a name based on the project.
- Bring back hidden fronts. If you hid them with Shift+F, click Show fronts in the EFS tool header. Hidden fronts do not go into the cutting list (see Boards that are left out).
- The export works while the trial or the subscription is running. When they run out, clicking the export reports an error (see When the free trial or the subscription ends).
Workflow from the video
The video uses the finished kitchen Kuhinja Horvat. The same steps, with links to the details:
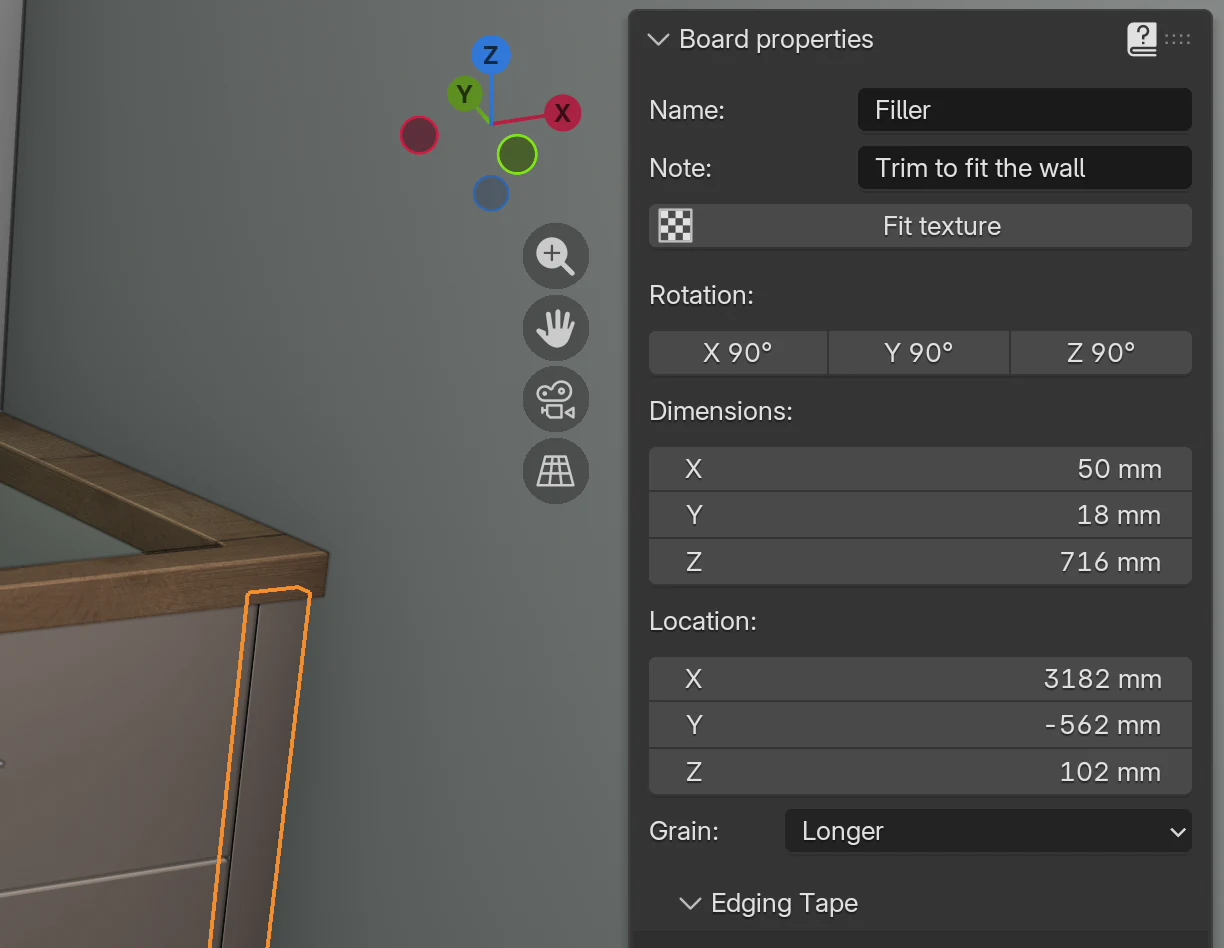
- Click the filler by the wall. In the EFS - Board tab, in the Note field, type Trim to fit the wall and press Enter. See Notes.
- In the EFS tab, open the Export panel and click Cutting list to Excel.
- The file browser suggests the project folder and the name Kuhinja Horvat_cutting_list.xlsx. Click Export to Excel. See Export to Excel.
- Open the file in Excel. The first sheet is Cutting Sheet: each row is one board. See Cutting list columns.
- Compare Cut size and Finished size. The left door of the sink cabinet is 716 × 396 mm finished, with 2 mm edge tape all round, and is cut to 712 × 392 mm. See Finished size and cut size.
- In the program, click the same door and look at the Edging Tape box: edge tape is chosen for the two longer and the two shorter edges. See Edge tape per edge.
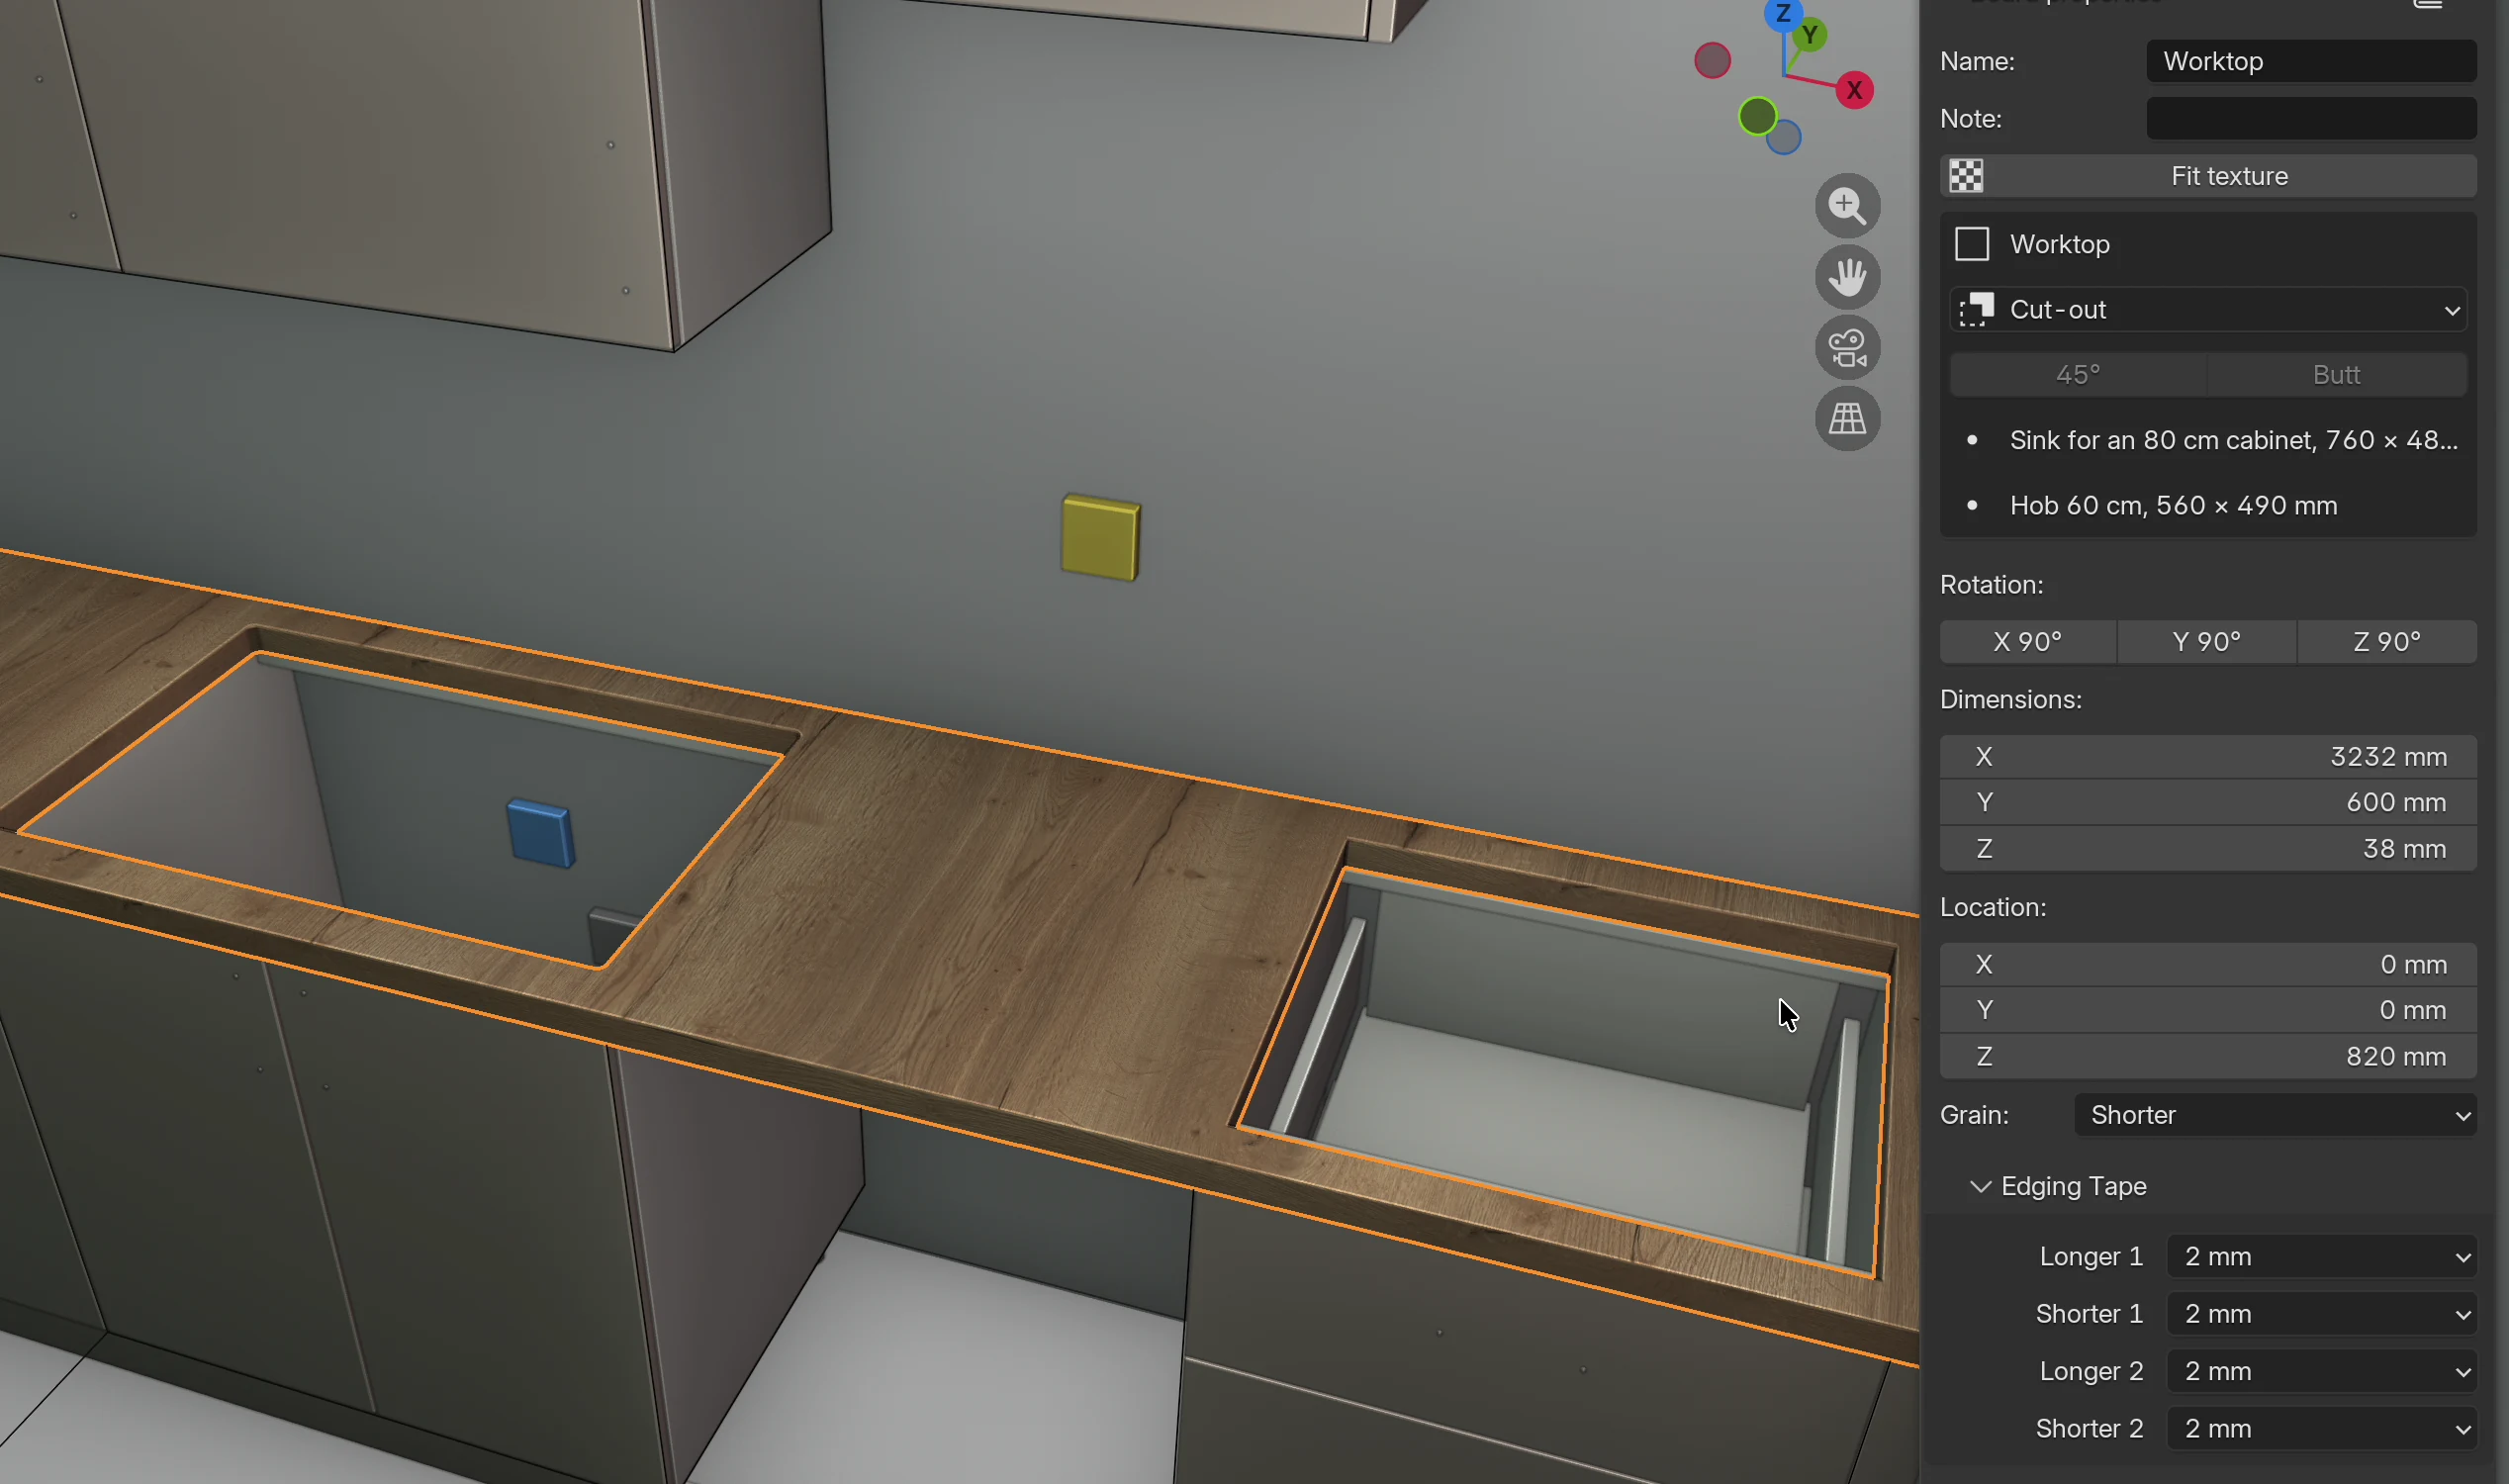
- Click the worktop and in the Grain field choose Shorter, then set it back to Longer. In the cutting list, Length always runs along the grain. See Grain and Length.
- In Excel, look at the Hinges, Note and CNC columns. See Hinges and CNC mark.
- Open the Bill Of Materials sheet: square metres of board per decor and thickness, and metres of edge tape per thickness. See Bill Of Materials.
Export to Excel
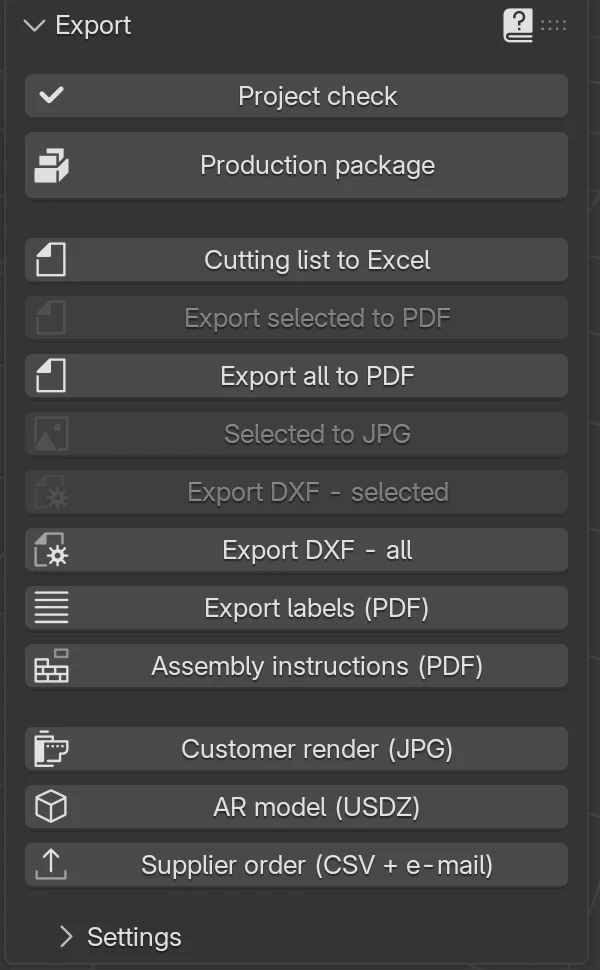
- In the EFS tab, open the Export panel.
- Click Cutting list to Excel.
- In the file browser, check the folder and the name.
- Click Export to Excel.

The program reports Export completed.
Rules the program applies on its own:
- The cutting list always covers the whole project. The selection in the scene has no effect. For part of the project, use Export selected to PDF or Export DXF - selected.
- The suggested name is project name
_cutting_list.xlsx, in the folder where the project is saved. The project name is the one from the Name field in the Web publish panel (see Web preview and QR). Until you enter it, the name of the .blend file is used. An unsaved project without a name gets Project_cutting_list.xlsx. - On the Croatian interface the name ends in
_krojna_lista.xlsx, and the column headings are in Croatian too. See Interface language. - After the export, EFS runs the Project check on its own. If it finds errors (overlapping cabinets, dowel holes through a board), it reports Exported, but the project check found 2 errors (Project check). The file is saved anyway. It does not report warnings; for those, click Project check.
- If a file with the same name is already in the folder, the export overwrites it.
Watch out
If the same file is open in Excel, the program cannot overwrite it and reports an error. Close the file in Excel or save under a different name.
Sheets in the file
| Sheet | When it exists | Contents |
|---|---|---|
| Cutting Sheet | Always | One row per board. See Cutting list columns. |
| Bill Of Materials | Always | Board area and edge tape metres per decor and thickness. See Bill Of Materials. |
| Nesting | Nesting: cutting diagrams is on | Stock sheets with the part numbers and the yield. See Nesting and board prices. |
| Hardware | The project has hardware | Hinges, drawer slides, dowels, legs, screws and the other hardware per cabinet, with TOTAL at the end. See Project hardware. |
Cutting list columns
The Cutting Sheet sheet has two heading rows: the group on top (Cut size, Edging tape, Board, Cabinet, Finished size), the column name below it. The third row is empty, and the boards start in the fourth row.
| Excel column | Group and name | What it shows |
|---|---|---|
| A | (no heading) | The board's sequence number: 1, 2, 3… |
| B | Material | The full decor name, e.g. U702 ST9 Kašmir siva. A board without a decor has Default white. |
| C | Thickness | The board thickness in mm, rounded to a whole millimetre. |
| D | Cut size → Length | The size the board is cut to, along the grain. |
| E | Cut size → Width | The size the board is cut to, across the grain. |
| F | Edging tape → Longer 1 | The edge tape thickness on the first longer edge, in mm: 0.4, 0.8, 1.0 or 2.0. Empty means no edge tape. |
| G | Edging tape → Shorter 1 | The same, for the first shorter edge. |
| H | Edging tape → Longer 2 | The same, for the second longer edge. |
| I | Edging tape → Shorter 2 | The same, for the second shorter edge. |
| J | Board → Hinges | Doors only: the number of hinges and the side, e.g. 2 hinges on longer side. See Hinges. |
| K | Board → Type | The board type, in the interface language: e.g. Left, Right, Top, Bottom, Back, Front left, Shelf horizontal, Drawer front, Corner top, and for a free board Board. The type stays the same when you rename the board. |
| L | Board → Name | The board name, e.g. Front left. This is the Name field in the EFS - Board tab. |
| M | Board → Note | The board note, with an addition for a grooved or rebated back. See Notes. |
| N | Board → CNC | CNC 1, CNC 2… for boards that are not a plain rectangle. See CNC mark. |
| O | Cabinet → Name | The name of the cabinet the board belongs to, e.g. Sink base 800. For a free board (worktop, kickboard, filler) this is its own name. |
| P | Cabinet → Note | The cabinet note. For a free board, its own note. |
| Q | Finished size → Length | The length of the finished board, with edge tape, in whole mm. |
| R | Finished size → Width | The width of the finished board, with edge tape, in whole mm. |
Rules for the whole sheet:
- The columns are as wide as the text in them (at most 48 characters).
- The headings and column A are frozen: when you scroll down or to the right, they stay in place.
- Cut size has whole millimetres or one decimal (e.g. 563.2). Finished size is always in whole millimetres.
- The edge tape in the Edging tape columns is written as text with a point (
2.0), as in the program's menu. To add up edge tape, use the Bill Of Materials sheet.
Order and numbering
- The boards go cabinet by cabinet. All boards of a cabinet are together, one below the other.
- The order of cabinets and free boards follows their order in the project. It is not alphabetical and does not go by wall.
- The sequence number in column A is the part number in the whole project. The cutting diagrams and the labels use the same number, so you can find a part from a label in the list by its number.
- Two identical boards (e.g. two shelves of the same cabinet) have two rows. The cutting list does not merge them into one row with a quantity.
Watch out
The numbers are assigned anew on each export. When you delete or add a cabinet or a board, the numbers of the other boards can shift. So export the cutting list, the labels and the cutting diagrams from the same version of the project, best in one go with Production package (see The production package and the supplier order).
Finished size and cut size
Finished size is the size of the board as it is in the project: with edge tape. These are the sizes you see in the EFS - Board tab, under Dimensions. Cut size is the size the saw cuts the board to before edge banding: the finished size less the edge tape thickness on each taped edge.
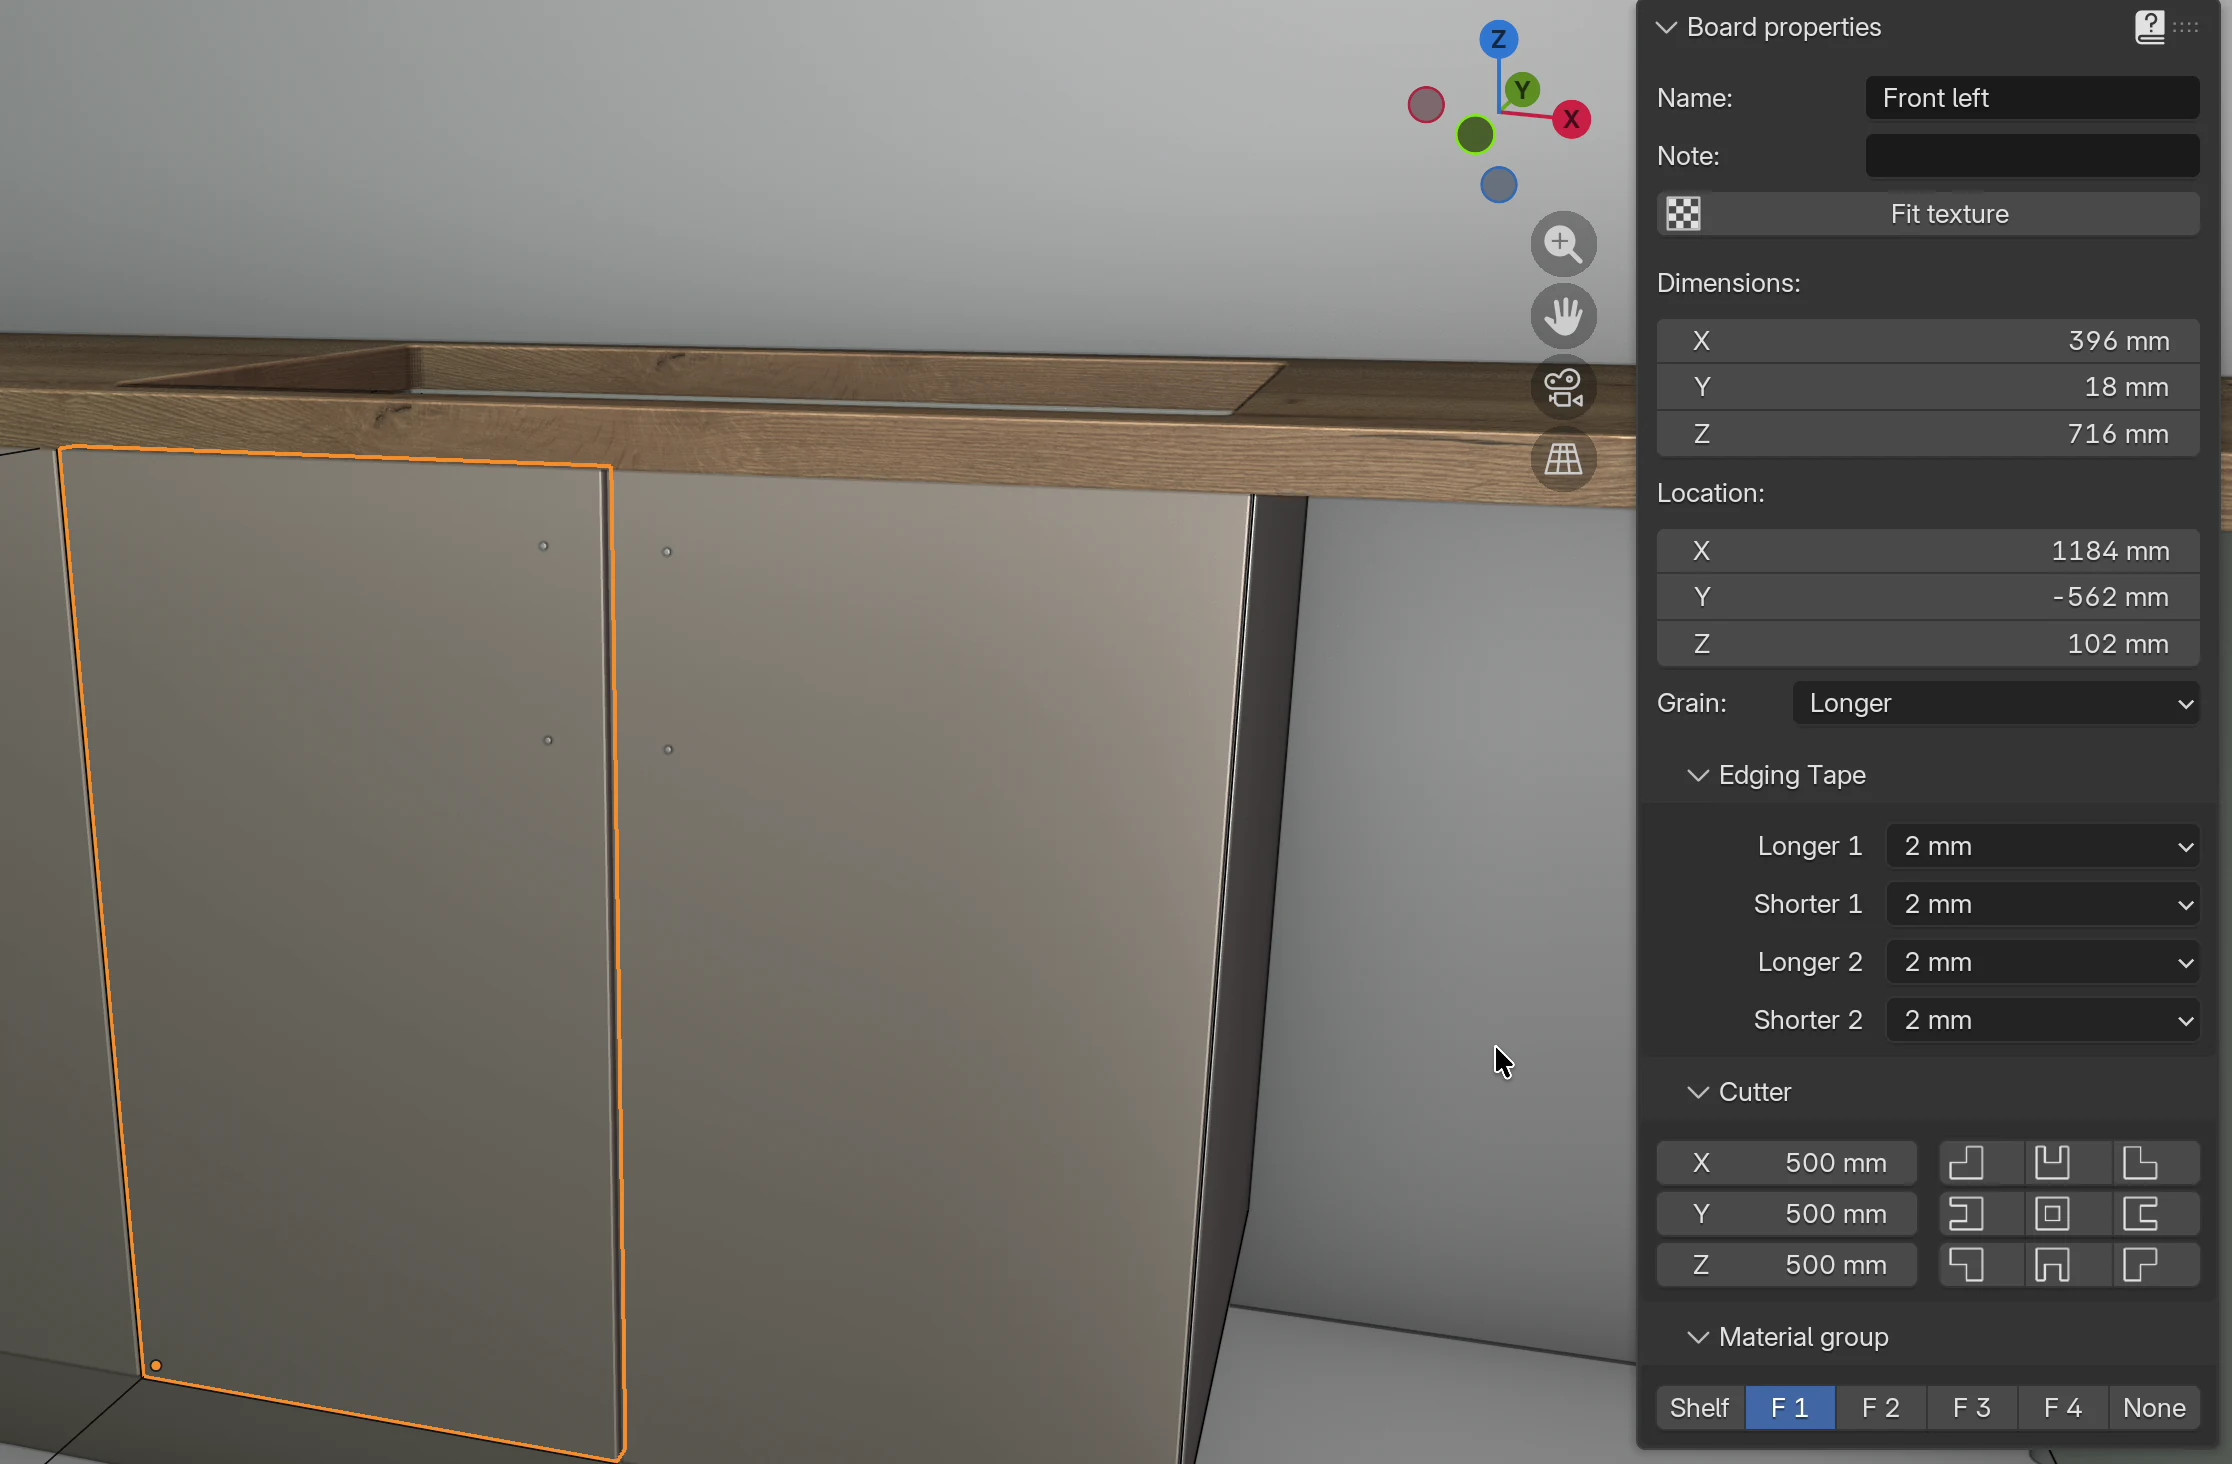
How EFS calculates the cut size:
- Edge tape on Longer 1 and Longer 2 reduces the shorter size of the board.
- Edge tape on Shorter 1 and Shorter 2 reduces the longer size of the board.
- An edge without edge tape (None) is cut to the finished size.
- Longer and Shorter are the actual longer and shorter sides of the board, whatever the grain.
Examples (a door with a finished size of 716 × 396 mm, grain along the longer side):
| Edge tape | Cut size (Length × Width) |
|---|---|
| 2 mm on all four edges | 712 × 392 mm |
| Longer 1 1 mm, the other edges 2 mm | 712 × 393 mm |
| Longer 1 and Longer 2 2 mm, shorter edges without edge tape | 716 × 392 mm |
| No edge tape | 716 × 396 mm |
Examples from the kitchen in the video:
| Board | Finished size | Edge tape | Cut size |
|---|---|---|---|
| Corner top (corner cabinet) | 1164 × 1146 mm | 0.4 mm all round | 1163.2 × 1145.2 mm |
| Post left (corner post) | 718 × 60 mm | 2 mm all round | 714 × 56 mm |
| Front left (Sink base 800) | 716 × 396 mm | 2 mm all round | 712 × 392 mm |
Where each size is used:
| Output | Size |
|---|---|
| Cutting Sheet, Cut size columns | cut size |
| Cutting Sheet, Finished size columns | finished size |
| Bill Of Materials (area and edge tape metres) | cut size |
| Cutting diagrams and the Nesting sheet | cut size |
| Labels | cut size |
| DXF, MPR and CIX | cut size, holes measured from the cut edges (see Cut size in CNC files) |
| PDF board drawing | finished size, and below it a Cut size row |
Note
EFS always treats a size you enter in the program (e.g. a cabinet Width of 600 mm) as the finished size. The edge tape is subtracted only in the cutting list. So you draw cabinets at their real sizes, without allowing for the edge tape.
Edge tape per edge
Edge tape is set for each edge separately, in the EFS - Board tab, Edging Tape box. The steps, the default edge tape per board type and the To selected boards button are described in the chapter Decors, edge tape and materials.
In the cutting list, the edge tape is in the four columns of the Edging tape group, in the same order as in the box: Longer 1, Shorter 1, Longer 2, Shorter 2. A column stays empty when the edge has no edge tape.
Which edge is "1" and which is "2" shows on the PDF drawing of the board: a blue line along the edge, with the edge tape thickness. Edge 1 is the bottom or left one, edge 2 the top or right one. See Board page.
Tip
Edges against the wall and under the worktop need no edge tape. Set them to None before the export: the cut size is then right, and the edge tape metres in the Bill Of Materials do not grow for nothing.
Grain and Length
In the cutting list, Length always runs along the grain and Width across it. You choose the grain direction in the EFS - Board tab, in the Grain field.
| Grain | Length | Width |
|---|---|---|
| Longer (default) | the longer side of the board | the shorter side of the board |
| Shorter | the shorter side of the board | the longer side of the board |
Example from the video, a 3232 × 600 × 38 mm worktop with 2 mm edge tape all round:
| Grain | Finished size (Length × Width) | Cut size (Length × Width) |
|---|---|---|
| Longer | 3232 × 600 mm | 3228 × 596 mm |
| Shorter | 600 × 3232 mm | 596 × 3228 mm |
Rules:
- Nesting places a part with its Length along the length of the stock sheet and does not rotate it. See Nesting and board prices.
- Drawer sides, backs and bottoms, and the cross rails have no Grain field. In the cutting list their Length is always along the longer side.
- On the PDF board drawing, Length is always horizontal, and a grey double arrow in the middle of the board shows the grain direction.
More about grain and how the texture turns is in the chapter Decors, edge tape and materials.
Notes
The cutting list has two notes: the board note and the cabinet note.
| Note | Where you enter it | Where it appears |
|---|---|---|
| Board note | EFS - Board tab, Note field | Cutting list, Board → Note column; the PDF page of that board |
| Cabinet note | EFS - Cabinet tab, Cabinet properties box, Note field | Cutting list, Cabinet → Note column in every row of that cabinet; the PDF page of the cabinet |
- Click a board, e.g. the filler.
- In the EFS - Board tab, click the Note field.
- Type the note, e.g. Trim to fit the wall, and press Enter.
For a free board (worktop, kickboard, filler, end panel), the board note is also the "cabinet" note, so it is in both columns.
Groove and rebate for the back
When the back sits in a groove or a rebate, EFS adds a text to the note of the side panels, the top and bottom boards and the back cross rails:
| Back | Addition to the note |
|---|---|
| Grooved | Grooved for back 3 mm thick |
| Rebated | Rebated for back 3 mm thick |
| Lay-on | nothing |
The thickness in the text is the Thickness of the back. The addition goes after your note, if you have one. The position of the groove (Engagement) and its Depth are not in the cutting list: the groove is drawn on the PDF board drawing, and in the DXF as a pocket. See Back and Grooves, rebates and cut-outs.
Tip
If you cut the groove for the back on the saw and not on the CNC, enter the groove's Engagement and Depth in the cabinet note (e.g. Groove 3 mm, 14 mm from the edge, 10 mm deep). That way the size is in every row of that cabinet.
Cut-outs and holes
- The cutting list does not describe cut-outs or holes. A board with a cut-out gets a CNC mark, and the shape is on the PDF drawing and in the DXF.
- Holes for dowels, hinges, drawer slides, handles and shelf supports are not in the cutting list. They are on the PDF board drawing, with positions, and in the DXF, MPR and CIX files. See Drillings, DXF, MPR and CIX.
- The only thing the cutting list says about hardware is the number of hinges on doors (the Hinges column). The Hardware sheet counts all the hardware.
CNC mark
The CNC column marks boards that are not a plain rectangle and need cutting on the CNC. The marks run in order through the whole project: CNC 1, CNC 2, CNC 3…
These boards get a mark:
| Board | Why |
|---|---|
| Corner top, Corner bottom, Corner shelf 1 to 3 of a corner cabinet | L-shaped boards |
| A worktop with a cut-out for the sink or the hob | a cut-out inside the board (see The worktop: cut-outs and the corner joint) |
| A worktop cut for a corner joint | an angled or straight cut in the corner |
| A board with a cut-out from the Cutter box in the EFS - Board tab | a cut corner or notch in the outline |
Boards that only have holes get no CNC mark. A side panel with a gola groove gets no mark either, although its outline is cut. In the DXF export all these boards still have their machining (see Drillings, DXF, MPR and CIX).
Hinges
The Hinges column is filled only for doors (Front left, Front right), in a corner cabinet too. Flaps and drawer fronts do not have it.
- The text is the number of hinges and the side of the door they are on: 1 hinge on longer side, 2 hinges on longer side, 5 hinges on longer side.
- on longer side appears when the door is taller than it is wide, on shorter side when it is wider than it is tall.
- The number is the one from the cabinet's Hardware and joints box: the Hinges field, or the automatic number with Auto hinge count (see Hardware and joints).
- A door with 0 hinges has 0 hinges on longer side. The project check then reports that the door has no hinges.
The hinge type and the cup distance are not in the cutting list. The PDF page of the door shows them, e.g. 2 hinges on longer side — Blum Clip top 110, cup distance 21.5 mm.
Bill Of Materials
The Bill Of Materials sheet sums up the cutting list by decor and thickness. Use it to order boards and edge tape.
| Column | What it shows |
|---|---|
| Material | The decor name. |
| Thickness mm | The board thickness. |
| Surface m2 | The sum of the areas of all boards of that decor and thickness, by cut size (Length × Width), to two decimals. |
| Edging tape length in m → 0.4 mm, 0.8 mm, 1 mm, 2 mm | Metres of edge tape of each thickness on the boards of that decor and thickness. An edge counts with the length of its side of the board, by cut size. |
Example from the video: U702 ST9 Kašmir siva, 18 mm: 7 m² of board and 63.6 m of 2 mm edge tape.
Rules:
- Edge tape is listed with the decor of the board it is on. The 2 mm edge tape on the U702 fronts counts in the U702 ST9 Kašmir siva row, not with the carcass.
- The area is net: without waste, edge trim and saw kerf. How many stock sheets you actually need is worked out by nesting (the Nesting sheet and Nesting and board prices).
- 3 mm backs and boards without a decor (Default white) have their own row, like any other decor.
- The edge tape metres have no allowance for trimming. Add it yourself when you order.
Boards that are left out
| What | Why | Where it is instead |
|---|---|---|
| Fronts hidden with Shift+F | Hidden fronts are left out of every export on purpose | Bring them back with the Show fronts button in the header and export again |
| Boards set to None (side panel, top or bottom, back) | The cabinet does not use them | — |
| The top or bottom board when cross rails replace it | The cabinet does not use it | The cross rails are in the list |
| Metal drawer sides of box systems (TANDEMBOX, LEGRABOX, MERIVOBOX) | They are bought, not cut | Hardware sheet |
| Dowels and holes | They are not boards | Dowels in the Hardware sheet, holes on the drawings and in the DXF |
| Legs, hinges, drawer slides and other hardware | They are not boards | Hardware sheet |
| Walls, floor, openings and installation markers | Part of the room | — |
| Objects that are not EFS boards (furniture from the library, a lamp) | The program cannot cut them | — |
Watch out
Fronts hidden with Shift+F are not in the cutting list, the PDF, the DXF, the labels, the quote or the render. The program does not warn you about it. Before every export, check that the Show fronts button in the header is blue (the fronts are visible).
A board you hid with a Blender key (e.g. H or Shift+H) is still in the cutting list. Hiding it in the view does not change the export.
PDF drawings
The Export panel has three drawing exports:
| Button | What it exports | When it is greyed out |
|---|---|---|
| Export all to PDF | Drawings of all cabinets and boards of the project in one PDF | Never |
| Export selected to PDF | The same, only for the selected cabinets and free boards | Nothing is selected |
| Selected to JPG | An image of one board with dimensions | Not exactly one board is selected |
The PDF has no table of all parts like the Excel file. Each board has its own page with a drawing and sizes, so the PDF is a cutting list for the workshop: board by board.
Export all to PDF
- In the Export panel, click Export all to PDF.
- In the file browser, check the name. The suggested name is project name
_drawings.pdfin the project folder. - Click Export all to PDF at the bottom right of the file browser.
- If Cabinets is on, the program renders each cabinet. The bottom of the 3D view says Exporting 5 out of 48. Wait.
- When it says Export completed, the PDF is saved.
Esc stops the export while the renders are running. The program reports Export cancelled and does not save the PDF.
Export selected to PDF
- Select a cabinet: click any of its boards. For several cabinets, hold Shift and click boards of the other cabinets.
- Click Export selected to PDF.
- Check the name and click Export selected to PDF at the bottom right of the file browser.
Rules:
- Selecting any board exports the whole cabinet it belongs to.
- A selected free board (worktop, kickboard, filler) exports only itself.
- The hardware list and the cutting diagrams in that PDF cover only the selected cabinets.
What is in the PDF
| Part | When it is in the PDF | Contents |
|---|---|---|
| Cover | Always | EASY FORM STUDIO, Cutting list for and the project name, Created on and the date |
| Cabinet page | Cabinets is on | Four views of the cabinet with dimensions and a table of Width, Depth, Height, with the cabinet note |
| Pages of the cabinet's boards | Always, for each board | The board drawing and tables, see Board page |
| Free board pages | Always | The same as for a cabinet board |
| Hardware list | The project has hardware | Hardware per cabinet, with TOTAL at the end |
| Cutting diagram | Nesting: cutting diagrams is on | Stock sheets with the parts; the numbers are the cutting list row numbers |
Order: the cover, then for each cabinet its page and the pages of its boards, then the free boards, the hardware list and the cutting diagrams. From the second page on, the bottom right says Page 2 of 48.
The title of a cabinet page is the cabinet name. The title of a board page is Cabinet - Board, e.g. Sink base 800 - Front left.
Tip
Enter the project name before the export (Web publish panel, Name field). The name goes on the PDF cover and into the names of all exported files. Until you enter it, the place for the name on the cover stays empty.
Board page
At the top is the board drawing. With PDF: vector board drawings on (the default), it is a technical drawing with the outline, holes, dimensions and edge tape. What each line and colour means is described in Vector PDF board drawings. Without that tick box, the drawing is a rendered image of the board with dimensions.
Below the drawing are the tables:
| Row | What it shows |
|---|---|
| Dimensions | Length, Width and Thickness: the finished size |
| Cut size | The cut length and width. The row appears only when it differs from the finished size (the board has edge tape). |
| Material | The decor name |
| Grain direction | Longer or Shorter |
| Hinges | For doors, the number of hinges and the side, and with a catalogue hinge also its name and cup distance. Otherwise -. |
| Note | The board note, if it has one |
| Edging tape | Longer 1, Shorter 1, Longer 2, Shorter 2: the edge tape thickness, - for an edge without edge tape |
| Drilling legend | For each group of holes: purpose, Ø × depth, Face, Qty and Positions X/Y. Only with vector drawings and when the board has holes. |
Selected to JPG
Selected to JPG saves an image of one board: the rendered board with dimensions and dowel hole marks, like the board page in a PDF without vector drawings.
- Click one board (not the whole cabinet in the Scene elements list).
- Click Selected to JPG.
- In the file browser, type a name for the image, e.g. the board name.
- Click Export to JPG.
The button is greyed out when the whole cabinet is selected, when several objects are selected or when the selected object is not an EFS board.
Tip
A JPG is handy for a message about one board to a tradesman or a supplier. For the workshop the PDF is better: the vector drawing has all holes with their positions, the image only the dowels.
Export settings
The tick boxes for PDF, CNC files, nesting and labels are in the Export panel, in the Settings box at the bottom of the panel. Click Settings to open it.
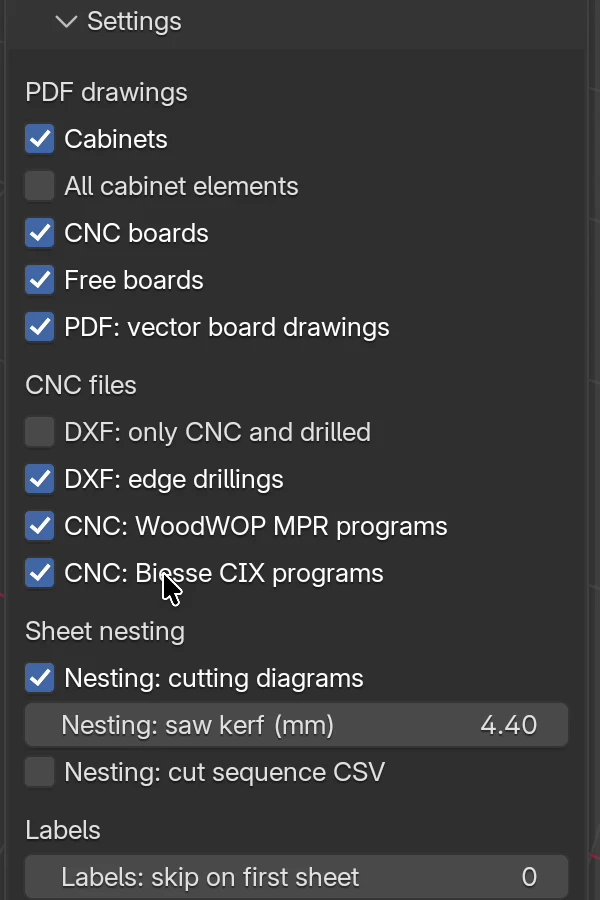
| Option | What it does | Default | Values |
|---|---|---|---|
| PDF drawings | |||
| Cabinets | In the PDF, each cabinet gets a page with four rendered views and sizes. Renders take time: without this tick box, and with vector drawings, the PDF is ready straight away. | on | on, off |
| All cabinet elements | In this version it does not change the PDF: the page of each cabinet board is always in the PDF. | off | on, off |
| CNC boards | In this version it does not change the PDF. | on | on, off |
| Free boards | In this version it does not change the PDF: free boards are always in the PDF. | on | on, off |
| PDF: vector board drawings | The board page is a technical drawing (outline, holes, dimensions, edge tape) instead of a rendered image. Faster and sharper, with a drilling legend. | on | on, off |
| CNC files | |||
| DXF: only CNC and drilled | The DXF export skips plain rectangles without holes and grooves. | off | on, off |
| DXF: edge drillings | Holes in the edge go into the DXF, MPR and CIX. | on | on, off |
| CNC: WoodWOP MPR programs | Writes a .mpr program for Homag next to the DXF. |
off | on, off |
| CNC: Biesse CIX programs | Writes a .cix program for Biesse next to the DXF. |
off | on, off |
| Sheet nesting | |||
| Nesting: cutting diagrams | Adds cutting diagrams to the PDF and the Nesting sheet to the Excel file. The stock sheet sizes are in the price list. | on | on, off |
| Nesting: saw kerf (mm) | The thickness of the saw blade that nesting leaves between parts. | 4.4 mm | 0–20 mm |
| Nesting: cut sequence CSV | Next to the Excel file, also writes the file name_cuts.csv with all saw cuts in order. Works only with Nesting: cutting diagrams on. |
off | on, off |
| Labels | |||
| Labels: skip on first sheet | How many labels on the first sheet are already used. | 0 | 0–23 |
Details on the CNC tick boxes are in the chapter Drillings, DXF, MPR and CIX, on nesting in Nesting and board prices, on labels in Labels and assembly instructions.
Rules:
- The settings apply to the project and are saved with it.
- Save as my settings saves these tick boxes too, so every new project gets them. See My settings.
- The Production package uses the same tick boxes.
- The Excel cutting list does not depend on the PDF drawings or CNC files tick boxes. Only Nesting: cutting diagrams (the Nesting sheet) and Nesting: cut sequence CSV affect it.
Note
In this version, the All cabinet elements, CNC boards and Free boards tick boxes do not make the PDF shorter. For a PDF of only some cabinets, select them and click Export selected to PDF.
Common problems and solutions
There are no fronts in the cutting list. The fronts are hidden with Shift+F. Click Show fronts in the EFS tool header and export again.
The cut size is the same as the finished size. The board has no edge tape: all edges are None. Check the Edging Tape box in the EFS - Board tab.
The cut size has a decimal, e.g. 563.2. The board has 0.4 mm edge tape on both edges (2 × 0.4 = 0.8 mm). That is the correct cut size. If your saw cuts to whole millimetres, round it the way you usually do.
Length and Width are swapped. The board has Grain: Shorter. Length runs along the grain. If the decor has no grain (a plain colour board), set it back to Longer.
The Hinges column is empty for a flap. The column is filled only for doors. The number of hinges of a flap is in the cabinet's Hardware and joints box and in the Hardware sheet.
The numbers on the labels do not match the cutting list. The labels and the cutting list were exported from different versions of the project. Export them again in one go, e.g. with Production package.
The export reports an error and does not save the file. A file with the same name is open in Excel. Close it or save under a different name. If the error says the trial or the subscription has run out, see When the free trial or the subscription ends.
After the export it says "Exported, but the project check found errors". The file is saved, but the project has overlapping cabinets or dowel holes through a board. Click Project check, fix the errors and export again. See Project check.
Export selected to PDF is greyed out. Nothing is selected. Click a cabinet board or a free board.
Selected to JPG is greyed out. The whole cabinet or several objects are selected. Click one board in the 3D view or in the Cabinet elements list.
The PDF takes a long time to export. Cabinets is on, so the program renders four views of each cabinet. For quick board drawings, turn Cabinets off and leave PDF: vector board drawings on.
I turned off Free boards, and the worktop is still in the PDF. In this version that tick box does not change the PDF. For a PDF without free boards, select only the cabinets and click Export selected to PDF.
The project name is not on the PDF cover. The project has no name. Enter it in the Web publish panel, Name field, and export again.
The cutting list has a board I cannot see in the scene. It is hidden with a Blender key, e.g. Shift+H. Press Alt+H to see it again.
Shortcuts in this chapter
| Key | Action |
|---|---|
| Enter | Confirm the note you typed |
| Shift+F | Hide fronts: hidden fronts do not go into the export |
| Esc | Stop the PDF export while the renders are running |
| Ctrl+Shift+E | Production package: cutting list, drawings, DXF and the rest in one go |
| Alt+H | Show everything hidden with a Blender key |
| Ctrl+S | Save the project before the export |
All shortcuts are in the chapter Keyboard shortcuts.
Next
Next chapter: Joints: dowels, confirmat, minifix