Hallway and living room from templates
In this chapter you build a hallway and a TV wall from ready-made templates: a hall wardrobe with a pull-out rail, a bench with a drawer, a shoe cabinet, a floating TV unit and a shelf above it. You will learn how to put a template on any wall, at what height the wall-hung cabinets hang and how to change the sizes of a template made of several carcasses. The same applies to the bedroom and office templates.
Video: D04 Hallway and living room from templates
The same workflow in a one-and-a-half-minute video.

Before you start
- A project with a room. In the video the room is 5600 × 4000 × 2600 mm, and the hallway and the TV wall are on the back wall. How to set up the room is in the chapter Room, openings and installations.
- The EFS tool selected in the toolbar and the sidebar open (N).
- The EFS - Templates tab, Cabinet templates panel. How templates are searched for and placed is in the chapter Templates and My templates.
- A front view: the right end of the EFS tool header shows 000°.
Templates for the hallway, living room, bedroom and office
Four categories have 23 templates: Hallway 5, Living room 7, Bedroom 6 and Office 5. The sizes, thumbnail and description of each are in the list of templates. For working in the room, what a template stands on matters, because it decides the height it comes at.
| How it stands | Templates | Height of the carcass bottom above the floor |
|---|---|---|
| Legs 50 mm | Bench with drawer (Hallway); Bookcase with lower doors, Drawer pedestal, Filing cabinet (Office) | 50 mm |
| Legs 100 mm | Hall wardrobe, Shoe cabinet (Hallway); Display cabinet, Sideboard 1200, TV unit with drawers (Living room) | 100 mm |
| Legs 150 mm | Chest, 3 drawers, Dresser, 6 drawers, Nightstand, 2 drawers, Nightstand, drawer and niche, Tall chest, 5 drawers (Bedroom) | 150 mm |
| On the floor, without legs | Narrow open shelf (Hallway), Bookcase (Living room), Desk (Office) | 0 mm |
| Wall-hung | Wall unit with flap (Hallway); Floating TV unit, 3 flaps, Wall shelf, Wall unit with lift-up flap (Living room); Floating nightstand (Bedroom); Shelf above desk (Office) | each its own, see Wall-hung cabinets and mounting height |
Six templates are made of several related carcasses: Floating TV unit, 3 flaps, TV unit with drawers, Sideboard 1200, Dresser, 6 drawers, Nightstand, drawer and niche and Bookcase with lower doors. How their sizes are changed is in the section A multi-carcass template.
Note
Bookcase and Narrow open shelf stand on the floor without legs and are 2000 and 1800 mm high. Fix them to the wall when fitting. EFS doesn't add hardware for this.
Hallway: wardrobe, bench and shoe cabinet
This is the workflow from the video. Each next template lands next to the previous one because the previous one stays selected.
Hall wardrobe
- Click an empty part of the view so that nothing is selected.
-
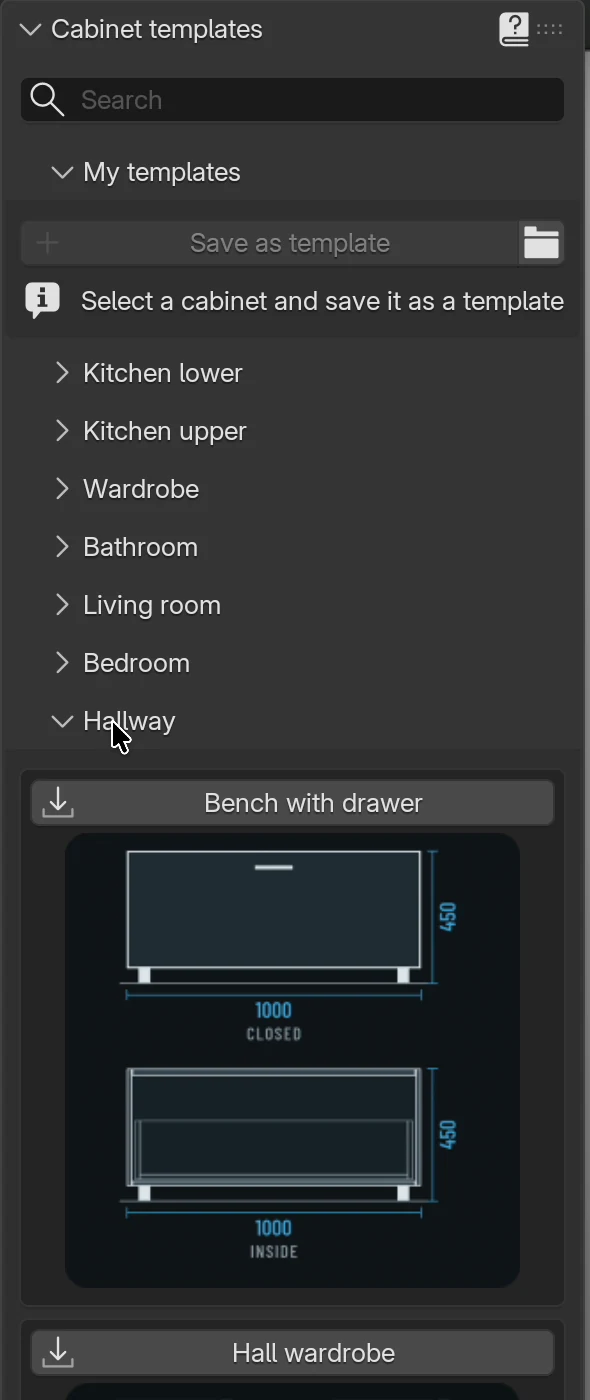
In the Cabinet templates panel, open the Hallway category.
-
Click the Hall wardrobe button on the card. In the video the wardrobe was first found by searching for
hall.
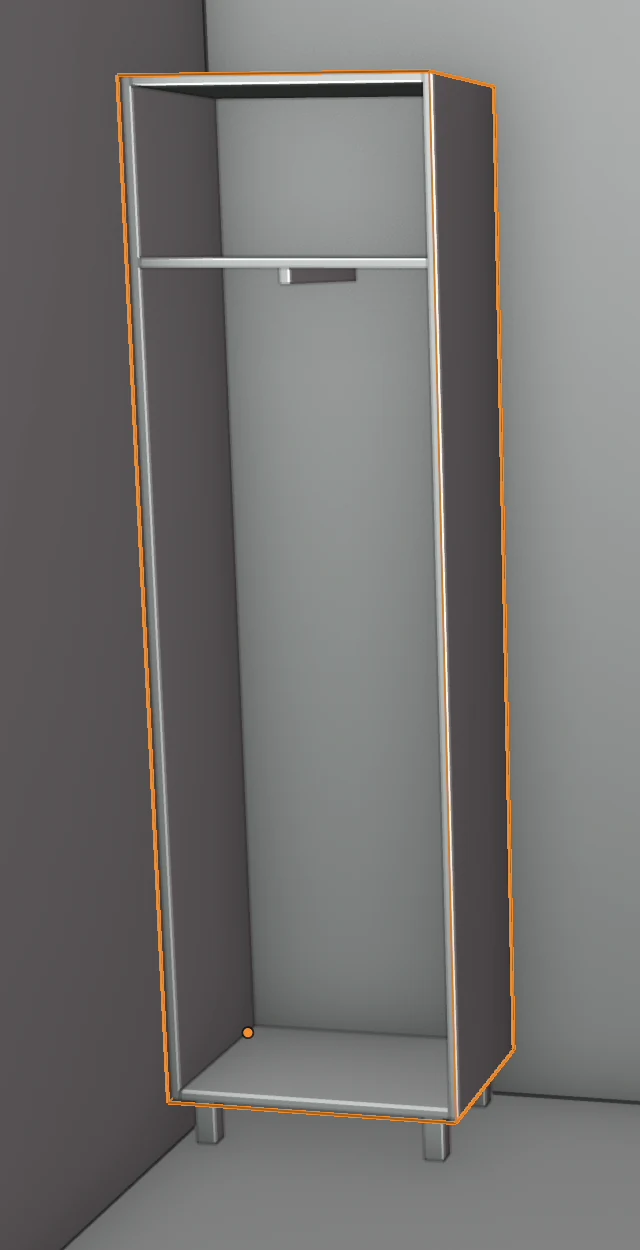
The wardrobe lands in the back left corner of the room and stays selected. It is 600 × 400 × 2000 mm, stands on 100 mm legs and has one door and a shelf. It is 400 mm deep, so instead of a tube across it has a pull-out rail running from front to back, under the shelf.
Clothes rail
You choose the rail in the EFS - Cabinet tab, in the Shelves panel.
| Option | What it does | Default | Values |
|---|---|---|---|
| Clothes rail | A rail for clothes in the cabinet | None; in the Hall wardrobe template Pull-out rail | None, Tube across, Pull-out rail |
| Rail height | Height of the tube above the carcass bottom. 0 means 60 mm below the shelf above or below the top. Visible only with Tube across | 0 mm | 0–3000 mm |
Rules the program applies itself:
- The pull-out rail has a 20 × 30 mm cross-section. It goes in the middle of the width, right under the lowest shelf that is more than 900 mm above the carcass bottom. If there is no such shelf, it goes under the top.
- EFS chooses the length: the largest of 250, 300, 350, 400, 450, 500 and 550 mm that fits into the inner depth less 20 mm. In the Hall wardrobe the rail is 350 mm long. When you change the depth, the length is chosen again.
- The rail moves with the wardrobe and is not a board, so it doesn't go into the cutting list. In the cost estimate, the quote and the hardware list it is the item Pull-out wardrobe rail, with its length. In the price list its code is
PULL_OUT_RAILon the Other sheet.
The tube across and wardrobes with compartments are covered in the chapter A wardrobe with compartments and a rail.
Bench with drawer and shoe cabinet
- The Hall wardrobe stays selected. Search for
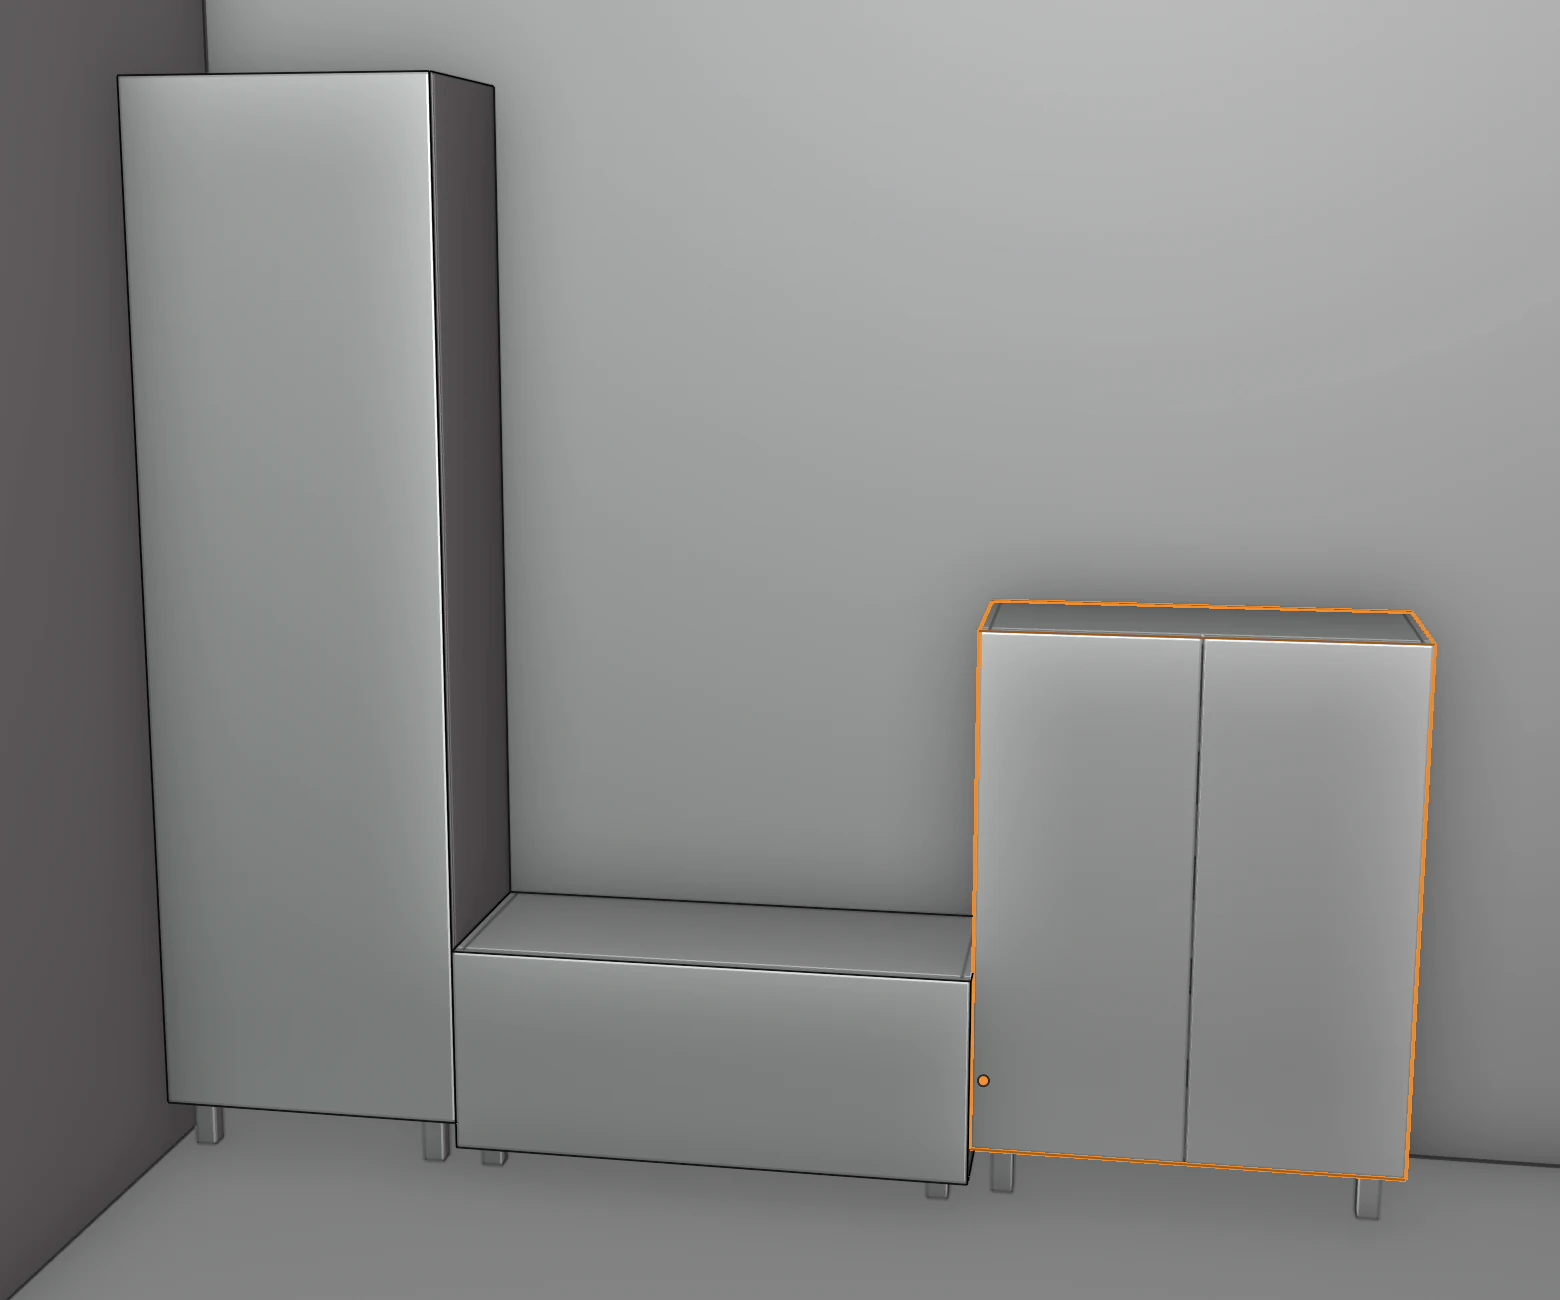
benchand click Bench with drawer. The bench lands to the right of the wardrobe, with its back in the same line and the same rotation. - Now the bench is selected. Search for
shoeand click Shoe cabinet. The shoe cabinet comes to the right of the bench.
| Template | Sizes | What it has |
|---|---|---|
| Bench with drawer | 1000 × 400 × 400 mm, legs 50 mm | one drawer; a 25 mm top; seat at 450 mm above the floor |
| Shoe cabinet | 800 × 350 × 1000 mm, legs 100 mm | two doors, four shelves |
A template placed next to the selected cabinet is not linked to it by a relation. When you move the wardrobe, the bench stays in place. If the right side of the selected cabinet is taken, the template comes to the left. All placing rules are in the section Where a template goes.
Tip
The top of the bench is a 25 mm board. For its price, the price list needs a decor row with the 25 (<28) column, and the edge tape for it is calculated in a width of 43 mm (see Enter the price in the price list). If you make the seat from an 18 mm board, change Thickness in Construction → Top. You get a seat that overhangs the side panels with the Continuous joint on the left and right and the Left overflow and Right overflow fields (see Top).
Living room: TV unit and shelf
Floating TV unit, 3 flaps
- The Shoe cabinet stays selected.
- Open the Living room category. In the video the unit was found by searching for
floating TV unit. - Click Floating TV unit, 3 flaps.
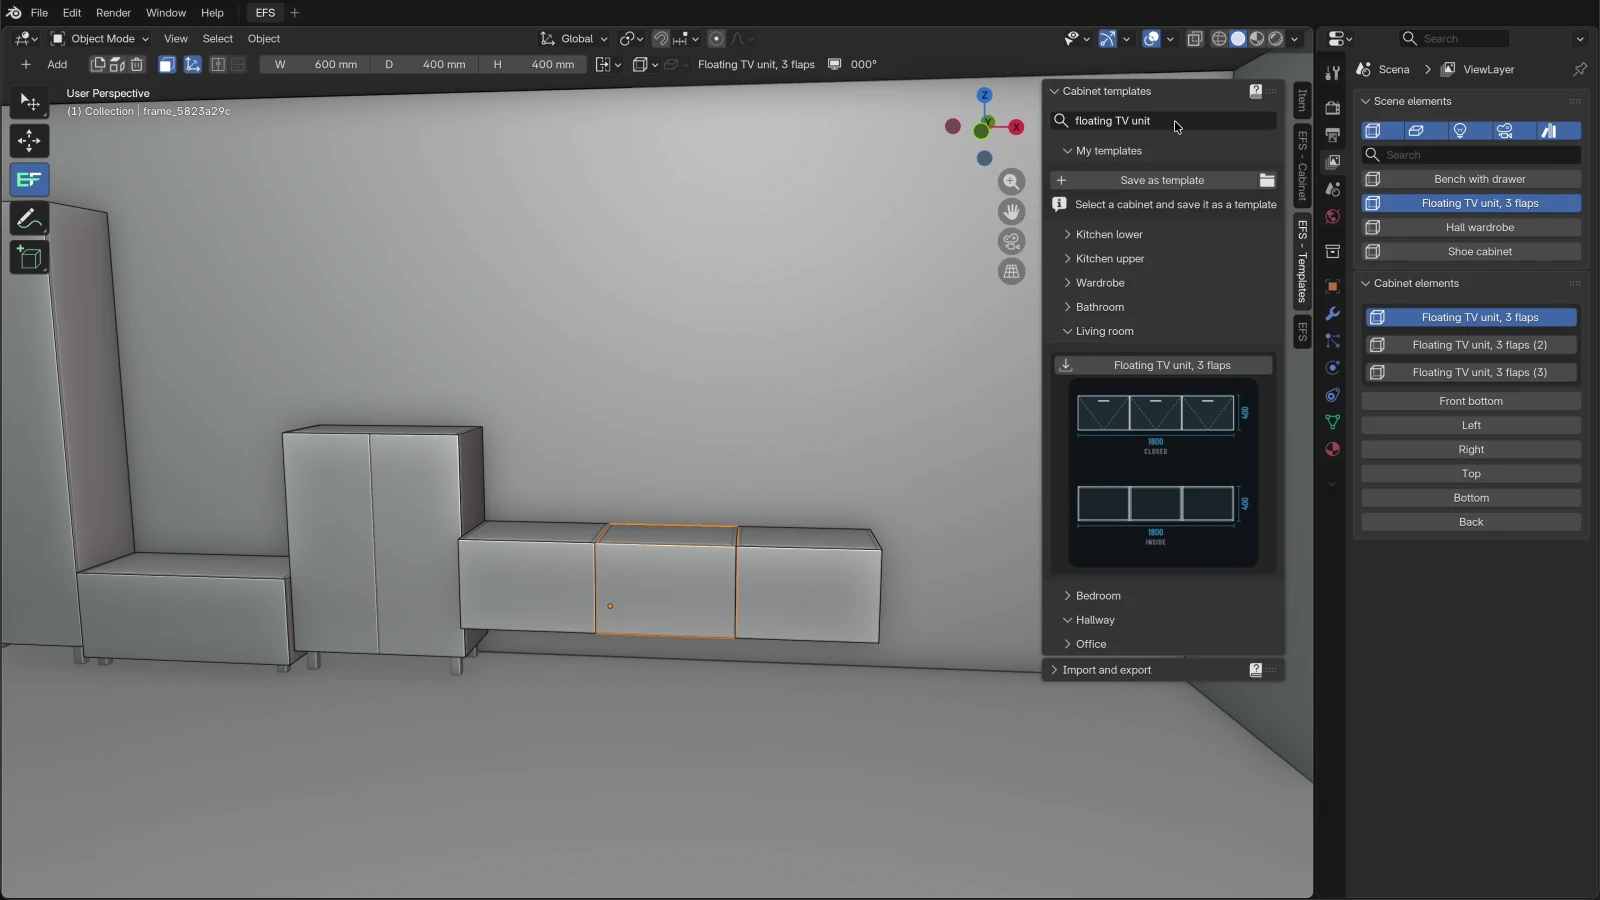
The unit is made of three related 600 mm carcasses, 1800 × 400 × 400 mm in total. It hangs: the bottom is 250 mm above the floor, and the top at 650 mm. The flaps open downwards. The parts list shows Front bottom. The whole unit, with all three carcasses, lands to the right of the shoe cabinet.
The main carcass is the middle one and carries the template's name. The left carcass is called Floating TV unit, 3 flaps (2), and the right one Floating TV unit, 3 flaps (3). Only the main carcass is in the Scene elements list. You see the related carcasses in the Cabinet elements list when the unit is selected.
Wall shelf above the TV unit
- The TV unit stays selected. Its main, middle carcass is active.
-
Search for
wall shelfand click Wall shelf.The shelf is 1200 × 250 × 300 mm and has a divider in the middle. It lands to the right of the middle carcass of the TV unit, at its own height: the bottom is at 1200 mm. EFS looks for free space next to the selected cabinet in 3D, so the right carcass of the TV unit, which is lower, is not in its way.
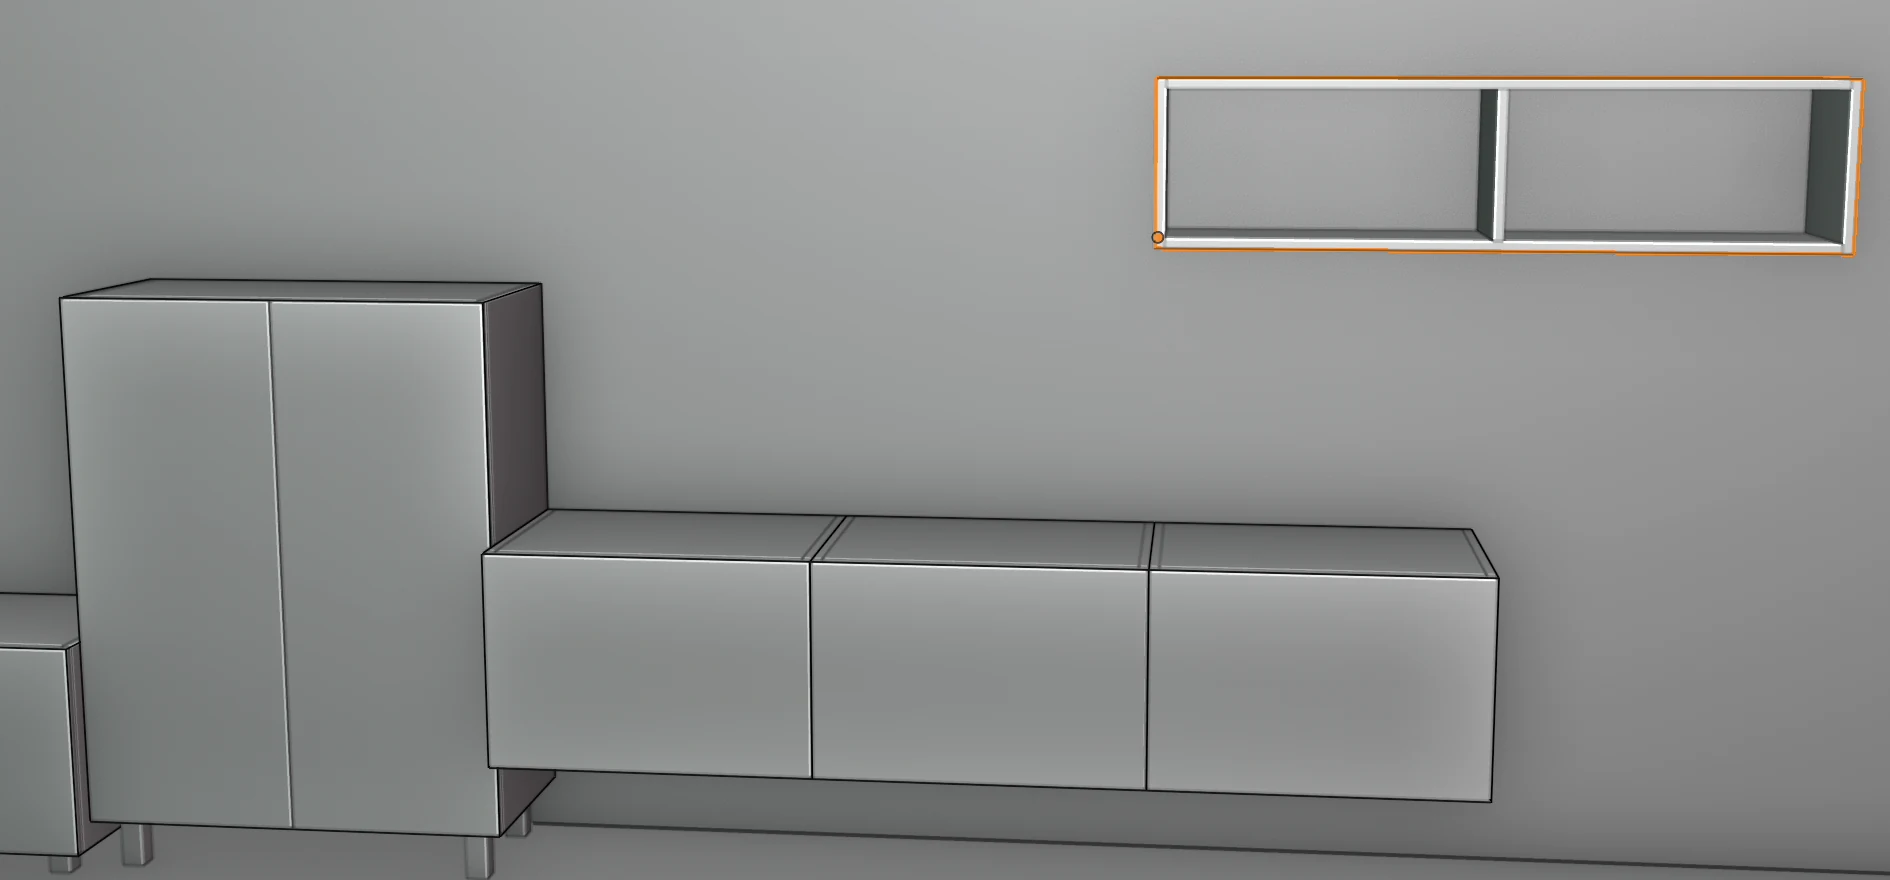
-
In the Scene elements list, click Wall shelf. This selects the whole cabinet, not one of its boards.
- Move the mouse pointer over the 3D view. Press G, then X.
- Type
-900and press Enter.
The shelf moves 900 mm to the left and sits centred above the TV unit.
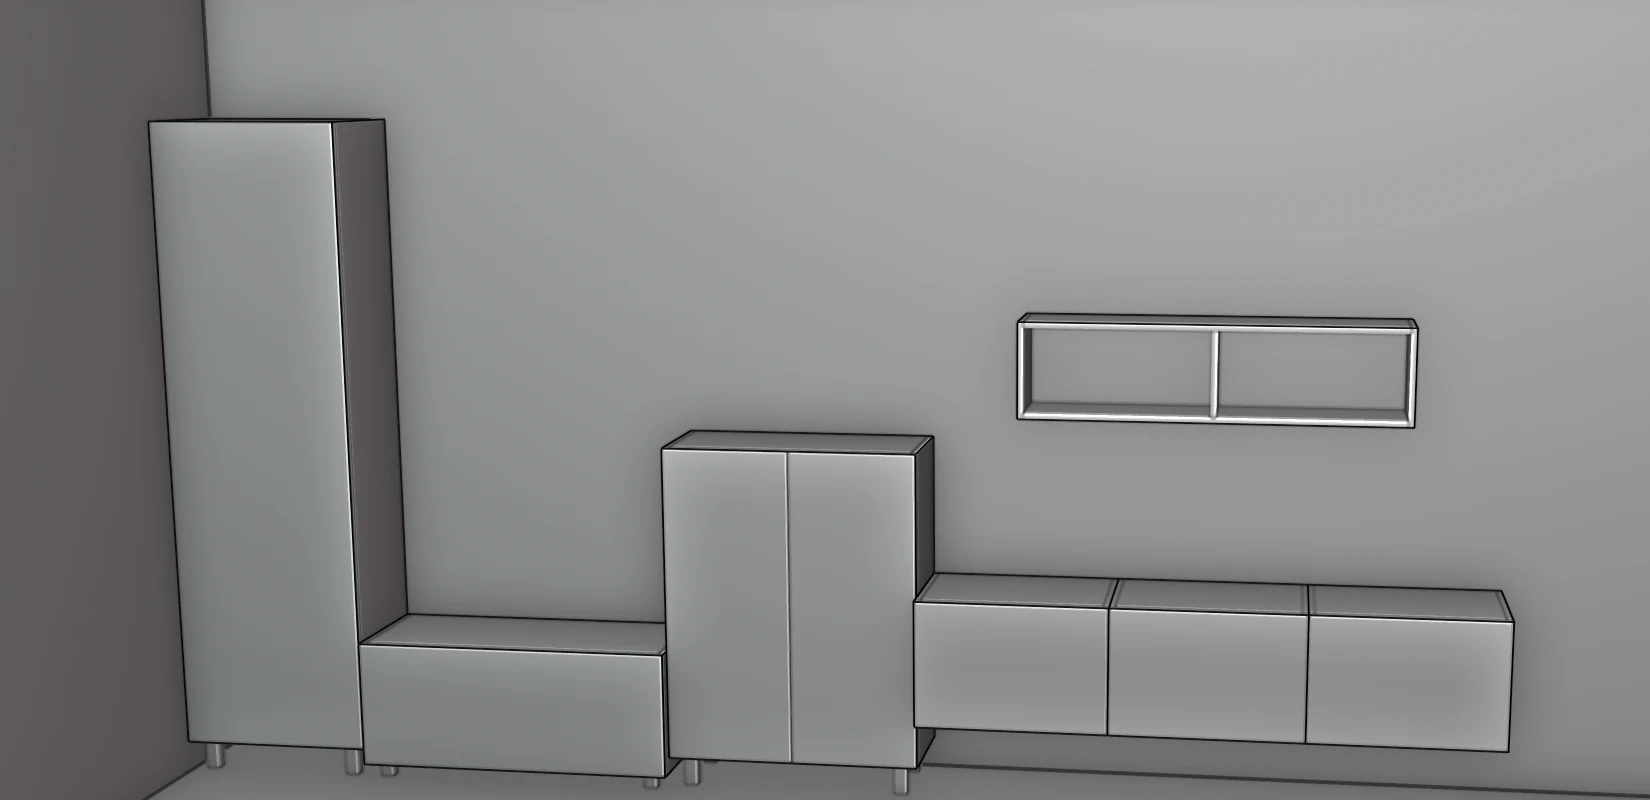
Why 900 mm: the shelf starts at the right edge of the middle carcass, 1200 mm from the left edge of the TV unit. It is centred when its left edge comes to (1800 − 1200) / 2 = 300 mm from the left edge of the TV unit. The move is 1200 − 300 = 900 mm to the left. The same applies to other sizes: the move is the distance from the left edge of the TV unit to the left edge of the shelf, less half the difference of their widths.
Tip
Instead of G and X you can press 1 (Move along X), type -900 and Enter. The 1 key moves the whole cabinet even when you clicked only one of its boards in the view. See Moving: 1, 2 and 3.
Watch out
G is a Blender key and moves exactly what is selected. If you clicked a board in the view, G moves only that board and it leaves the cabinet. Bring it back with Ctrl+Z, then select the cabinet in the Scene elements list or use 1.
Templates are ordinary cabinets
A template in the scene is an ordinary EFS cabinet. You change sizes, fronts, shelves, legs and hardware as on any cabinet, in the header and in the EFS - Cabinet tab. The changes don't touch the template in the catalogue. Save a cabinet you have adapted in My templates (see A template is an ordinary cabinet and Saving with a worktop).
Placing on another wall
In the video all the cabinets are on the back wall. You put a template on the other walls in two ways: next to a cabinet that already stands on that wall, or from the view direction.
Next to a cabinet on that wall
When a cabinet (or one of its boards) is selected, the template gets its rotation and lands against its right side, with the back in the same line. The right side is on the right when you look at the front of that cabinet:
| Wall of the selected cabinet | Rotation | Where "right" goes |
|---|---|---|
| Back | 0° | towards the right wall |
| Right | 90° | towards the front wall |
| Front | 180° | towards the left wall |
| Left | 270° | towards the back wall |
If the right side is taken, the template lands on the left. If both sides are taken, it is placed as if nothing were selected. So it is enough to place the first cabinet on a wall exactly: all the following ones go next to it.
From the view direction
When nothing is selected, the rotation depends on the view angle at the right end of the header. You turn the view with the middle mouse button, and the angle is rounded to 000°, 090°, 180° or 270°.
| Angle in the header | Wall | Template rotation | Where it lands |
|---|---|---|---|
| 000° | back | 0° | At the right end of the run along the back wall. The first cabinet in the back left corner. |
| 270° | left | 270° | With its back against the left wall, right in front of the cabinet that stands furthest forward in the scene. If there is none, behind the back wall, outside the room. |
| 090° | right | 90° | Follows the mouse. Click the left button to drop it. |
| 180° | front | 180° | Follows the mouse. Click to drop it. |
The wall-hung templates in these categories are not wall units. With the 000° and 270° views they therefore go by the base units: they come to the end of the run of base units, at their own height.
The first cabinet in the corner, exactly
A cabinet's position is its back left bottom corner. You enter it in the Cabinet properties drop-down button in the header, in the X, Y and Z fields. The room floor runs from X = 0 (left wall) to the room width (right wall) and from Y = 0 (back wall) to minus the room depth (front wall). Left and right here mean as seen from the front, from the 000° direction.
| Where the cabinet stands | Z rotation | X | Y |
|---|---|---|---|
| Back wall, in the corner with the left wall | 0° | 0 | 0 |
| Right wall, in the corner with the back wall | 90° | room width | 0 |
| Front wall, in the corner with the right wall | 180° | room width | minus room depth |
| Left wall, in the corner with the front wall | 270° | 0 | minus room depth |
| Left wall, in the corner with the back wall | 270° | 0 | minus cabinet width |
Example, the first cabinet on the right wall in the room from the video:
- Click on empty space. Turn the view so that the header shows 090°.
- Click the template. It turns its back to the right wall and follows the mouse.
- Click the left button to drop it anywhere along the right wall.
- Open the Cabinet properties drop-down button in the header. Type X
5600and Y0.
The cabinet stands on the right wall, in the corner with the back wall. Next template: leave the cabinet selected and click the card. The new one comes next to it, towards the front wall.
Tip
You rotate a cabinet that is already in the scene with the R key (90° clockwise, seen from above) or with the Z rotation buttons in the EFS - Cabinet tab. The cabinet rotates round its back left bottom corner, so set it in X and Y after rotating. With a multi-carcass template, rotate the main carcass: the related ones rotate with it. See Turning: R and Z rotation.
Note
If sliding is selected in the Positioning options, the template doesn't go next to the selected cabinet but follows the mouse. If Rotate cabinet based on view rotation on creation is turned off in the add-on preferences, the template is always at 0° and follows the mouse. See Where a new cabinet goes.
Wall-hung cabinets and mounting height
A wall-hung template comes at its own mounting height. The mounting height is the height of the carcass bottom above the floor.
| Template | Category | Sizes (W × D × H) | Bottom above floor | Top above floor |
|---|---|---|---|---|
| Floating TV unit, 3 flaps | Living room | 1800 × 400 × 400 mm | 250 mm | 650 mm |
| Wall shelf | Living room | 1200 × 250 × 300 mm | 1200 mm | 1500 mm |
| Wall unit with lift-up flap | Living room | 800 × 350 × 350 mm | 1500 mm | 1850 mm |
| Wall unit with flap | Hallway | 1000 × 350 × 400 mm | 1500 mm | 1900 mm |
| Floating nightstand | Bedroom | 450 × 350 × 180 mm | 400 mm | 580 mm |
| Shelf above desk | Office | 1200 × 250 × 350 mm | 1100 mm | 1450 mm |
The wall-hung bathroom templates are in the chapter Bathroom: siphon and pipes.
Change the mounting height
- Select the cabinet. With a multi-carcass template, select the main carcass (click its name in Scene elements).
- Open the Cabinet properties drop-down button in the header.
- In the Z field, type the new height of the bottom above the floor, e.g.
300, and press Enter.
You get the same with the 3 key (Move along Z) and a typed offset: 50 raises the cabinet by 50 mm. The related carcasses go with the main one.
Rules the program applies itself:
- When a template goes next to the selected cabinet, it keeps its own height. The TV unit next to the shoe cabinet hangs at 250 mm, and the shoe cabinet beside it stands on legs.
- EFS looks for free space next to the selected cabinet in 3D. A wall shelf can come above a lower cabinet because it doesn't collide with it.
- The wall-hung templates in these categories are not wall units. They don't follow the Upper elements height field in the Scene properties panel, and their fronts are in group F 1, as on base units.
- The flap of the Wall unit with flap and Wall unit with lift-up flap templates opens upwards. The lift mechanism comes from Project hardware, and you change it in the Flap lift field in the Hardware and joints box. See also Wall units, tall units and flaps.
Watch out
The Wall unit hangers field and the hangers in the cost estimate, the quote and the hardware list exist only for wall units. The floating TV unit, the wall shelf and the other wall-hung templates in these categories therefore have no hangers or hanging rail, neither in the quote nor in the hardware list. Add them to the price yourself, e.g. through the Labor amount.
Watch out
When you save a wall-hung cabinet from these categories in My templates, the mounting height is not saved. From My templates it comes onto the floor. After placing it, type Z again.
For advanced users
You can turn a single-carcass wall-hung cabinet into a wall unit with the U key or with the Is upper checkbox in the Cabinet properties panel (visible only when the cabinet has no legs). The cabinet then jumps to the Upper elements height (1430 mm by default), the fronts move to group F 2, and the Wall unit hangers field appears, so hangers go into the quote and the hardware list. Then type the mounting height in Z again. When you later change the Upper elements height, all wall units, this one included, jump to the new height. With a multi-carcass template only the main carcass becomes a wall unit, and the related carcasses stay base units, with fronts in F 1 and without hangers.
Adjusting a template's sizes
A single-carcass template
You change the sizes in the header (W, D, H) or in the Cabinet properties panel, as on any cabinet. The boards are rebuilt, and the shelves, drawers, rail and fronts follow the new sizes. The cabinet grows from its back left bottom corner: to the right, forwards and upwards. See Cabinet dimensions.
Example: a hall wardrobe in a 650 mm recess between the wall and the door frame. Click the wardrobe, type 650 in the W field and press Enter. If it has to reach the ceiling, calculate the height without the legs: for a ceiling at 2600 mm and 100 mm legs type H 2500, or less for a fitting gap.
A multi-carcass template
A multi-carcass template has a main carcass and related carcasses. The main one carries the template's name, and the related ones the same name with a number in brackets. The related carcasses stand next to the main one (left, right, above or below) and move and rotate with it.
Which size the main carcass passes on to the related ones is decided by the Include in scaling checkboxes: Width, Depth and Height. They are in the EFS - Cabinet tab, Cabinet properties panel, Relations subpanel. When a checkbox is on and you change that size on the main carcass, all its related carcasses get the same size.
| Template | Main carcass | Related carcasses | Included in scaling |
|---|---|---|---|
| Floating TV unit, 3 flaps | middle, 600 mm, flap | left and right, 600 mm, flaps | Depth, Height |
| TV unit with drawers | middle, 800 mm, two drawers | left and right, 400 mm, doors | Depth, Height |
| Sideboard 1200 | left, 600 mm, three drawers | right, 600 mm, two doors | Depth, Height |
| Dresser, 6 drawers | left, 600 mm, three drawers | right, 600 mm, three drawers | Depth, Height |
| Nightstand, drawer and niche | carcass with an open niche | drawer, a carcass inside the main one, at its top | Width, Depth |
| Bookcase with lower doors | lower, 750 mm high, two doors | upper, 1250 mm high, open, three shelves | Width, Depth |
From the table it follows:
- With carcasses side by side, a change of the main carcass's height or depth applies to the whole template. A change of width applies only to the main carcass, and the right related carcass moves along with it.
- With carcasses one above the other, a change of width or depth applies to the whole template. When you change the main carcass's height, the upper carcass keeps its height and rises or drops with the top of the main one.
Example: a floating TV unit 2100 mm wide, three carcasses of 700 mm each.
- In the Scene elements list, click Floating TV unit, 3 flaps. The main, middle carcass is selected.
- In the EFS - Cabinet tab, open Cabinet properties → Relations.
- Under Include in scaling, turn on Width.
- In the header, type
700in the W field and press Enter.
All three carcasses are now 700 mm wide. The left carcass has widened to the left, and the middle and right ones to the right. Then put the unit in the right place with the 1 key or the X field. If you don't want the next width change to change all three carcasses again, turn Width off.
You change only one related carcass like this:
- Select the TV unit.
- In the Cabinet elements list, click the related carcass, e.g. Floating TV unit, 3 flaps (3).
- Type the size in the header.
The Include in scaling checkboxes on a related carcass are off, so changing it doesn't touch the others.
Watch out
The left related carcass grows to the right, like any cabinet, so after a width change it overlaps the main one. It goes back into place only when you move the main carcass. When you add e.g. 100 mm to the left carcass, move the main carcass 100 to the right (1, 100, Enter): the left carcass goes back to its left edge, and the whole unit is 100 mm wider to the right.
Watch out
Don't move or rotate a related carcass on its own. The next time you move or change the main carcass, the related one goes back next to it. Always move, rotate and delete the main carcass. X on the main carcass also deletes the related ones.
More about links between cabinets: Relations and Working faster.
Fitting into the space
- A gap between two cabinets. Select both and click Fill the gap: from 150 mm up EFS adds a cabinet of exactly that width, and from 20 to 150 mm a filler flush with the fronts. See The cabinet panel with several selected.
- The same height above the floor. Select the cabinets, and click the one with the right height last. Click Align to active. This way you bring e.g. two wall shelves to the same height.
- End panel and filler. You add a filler to the wall and an end panel at the end of the run as in the chapter Kickboard, fillers, end panels and cornice.
Open cabinets without fronts
Wall shelf, Narrow open shelf, Bookcase and Shelf above desk have no fronts. Bench with drawer has no doors, but it has a drawer front. On open cabinets everything that sits behind the fronts on closed ones is visible, so watch out for this:
- Decor. The side panels, top and bottom, shelves and dividers are in the Shelf group. You give them a decor with the Select material for Shelves button in the Material assignment panel (see Material groups). The drawer front of the bench is in group F 1.
- The back is visible. The back is in the None group, together with the legs. The Select material for None button would colour the legs too. So drag the decor directly onto the back of an open cabinet, or move the back to group F 4 and give it a decor with the assignment for front 4.
- Edge tape on visible edges. The carcass and the shelves get 0.4 mm edge tape. On front edges that are visible, change the edge tape in the Edging Tape box (see The Edging Tape box).
- Fronts later. An open cabinet gets doors with the F key, like any cabinet (see Front).
- Kickboard and filler next to a cabinet without fronts get group F 3, like the worktop.
Watch out
On a cabinet without fronts and drawers, Blender takes over the O key and turns on proportional editing. The next move then drags the neighbouring objects too. Turn it off by pressing O again.
Common problems and solutions
The template came to the left of the selected cabinet, not to the right. The right side was taken. Move it with the 1 key or select the cabinet at the other end of the run.
The wall shelf landed next to the TV unit, not above it. Next to the selected cabinet a template goes to the side, at its own height. Move it along X, as in the section Wall shelf above the TV unit.
The shelf landed next to the middle carcass of the TV unit, not at its right end. The main carcass of the TV unit was selected, and it is the middle one. Calculate the move from the right edge of the middle carcass.
After G only one board moved. A board was clicked in the view. Undo with Ctrl+Z. Select the cabinet in Scene elements or move with the 1 key.
The template landed behind the back wall. You were looking from the 270° direction, and there was no base unit in the scene yet. Type X and Y as in the table The first cabinet in the corner, exactly or move it with the 2 key.
The template follows the mouse. You are looking from the 090° or 180° direction, or sliding is selected in the Positioning options. Click where you want it, then type the position in X and Y.
The cabinet has its back to the room. The view angle didn't match the wall. Click the right Z rotation button or press R, then set it in X and Y.
A wall-hung cabinet from My templates stands on the floor. The mounting height of a wall-hung cabinet that is not a wall unit is not saved in the template. Type Z after placing it.
After changing the width of only one carcass the TV unit has an overlap. You changed the left related carcass. Move the main carcass to the right by the same amount.
Changing the main carcass's width didn't change the others. With carcasses side by side, Width is not turned on under Include in scaling. Turn it on or change the carcasses one by one.
Changing the height of the bookcase's lower carcass didn't change the upper one. With carcasses one above the other, Height is not turned on. That is intentional: the upper carcass only rises.
The rail in the hall wardrobe is shorter than you expect. EFS chooses the longest rail from 250 to 550 mm that fits into the inner depth less 20 mm. For a longer rail, increase the wardrobe's depth.
The quote has no hangers for the floating TV unit. The wall-hung templates in these categories are not wall units, so EFS doesn't count hangers. Add them to the price yourself or see For advanced users in the section on mounting height.
The new templates are white. A template doesn't carry a decor. Repeat the Material assignment for the groups (see Decors, edge tape and materials).
Shortcuts in this chapter
| Key | Action |
|---|---|
| N | Sidebar on / off |
| Enter | Confirm the template search and a typed move |
| G, then X | Blender's move of the selection along the X axis; type the size in mm and confirm with Enter |
| 1 / 2 / 3 | Move the whole cabinet along X, Y or Z, even when a board is clicked |
| R | Rotate the cabinet by 90° |
| U | Upper / lower cabinet |
| F | Next front (doors for an open cabinet) |
| O | Open / close doors and drawers; on a cabinet without fronts and drawers, Blender's proportional editing |
| X | Delete the cabinet, with its related carcasses |
| Ctrl+Z | Undo the last action |
| middle mouse button | Turn the view (the angle in the header) |
Next
This is the last chapter of the Wardrobes, bathroom, hallway part. The next part is For the customer: render, web preview and decor comparison.
Next chapter: One-click render