Labels and assembly instructions
Every part gets a label with its number from the cutting list, the cut size, the edge tape and a QR code. Every cabinet gets a page of assembly instructions with an exploded view and the same numbers. This chapter describes both exports, printing on label sheets and what the QR code opens in the web viewer.
Video: C06 Labels and assembly instructions
The same workflow in a video of almost two minutes.

Before you start
- The project should be finished and saved (Ctrl+S). EFS then suggests a file name after the project, in the project folder.
- Bring back hidden fronts with the Show fronts button in the header. Fronts hidden with Shift+F get no label and no place in the assembly instructions. See Fronts: F and Shift+F.
- If you want the QR code to open the part in the 3D viewer, publish the project first (EFS tab, Web publish panel). See QR code on the label.
- For printing you need A4 sheets with 24 labels of 70 × 37 mm (3 columns, 8 rows, no margins).
- The exports work during the trial or the subscription. See When the free trial or the subscription ends.
The workflow from the video
In the video, labels and assembly instructions are exported for a finished kitchen that is already published on the web.
- In the EFS tab, click the title of the Export panel.
- Click Export labels (PDF). A save dialog opens with the name
Horvat kitchen_labels.pdfin the project folder. - Click Export labels (PDF) at the bottom right. At the top right it says Export completed (100): 100 labels.
- Open the PDF. Each sheet has 24 labels. See Sheet and printing.
- Scan a label's QR code with your phone. The web viewer opens with that part highlighted. See QR code on the label.
- For a partly used sheet, open Export → Settings and type the number of used labels in Labels: skip on first sheet. See Partly used sheet.
- Click Assembly instructions (PDF). EFS suggests the name
Horvat kitchen_assembly.pdf. Click Assembly instructions (PDF) at the bottom right. - Open the PDF. Each cabinet has its own page. See Cabinet page.
- At the top right of the page is the cabinet QR, and the part numbers are links. See Cabinet QR and links.
Labels and assembly instructions also go into the production package (Ctrl+Shift+E), with the same content.
Where the buttons are
Both exports are in the EFS tab, in the Export panel, one below the other.
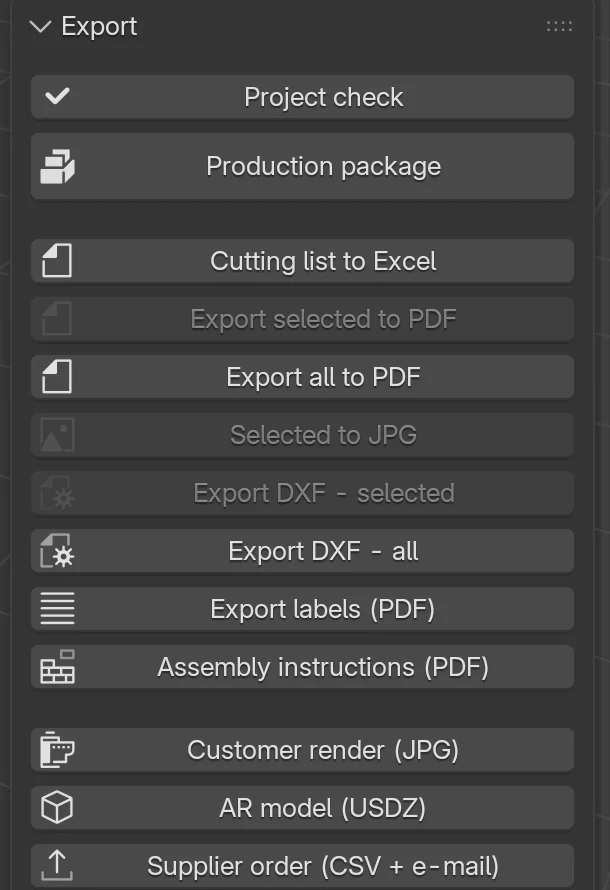
| Button | What it creates | Default file name |
|---|---|---|
| Export labels (PDF) | Labels of all parts on A4 sheets, 70 × 37 mm | <project>_labels.pdf |
| Assembly instructions (PDF) | One page per cabinet: exploded view and a table of the parts in assembly order | <project>_assembly.pdf |
<project> is the project name from the Web publish panel (Name field). While the project has no name, EFS takes the name of the project file. With the Croatian interface the files are called _naljepnice.pdf and _montaza.pdf.
The other buttons of the Export panel are described in the chapter The production package and the supplier order.
Labels
Exporting labels
- EFS tab → Export panel.
- Click Export labels (PDF).
- The save dialog opens in the project folder, with a suggested name. Change the folder or the name if you want.
- Click Export labels (PDF) at the bottom right.
At the top right it says Export completed and the number of labels in brackets. If Project check finds errors, a warning follows right after it: Exported, but the project check found 2 errors (Project check). The PDF is saved, but fix the errors before printing.
Sheet and printing
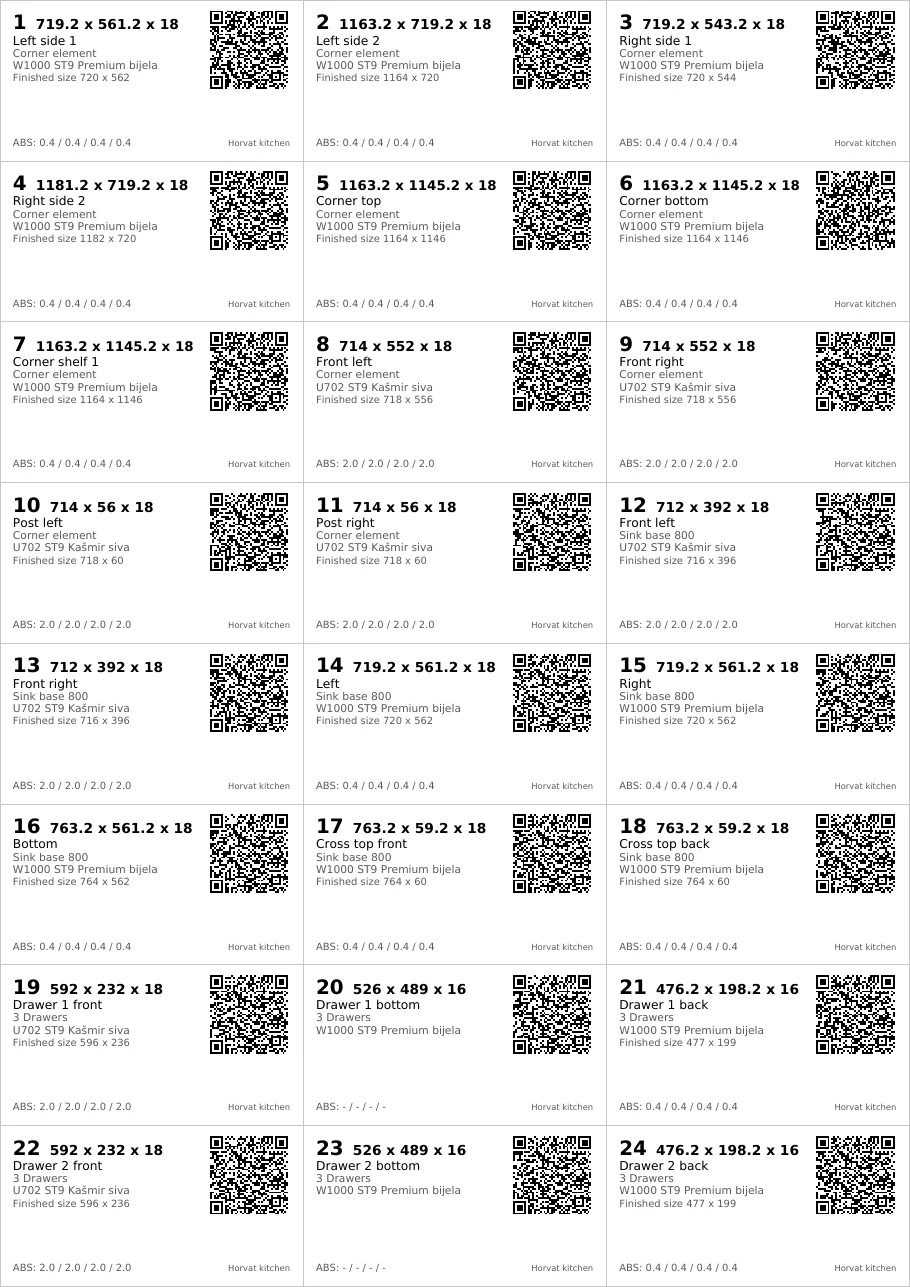
| Property | Value |
|---|---|
| Sheet format | A4, 210 × 297 mm |
| Label | 70 × 37 mm |
| Layout | 3 columns × 8 rows = 24 labels per sheet |
| Sheet margins | none: the labels run from edge to edge |
| Order | left to right, row by row from the top: 1, 2, 3 in the first row, 4, 5, 6 in the second… |
| Border | a thin grey line around each label |
| New sheet | after every 24th label |
How to print:
- Open the PDF in a PDF program.
- Put a sheet of 70 × 37 mm labels with 24 labels in the printer tray.
- In the print dialog, choose actual size (100 %). Switch off fit to page, because it shrinks the labels and moves them out of place.
- Print.
Tip
The first time, print one page on plain paper. Put the paper on the label sheet and hold it up to the light: the grey lines must fall on the edges of the labels.
Watch out
EFS draws the labels without sheet margins, 297 / 8 mm high. A sheet with a top and bottom margin or with labels of another size (e.g. 70 × 36 mm) doesn't match the print.
What the label says
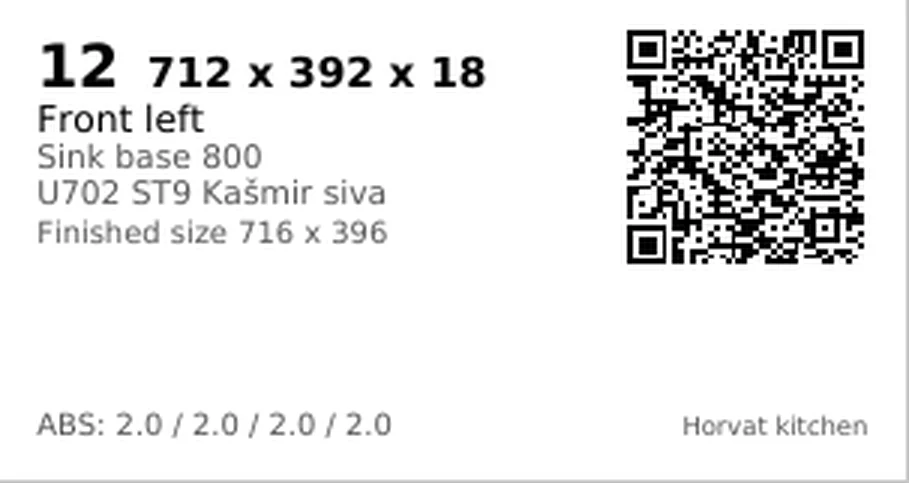
| Place | What it says | Example from the image |
|---|---|---|
| Top left, large | Part number, the same as in the cutting list | 12 |
| Next to the number, bold | Cut size: length × width × thickness, in mm | 712 x 392 x 18 |
| Second line | Board name | Front left |
| Third line, grey | Cabinet name | Sink base 800 |
| Fourth line, grey | Material (decor) | U702 ST9 Kašmir siva |
| Fifth line | Finished size: length × width with edge tape. Only when it differs from the cut size | Finished size 716 x 396 |
| Bottom left | Edge tape on the edges, in the order Longer 1 / Shorter 1 / Longer 2 / Shorter 2, in mm. A dash means an edge without tape | ABS: 2.0 / 2.0 / 2.0 / 2.0 |
| Bottom right, small | Project name | Horvat kitchen |
| Top right | QR code, 19 mm |
Rules:
- The first size is always the length along the grain, as in the cutting list. See Grain direction.
- The cut size is the finished size minus the edge tape on each edge. 0.4 mm edge tape gives a size with a decimal, e.g. 719.2 x 561.2 x 18. See Edge tape and cut size.
- Decimals on the label follow the interface language: a point in English (719.2; ABS: 2.0), a comma in Croatian (719,2; ABS: 2,0).
- A board without edge tape, e.g. a drawer bottom, has no Finished size line, and the edge tape reads ABS: - / - / - / -.
- A long board name is cut to the width of the label. EFS prints a long cut size in smaller letters so that it doesn't run into the QR code.
- The letters č, ć, đ, š and ž print correctly.
- For a free board (worktop, kickboard, filler, end panel, cornice) the third line repeats its name, because it has no cabinet.
Numbers as in the cutting list
The number on the label is the part's row number on the Cutting Sheet sheet of the cutting list (first column). The same number appears on:
- the part in the assembly instructions (the circle on the drawing and the No. column in the table);
- the part in the cutting diagrams (cutting list rows), see Nesting and board prices;
- the part card in the web viewer, when the project is published.
Rules:
- Every part gets its own label, also when several parts have the same size.
- The boards of the cabinets and the free boards get labels. Dowels, hardware and legs don't.
- Fronts hidden with Shift+F and boards you set to None get no label and are not counted.
- The numbers follow the current project. When you add or delete a cabinet, the numbers after it shift. After every change, export the cutting list, labels and assembly instructions again, all together.
Watch out
Don't mix labels from two exports. If you changed the project after printing the labels, number 12 on the old label and number 12 in the new cutting list can be different parts. The safest way is to export all production files at once, with the production package.
Partly used sheet
When some labels on the first sheet are already used, EFS can start from the first free one.
- EFS tab → Export panel → click Settings (at the bottom of the panel).
- In the Labels box, type in the Labels: skip on first sheet field how many labels on the sheet are used.
- Export the labels.

| Option | What it does | Default | Values |
|---|---|---|---|
| Labels: skip on first sheet | The number of labels already used on a partly used sheet. The first label goes to the first free place. | 0 | 0–23 |
Skipped places are counted in the same order as the print: left to right, row by row from the top. Example: a sheet with the first row and one label of the second row used has 4 used labels. Type 4 and the first label goes into the second row, middle column.
Rules:
- Skipping applies only to the first sheet. The other sheets start from the first place.
- The value is saved in the project and also applies to the labels in the production package.
Watch out
The value stays for the next print too. When you next print on a new sheet, set it back to 0, or the first places will stay empty.
QR code on the label
What the QR code holds depends on whether the project was published on the web when you exported the labels.
| Project state | What the QR opens |
|---|---|
| Published (Web publish panel) | The web viewer on projects.easyformstudio.com with that part highlighted and the part card |
| Not published | A short text with the part data, without a link |
Published project: the part in the web viewer
When the project is published, the QR code on every label leads to the same web preview of the project, with the part number in the address (ending in #part-12). The fitter scans the label with a phone and sees where the part goes.
- Before exporting the labels, publish the project: EFS tab → Web publish panel → type the Name → click Publish. The project must be saved. Everything about publishing is in the chapter Web preview and QR.
- Export the labels.
- Scan the QR code with the phone camera and open the link.
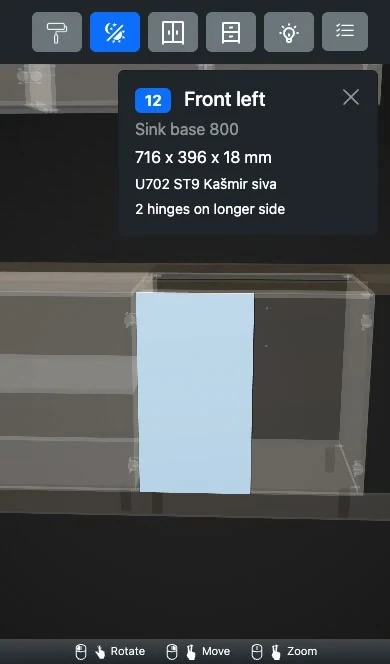
What you see:
- The part is coloured blue, and the rest of the project is see-through.
- The view turns towards the part.
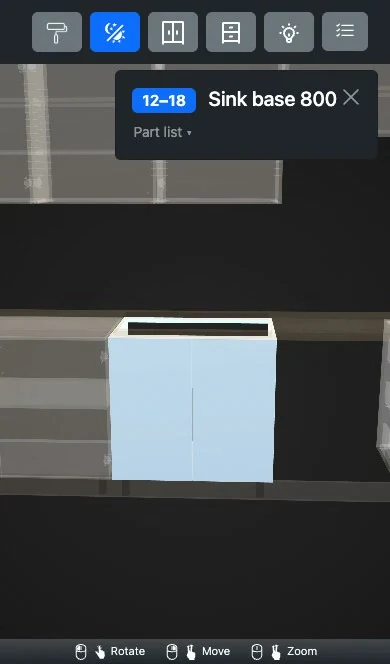
- At the top right is the part card: number, board name, cabinet, finished size, material and hardware (e.g. 6x dowel or 2 hinges on longer side).
- X on the card closes the card. The model goes back to normal, and the view returns to where it was before the highlighting.
The card shows the finished size (with edge tape), while the label shows the cut size in bold.
The Parts menu. The viewer's toolbar has a Parts button (a list icon with ticks). It opens a list of all the project's parts, grouped by cabinet:
- A tick next to a cabinet highlights all its parts. A tick next to a part highlights only that part.
- The Find a part or cabinet field narrows the list by number, part name or cabinet name.
- Clear removes all highlights.
- When several parts are highlighted, the card shows the range of numbers (e.g. 12–18) and the cabinet name, with the list of parts below. On a phone the list is folded; Part list ▾ opens it.
- The address in the browser follows the selection, so you can pass on a link with the highlighted parts.
The card and menu texts are in the language the project was published in, that is EFS's interface language at the time (Croatian, English or one of the six other languages).
Project not published
Without publishing, the QR code carries the part data as text. The phone camera then shows text, not a link:
EFS|Horvat kitchen|12|Sink base 800|Front left|716x396x18|U702 ST9 Kasmir siva
In order: the EFS mark, project name, part number, cabinet, board, finished size (length × width × thickness) and material. The letters č, ć, š, ž and đ in the QR code text become c, c, s, z and d.
You can read such a QR code with any QR code app. If you want links later, publish the project and export the labels again.
When you change the project after publishing
The web preview remembers the list of parts from the moment of publishing. The QR code on the label remembers only the part number.
Watch out
If you add or delete a board or a cabinet after publishing, the numbers in the project shift, while the web preview still has the old list. The QR from a new label can then highlight a different part. After every change, click Publish again, and only then export the labels. Publishing again keeps the same project address.
The New project button in the Web publish panel gives the next publish a new address. Old labels still lead to the old publish. When you delete a publish with the bin in the Web publish panel, its QR codes stop working (see Deleting from the web).
For advanced users
The address in the QR code is the address of the project's web preview with #part- and the number added, e.g. …/index.html#part-12. The cabinet QR in the assembly instructions uses #parts- and a range, e.g. #parts-12-18. You can type the same address with a number by hand or send it as a link.
Assembly instructions
Exporting assembly instructions
- EFS tab → Export panel.
- Click Assembly instructions (PDF).
- The save dialog opens in the project folder with the name
<project>_assembly.pdf. - Click Assembly instructions (PDF) at the bottom right.
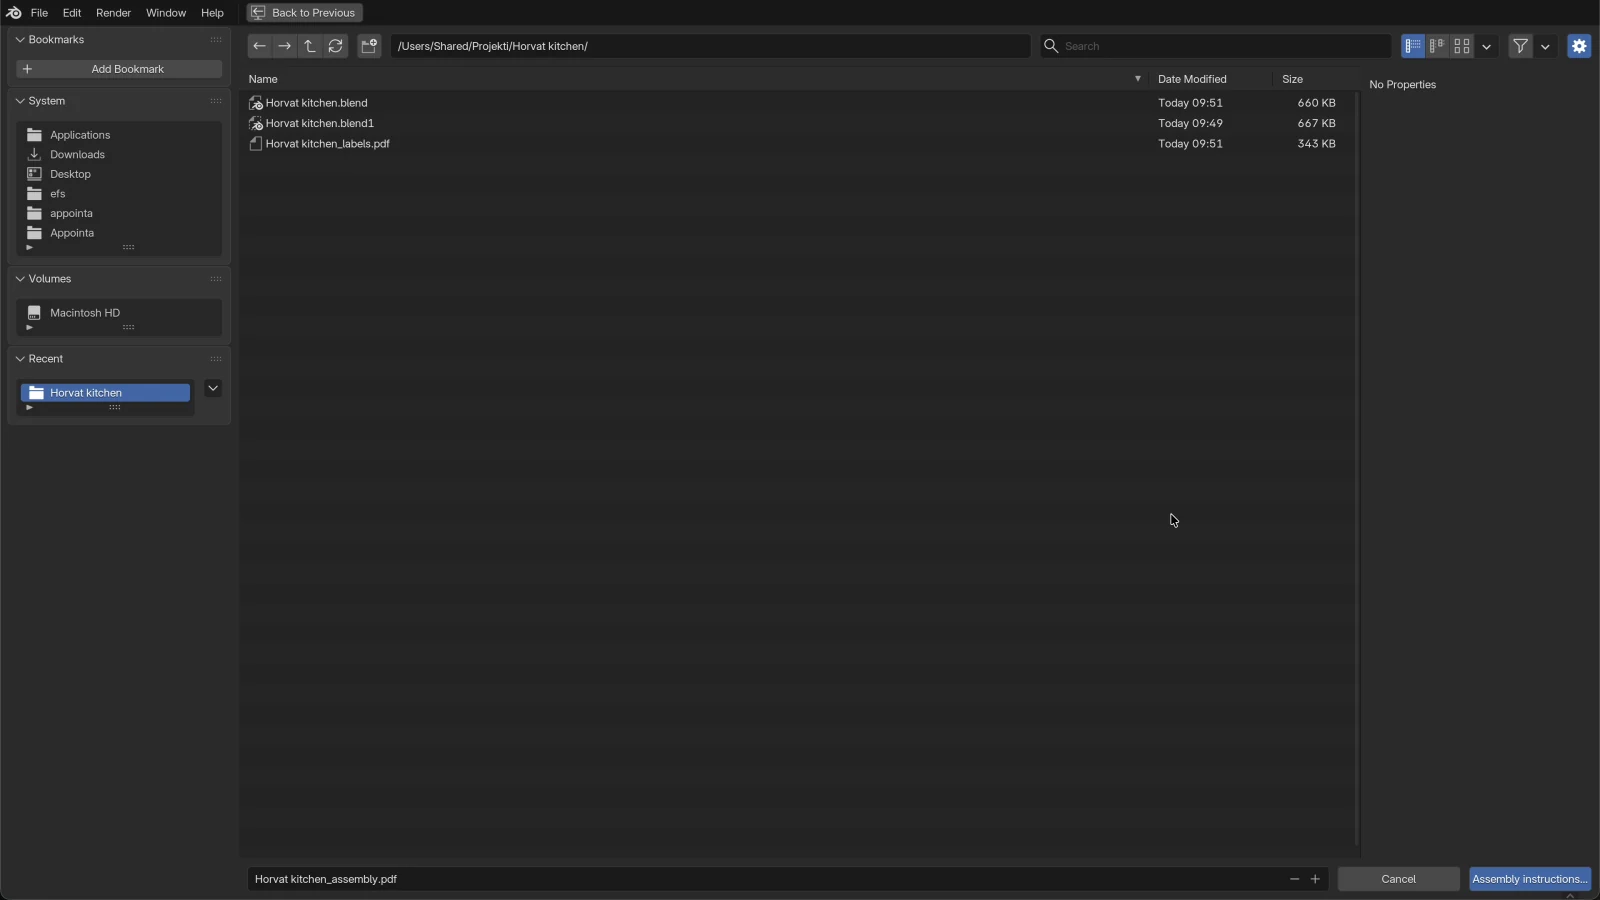
At the top right it says Export completed and the number of cabinets in brackets.
Cabinet page
Each cabinet has its own A4 page, in the same order as in the cutting list.
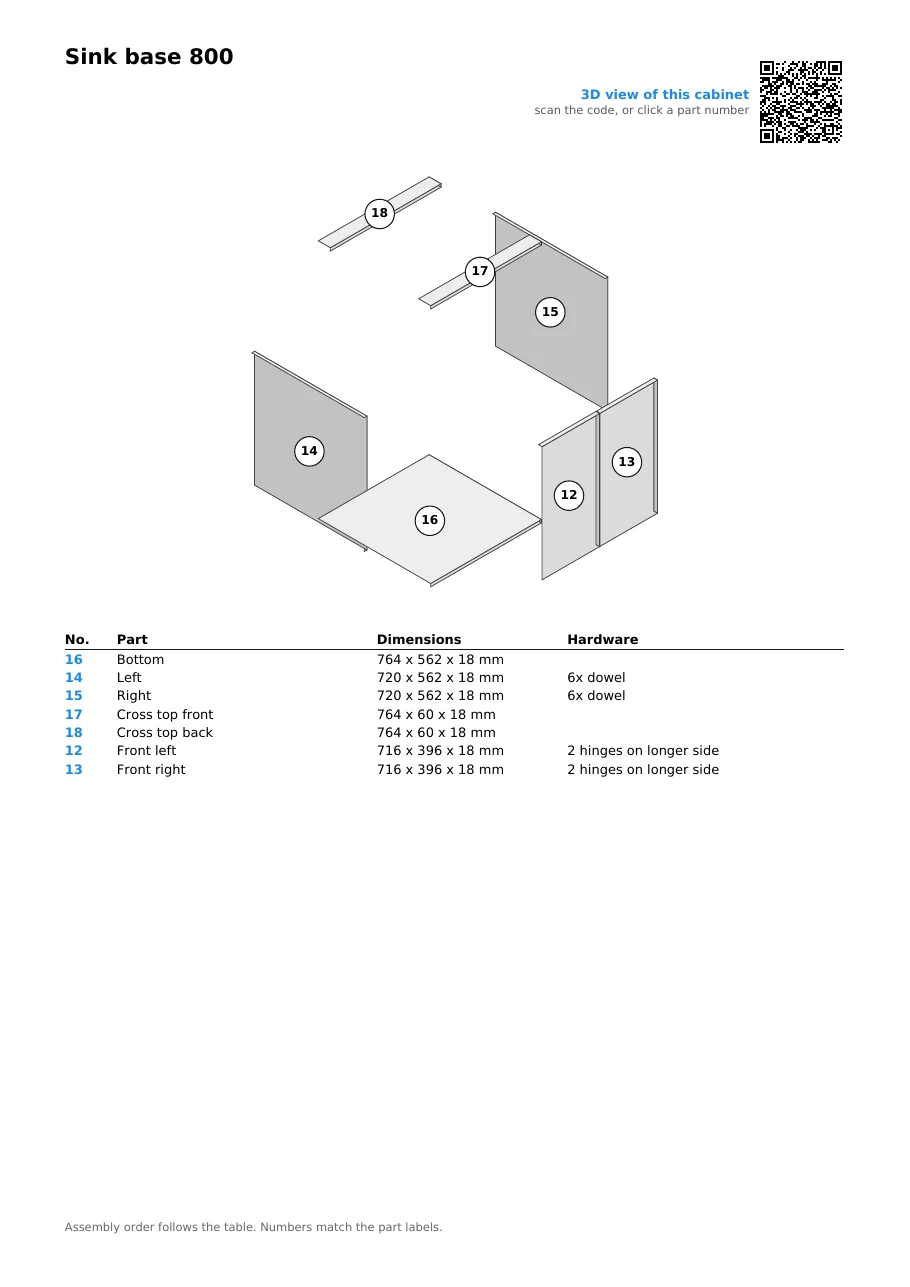
| Part of the page | What it contains |
|---|---|
| Title | Cabinet name. Below it, in grey, the cabinet's Note if one is entered |
| Top right | Cabinet QR with the text 3D view of this cabinet and scan the code, or click a part number. Only when the project is published |
| Exploded view | The cabinet's parts moved apart from the centre, in isometric view. Each part has a circle with its number |
| Table | Columns No., Part, Dimensions and Hardware, in assembly order |
| Bottom of the page | Assembly order follows the table. Numbers match the part labels. |
Rules for the exploded view:
- Each part moves away from the centre of the cabinet in the direction it lies: side panels to the left and right, top board up, bottom down. Parts from the middle of the cabinet, e.g. shelves, are pulled forward.
- Fronts are pulled further forward, so that they don't cover the carcass.
- The parts are drawn as grey boxes. Cut-outs, grooves and holes are not drawn; the board drawings and DXF are there for those. See Drillings, DXF, MPR and CIX.
- The number in the circle is the number from the label.
Rules for the table:
- Dimensions are finished sizes, with edge tape: length × width × thickness in mm. The cut size is on the label.
- When the table doesn't fit on the page, it continues on the next one, with the note continued on next page. The drawing is not repeated.
Assembly order
Each row of the table is one step: the part you fit next. EFS orders the rows by board type, in this order:
| Step | Parts |
|---|---|
| 1 | Bottom: Bottom, for a corner cabinet Corner bottom |
| 2 | Side panels: Left, Right; for a corner cabinet Left side 1 and 2, Right side 1 and 2, Left back, Right back |
| 3 | Vertical shelves (dividers) |
| 4 | Back |
| 5 | Top, Corner top and all cross boards (top and bottom cross boards) |
| 6 | Horizontal shelves, Corner shelf 1 to 3 |
| 7 | Other parts: drawer boxes (left, right, bottom, back), the corner joint boards Post left and Post right |
| 8 | Drawer fronts (Drawer 1 front…) |
| 9 | Doors and flaps |
Parts in the same step go in the order of their numbers.
Hardware in the table
The Hardware column shows the hardware that goes on that part:
| Entry | What it means |
|---|---|
| 6x dowel | The board face has 6 dowel holes. The dowels join this board to its neighbours. |
| 2 hinges on longer side | The door has 2 hinges on its longer edge. The number of hinges comes from the Hardware and joints box or from Project hardware. |
Rules:
- Dowels are counted on the board that has the face holes, usually the side panel. A board with holes only in its edge, e.g. the bottom, has an empty column.
- Hinges are listed only for doors (Front left, Front right…). Flaps have no hinge entry.
- Slides, handles, legs, hangers and screws are not in the table. The full hardware list is on the Hardware sheet of the cutting list and in the supplier order.
You choose a cabinet's joints and hardware in the Hardware and joints box, and for the whole project in Project hardware.
Cabinet QR and links
When the project is published, the assembly instructions get links to the web preview:
- The cabinet QR at the top right opens the web viewer with the whole cabinet highlighted. The card shows the part numbers (e.g. 12–18) and the cabinet name.
- The numbers in the table are blue. Clicking a table row in the PDF opens that part in the viewer, like the QR on the label.
- The circles on the drawing are links to their part too.
- Clicking the QR code in the PDF opens the same preview as scanning it.
Without publishing, the page has no QR code, and the numbers are black and without links.
Tip
Send the assembly instructions to the fitter's phone as a PDF. Tapping a blue number opens the part in 3D, without scanning.
Note
Links in a PDF open only in a PDF program that allows links. If tapping doesn't work, scan the QR code.
What doesn't go into the assembly instructions
- Free boards: worktop, kickboard, filler, end panel, cornice and boards added with B. They have a label, but no page in the assembly instructions. The position of the worktops and of the cut-outs in them is shown in Room documentation for the fitters.
- Hidden fronts and boards you set to None.
- Hardware without a board: dowels, legs and slides have no row of their own.
A project with only free boards has no assembly instructions. EFS then reports an error that starts with Assembly instructions (PDF): No cabinets in the scene.
Common problems and solutions
The QR code shows text instead of a link. The project wasn't published when you exported the labels. Publish the project in the Web publish panel, then export and print the labels again.
The QR opens the wrong part. The project was changed after publishing. Click Publish, then export the labels again. See When you change the project after publishing.
The QR opens the project, but the part isn't highlighted and there is no card. The project was published with an older version of EFS, without the list of parts. Click Publish again.
The print doesn't land on the labels. The printer is fitting the page. In the print dialog, choose actual size (100 %). Also check that the sheet has 24 labels of 70 × 37 mm without margins.
The first places on the sheet stayed empty. Labels: skip on first sheet still holds the number from the last print. Set it to 0 and export again.
Some fronts have no label. The fronts are hidden with Shift+F. Click Show fronts in the header and export again.
The number on the label doesn't match the cutting list. The cutting list and the labels were exported from different states of the project. Export them again together, most easily with the production package (Ctrl+Shift+E).
The corner of the label has no project name. The project has no name, so the corner stays empty. Type it in the Web publish panel, Name field, and export again.
The worktop isn't in the assembly instructions. Free boards have no page in the assembly instructions. They have a label and a row in the cutting list.
The numbers in the assembly instructions aren't blue. The project isn't published. Publish it and export the assembly instructions again.
The export reports a licence error. The trial or the subscription has ended. See When the free trial or the subscription ends.
Shortcuts in this chapter
| Key | Action |
|---|---|
| N | Show / hide the sidebar with the tabs |
| Shift+F | Hide fronts. Hidden fronts get no label and no place in the assembly instructions |
| Ctrl+S | Save the project (needed for publishing and for the suggested file name) |
| Ctrl+Shift+E | Production package: labels, assembly instructions and the other exports at once |
All shortcuts are in the chapter Keyboard shortcuts.
Next
Next chapter: The production package and the supplier order