Room, openings and installations
A kitchen starts with the room. In this chapter you enter the room's measurements, add corners, pillars and a hip roof where needed, and mark the window, door, sockets, water and drain on walls A, B, C and D. From this data EFS later makes the room documentation for the fitters and the electrician.
Video: B01 Room, openings and installations
The same workflow in a two-minute video.

Show me in the program
The interactive tour The room (3 min) shows you in the program where to click and what to type, step by step. In the EFS tab, open the Interactive tours panel and click Start next to the tour. The AI assistant also offers it when you ask how to do this.
Before you start
- Open a new project (see New project). The room is saved in the project, together with the cabinets.
- Turn on the sidebar: hold the mouse pointer over the 3D view and press N. Open the EFS tab.
- Measure the room on site: the clear dimensions from wall to wall and the height to the ceiling. For every window, door and installation, write down which wall it is on, how far it is from the corner and how high it is above the floor. Which corner is the start of which wall is explained in Walls A, B, C and D.
- The room is not required for working (see Without a room). You need it to mark openings and installations and for the Room documentation.
The workflow from the video
The video sets up a 3232 × 2400 × 2600 mm room, in which the same kitchen is built throughout the Kitchen from A to Z section.
- In the EFS tab, click the title of the Room properties panel.
- Turn on Show room. See Show room.
- Click the Width field, type
3232and press Enter. The same for Depth2400and Height2600. - Leave Left corner, Right corner, the pillars and Hip roof off: the room is rectangular. See Corners, pillars and hip roof.
- Open the Openings and installations subpanel, click + and choose Window. Set Wall B, From wall start 800 mm, Height from floor 1000 mm, Width 1000 mm and Height 1200 mm.
- Click + and choose Door. Set Wall C, From wall start 1300 mm, Width 900 mm and Height 2050 mm.
-
Add the installations on wall A, each with +:
Kind From wall start Height from floor For Water 1550 mm 550 mm sink Drain 1650 mm 400 mm sink 400 V connection 2900 mm 500 mm hob Socket 2300 mm 1100 mm above the worktop -
Look at wall A: every installation has a coloured marker, and the list in the subpanel shows them all with their measurements.
The details are in Openings and installations.
The Room properties panel
The panel is the third in the EFS tab, below Account and Decor comparison. While the room is off, it holds only Show room and Show floor.
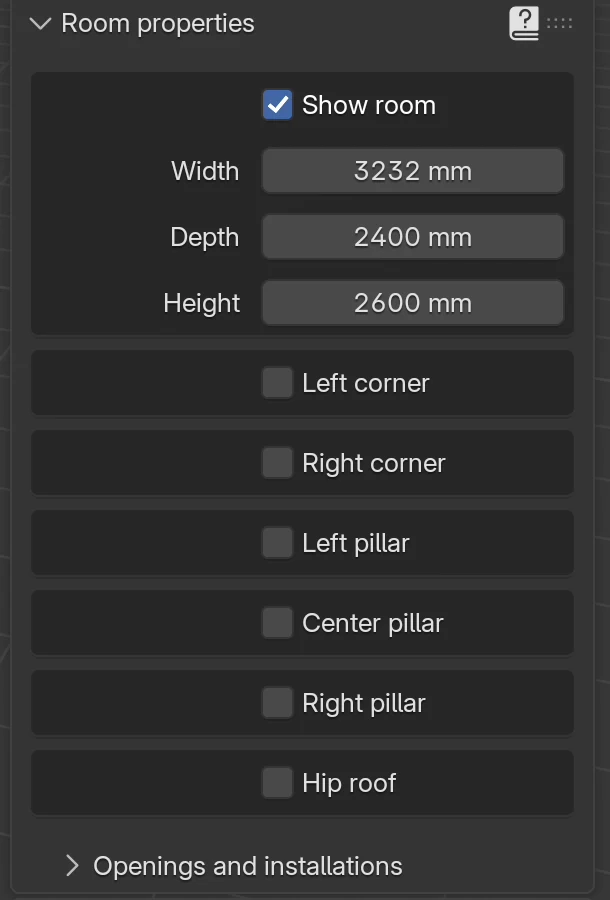
| Field | What it does | Default |
|---|---|---|
| Show room | Turns on the room: the floor and four walls. Only then do the measurements, corners, pillars, hip roof and the Openings and installations subpanel appear. | off |
| Width, Depth, Height | The room's measurements. See Room measurements. | 4500, 1500, 2650 mm |
| Left corner, Right corner | A block in a back corner of the room, e.g. a service riser or a chimney. | off |
| Left pillar, Center pillar, Right pillar | A pillar that sticks out of the left, back or right wall. | off |
| Hip roof | A ceiling that rises to a ridge. | off |
| Show floor | Only the floor plane, without walls. See Show floor. | off |
| Openings and installations | Subpanel with the list of windows, doors and installations and the Room documentation (PDF) button. | closed |
Show room
When you turn on Show room for the first time:
- EFS adds a 4500 × 1500 × 2650 mm room. Its back left corner is at the scene origin, where the red and green axes cross. The first cabinet also goes there (see Where a template goes).
- The walls facing you become invisible. Whichever side you look from, you see the inside of the room and the cabinets in it. A wall is visible when you look at it from the inside.
- The room stays selected: it has an orange outline, and the EFS tool header reads Room. When you later change the room fields, the selection stays as it was: if you selected a cabinet, the cabinet stays selected.
- The room is not a board. It doesn't go into the cutting list, the cost estimate or the production exports.
When you turn Show room off, the room is hidden together with the markers of the openings and installations. The measurements, corners, pillars and the list of openings and installations stay saved. When you turn it on again, everything is as before.
Note
Right after you turn it on for the first time, the room is selected, so X then deletes the room. If that happens, press Ctrl+Z.
Room measurements
| Field | What it does | Default | Values |
|---|---|---|---|
| Width | Length of walls A and C: from the left to the right wall. | 4500 mm | 1000–30000 mm |
| Depth | Length of walls B and D: from the back to the front wall. | 1500 mm | 600–30000 mm |
| Height | Height of the walls, from the floor to the ceiling. | 2650 mm | 1000–30000 mm |
Enter the clear dimensions, from wall to wall. Walls in EFS have no thickness.
Rules:
- The back left corner always stays at the origin. When you increase Width, the right wall (B) moves, and when you increase Depth, the front wall (C) moves.
- Changing the room's measurements doesn't move the cabinets. Cabinets along wall B or C stay where they were, and the wall can cut through them.
- Openings and installations are measured from the start of their wall. When you change the measurements, they stay at the same distance from that corner, and their markers in the 3D view move with the wall straight away. Example: a door on wall C, 1300 mm from the start, moves together with the B/C corner when the room's Width gets larger.
Tip
Enter the room's measurements before the cabinets and before the openings. That way you don't have to move anything.
Walls A, B, C and D
The walls are marked with letters. When you look from the front (angle 000° in the EFS tool header), wall A is in front of you, B on the right, C behind you and D on the left.
Each wall is measured from its left end, seen from inside the room looking at that wall. That end is the start of the wall: From wall start in the Openings and installations subpanel is measured from it, and the dimensions on the wall elevation in the documentation also start from it.
| Wall | Where it is (view 000°) | Start of the wall (0 mm) | Length | Z rotation of cabinets along the wall |
|---|---|---|---|---|
| A | back | corner with wall D (back left) | Width | 0° |
| B | right | corner with wall A (back right) | Depth | 90° |
| C | front | corner with wall B (front right) | Width | 180° |
| D | left | corner with wall C (front left) | Depth | 270° |
Example from the video: a 3232 × 2400 mm room. A window on wall B, 800 mm from the start, begins 800 mm from the back wall. A door on wall C, 1300 mm from the start, begins 1300 mm from the right wall.
The Z rotation column tells which wall EFS assigns a cabinet to. A cabinet with Z rotation 0° belongs to wall A, with 90° to wall B, and so on. That is how the room documentation draws it on the elevation of the correct wall. How a cabinet is turned is explained in Turning: R and Z rotation.
Corners, pillars and hip roof
For a room that isn't rectangular, turn on a corner, a pillar or the hip roof. Each has its own box with a checkbox. The fields appear only when you tick the checkbox.
The walls go around the corner or pillar, as in a real room. Width is always the measurement along wall A (left-right), and Depth the measurement along walls B and D (front-back).
Left corner and Right corner: a block in the back left (A/D) or back right (A/B) corner.
| Field | What it does | Default | Values |
|---|---|---|---|
| Width | How much the block takes up along wall A, measured from the side wall. | 300 mm | 10–1000 mm |
| Depth | How much the block takes up along the side wall (D or B), measured from wall A. | 300 mm | 10–1000 mm |
Left pillar (on wall D) and Right pillar (on wall B):
| Field | What it does | Default | Values |
|---|---|---|---|
| Width | How far the pillar sticks out of the wall into the room. | 300 mm | 10–1000 mm |
| Depth | Width of the pillar along the wall. | 300 mm | 10–1000 mm |
| Distance | From wall A to the pillar. If Left corner (for the left pillar) or Right corner (for the right pillar) is on, it is measured from that corner. | 300 mm | 10–30000 mm |
Center pillar (on wall A):
| Field | What it does | Default | Values |
|---|---|---|---|
| Width | Width of the pillar along wall A. | 300 mm | 10–1000 mm |
| Depth | How far the pillar sticks out of wall A into the room. | 300 mm | 10–1000 mm |
| Distance | From wall D to the pillar. If Left corner is on, it is measured from the corner. | 300 mm | 10–30000 mm |
Hip roof: the ceiling rises from wall D to the ridge, then falls to wall B. The ridge runs from wall A to wall C. The room's Height is the ceiling height at walls D and B, and the ridge is higher by the amount you enter in the hip roof's Height.
| Field | What it does | Default | Values |
|---|---|---|---|
| Distance | From wall D to the ridge. If it is larger than the room's Width, the ridge is on wall B. | 300 mm | 0–30000 mm |
| Height | How much higher the ridge is than the walls. | 300 mm | 0–30000 mm |
Rules:
- A pillar moves only if it fits. Left pillar and Right pillar must fit between wall A (or the corner) and wall C, and Center pillar between Left corner (or wall D) and Right corner (or wall B). If it doesn't fit, it stays where it was.
- When you turn off a corner, pillar or hip roof, the wall goes back to straight. The measurements you entered are kept for next time.
- Corners, pillars and the hip roof are only part of the room. They don't go into the cutting list, don't move cabinets and aren't drawn in the room documentation: the floor plan and the wall elevations show the room as a rectangle. If the fitter needs to know about them, write them in the Note of an opening or installation (see Fields).
- For a pillar or pipes in the corner of the kitchen, the corner cabinet has its own Cut-out (see Corner cabinet).
Show floor
Show floor adds only the floor plane, without walls. Use it when you don't need a room but want to see the floor below the cabinets, e.g. for a freestanding piece of furniture.
- Show floor is visible only while Show room is off.
- While the floor is on, the panel holds only Show floor. For a room, turn it off first.
- You can also remove the floor with X: click the floor and press X. Show floor then turns off, so Show room appears in the panel again.
- The floor has no Openings and installations subpanel and no room documentation.
Openings and installations
The Openings and installations subpanel is at the bottom of the Room properties panel. It is visible only while Show room is on. It holds the list, the + and − buttons, the fields of the selected row and the Room documentation (PDF) button.
Kinds
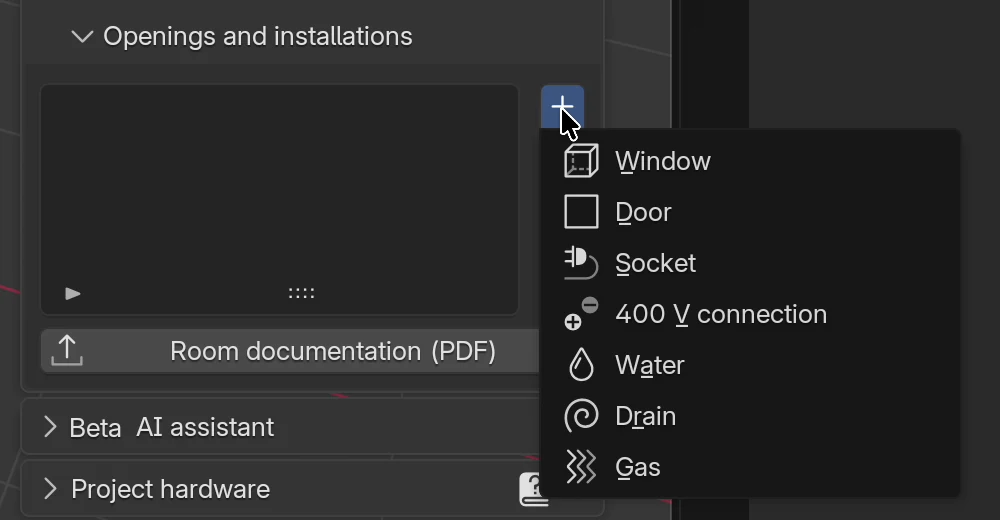
| Kind | What it is | From wall start measures to | Height from floor is |
|---|---|---|---|
| Window | An opening in the wall with a width, height and sill. | the left edge of the window | the sill: the bottom edge of the opening |
| Door | An opening down to the floor. | the left edge of the door | 0 (a door starts at the floor) |
| Socket | A 230 V socket. | the centre of the socket | the centre of the socket |
| 400 V connection | A connection for a hob or an oven. | the centre of the connection | the centre of the connection |
| Water | Cold and hot water. | the centre of the connection | the centre of the connection |
| Drain | A drain. | the centre of the drain | the centre of the drain |
| Gas | A gas connection. | the centre of the connection | the centre of the connection |
The "left edge" of an opening is the edge closer to the start of the wall, seen from inside the room.
Adding
- Open the Openings and installations subpanel.
- Click + to the right of the list and choose a kind.
- A new row appears in the list and is selected straight away. Its fields are below the list.
- Click the Wall field and choose a wall.
- Enter From wall start and Height from floor, confirming each with Enter.
- For a window or door, also enter Width and Height.
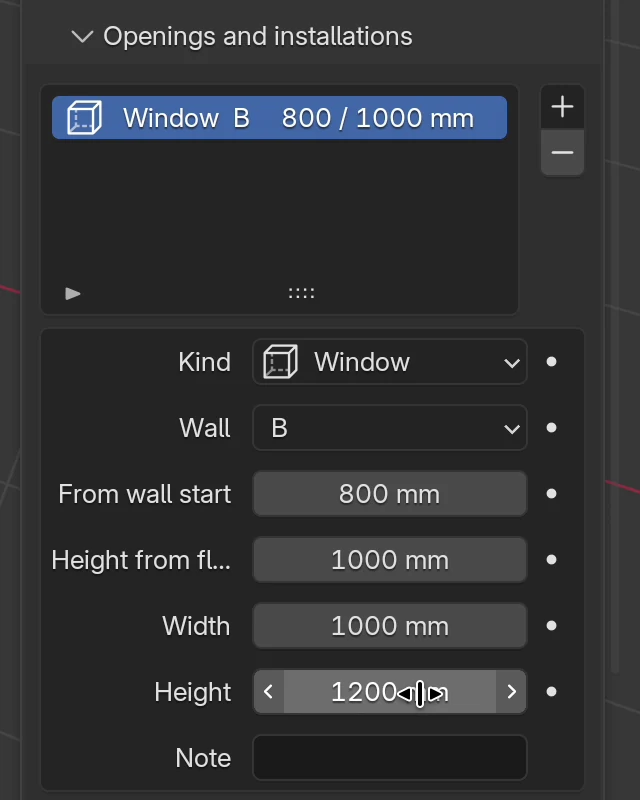
A new row gets wall A, From wall start 500 mm and the default measurements of its kind:
| Kind | Height from floor | Width × Height | Marker on the wall |
|---|---|---|---|
| Window | 1000 mm | 1000 × 1200 mm | blue panel |
| Door | 0 mm | 900 × 2050 mm | brown panel |
| Socket | 300 mm | – | yellow square |
| 400 V connection | 500 mm | – | orange square |
| Water | 500 mm | – | blue square |
| Drain | 450 mm | – | grey square |
| Gas | 600 mm | – | yellow square |
Tip
When you open the Wall menu, press the wall's letter (A, B, C or D). The wall is chosen without searching for it with the mouse.
Fields
| Field | What it does | Default | Values |
|---|---|---|---|
| Kind | The kind of opening or installation. You can also change it later. | the kind chosen with + | the 7 kinds from the Kinds table |
| Wall | The wall the opening or installation is on. | A | A, B, C, D |
| From wall start | From the start of the wall to the left edge of the opening, or to the centre of the installation. In a narrow panel the label is cut short, e.g. From wall st…. | 500 mm | 0–30000 mm |
| Height from floor | Window sill, 0 for a door, centre of a socket or pipe. | depends on the kind | 0–10000 mm |
| Width | Width of the opening. Only for a window and a door. | 1000 mm (window), 900 mm (door) | 10–10000 mm |
| Height | Height of the opening. Only for a window and a door. | 1200 mm (window), 2050 mm (door) | 10–10000 mm |
| Note | Your text, e.g. "socket with switch" or "drain Ø50". It goes into the Note column of the installation plan. | empty | free text |
The dots to the right of the fields are Blender's animation buttons. You don't need them for the room; don't click them.
Rules:
- Every change to a field redraws the markers on the walls straight away.
- When you change Kind, the measurements stay. A socket turned into a window becomes an 80 × 80 mm window. Enter its Width and Height.
- EFS doesn't check whether an opening fits on the wall. If From wall start is larger than the length of the wall, the marker ends up outside the room.
- A window and a door are not holes in the wall. They are coloured panels on the inner face of the wall that show where the opening is.
Window and door
In the video the window is on the right wall B, and the door on the front wall C, behind you when you look from the front.
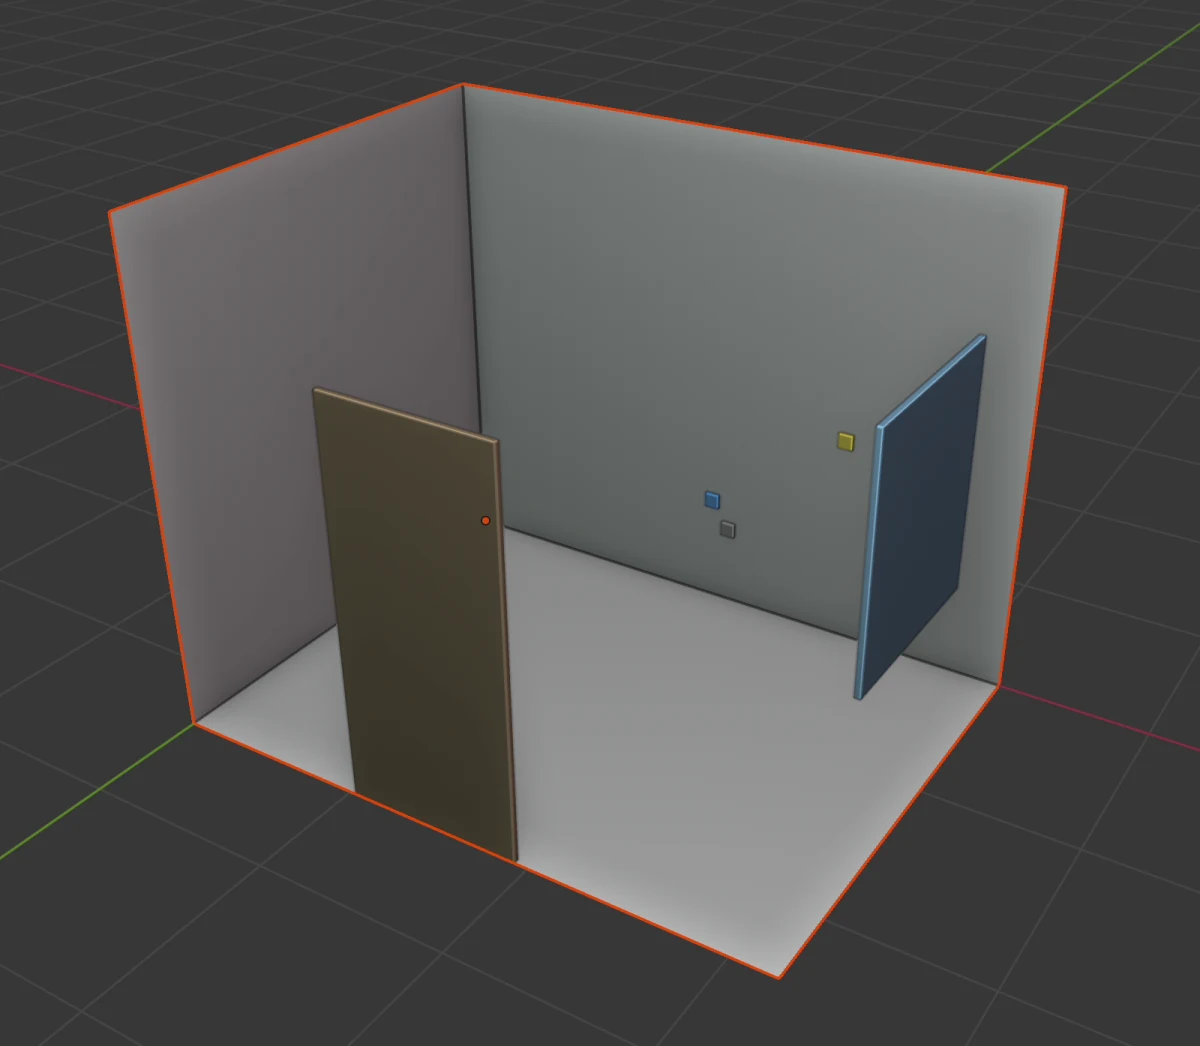
Window: Wall B, From wall start 800 mm, Height from floor 1000 mm, Width 1000 mm, Height 1200 mm. The window takes up wall B from 800 to 1800 mm, and from 1000 to 2200 mm in height.
Door: Wall C, From wall start 1300 mm, Width 900 mm, Height 2050 mm. Height from floor stays 0.
Note
In the picture walls B and C are not visible, because they face the view. That is why the window and door seem to float. When you turn the view towards that wall, the panel lies on the wall.
Installations
An installation is a point on the wall. From wall start and Height from floor set its centre. In the video all four are on wall A, below the future sink and hob.
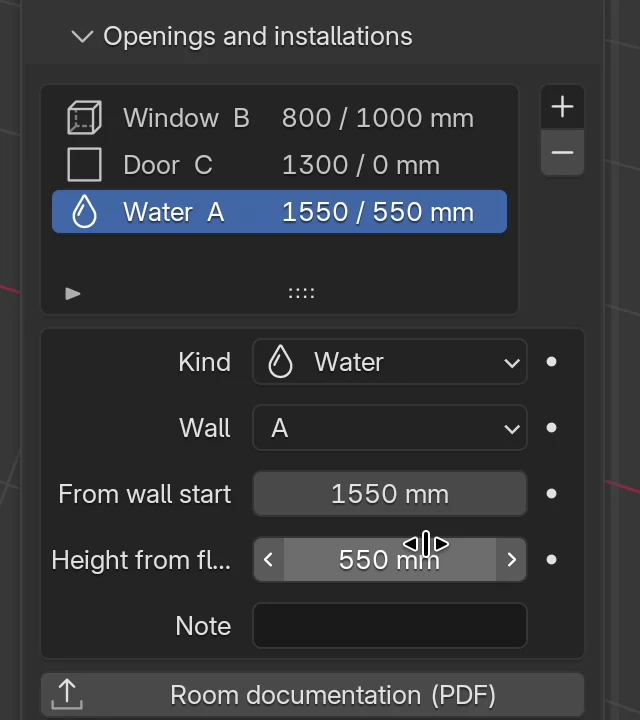
An installation has no Width and Height fields. Its marker on the wall is an 80 × 80 mm square in the colour of its kind.
Tip
Draw the installations as they are on the wall, including the ones that need to be moved. In the Room documentation EFS compares them with the installations that the sink, hob, cooker hood, oven, fridge and dishwasher need, and marks in red the ones that are not in place.
List and markers on the walls
Each row of the list has the kind's icon, the kind's name and the wall, and on the right From wall start / Height from floor, e.g. Water A 1550 / 550 mm. When the list has more rows than fit, scroll it with the mouse wheel or drag the dots below the list to make it longer.
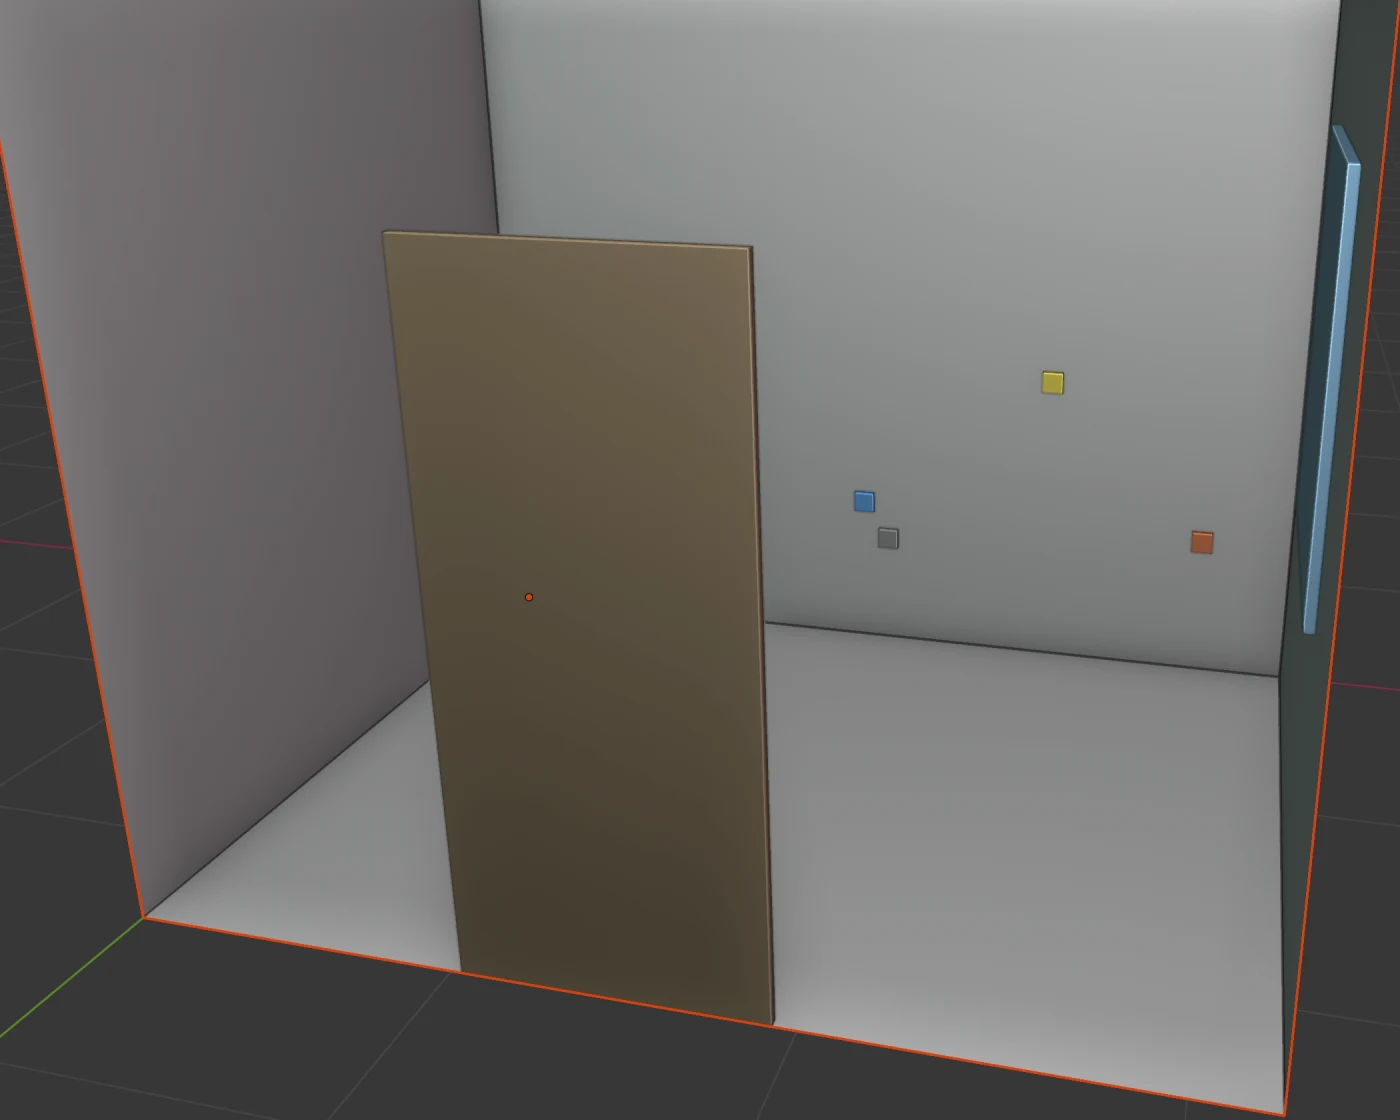
Markers on the walls:
- Every kind has its own colour (table in Adding).
- A marker can't be clicked in the 3D view. You select an opening or installation in the list.
- The markers are hidden and shown together with the room (Show room).
- In the customer render the window and door are visible, and the installation markers are hidden (see One-click render).
Editing and deleting
Change: click a row in the list and change the fields below the list.
Delete:
- Click a row in the list.
- Click − to the right of the list.
The row and its marker disappear without confirmation. The − button is grey while no row is selected. Undo a deletion with Ctrl+Z.
How the room affects the cabinets
- The first cabinet goes into the back left corner of the room (the corner of walls A and D), because that corner is at the scene origin. Where the next cabinets go is explained in Where a new cabinet goes.
- The cabinet's wall is set by EFS from Z rotation: 0° is wall A, 90° wall B, 180° wall C, 270° wall D. Cabinets are placed along the walls in the chapters Base units and the corner and Wall units, tall units and flaps.
- The room doesn't stop cabinets. A cabinet can go into a wall, a pillar or a window, and stand in front of a socket. EFS doesn't warn you about it. Check by eye and in the Room documentation.
- The room's measurements don't move cabinets. If you change the room once the cabinets are placed, move the cabinets along walls B and C yourself (see Moving: 1, 2 and 3).
- The height of the wall units is not set by the room but by the Upper elements height field in the Scene properties panel (default 1430 mm). See Wall units, tall units and flaps.
- Water, drain and gas behind a cabinet set the Opening for pipes in the back: the opening takes in the markers that are behind the back. See Bathroom: siphon and pipes.
- Customer render: if the project has no camera of its own, EFS places a temporary camera inside the room for the render, in the corner opposite the furniture. See One-click render.
- Room documentation draws the room, openings, installations and cabinets wall by wall. See Room documentation for the fitters.
Common problems and solutions
The panel has only Show floor, there is no Show room. The floor is on. Turn off Show floor, and Show room appears.
There is no Openings and installations subpanel. The room is not on. Turn on Show room. The subpanel is at the bottom of the panel, below Hip roof.
The room has disappeared, and when I turn it on, it measures 4500 × 1500 × 2650 mm. The room was selected, e.g. right after you turned it on, and was deleted with X. Press Ctrl+Z until it is back, or enter the measurements again. The openings and installations stay in the list.
I can't see the wall I'm looking through. That is intended: the wall facing you is invisible so that you can see inside. Turn the view and you will see it from the inside.
The door is at the wrong end of the wall. From wall start is measured from the left end of the wall, seen from inside the room. For wall C that is the corner with wall B, for wall D the corner with wall C. See the table in Walls A, B, C and D.
A marker floats outside the room. From wall start is larger than the length of the wall. Check Wall and From wall start.
The window has turned into a small square. You changed the row's Kind from an installation to a window, and the measurements stayed at 80 × 80 mm. Enter Width and Height.
I can't click a marker on the wall. Markers can't be selected in the 3D view. Click the row in the list.
The pillar doesn't move when I change Distance. A pillar at that distance doesn't fit in the room. Reduce the pillar's Distance or Depth, or make the room larger.
The − button is grey. No row is selected. Click a row in the list.
The corner or pillar is missing from the room documentation. The documentation draws the room as a rectangle. Write the corner or pillar in the Note of a window, door or installation on that wall.
Shortcuts in this chapter
| Key | Action |
|---|---|
| N | Turns the sidebar with the tabs on / off |
| Enter | Confirms the measurement you typed |
| A, B, C, D | In the open Wall menu, chooses that wall |
| Ctrl+Z | Undoes the last action, including deleting the room or a row |
| X | Delete: also deletes the room or the floor, if it is selected |
All shortcuts are in the chapter Keyboard shortcuts.
Next
Next chapter: Base units and the corner