How a cabinet is built
A cabinet in Easy Form Studio is made of boards, and you set up each of them in the EFS - Cabinet tab: side panels, top and bottom, cross boards, back, fronts, drawers, shelves, legs, Gola profile and joints. This chapter goes through the tab panel by panel, in the order of the interface, and for every field it tells you what happens to the boards and in the cutting list.
Video: A03 How a cabinet is built
The same workflow in a video of two and a half minutes.

Show me in the program
The interactive tours Fronts and drawers (3 min) and The back and the construction (2 min) show you in the program where to click and what to type, step by step. In the EFS tab, open the Interactive tours panel and click Start next to the tour. The AI assistant also offers them when you ask how to do this.
Before you start
- Open a project with at least one cabinet. How to add a cabinet is explained in the chapter The interface and your first cabinet.
- Click any board of the cabinet. The EFS - Cabinet tab always shows the whole cabinet the board belongs to, and the header shows the name of the board you clicked.
- If the sidebar is not open, hold the mouse pointer over the 3D Viewport and press N.
- The panels below Cabinet properties are closed. Click a panel's title (Front, Drawers, Construction…) to open it.
What a cabinet is made of
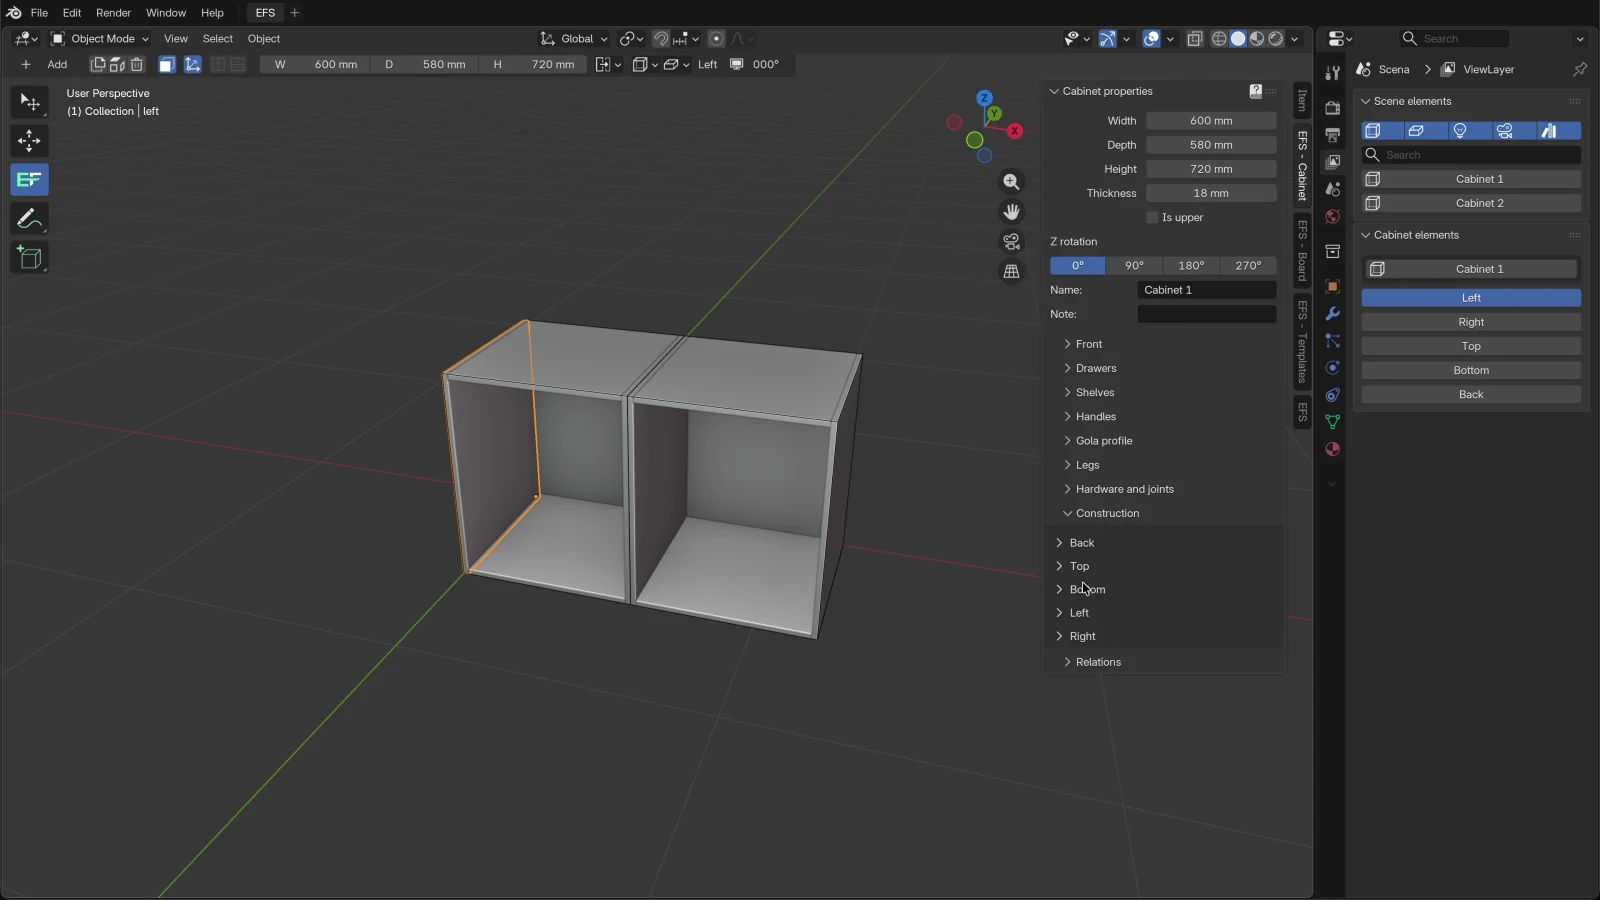
A new cabinet is an open carcass of five boards. You add the rest as you need it.
| Board | Name in the Cabinet elements list and in the cutting list | When it exists |
|---|---|---|
| Side panels | Left, Right | Always, unless you set them to None |
| Top board | Top | When the top is Standard |
| Cross boards | Cross top front, Cross top back (at the bottom: Cross bottom…) | When you build the top or the bottom from cross boards |
| Bottom | Bottom | When the bottom is Standard |
| Back | Back | Always, unless you set it to None |
| Fronts | Front left, Front right, Front top, Front bottom | When you choose doors or a flap in the Front panel |
| Drawers | Five parts for each drawer: Drawer 1 front, Drawer 1 left, Drawer 1 right, Drawer 1 bottom, Drawer 1 back | When you choose a type and a number in the Drawers panel |
| Shelves and dividers | Shelf horizontal, Shelf vertical | When you add them (Shift+H, Shift+V) |
| Legs | Not boards: they go into the hardware list | When you choose a type in the Legs panel |
Rules that apply to the whole cabinet:
- Width, Depth and Height are the outer dimensions of the cabinet. The depth includes the fronts and a lay-on back, and the height does not include the legs.
- A front and a lay-on back reduce the depth of the side panels, the top and the bottom. Example: a cabinet 580 mm deep with a 3 mm lay-on back has side panels 577 mm deep. When you add 18 mm doors, the side panels become 559 mm deep, and the whole cabinet stays 580 mm.
- A board you set to None is hidden and does not go into the cutting list.
- A cabinet has either fronts or drawers. When you choose a front type, the drawers disappear, and the other way round.
- Every change to a field rebuilds the boards, drillings and dowels at once. The decor of the fronts stays when you change the front type or the number of drawers.
- A new cabinet gets the default values from the tables below. If you have saved My settings, it starts from your construction (see Working faster), and it takes hardware and joints from Project hardware (see Project hardware).
Field names
The same word in the interface means the same thing in every panel. All dimensions are in mm.
| Name in the interface | Croatian interface | What it means on the board |
|---|---|---|
| Overflow (left, right, top, bottom) | Prevjes | How far the board extends past the edge of the cabinet or of the neighbouring board; a negative value shortens it. |
| Engagement | Uvučenost | For the top and the bottom: how far the board is lowered below the top edge or raised above the bottom edge of the cabinet. For the back: how far the back is set in from the back edge of the carcass. |
| Front recess, Back recess | Prednji urez, Stražnji urez | How much shorter the board is than the front or back edge of the carcass, so it is set inwards. |
| Gap | Razmak | For fronts: the gap between the edge of the front and the edge of the cabinet. For a lay-on back: how much smaller the back is on each side. |
| Clearance | Odmak | For shelves: how much narrower the shelf is than the inner width, half on the left and half on the right. |
| Depth (back) | Dubina | How deep the groove or rebate is in the board. |
| Thickness | Debljina | The thickness of the board. |
The workflow from the video
The video goes through the whole construction on two empty cabinets. The same steps, with links to the details:
- Click a board of the first cabinet and open the EFS - Cabinet tab.
- Open Construction: inside are Back, Top, Bottom, Left and Right.
- In Top change Left joint to Continuous: the top board runs over the left side panel. Set it back to Inset. See Top.
- In Top change Construction to Double cross boards: instead of a full board you get two cross boards. See Cross boards.
- In Back change Construction from Lay-on to Grooved. See Back.
- In Front choose Type: Two doors. See Front.
- In the header click Add → Horizontal shelf (or press Shift+H). Press O to open the doors and see the shelf, then O again to close them. See Shelves.
- Click a board of the second cabinet. In Drawers choose Type: Outer drawers and enter Number 3. See Drawers.
- In Legs choose Squared legs. See Legs.
- In Gola profile enter Count 2. See Gola profile.
- In Hardware and joints choose Joints type: Dowels. Press Alt+Z for the X-ray view, in which you see the dowels, then Alt+Z again. See Hardware and joints.
The EFS - Cabinet tab
The panels are in the tab in this order:
| Panel | What it is for |
|---|---|
| Cabinet properties | Dimensions, board thickness, wall unit, rotation, name and note |
| Front | Doors and flaps |
| Drawers | Outer or inner drawers and the settings of each drawer |
| Shelves | Dimensions of shelves and dividers, shelf supports, clothes rail, offsets and compartments |
| Handles | Drilling for handles, or push to open |
| Gola profile | Grooves in the side panels for opening without a handle |
| Legs | Adjustable legs |
| Hardware and joints | Hinges, slides, flap lift, hangers and carcass joints |
| Construction | Back, Top, Bottom, Left, Right |
| Relations | Neighbouring cabinets that go together with this one |
The corner cabinet has its own tab with different panels. See Corner cabinet.
Cabinet properties
The top part of the tab, always open.
| Option | What it does | Default | Values |
|---|---|---|---|
| Width | Outer width. The top and bottom, cross boards, back, fronts, drawers and shelves adjust by themselves. | 600 mm | 100–5000 mm |
| Depth | Outer depth, including the front and a lay-on back. | 580 mm | 100–5000 mm |
| Height | Outer height of the carcass, without legs. | 720 mm | 100–5000 mm |
| Thickness | Carcass thickness: sets the same thickness for the side panels, the bottom, the top and all shelves. Fronts and back have their own thickness. | 18 mm | 0–100 mm |
| Is upper | The cabinet becomes a wall unit: it rises to the height in the Upper elements height field (EFS tab, Scene properties panel), and its fronts move to material group F 2. When you switch it off, the cabinet drops to the floor and the fronts go back to F 1. | off | on, off |
| Z rotation | Turns the cabinet around the vertical axis. | 0° | 0°, 90°, 180°, 270° |
| Name | The cabinet's name in lists and exports. | Cabinet 1, Cabinet 2… | free text |
| Note | Your note on the cabinet. | empty | free text |
Rules:
- Is upper is shown only while the cabinet has no legs. When you choose legs, it switches off by itself.
- You can also change the thickness of single boards separately, in the Construction panel. Thickness here sets them all back to one value.
- If the cabinet is related to its neighbours, Joint width (the sum of the widths with the gaps) appears under Width, and Joint height appears under Height. See Relations.
- When you select several cabinets, the top of the panel says how many are selected and that the fields show the active cabinet. There you find the buttons Copy to selected cabinets and Align to active, and with two selected also Fill the gap and Relate to the selected cabinet. The details are in the chapter Working faster.
Watch out
Thickness also sets the same value for side panels and a bottom that you have set to None in the Construction panel. The top and bottom, cross boards and shelves are then shortened as if the side panel were there, and dividers are raised as if the bottom were there. If the cabinet has no side panel or no bottom, change the thickness in the Construction panel, for each board separately. If it has already happened, set that side to Standard and then to None again.
Front
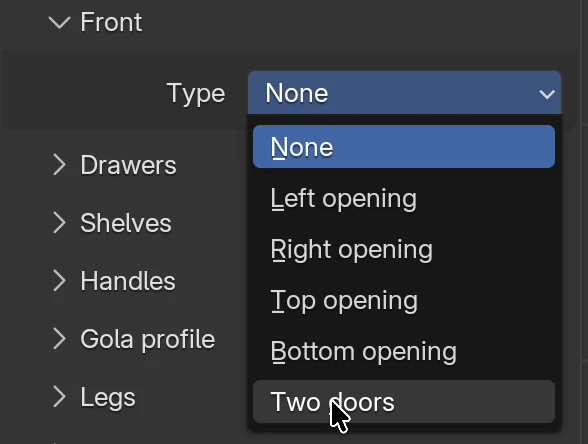
The cabinet's doors and flaps. In the video: click Front, open the Type drop-down menu and choose Two doors.
- Click a board of the cabinet.
- Open the Front panel.
- In the Type field choose the front type.
- If needed, adjust Thickness, Gap and the overflows.
- You choose the hinges and the flap lift in the Hardware and joints panel.
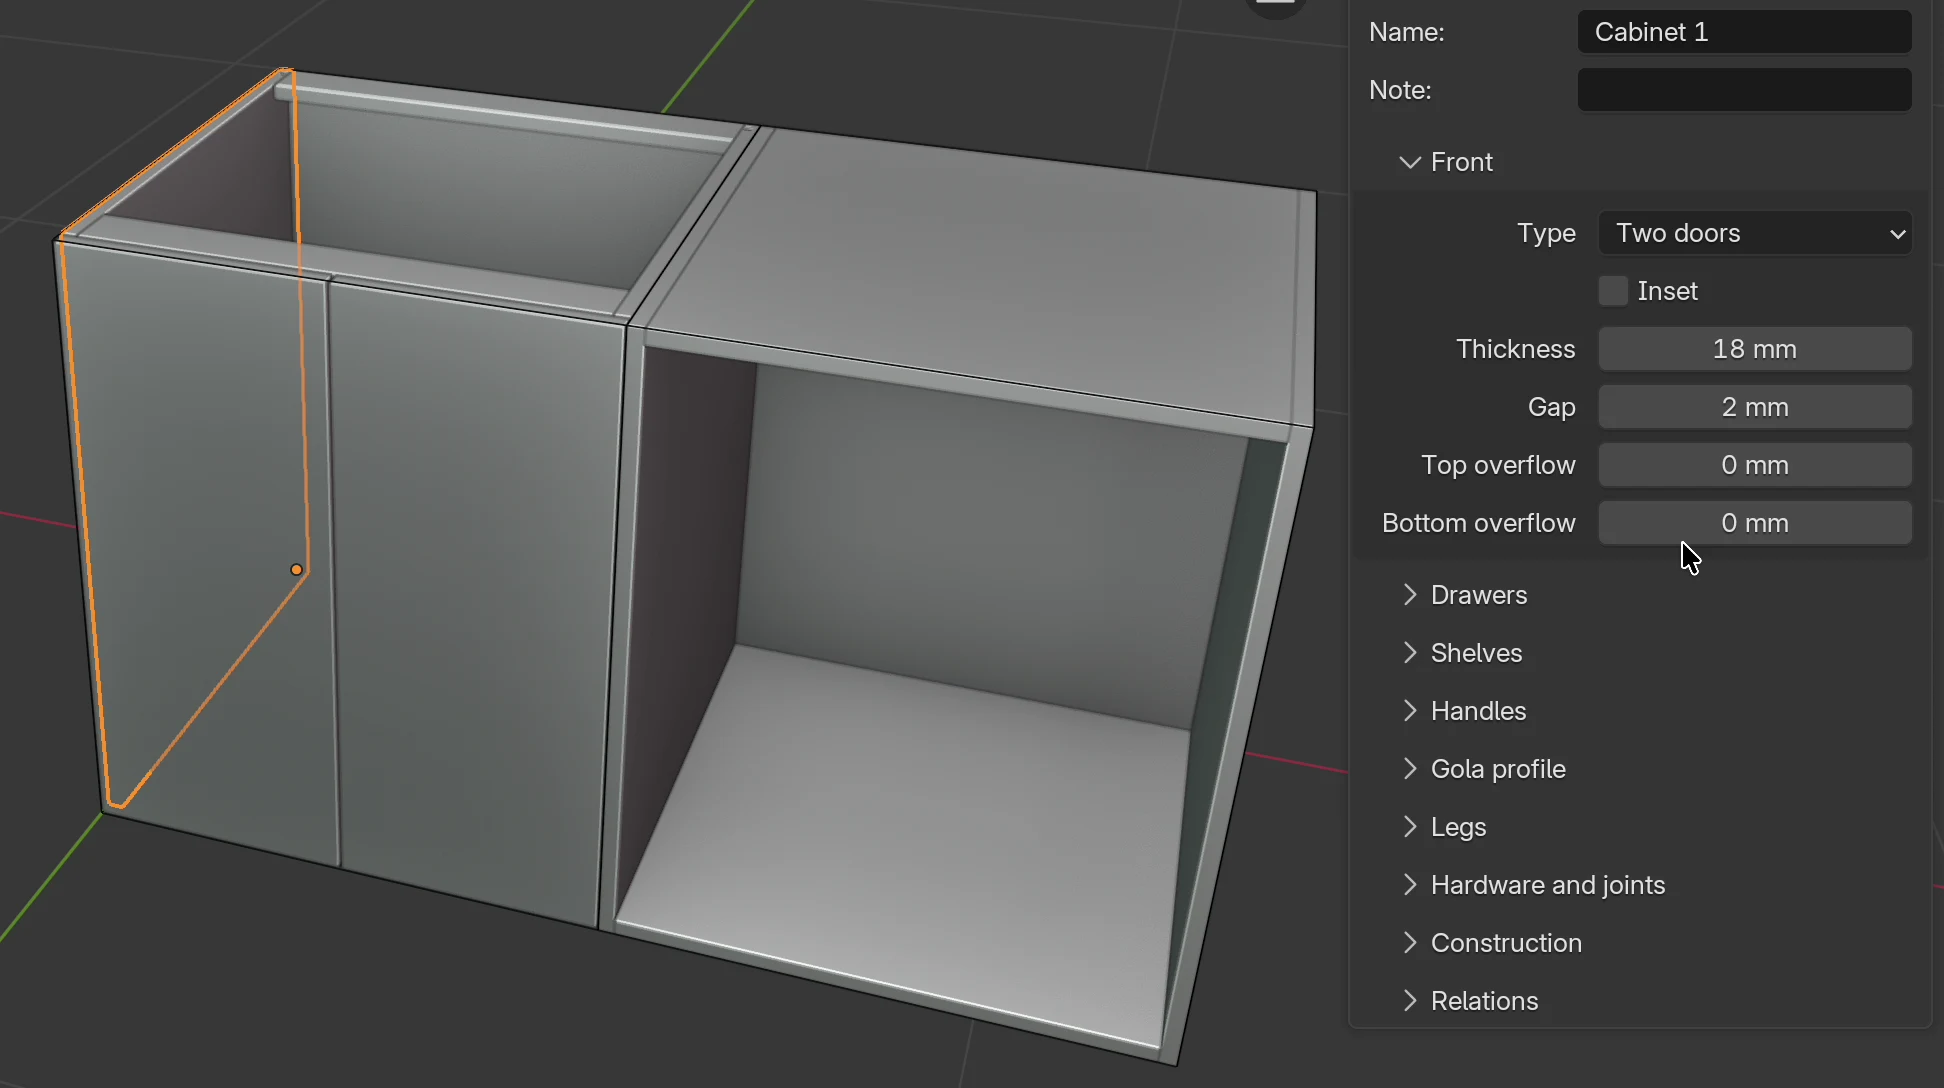
Front type
| Type | What you get |
|---|---|
| None | A cabinet without a front. |
| Left opening | One door hinged on the left. |
| Right opening | One door hinged on the right. |
| Top opening | A flap hinged at the top. |
| Bottom opening | A flap hinged at the bottom. |
| Two doors | Two doors hinged on the outer sides, meeting in the middle. |
Options
| Option | What it does | Default | Values |
|---|---|---|---|
| Type | Front type, see the table above. | None | 6 types |
| Inset | The front sits inside the carcass, between the side panels, the top and the bottom, flush with the front edge. The side panels, top and bottom then run the full depth (less a lay-on back). | off | on, off |
| Thickness | Front thickness. The side panels, top and bottom are shallower by this amount. | 18 mm | 0–100 mm |
| Gap | The gap from the edge of the cabinet to the edge of the front, on each side. With two doors the gap in the middle is double. | 2 mm | 0–100 mm |
| Left overflow | Moves the left edge of the front. Not shown for Two doors. | 0 mm | −2000 to 2000 mm |
| Right overflow | Moves the right edge of the front. Not shown for Two doors. | 0 mm | −2000 to 2000 mm |
| Top overflow | The front extends this far above the top edge (negative: lower). | 0 mm | −2000 to 2000 mm |
| Bottom overflow | The front extends this far below the bottom edge (negative: higher). | 0 mm | −2000 to 2000 mm |
The fields other than Type are shown only after you choose a front.
How EFS works out the front sizes (cabinet 600 × 720 mm, Gap 2 mm):
- One door: 596 × 716 mm.
- Two doors: each 296 × 716 mm. Between them is a 4 mm gap.
- Inset: the door is also narrower by both side panels and lower by the top and the bottom (with their Engagement). With 18 mm boards one door is 560 × 680 mm.
Note
On single doors and flaps, the overflow on the hinge side moves the whole front, and the overflow on the opposite side extends it. With Left opening a positive Left overflow moves the door to the right, and a positive Right overflow extends it to the right. With Right opening it is the other way round. On a Top opening flap the same applies to Top overflow (moves) and Bottom overflow (extends), and on Bottom opening the other way round. Left overflow and Right overflow of a flap extend it to that side.
Tip
To extend a Left opening door by 10 mm to the left, set Left overflow to −10 mm and Right overflow to 10 mm. The right edge then stays where it was.
Rules:
- When you choose a front, the drawers disappear. A cabinet has either fronts or drawers.
- Fronts get material group F 1, and on a wall unit F 2. The edge tape of fronts is 2 mm by default. See Decors, edge tape and materials.
- When you change the front type, the new front keeps the decor of the old one.
- F cycles through the fronts of the selected cabinet: None → Left opening → Right opening → Two doors → None. In the second round the same fronts come with Inset switched on. You choose flaps in the menu.
- O opens and closes the doors and drawers of the selected cabinet.
- Shift+F hides all the fronts in the scene, so you can see inside. You bring them back with the fronts icon in the 3D Viewport header.
Watch out
Fronts hidden with Shift+F do not go into the cutting list, the drawings or the cost estimate. Bring them back with the icon in the header before you export.
Watch out
The Left overflow and Right overflow fields disappear when you choose Two doors, but their values stay. If you set a Right overflow before, both doors become wider by that amount and overlap in the middle. Set the overflows back to 0 before you switch to two doors.
Drawers
Drawers take up the whole height of the cabinet and divide it by ratios. In the video: on the second cabinet open Drawers, choose Outer drawers and enter Number 3.
- Click a board of the cabinet.
- Open the Drawers panel.
- In the Type field choose Outer drawers or Inner drawers.
- Click the Number field, type the number of drawers and press Enter.
- If needed, open the Drawer 1, Drawer 2… section and adjust that drawer.
- You choose the slides in the Hardware and joints panel.
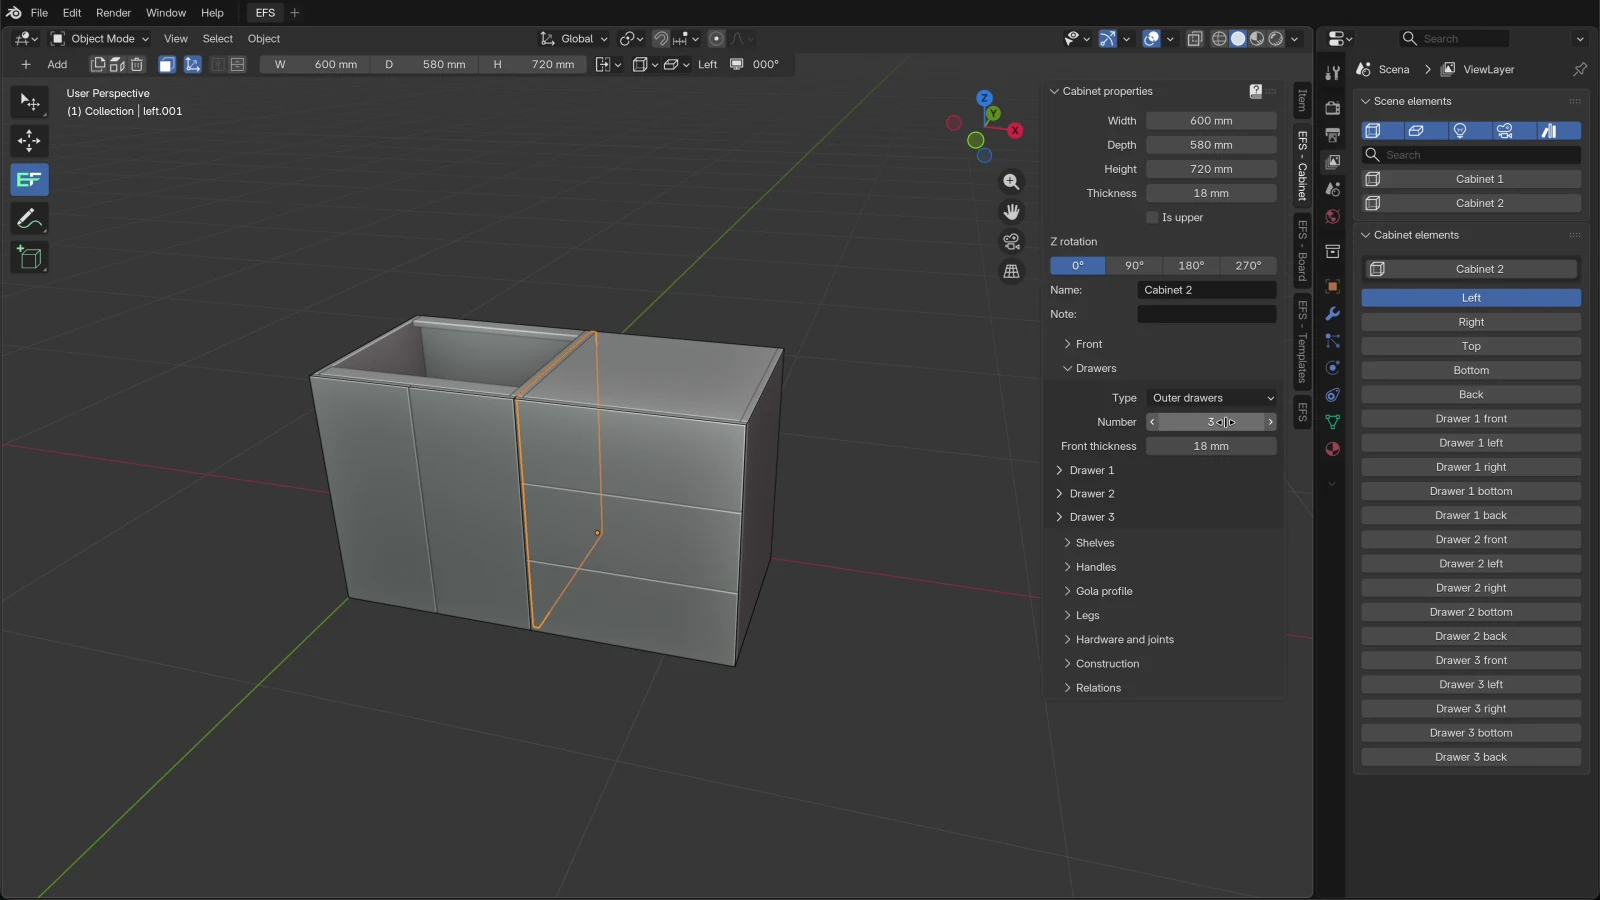
Drawer type
| Type | What you get |
|---|---|
| None | A cabinet without drawers. |
| Outer drawers | The drawer fronts lie over the edges of the carcass and cover the whole height of the cabinet. |
| Inner drawers | The drawer fronts sit inside the carcass, between the side panels, the top and the bottom, flush with the front edge. |
Options of the Drawers panel
| Option | What it does | Default | Values |
|---|---|---|---|
| Type | Drawer type, see the table above. | None | None, Outer drawers, Inner drawers |
| Number | Number of drawers. | 0 | 0–5 |
| Front thickness | Thickness of all the drawer fronts. With outer drawers the side panels are shallower by this amount. | 18 mm | 0–100 mm |
Number and Front thickness are shown only after you choose a type. A Drawer N section appears for each drawer up to the number you entered.
Drawer 1 to Drawer 5
Each drawer has its own collapsible section with the same fields. Drawer 1 is the lowest.
| Option | What it does | Default | Values |
|---|---|---|---|
| Height ratio | This drawer's share of the height. Drawers with the ratios 1, 1, 2 get a quarter, a quarter and a half of the height. | 1 | 1–3 |
| Inner height ratio | The height of the box sides as a share of the drawer height. | 0.5 | 0.1–1.0 |
| Inner thickness | Thickness of the sides, bottom and back of the drawer box. | 16 mm | 0–100 mm |
| Front gap | The gap around the drawer front, on each side. Between two drawers the gap is double. | 2 mm | 0–100 mm |
| Inner side gap | The space between the side panel of the cabinet and the side of the box, for the slide. | 10 mm | 0–50 mm |
| Back gap | The space between the back end of the box and the back of the cabinet. | 10 mm | 0–50 mm |
| Top overflow | The drawer front extends this much higher (negative: lower). | 0 mm | −2000 to 2000 mm |
| Bottom overflow | The drawer front extends this much lower (negative: higher). | 0 mm | −2000 to 2000 mm |
How EFS builds a drawer (cabinet 600 × 580 × 720 mm, 18 mm boards, 3 mm lay-on back, three outer drawers with ratio 1):
- Each drawer gets 240 mm of height. The front is 596 × 236 mm.
- The box sides are 240 × 0.5 = 120 mm high and 580 − 18 − 10 − 3 = 549 mm deep.
- The bottom and the back of the box sit between the sides: they are 600 − 2 × 18 − 2 × 10 − 2 × 16 = 512 mm wide. The back of the box stands on the bottom.
- The box is 5 mm above the bottom panel.
Rules:
- When you choose drawers, the fronts disappear. A cabinet has either drawers or fronts.
- If you choose a type but Number stays 0, there are no drawers. Enter a number.
- Drawer fronts get material group F 1 (on a wall unit F 2) and 2 mm edge tape. The drawer box goes into the Shelf group.
- With a slide from the catalogue, EFS picks the slide length from the drawer depth and drills the side panels. With a box system (TANDEMBOX, LEGRABOX, MERIVOBOX) the metal sides leave the cutting list, and the bottom and back get their sizes from the manufacturer's formula. See Project hardware.
- D cycles through the drawer layouts: None → Outer drawers 1, 2, 3, 4, 5 → Inner drawers 1 … 5 → None.
- The siphon cut-out in a drawer is explained in the chapter Bathroom: siphon and pipes.
Shelves
You add horizontal shelves and vertical dividers with the Add menu or a key. The Shelves panel sets them all together.
- Click a board of the cabinet. Only one object may be selected.
- In the header click Add → Horizontal shelf, or press Shift+H.
- For a vertical divider click Add → Vertical shelf, or press Shift+V.
- Press O to open the doors and see inside. O again closes them.
- Open the Shelves panel and adjust the dimensions, offsets and compartments.
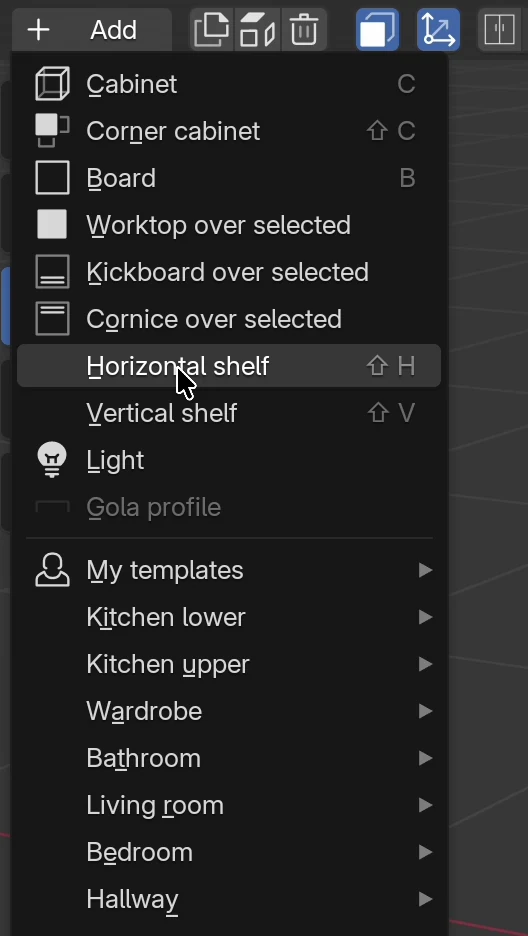
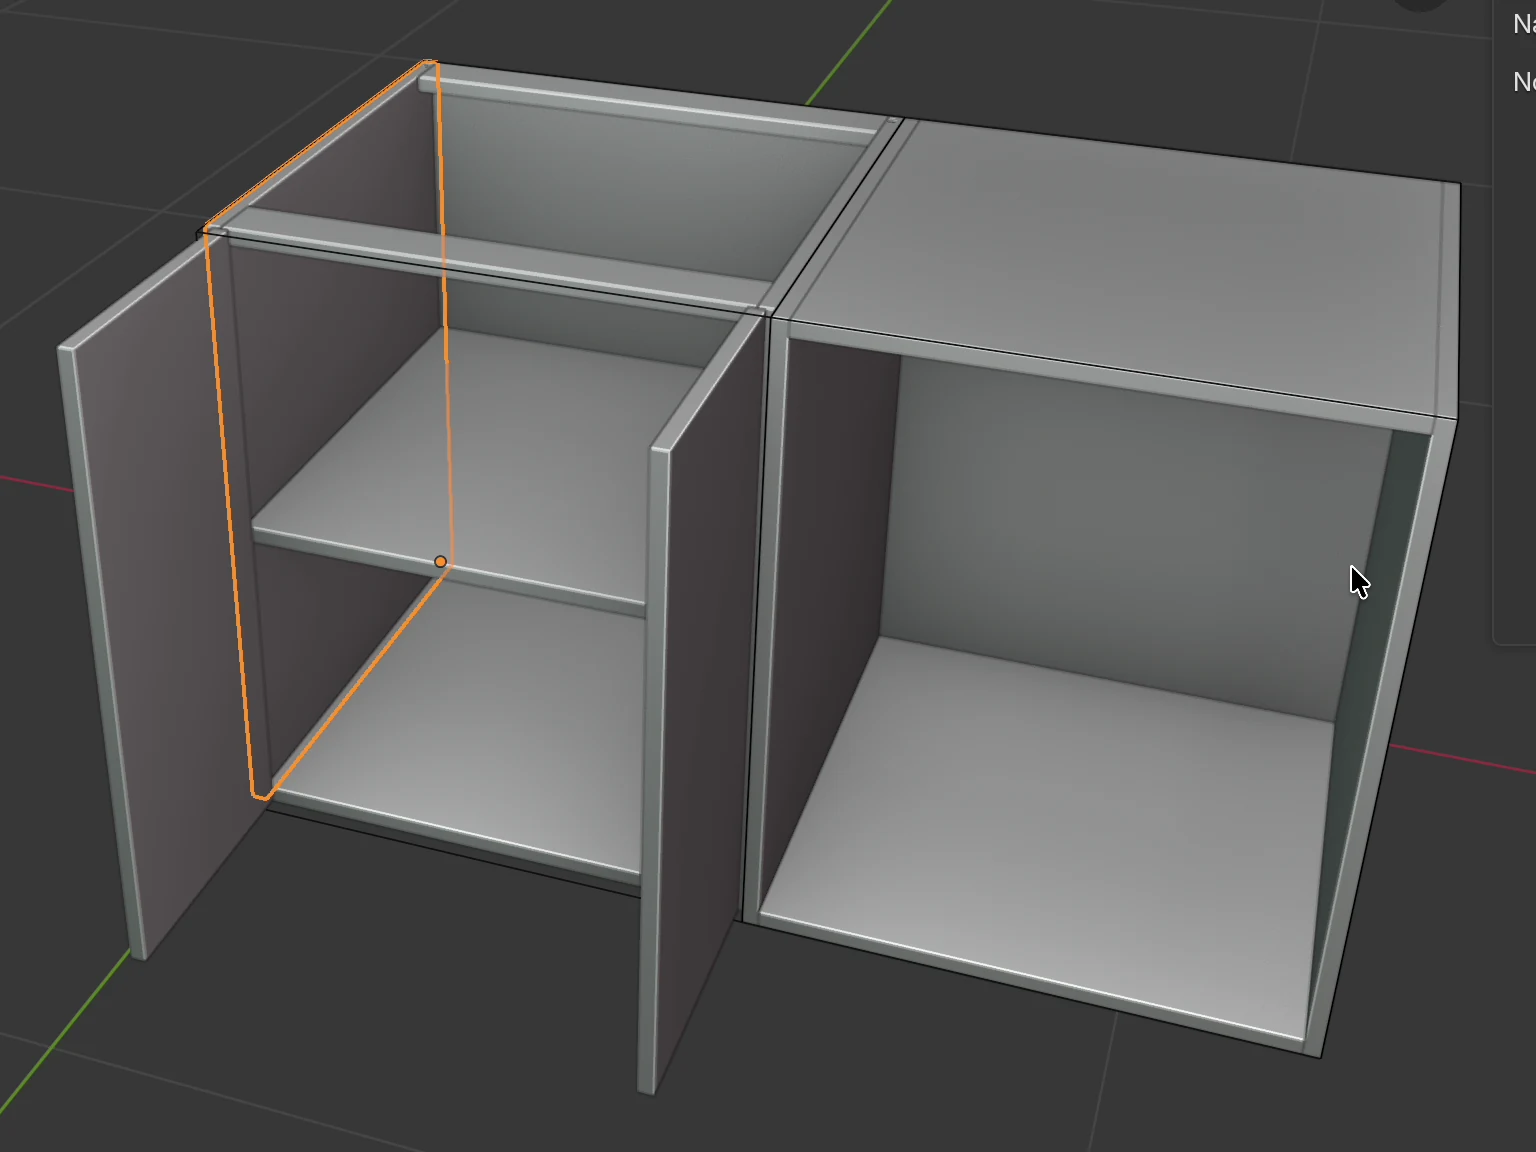
Each new shelf is spaced evenly with the others. Horizontal shelves divide the inner height, vertical dividers the width.
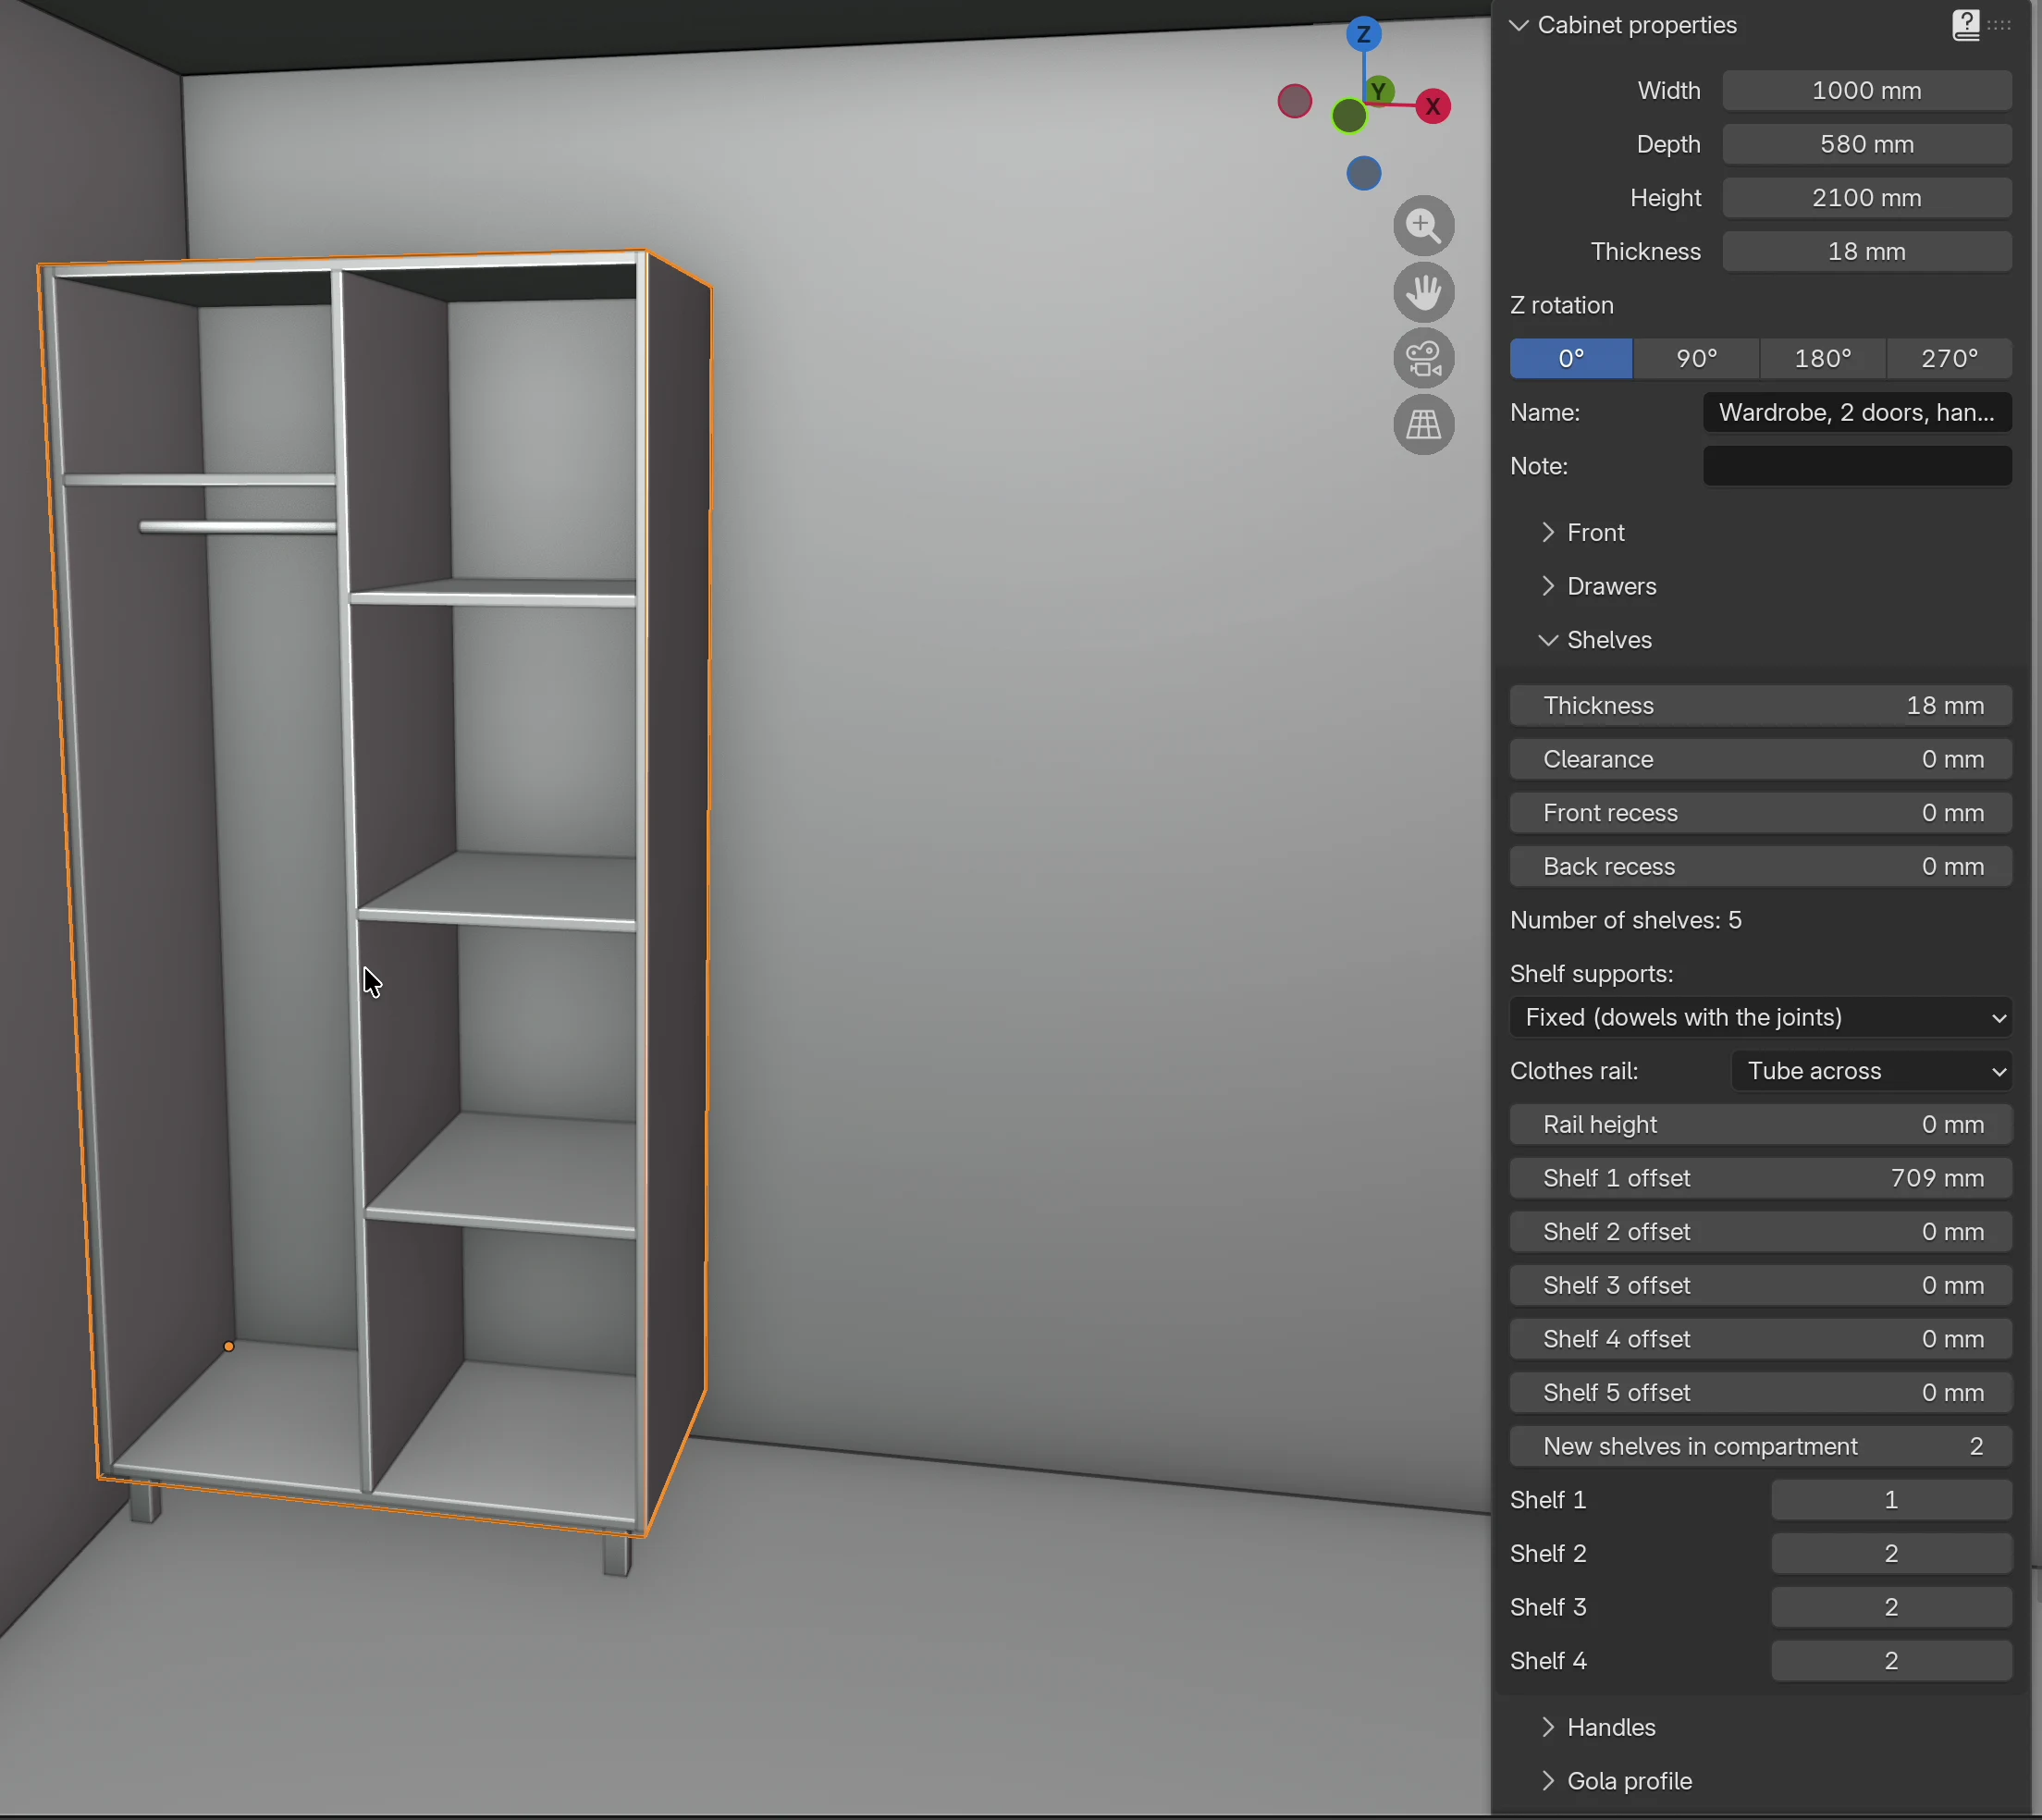
Options
| Option | What it does | Default | Values |
|---|---|---|---|
| Thickness | Thickness of all shelves and dividers of the cabinet. | 18 mm | 0–100 mm |
| Clearance | The shelf is narrower than the inner width by this amount, half on the left, half on the right. A divider is lower by this amount. | 0 mm | −100 to 100 mm |
| Front recess | The shelf starts this far behind the front edge of the carcass. | 0 mm | −1000 to 1000 mm |
| Back recess | The shelf ends this far in front of the back. | 0 mm | −1000 to 1000 mm |
| Number of shelves | Display only: how many shelves and dividers the cabinet has. | – | – |
| Shelf supports | Fixed shelves with dowels, or adjustable shelves on pins in rows of holes. See Adjustable shelves, System 32. | Fixed (dowels with the joints) | Fixed (dowels with the joints); Adjustable, System 32 full rows; Adjustable, System 32 around the shelves |
| Clothes rail | A rail for clothes. See A wardrobe with compartments and a rail. | None | None, Tube across, Pull-out rail |
| Rail height | Height of the tube above the bottom; 0 means 60 mm under the shelf above or the top. Only with Tube across. | 0 mm | 0–3000 mm |
| Shelf 1 offset … Shelf 10 offset | Moves a shelf out of the even spacing: a horizontal shelf up (+) or down (−), a divider to the right (+) or to the left (−). The number is the shelf's place in the order you added the shelves. | 0 mm | −2500 to 2500 mm |
| New shelves in compartment | Which compartment between the dividers the next horizontal shelf goes into, counting from the left. Only when the cabinet has a divider. | 1 | 1–11 |
| Shelf 1, Shelf 2… (compartment) | The compartment that horizontal shelf lies in. Only when the cabinet has a divider. | the compartment the shelf was added to | 1–11 |
| Shelf 1 ↑ … mm ↓ … mm | Display only: the clear space above and below the shelf (for dividers ← and →). Not shown when the cabinet has both dividers and horizontal shelves. | – | – |
How EFS works out a shelf (cabinet 600 × 580 mm, 18 mm boards, 3 mm lay-on back, no front): the shelf is 564 × 577 mm. With an 18 mm front the shelf is 559 mm deep. With the back in a groove the shelf ends at the back, so it is also shorter by the back's Engagement.
Rules:
- A cabinet can have at most 10 shelves and dividers together.
- With a divider, each horizontal shelf lies only in its own compartment and is spaced with the shelves of that compartment.
- Shelf supports is shown only when the cabinet has a horizontal shelf.
- A shelf gets 0.4 mm edge tape and material group Shelf.
- Add → Horizontal shelf and Shift+H do not work while a shelf on its own or several objects are selected. Click a side panel, a front or another board of the cabinet. Vertical shelf does not work on a corner cabinet.
Watch out
When you select a shelf and press X (or the bin in the header), all shelves and dividers of that cabinet are deleted, not only that one.
Note
The Thickness, Clearance, Front recess and Back recess fields are shown only while Enable material selection is on (EFS tab, Web publish → Settings panel). It is on by default. If you don't see the fields, switch it on.
Handles
The Handles panel drills holes for handles in doors and drawer fronts: the through holes go onto the drawing, and the handles and screws into the hardware list. The same is set for the whole project in Project hardware, so here you change only one cabinet. The details are in the chapter Project hardware.
| Option | What it does | Default | Values |
|---|---|---|---|
| Handle | Handle type. | None | None, Bar handle, Knob, Push to open |
| Hole spacing | The distance between the two holes of a bar handle. Only for Bar handle. | 128 mm | 16–1200 mm |
| Orientation | A bar handle on doors runs vertically or horizontally. On drawers it is always horizontal. Only for a bar handle on doors. | Vertical | Vertical, Horizontal |
| Position | Height of the handle on the doors. On drawers the handle is in the middle. Only with doors. | Top edge | Top edge, Bottom edge, Mid height |
| From opening edge | From the door edge on the opening side to the centre of the handle (or to the nearer hole of a horizontal bar). | 40 mm | 10–500 mm |
| From top/bottom edge | From the top or bottom edge of the door to the centre of the handle (or to the nearer hole of a vertical bar). | 50 mm | 10–1000 mm |
Rules:
- Push to open adds one push latch for each door, flap and drawer, without handle holes.
- If the cabinet has neither doors nor drawers, No doors or drawer fronts to drill appears under the Handle field.
- From opening edge and From top/bottom edge are hidden while the cabinet has no doors.
- On a wall unit, Project hardware puts the handle on the opposite edge: the project's Top edge becomes the bottom edge of the wall unit.
Gola profile
The Gola profile is a groove in the side panels for opening without a handle. Count sets how many grooves the cabinet has. In the video: open Gola profile and enter Count 2.
- Click a board of the cabinet.
- Open the Gola profile panel.
- Click the Count field, type the number of grooves and press Enter.
- Set Depth, and the Z location and Height of each groove.
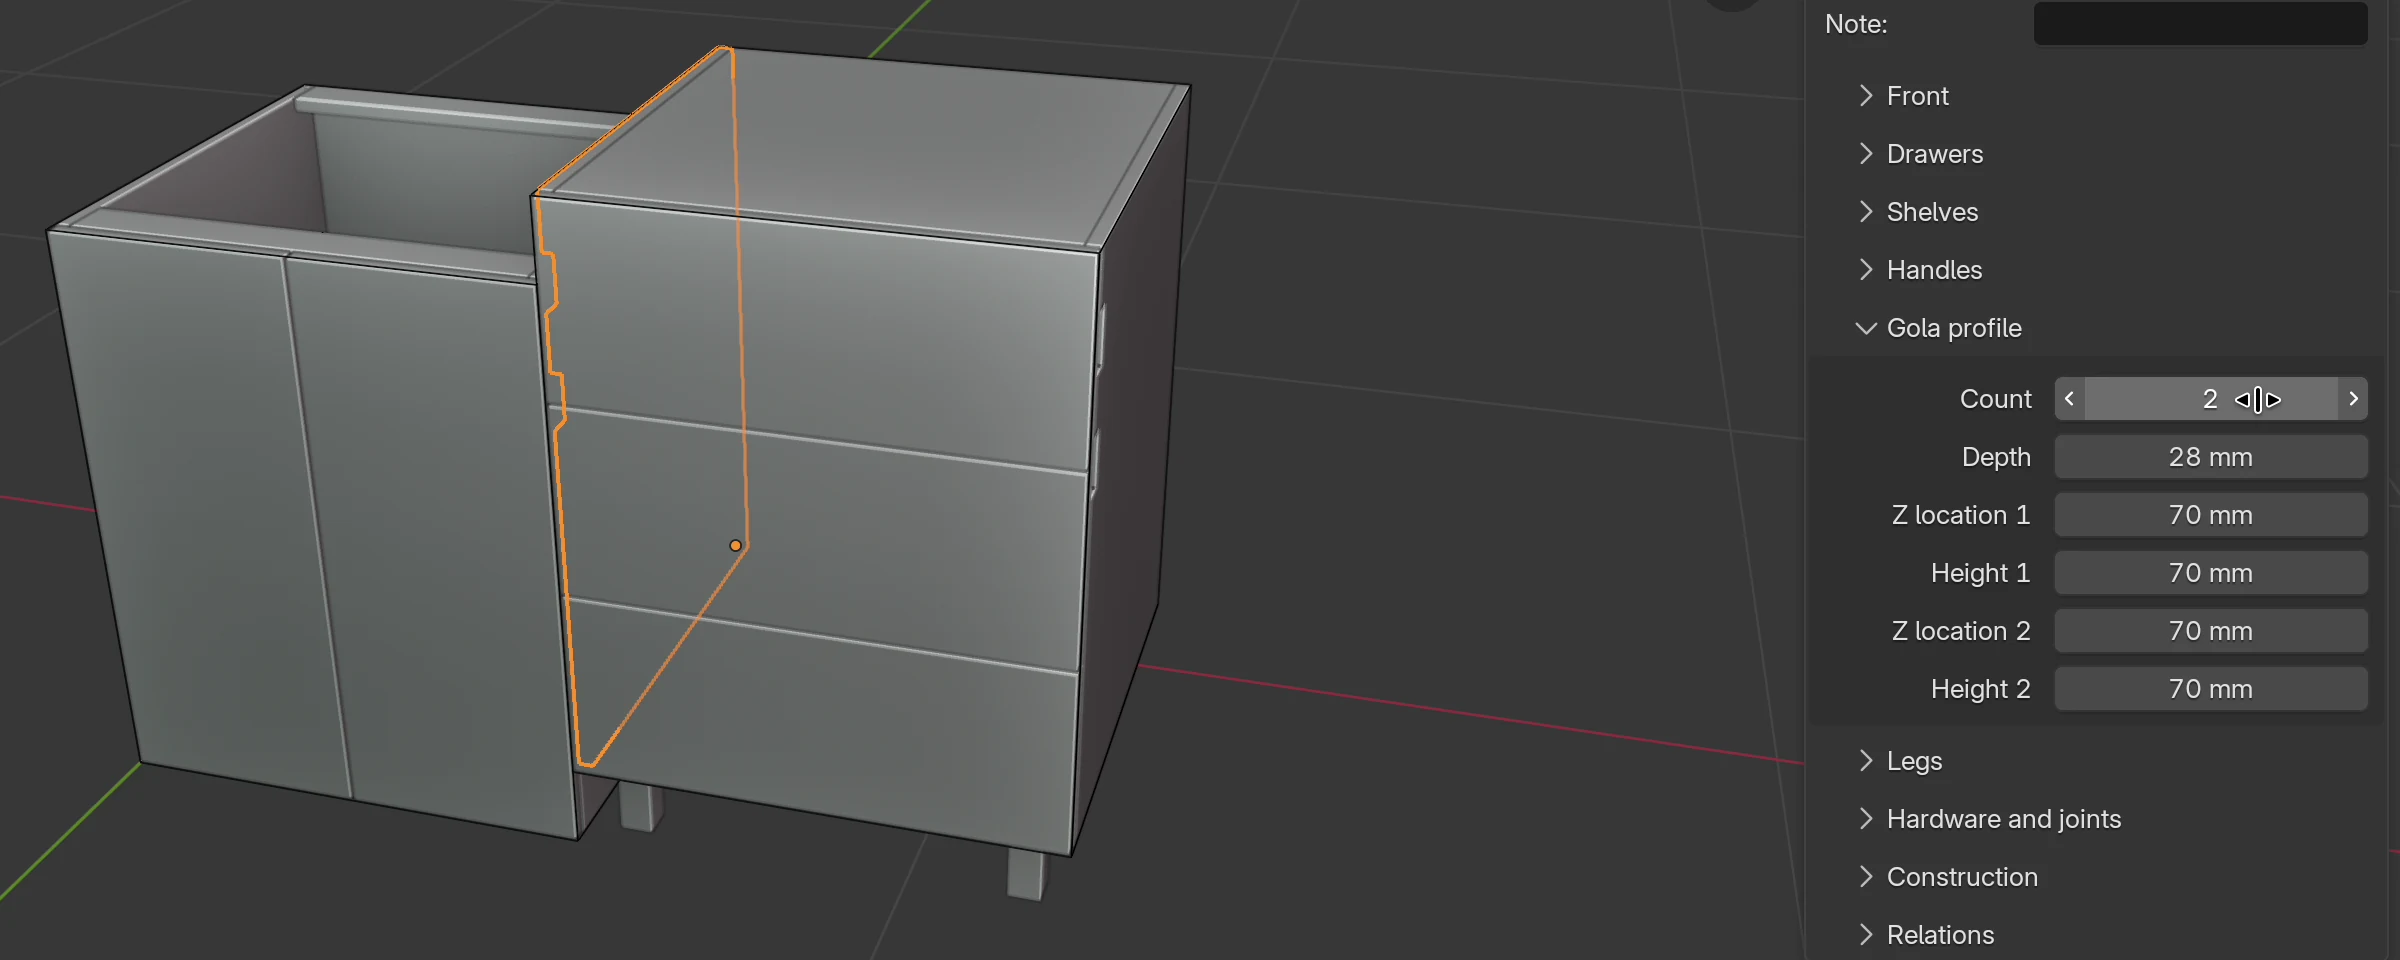
| Option | What it does | Default | Values |
|---|---|---|---|
| Count | Number of grooves. 0 means no Gola profile. | 0 | 0–3 |
| Depth | How deep the groove goes from the front edge of the side panel towards the back. | 28 mm | 0–200 mm |
| Z location 1 | From the top edge of the side panel to the top edge of the first groove. 0 means the groove is open at the top (L-profile). | 70 mm | 0–5000 mm |
| Height 1 | Height of the first groove. | 70 mm | 5–200 mm |
| Z location 2 | From the bottom edge of the first groove to the top edge of the second. | 70 mm | 10–5000 mm |
| Height 2 | Height of the second groove. | 70 mm | 5–200 mm |
| Z location 3 | From the bottom edge of the second groove to the top edge of the third. | 70 mm | 10–5000 mm |
| Height 3 | Height of the third groove. | 70 mm | 5–200 mm |
The fields for the second and third groove are shown only when Count is 2 or 3.
Rules:
- EFS cuts the groove only into the left and right side panels, if the cabinet has them. Fronts, the top board and the cross boards stay as they are. If a front has to leave room for the grip above it, shorten it yourself: give a drawer a negative Top overflow, and doors a negative Top overflow in the Front panel.
- If the grooves don't fit into the height of the side panel, EFS reduces Z location by itself so that they fit.
- Add → Gola profile places an aluminium profile across the full width, one for each groove: an L-profile for the top groove when Z location 1 is 0, otherwise a C-profile. The button is greyed out while the cabinet has no grooves or while several objects are selected.
- Cost estimate counts two cuts per groove and the length of the profile (the cabinet width times the number of grooves).
Legs
Adjustable legs under the cabinet. The cabinet is raised by the height of the legs. In the video: open Legs and choose Squared legs.
- Click a board of the cabinet.
- Open the Legs panel.
- In the Type field choose Rounded legs or Squared legs.
- In the Height field type the height of the legs.
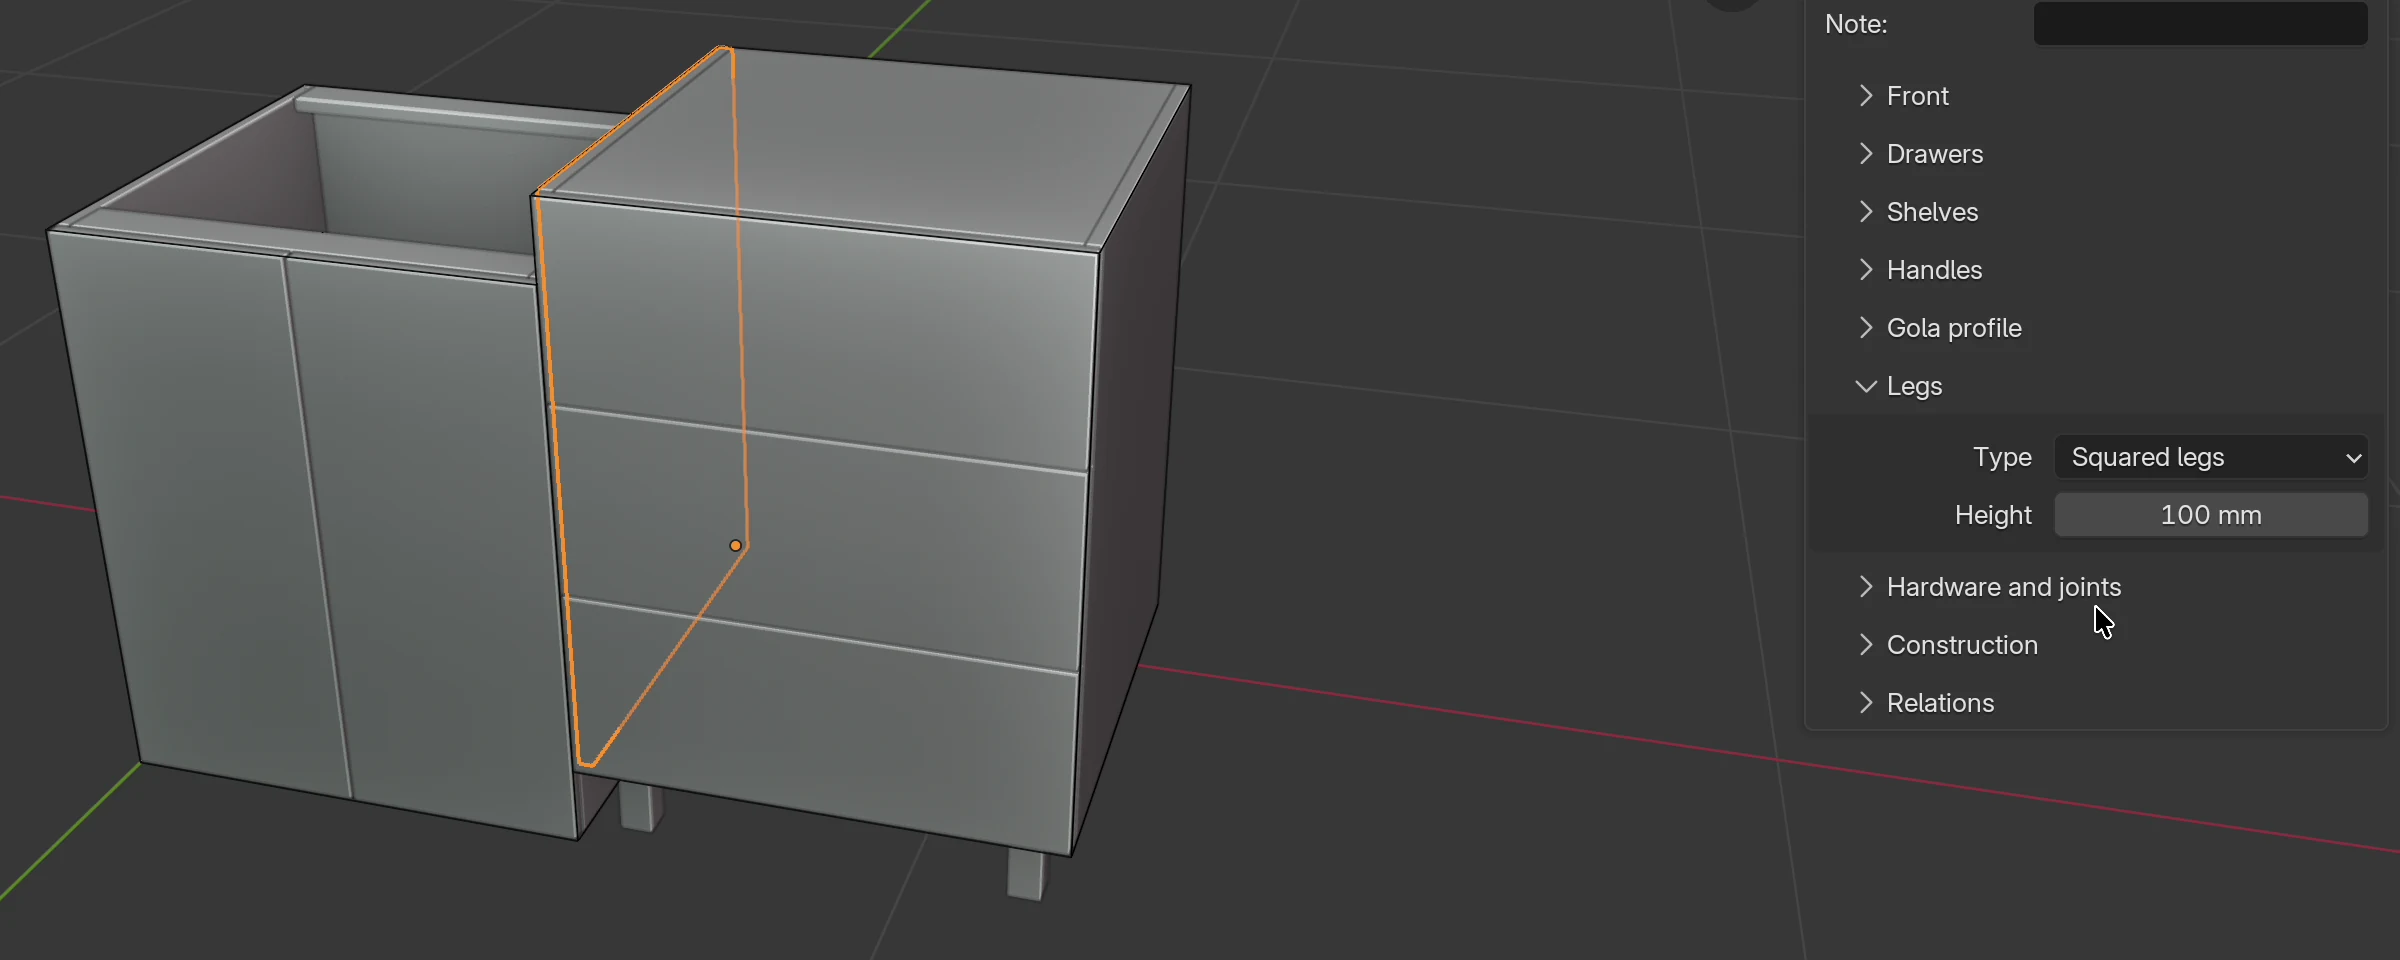
| Option | What it does | Default | Values |
|---|---|---|---|
| Type | Type of legs. | None | None, Rounded legs, Squared legs |
| Height | Height of the legs. The cabinet is raised off the floor by this amount. | 100 mm | 10–500 mm |
Height is shown only after you choose a type.
Rules:
- The cabinet gets four legs, 60 mm from the edges.
- The cabinet's Height does not include the legs: a cabinet 720 mm high on 100 mm legs has its top edge at 820 mm.
- A cabinet on legs cannot be a wall unit (Is upper): the field switches off and is hidden.
- When you set None, the legs disappear and the cabinet drops to the floor.
- The legs and their screws go into the hardware list.
- L cycles through the legs: None → Rounded legs → Squared legs → None.
- You add a kickboard in front of the legs with Add → Kickboard over selected. See Kickboard, fillers, end panels and cornice.
Hardware and joints
The Hardware and joints panel chooses hardware and joints for this cabinet only. For the whole project you choose them in Project hardware. The details are in the chapters Project hardware and Joints: dowels, confirmat, minifix.
In the video: open Hardware and joints, choose Dowels in the Joints type field, then press Alt+Z for the X-ray view.
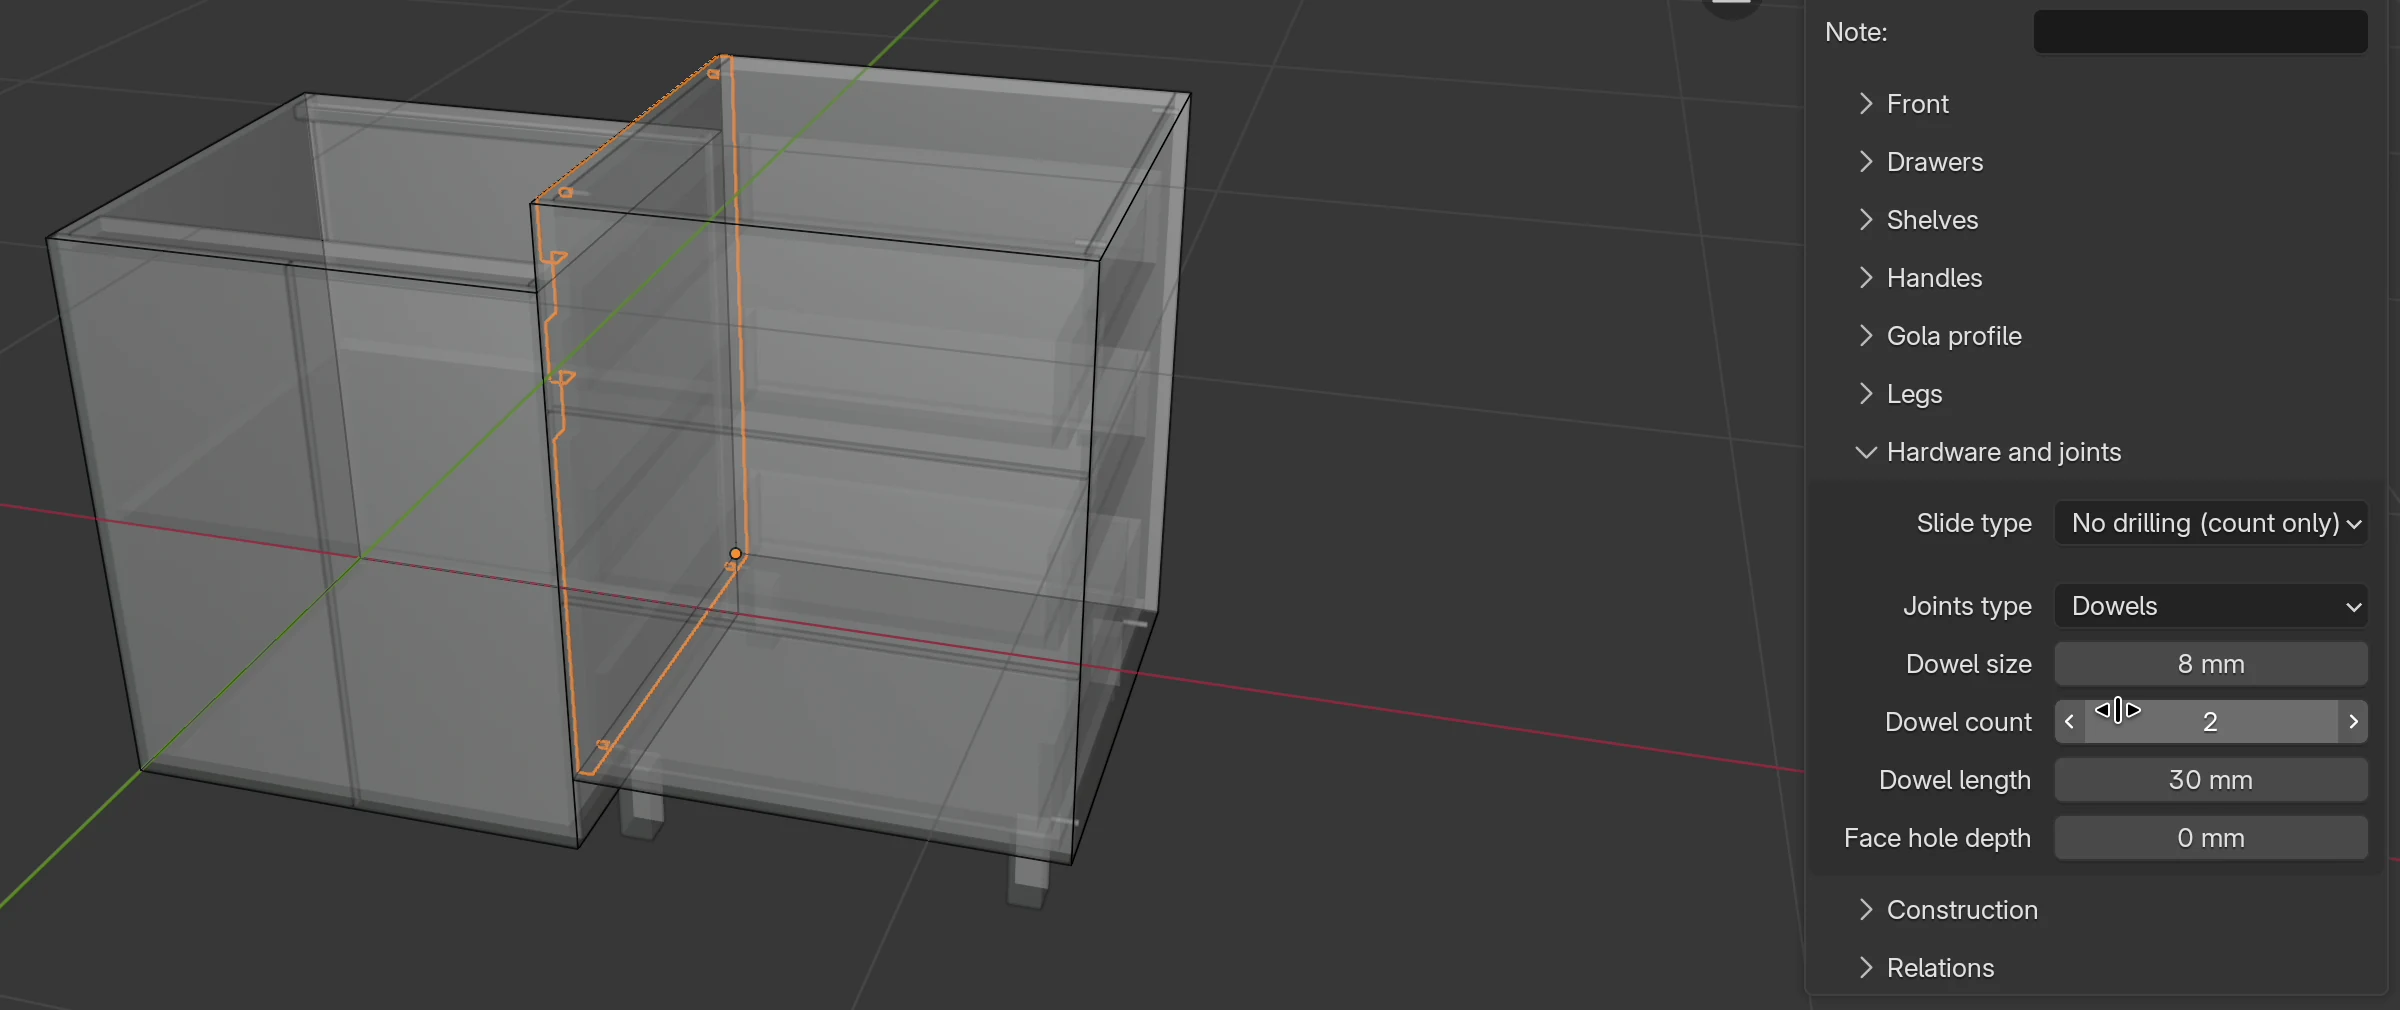
| Option | When it is shown | What it does | Default | Values |
|---|---|---|---|---|
| Hinge type | The cabinet has doors or a flap | A hinge from the catalogue drills the cup, the screws and the mounting plate. | No drilling (count only) | hinges from the catalogue |
| Auto hinge count | The cabinet has doors or a flap | Number of hinges from the door height: up to 900 mm 2, up to 1600 mm 3, up to 2000 mm 4, above that 5. | off | on, off |
| Hinges | Auto hinge count is off | Number of hinges per door. | 2 | 0–6 |
| Flap lift | Top opening | The flap lift system. Below it you see the power factor, the weight of the front and the suggested device; in red if none fits. See Wall units, tall units and flaps. | None (hinges) | lift systems from the catalogue |
| Slide type | The cabinet has drawers | A slide or box system from the catalogue. | No drilling (count only) | slides from the catalogue |
| Wall unit hangers | Is upper is on | Hangers, and a wall rail as long as the cabinet. | None | None, Hangers on a wall rail, Hangers screwed to the wall |
| Joints type | Always | The joint between the carcass boards. | None | None, Dowels, Confirmat, Minifix, Minifix and dowels |
| Dowel size | Dowels, Minifix and dowels | Dowel diameter. | 8 mm | 4–20 mm |
| Dowel count | Dowels | Number of dowels per joint. | 2 | 1–10 |
| Dowel length | Dowels, Minifix and dowels | Dowel length. The hole in the face goes by the board thickness, the hole in the edge takes the rest plus 2 mm for glue. | 30 mm | 16–100 mm |
| Face hole depth | Dowels, Minifix and dowels | Depth of the hole in the face of the board. 0 means automatic: board thickness minus 6 mm, at most half the dowel. | 0 mm | 0–60 mm |
| Connectors per joint | Confirmat, Minifix, Minifix and dowels | Number of confirmats or minifixes per joint. | 2 | 1–10 |
Rules:
- If EFS has to move hinges so that they don't hit the shelves, a line under the field says how many hinges were moved.
- With Minifix and dowels each minifix gets one dowel next to it, so there is no Dowel count field.
- Dowels and drillings are not boards: they don't go into the cutting list. Dowels go into the hardware list.
- Alt+Z switches the X-ray view on and off; in it you see the dowels and holes.
Note
In the screenshot the Face hole depth field still shows an older, shortened label: Dubina rupe u li…. The current program shows Face hole depth.
Construction
The Construction panel has five collapsible sections, one for each carcass board: Back, Top, Bottom, Left and Right. Click a section to open it.
Back
The back is a thin 3 mm board. It can be laid on over the back edge, set into a rebate or slid into a groove. In the video: open Back and change Construction to Grooved.
- Open Construction → Back.
- In the Construction field choose the method.
- Set Thickness, and for a rebate or a groove also Engagement and Depth.
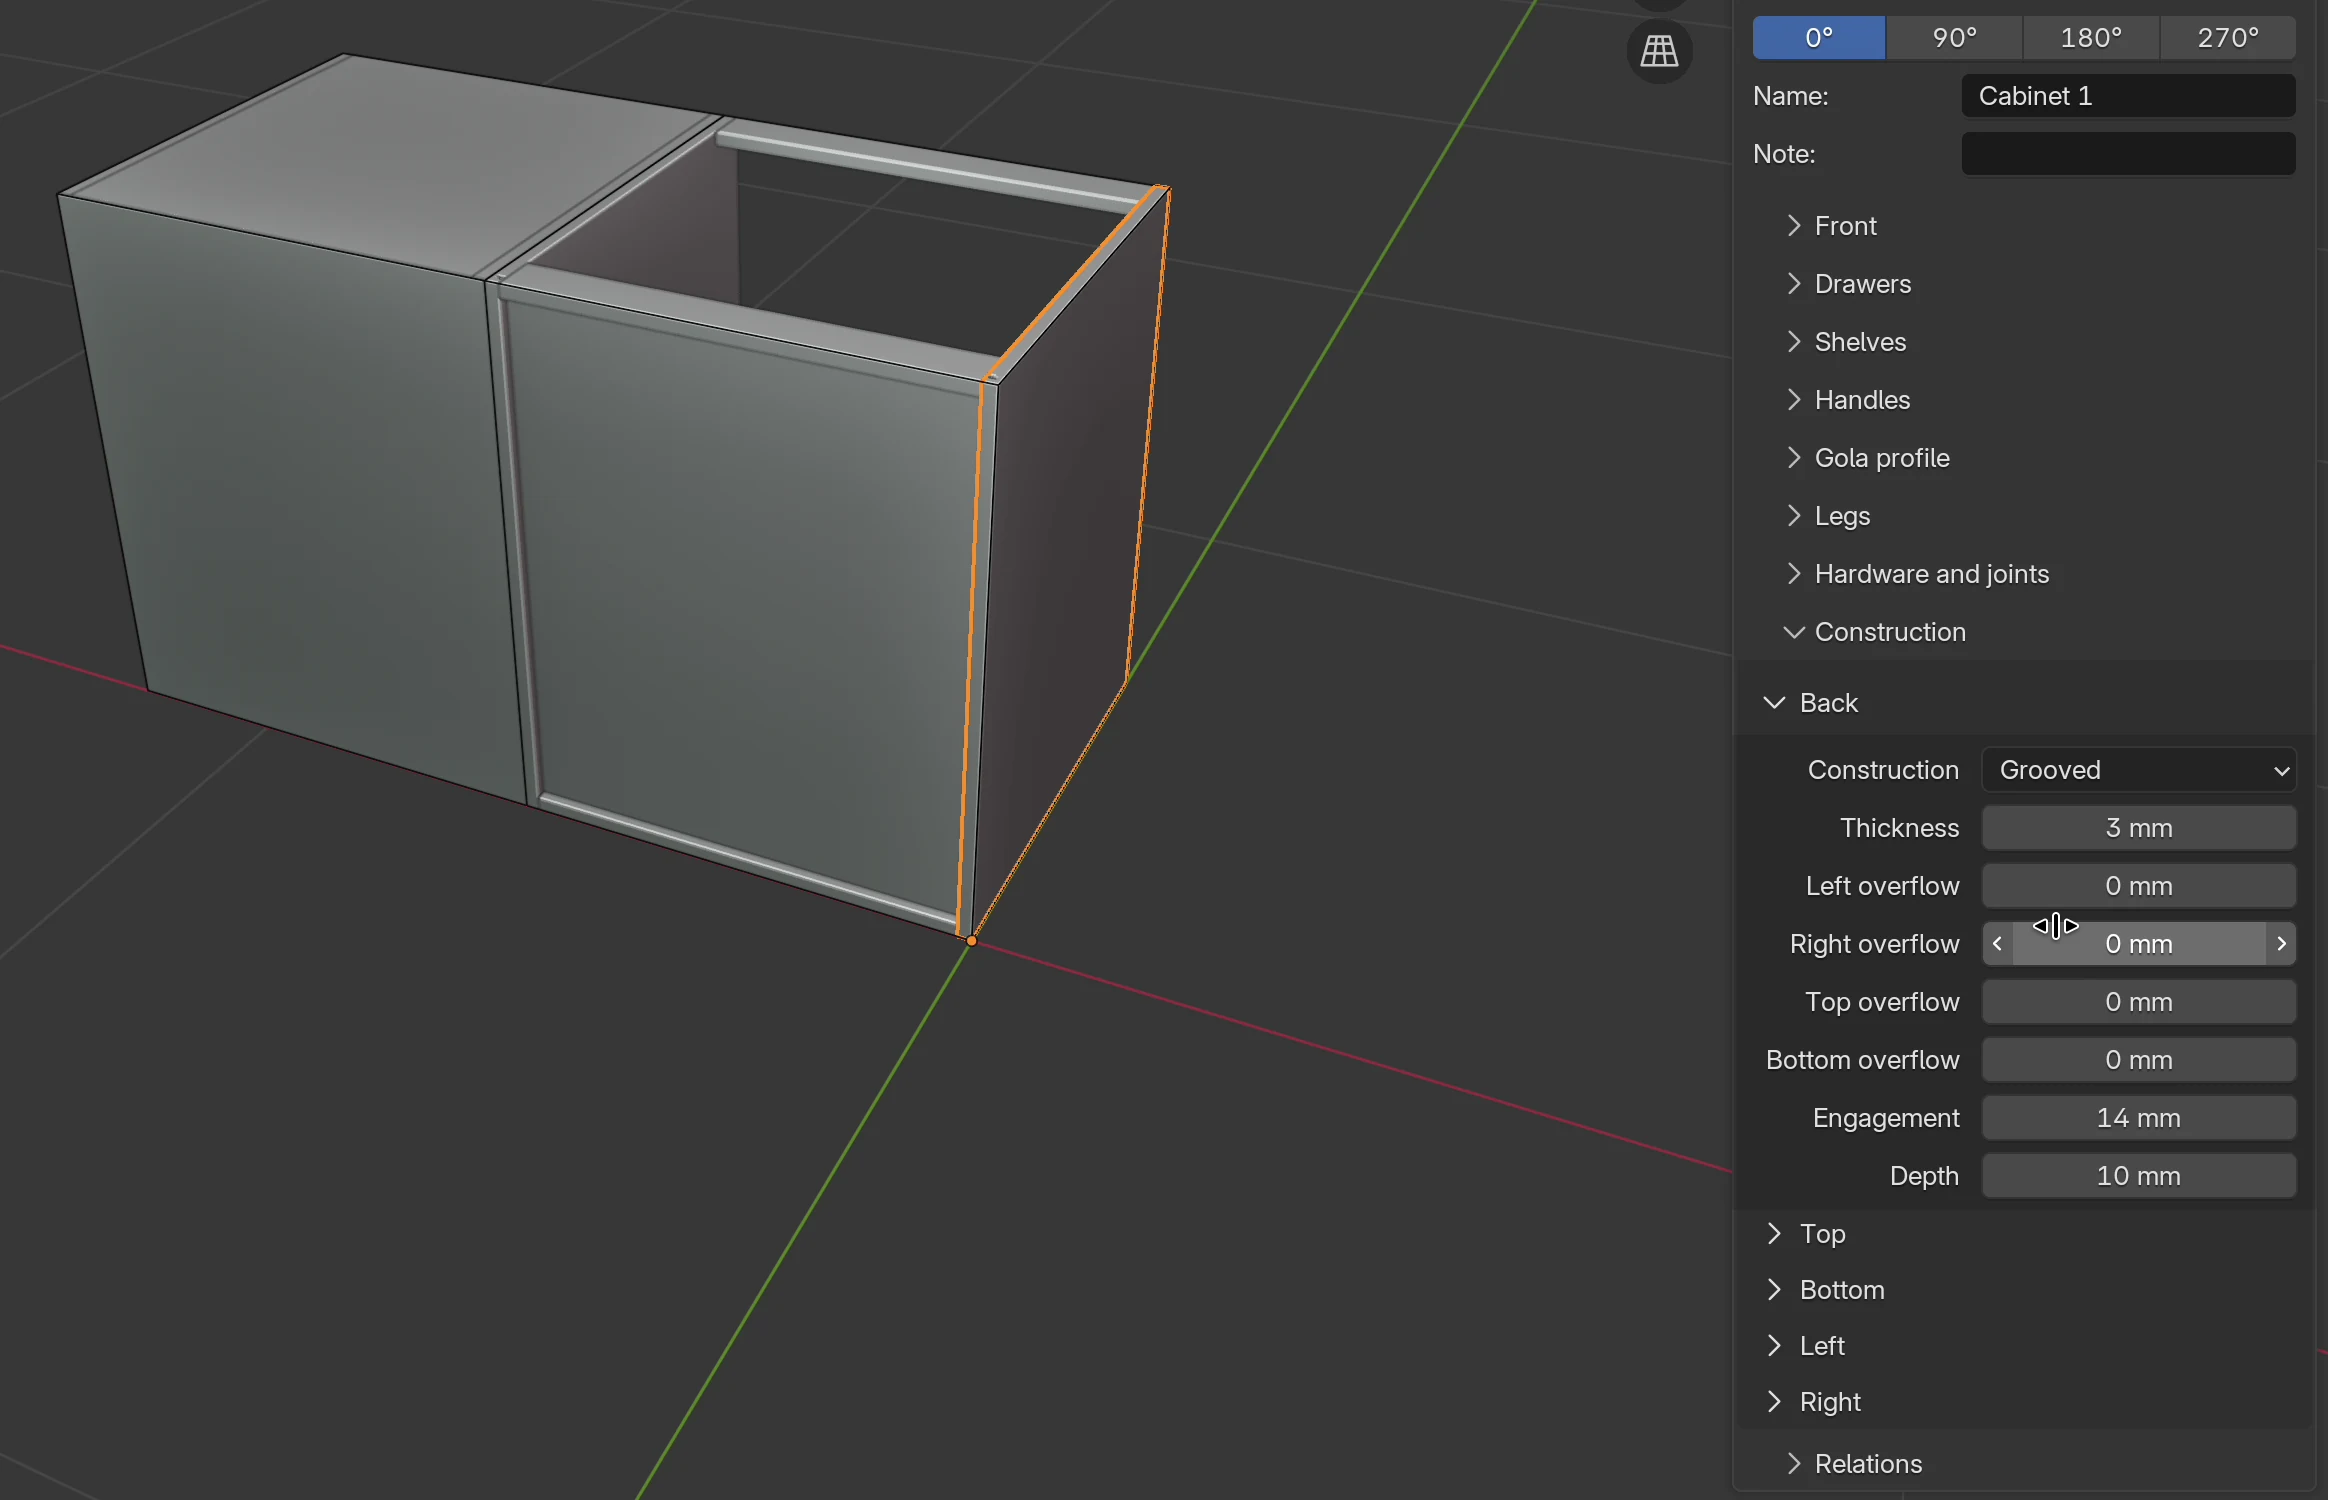
| Construction | What you get |
|---|---|
| Lay-on | The back is screwed on over the back edges of the carcass. It covers the whole width and height of the cabinet. |
| Rebated | The back sits in a rebate cut into the back edges of the carcass. |
| Grooved | The back slides into a groove cut into the carcass boards, set in from the back edge. |
| None | A cabinet without a back. |
| Option | What it does | Default | Values |
|---|---|---|---|
| Construction | How the back is fitted, see the table above. | Lay-on | Lay-on, Rebated, Grooved, None |
| Thickness | Back thickness. With a lay-on back the side panels, the top and the bottom are shallower by this amount. | 3 mm | 3–38 mm |
| Gap | The back is smaller by this amount on each of its four sides. Only for Lay-on. | 0 mm | 0–100 mm |
| Left overflow, Right overflow, Top overflow, Bottom overflow | The back extends this far past the edge on that side (negative: shorter). | 0 mm | −2000 to 2000 mm |
| Engagement | From the back edge of the carcass to the back. Only for Rebated and Grooved. | 14 mm | 3–50 mm |
| Depth | Depth of the groove or rebate in the board. Only for Rebated and Grooved. | 10 mm | 0–15 mm |
What EFS does by itself:
- For Grooved it actually cuts a groove, as wide as the back and as deep as Depth, into the left and right side panels, the top and the bottom, and the back cross board. The groove starts at Engagement from the back edge.
- For Rebated it cuts a rebate from the back edge to Engagement + the back thickness, as deep as Depth.
- A back in a groove or rebate is smaller than the cabinet by the board thickness minus Depth, on each side. A 600 × 720 mm cabinet with 18 mm boards and Depth 10 mm has a 584 × 704 mm back.
- In the cutting list these boards get a note, for example Grooved for back 3 mm thick or Rebated for back 3 mm thick. The groove also goes into the DXF and the board drawings. See Cutting list and cut size.
- Shelves and drawer boxes end at the back: with the back in a groove they are also shorter by Engagement.
- For Lay-on and Rebated the hardware list counts screws for the back, one for every 150 mm of perimeter. A back in a groove is held by the groove.
- For a groove and a rebate, Cost estimate counts CNC routing along the perimeter of the cabinet.
Tip
When you change Thickness in Cabinet properties while the back is in a groove or rebate, enter the back's Depth again (or choose Grooved again). Only then does EFS recalculate how much smaller the back is than the cabinet. Without that, the back goes into the side panels deeper or shallower than the Depth field says.
Top
The top board can sit between the side panels or over them, and a pair of cross boards can replace it. In the video: open Top, change Left joint to Continuous, then set it back to Inset.
- Open Construction → Top.
- In the Construction field choose a full board or cross boards.
- For a full board choose Left joint and Right joint.
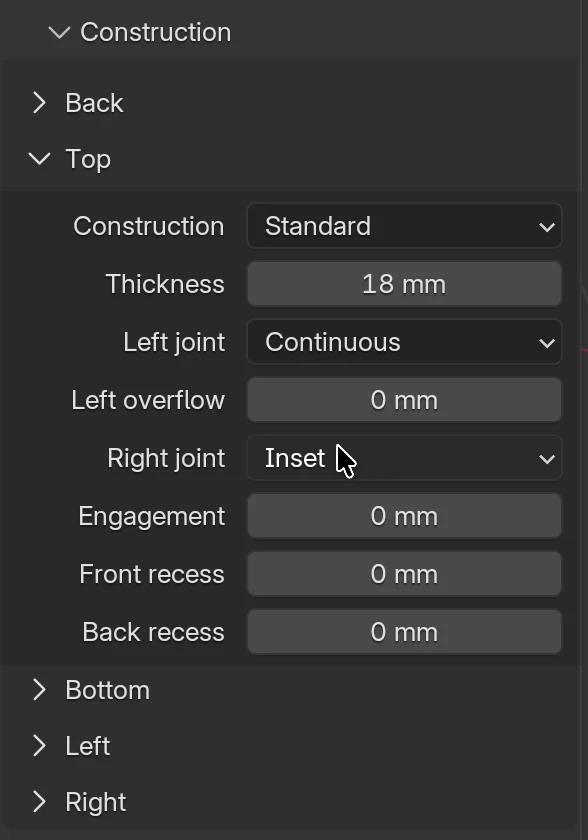
| Construction | What you get |
|---|---|
| Standard | A full top board. |
| Double cross boards | Two cross boards, at the front and at the back. |
| Front cross board | Only the front cross board. |
| Back cross board | Only the back cross board. |
| None | No top board. |
| Option | When it is shown | What it does | Default | Values |
|---|---|---|---|---|
| Construction | Always | See the table above. | Standard | 5 choices |
| Thickness | All except None | Thickness of the top board or the cross boards. | 18 mm | 0–100 mm |
| Left joint, Right joint | Standard | Inset: the top board sits between the side panels. Continuous: the top board runs over the side panel, and the side panel is lower by the thickness of the top board. | Inset | Inset, Continuous |
| Left overflow, Right overflow | Joint Continuous | The top board extends this far past the outer face of the side panel. | 0 mm | 0–2000 mm |
| Engagement | All except None | The top board or the cross boards are lowered this far below the top edge of the cabinet. | 0 mm | 0–1000 mm |
| Front cross | Front cross board | Horizontal: the cross board lies flat. Vertical: the cross board stands on its edge. | Horizontal | Horizontal, Vertical |
| Front recess | Standard and front cross board | The board or the front cross board is set back this far from the front edge. | 0 mm | −1000 to 1000 mm |
| Front cross width | Front cross board | Width of the front cross board. | 60 mm | 10–500 mm |
| Back cross | Back cross board | As for the front one. | Horizontal | Horizontal, Vertical |
| Back recess | Standard and back cross board | The board or the back cross board is set in this far from the back edge. | 0 mm | −1000 to 1000 mm |
| Back cross width | Back cross board | Width of the back cross board. | 60 mm | 10–500 mm |
How EFS works out the top board (cabinet 600 × 580 mm, 18 mm boards, 3 mm lay-on back, no front): with both joints Inset the top board is 564 × 577 mm, and the side panels are 720 mm high. With both joints Continuous the top board is 600 mm wide and the side panels are 702 mm high.
Cross boards instead of a top board
Base kitchen units have two cross boards instead of a full top board, and the worktop goes on them. In the video: in Top choose Construction: Double cross boards.
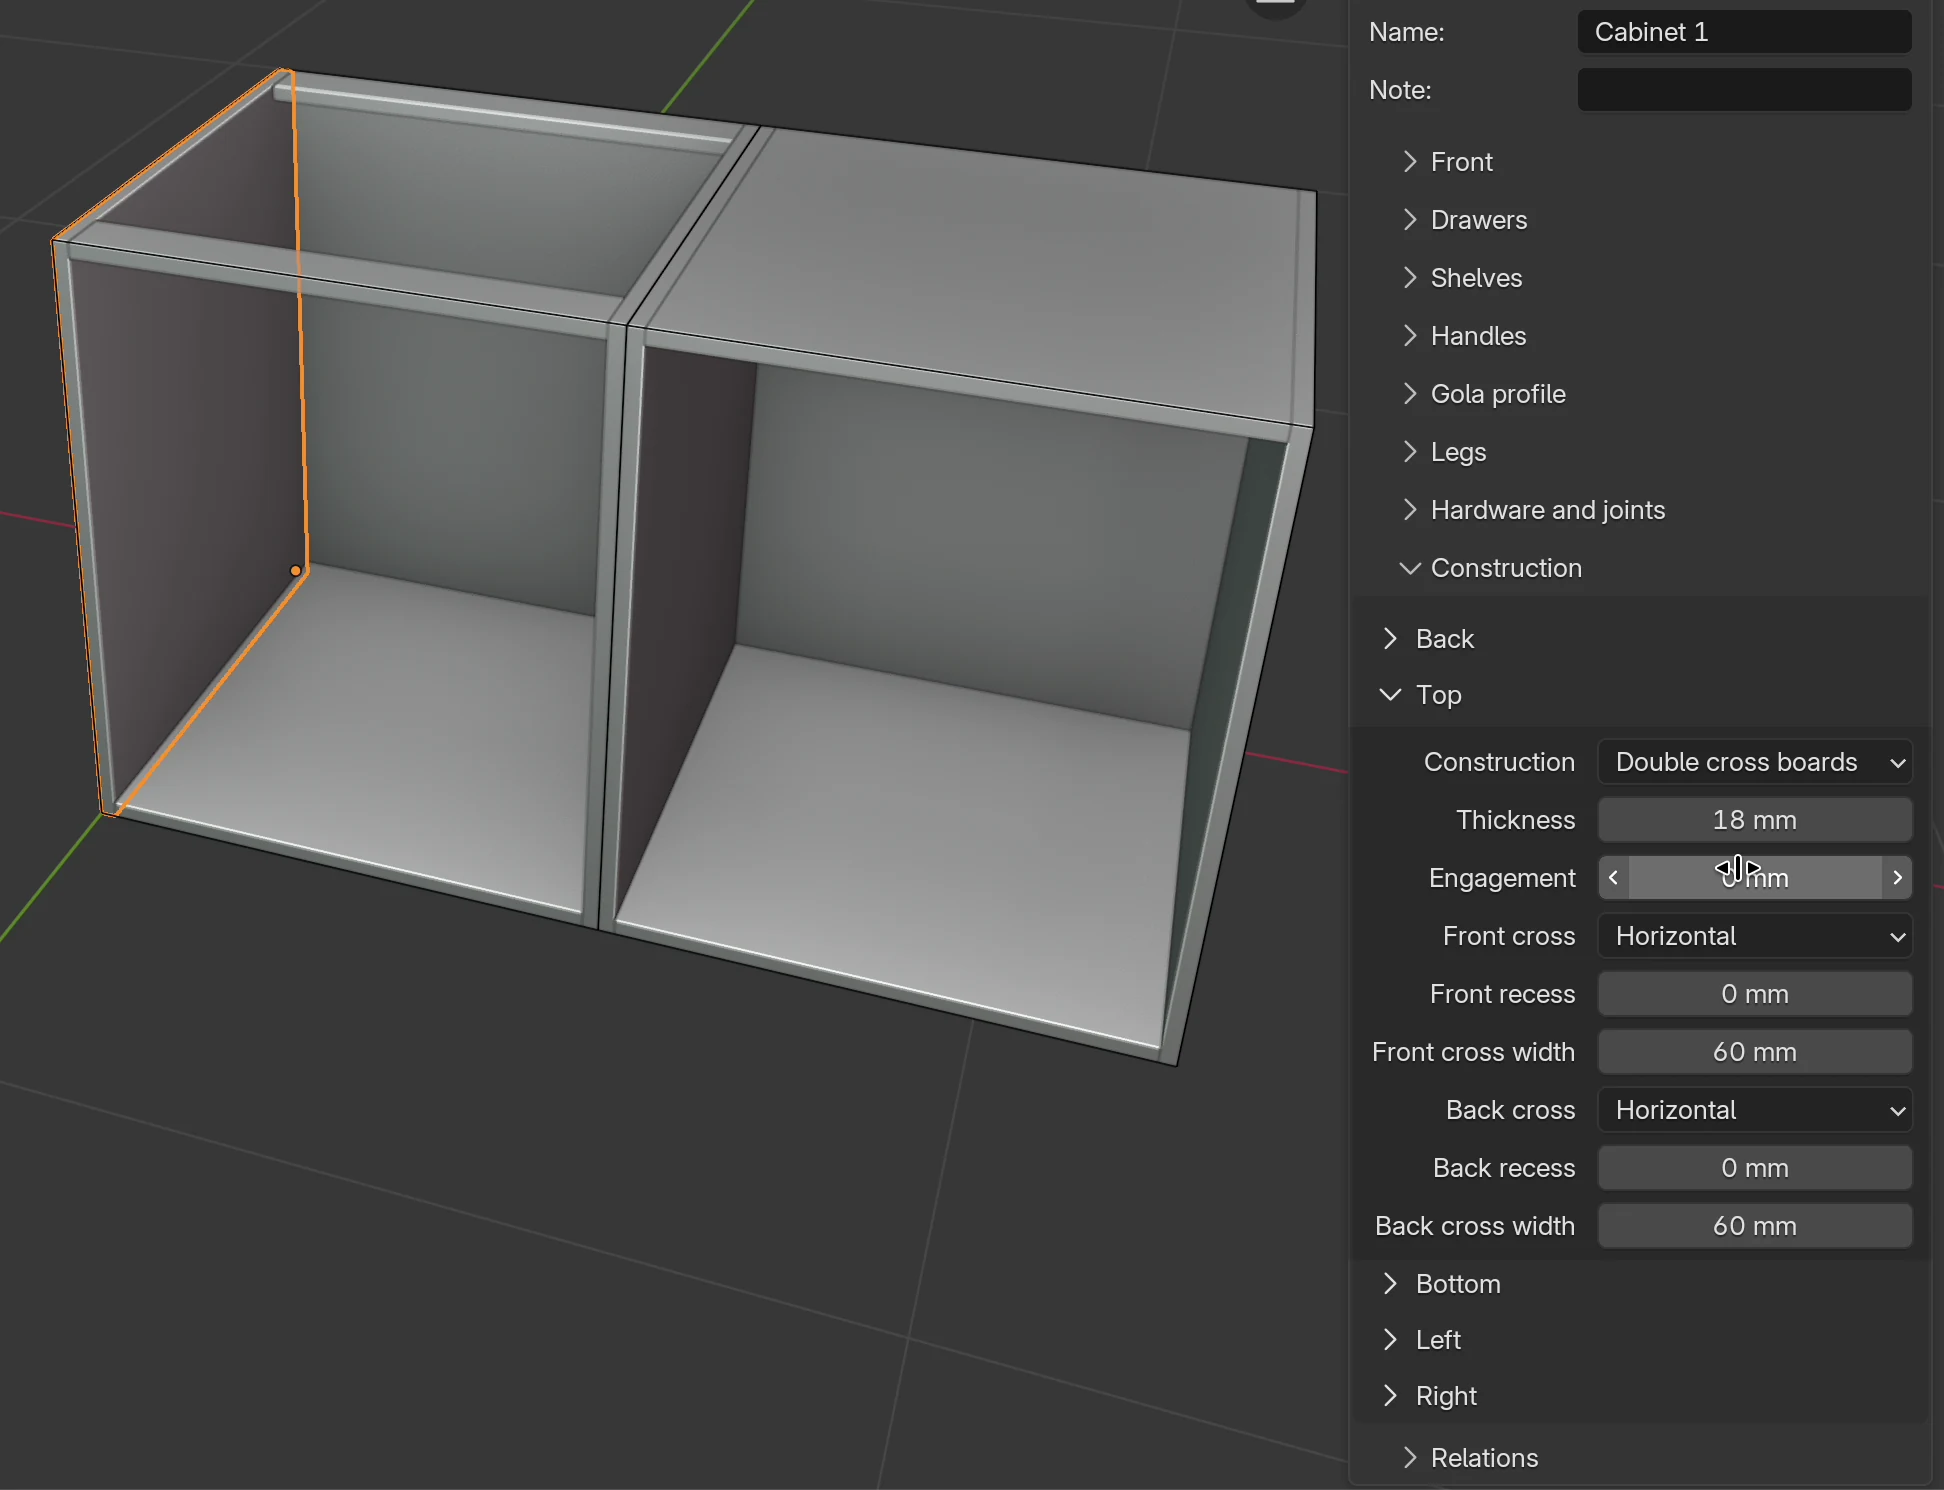
Rules:
- The cross boards sit between the side panels: they are as wide as the inner width of the cabinet (564 mm for a 600 mm cabinet with 18 mm side panels).
- When you choose cross boards, both joints go back to Inset, and the joint and overflow fields disappear.
- With the back in a groove or rebate, the back cross board gets a groove too.
- Shift+T cycles through the top: None → Standard → Double cross boards → Front cross board → Back cross board → None.
Note
When you set None, the top board disappears and its thickness counts as 0. When you go back to Standard, the board comes back with its old thickness.
Bottom
The same fields and the same choices as Top: Standard, Double cross boards, Front cross board, Back cross board, None. The cross boards are called Cross bottom front and Cross bottom back.
Differences:
- Engagement here raises the bottom (or the bottom cross boards) above the bottom edge of the cabinet. The side panels still go all the way down, so they can serve as a plinth. Drawers and shelves start above the raised bottom.
- The Continuous joint means that the bottom runs under the side panel, and the side panel is shorter by the thickness of the bottom.
- There is no key like Shift+T for the bottom.
Left and right sides
The side panels of the cabinet. The Left and Right sections have the same fields.
| Option | What it does | Default | Values |
|---|---|---|---|
| Construction | Standard: the side panel exists. None: no side panel. | Standard | Standard, None |
| Thickness | Side panel thickness. | 18 mm | 0–100 mm |
| Front recess | The side panel stops this far short of the front edge. | 0 mm | −1000 to 1000 mm |
| Back recess | The side panel stops this far short of the back edge. | 0 mm | −1000 to 1000 mm |
| Top overflow | The side panel extends this far above the top edge (negative: lower). | 0 mm | −2000 to 2000 mm |
| Bottom overflow | The side panel extends this far below the bottom edge (negative: higher). | 0 mm | −2000 to 2000 mm |
The fields other than Construction are shown only for Standard.
Rules:
- When you set a side panel to None, its thickness counts as 0: the top and bottom, cross boards and shelves run to the edge of the cabinet. This is how you build cabinets that share a side panel with their neighbour.
- The Gola groove goes only into side panels that exist.
Relations
Related cabinets go together with this cabinet: when you move it, they move too, with the gap you enter. Use it for a run of cabinets and for a wardrobe with a top box. The details are in the chapters Base units and the corner and A wardrobe with compartments and a rail.
- Select a cabinet, then add a second cabinet with Shift + click.
- Open the Relations panel and click Relate to the selected cabinet.
- Or choose the cabinet yourself in the Left, Right, Above or Below field.
| Option | What it does | Default | Values |
|---|---|---|---|
| Relate to the selected cabinet | The second selected cabinet becomes the left, right, upper or lower neighbour of the active one. Shown when two cabinets are selected; otherwise the panel says Select a second cabinet to relate it. | – | button |
| Show IDs | Shows the internal names of the cabinets in the scene, by which you pick them in the fields below. | off | on, off |
| Left, Right, Above, Below | The cabinet that stands on that side. | empty | cabinets in the scene |
| Left offset, Right offset, Above offset, Below offset | The gap between this cabinet and the neighbour. | 0 mm | −5000 to 5000 mm |
| Include in scaling: Width, Depth, Height | When you change that dimension of this cabinet, the related cabinets get the same dimension. | off | on, off |
Rules:
- A neighbour follows only the cabinet in whose field it is entered, not the whole chain.
- When you change the width of this cabinet, the right neighbour moves along with it.
Watch out
When you delete a cabinet, the cabinets entered in its Left, Right, Above and Below fields are deleted too. If you want to keep the neighbour, clear the field first.
Corner cabinet
The corner cabinet is an L-shaped cabinet for the corner of a kitchen. One arm runs along the width of the cabinet, the other along the depth, and each has its own door. In the inner corner of the L the doors close against two narrow corner post boards. You add it with Add → Corner cabinet or Shift+C, or from the templates. When you select it, the EFS - Cabinet tab has the Corner cabinet properties panel and its own sub-panels. How to put it in the corner of the room is explained in the chapter Base units and the corner.
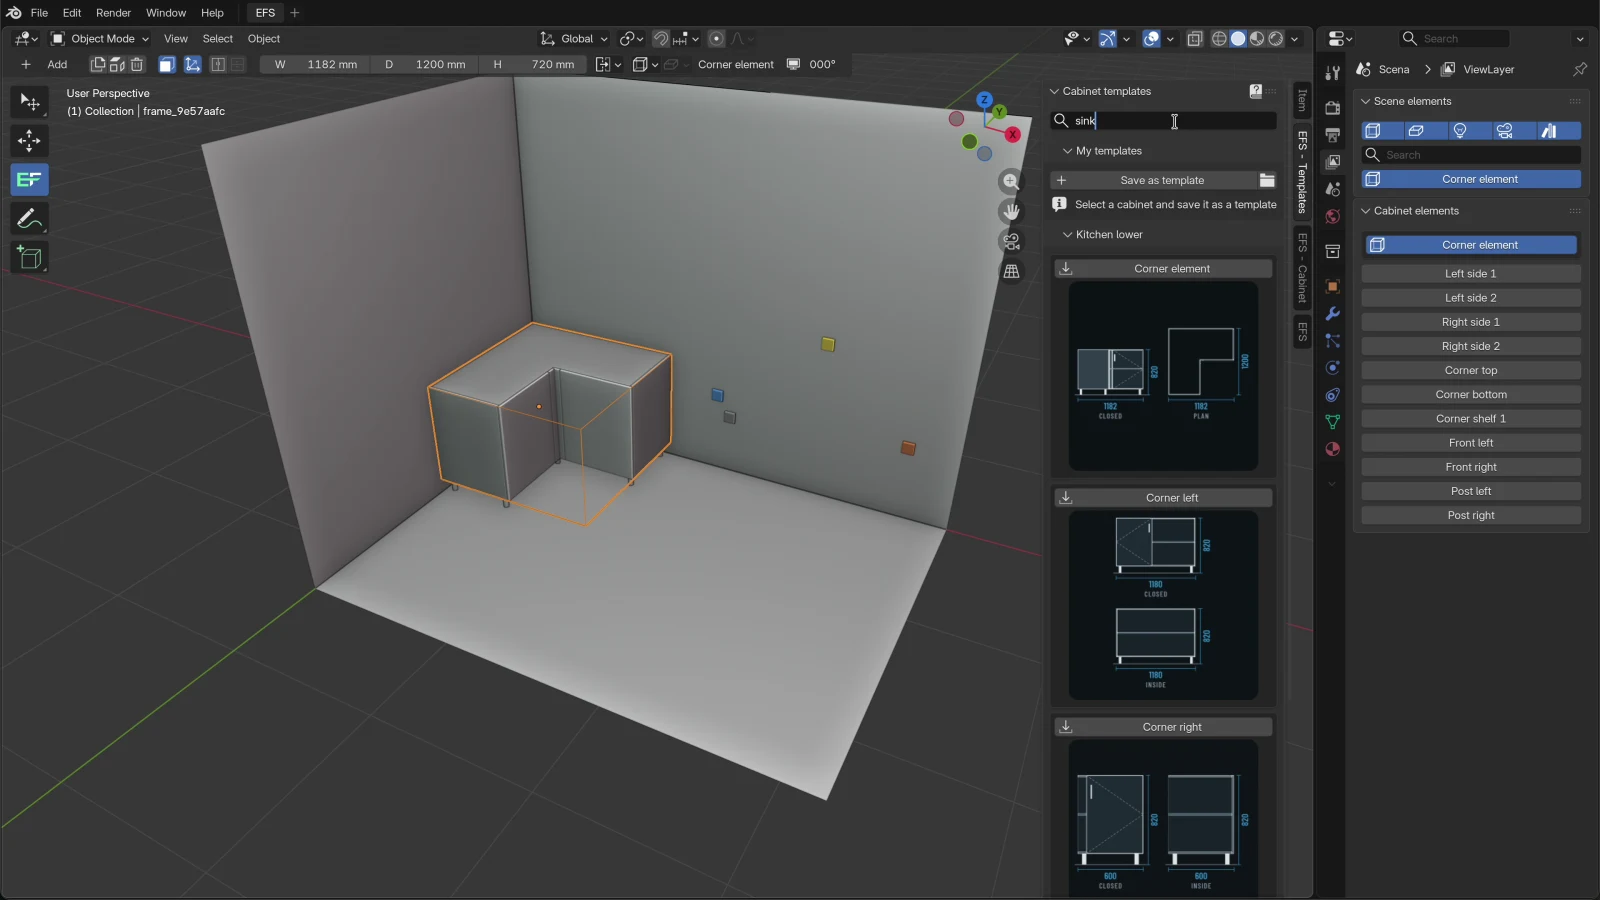
The boards of the corner cabinet (names from the Cabinet elements list):
| Board | Where it is |
|---|---|
| Right side 2 | The back panel along the whole width of the cabinet. |
| Left side 2 | The side panel along the whole depth of the cabinet, against the other wall. |
| Right side 1 | The end side panel of the arm along the width. |
| Left side 1 | The end side panel of the arm along the depth. |
| Corner top, Corner bottom, Corner shelf 1 to 3 | The L-shaped top, bottom and shelves. |
| Front right | The door on the arm along the width. |
| Front left | The door on the arm along the depth. |
| Post right, Post left | Narrow corner post boards in the inner corner, flush with the doors. |
| Left back, Right back | Boards that close the cut-out in the back corner. They exist only with a cut-out. |
The corner cabinet has no thin back: its back panels are boards of the same thickness as the carcass.
Corner cabinet properties
| Option | What it does | Default | Values |
|---|---|---|---|
| Width | Outer width of the L-shaped cabinet. | 1200 mm | 100–5000 mm |
| Depth | Outer depth of the L-shaped cabinet. | 1160 mm | 100–5000 mm |
| Height | Height, without legs. | 720 mm | 100–5000 mm |
| Thickness | Thickness of all boards of the corner cabinet, the doors included. | 18 mm | 0–100 mm |
| Shelves | Number of shelves, evenly spaced over the height. | 1 | 0–3 |
| Is upper | As on a regular cabinet. Shown only without legs. | off | on, off |
| Z rotation, Name, Note | As on a regular cabinet. | – | – |
Front side
| Option | What it does | Default | Values |
|---|---|---|---|
| Width | The opening on the arm along the width: from the inner corner to the end of the cabinet. The other arm is as deep as the cabinet's Width minus this value. | 638 mm (new corner cabinet) | 0–5000 mm |
| Depth | The opening on the arm along the depth: from the inner corner to the front end of the cabinet. The arm along the width is as deep as the cabinet's Depth minus this value. | 598 mm (new corner cabinet) | 0–5000 mm |
| Gap | The gap around the doors. The doors are lower than the cabinet by one Gap, half at the top and half at the bottom. | 2 mm | 0–100 mm |
| Hinges | Number of hinges per door. | 2 | 0–6 |
| Hinge type | A hinge from the catalogue. | No drilling (count only) | hinges from the catalogue |
How EFS works out the corner cabinet doors (default dimensions): Front right is Width − corner post width − 2 × Gap = 638 − 60 − 4 = 574 mm wide. Front left is Depth − corner post depth − 2 × Gap − Thickness = 598 − 60 − 4 − 18 = 516 mm wide. Both are 720 − 2 = 718 mm high.
Handles: the same fields as the Handles panel of a regular cabinet.
Cut-out
| Option | What it does | Default | Values |
|---|---|---|---|
| Width | Width of the cut-out in the back corner of the cabinet (against both walls), for example for a pillar or pipes. | 0 mm | 0–5000 mm |
| Depth | Depth of the cut-out. | 0 mm | 0–5000 mm |
The cut-out appears only when both values are greater than 0. Then the back panels, the top, the bottom and the shelves are shortened around the cut-out, and the Left back and Right back boards close it.
Corner post (in the parts list Post right and Post left)
| Option | What it does | Default | Values |
|---|---|---|---|
| Width | Width of the Post right board, next to Front right. 0 removes it. | 60 mm | 0–500 mm |
| Depth | Width of the Post left board, next to Front left. 0 removes it. | 60 mm | 0–500 mm |
The corner post boards are in the fronts' material group (F 1, on a wall unit F 2).
Legs
| Option | What it does | Default | Values |
|---|---|---|---|
| Type | Type of legs. | None | None, Rounded legs, Squared legs |
| Height | Height of the legs. | 100 mm | 10–500 mm |
Rules:
- The corner cabinet has six legs, and seven with a cut-out (both values greater than 0).
- Shift+H adds a shelf, up to three. The corner cabinet has no dividers, drawers or carcass joints.
- Project hardware gives the corner cabinet only hinges and handles.
- The Corner cabinet properties panel is shown only while one object is selected.
Common problems and solutions
The EFS - Cabinet tab is empty or missing. No board of a cabinet is selected, or you are in edit mode. Click a board of the cabinet in the 3D Viewport. If the header says Edit Mode, press Tab.
I chose Outer drawers, but there are no drawers. Number is 0. Type the number of drawers and press Enter. Or press D.
The fronts disappeared when I added drawers. A cabinet has either fronts or drawers. For a cabinet with doors and a drawer, stack two cabinets one on top of the other and relate them (Relations, Above/Below). That is how the Door and drawer template among the base kitchen units is built. See Templates and My templates.
Horizontal shelf is greyed out in the Add menu. A shelf or several objects are selected. Click one side panel or front of the cabinet.
I deleted one shelf and they all disappeared. Deleting a shelf deletes all the shelves and dividers of the cabinet. Undo with Ctrl+Z and give the shelf you don't want an offset (Shelf N offset), or add the shelves again.
I can't see the Is upper field. The cabinet has legs. Set Legs → Type: None.
I can't see the Engagement and Depth fields for the back. They are shown only for Rebated and Grooved. The Gap field is shown only for Lay-on.
I can't see Left overflow for the top. It is shown only when Left joint is Continuous. Cross boards have no joints.
The side panels are shallower than I expected. The cabinet's Depth includes the front and a lay-on back. A cabinet 580 mm deep with 18 mm doors and a 3 mm back has 559 mm side panels. If you need 580 mm side panels, enter Depth 601 mm.
There are no fronts in the cutting list. The fronts are hidden with Shift+F. Bring them back with the fronts icon in the header and export again.
The Gola profile button in the Add menu is greyed out. The cabinet has no Gola groove. In the Gola profile panel enter a Count greater than 0, and select only one board of the cabinet.
The neighbour disappeared when I deleted a cabinet. The neighbour was entered in the Relations of the deleted cabinet. Undo with Ctrl+Z, clear the field and delete again.
Shortcuts in this chapter
| Key | Action |
|---|---|
| N | Sidebar with the tabs on / off |
| Shift+A | The Add menu (the same as the Add button in the header) |
| Shift+H | New horizontal shelf in the selected cabinet |
| Shift+V | New vertical shelf (divider) in the selected cabinet |
| Shift+C | New corner cabinet |
| O | Open / close doors and drawers of the selected cabinet |
| F | Next front: none, left, right, two doors, then the same with Inset |
| Shift+F | Hide the fronts in the scene |
| D | Next drawer layout: outer 1–5, inner 1–5, no drawers |
| L | Next legs: rounded, squared, no legs |
| Shift+T | Next top: full board, cross boards, no top board |
| U | Upper / lower cabinet |
| Alt+Z | X-ray view: you see the dowels and drillings |
| X | Delete: the cabinet, or all the shelves of the cabinet if a shelf is selected |
| Ctrl+Z | Undo the last action |
The keys F, D, L, Shift+T and U also work on several selected cabinets: they all get the next state of the active cabinet. All the shortcuts are in the chapter Keyboard shortcuts.
Next
Next chapter: Decors, edge tape and materials