Wall units, tall units and flaps
In this chapter the kitchen from chapter B02 gets wall units on wall A, a flap with a lift system, hangers on a wall rail and a tall fridge unit on wall D. You will learn at what height EFS keeps the wall units and how their line is worked out, how a cabinet becomes a wall unit, which tall units are among the templates and how EFS chooses the force of the flap lift by the power factor.
Video: B03 Wall units, tall units and flaps
The same workflow in a video of a minute and a half.

Before you start
- Open the project with the base run from the chapter Base units and the corner: the corner cabinet in the corner of walls A and D, the sink unit, the dishwasher space, the drawers and the four-drawer cabinet on wall D.
- In the toolbar on the left, have the EFS tool selected, and in the header the positioning option Forward alignment.
- The rules by which a new cabinet sits next to the selected one or at the end of the run are described in Where a new cabinet sits. The same rules apply to wall units, except that wall units look at wall units.
The workflow from the video
- Click on empty space. Look from the front: the header shows 000°.
-
In the EFS - Templates tab, expand Kitchen upper, search for
double doorand click Double door. The wall unit sits on wall A, in the corner by wall D, with its top edge at 2150 mm. See Wall unit height.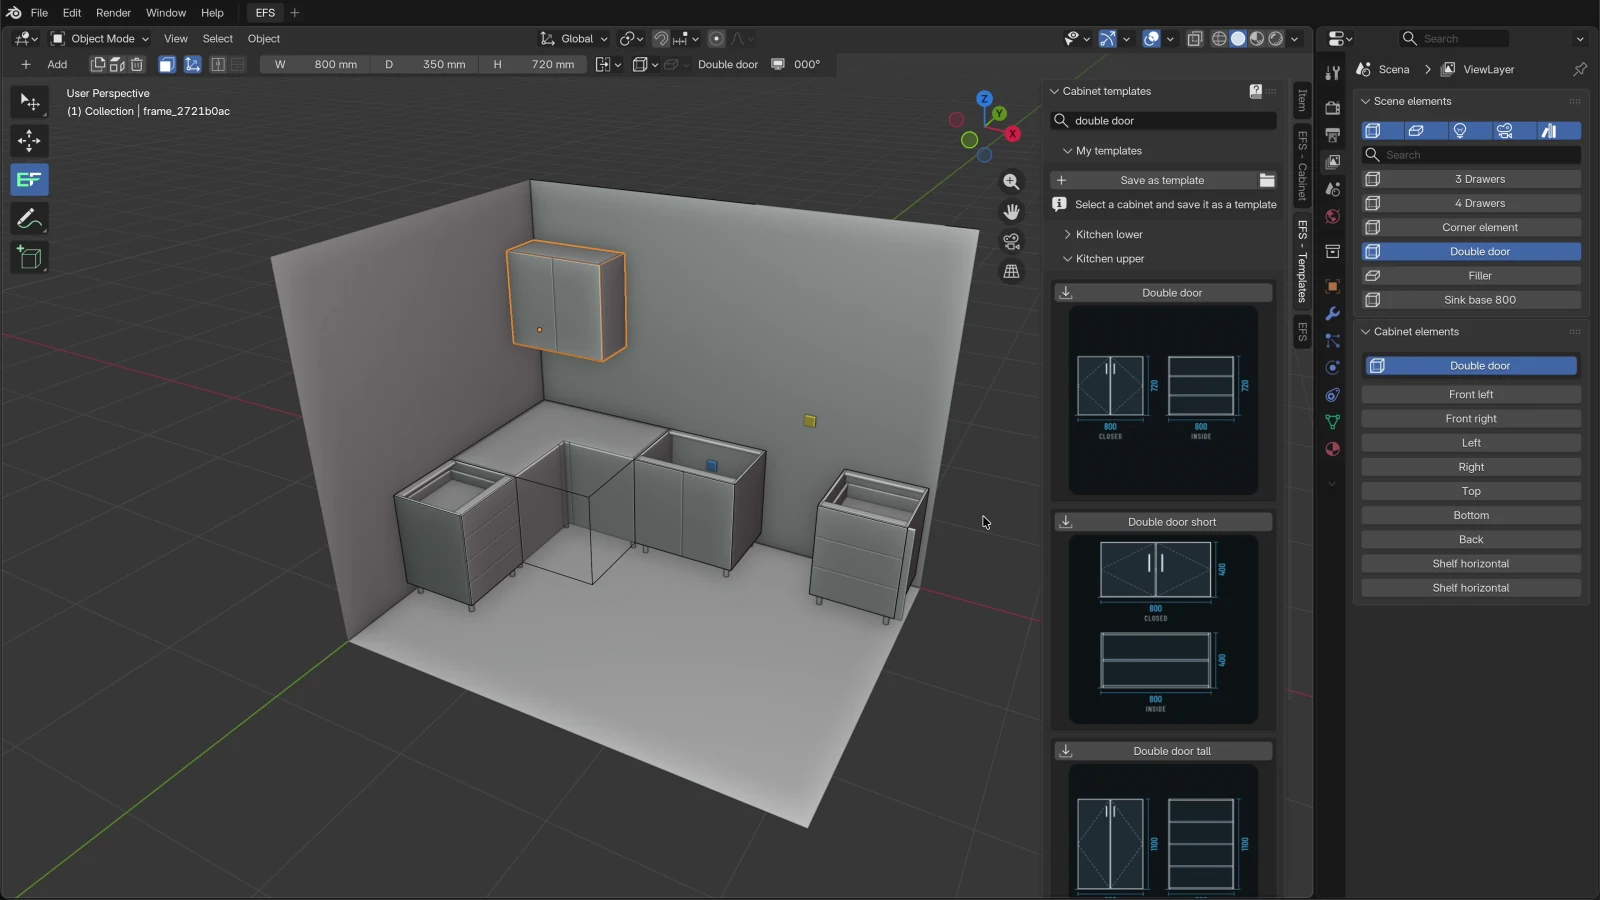
-
With it selected, search for
single doorand click Single door twice. Each new wall unit comes to the right of the previous one. The second one gets the name Single door - 2.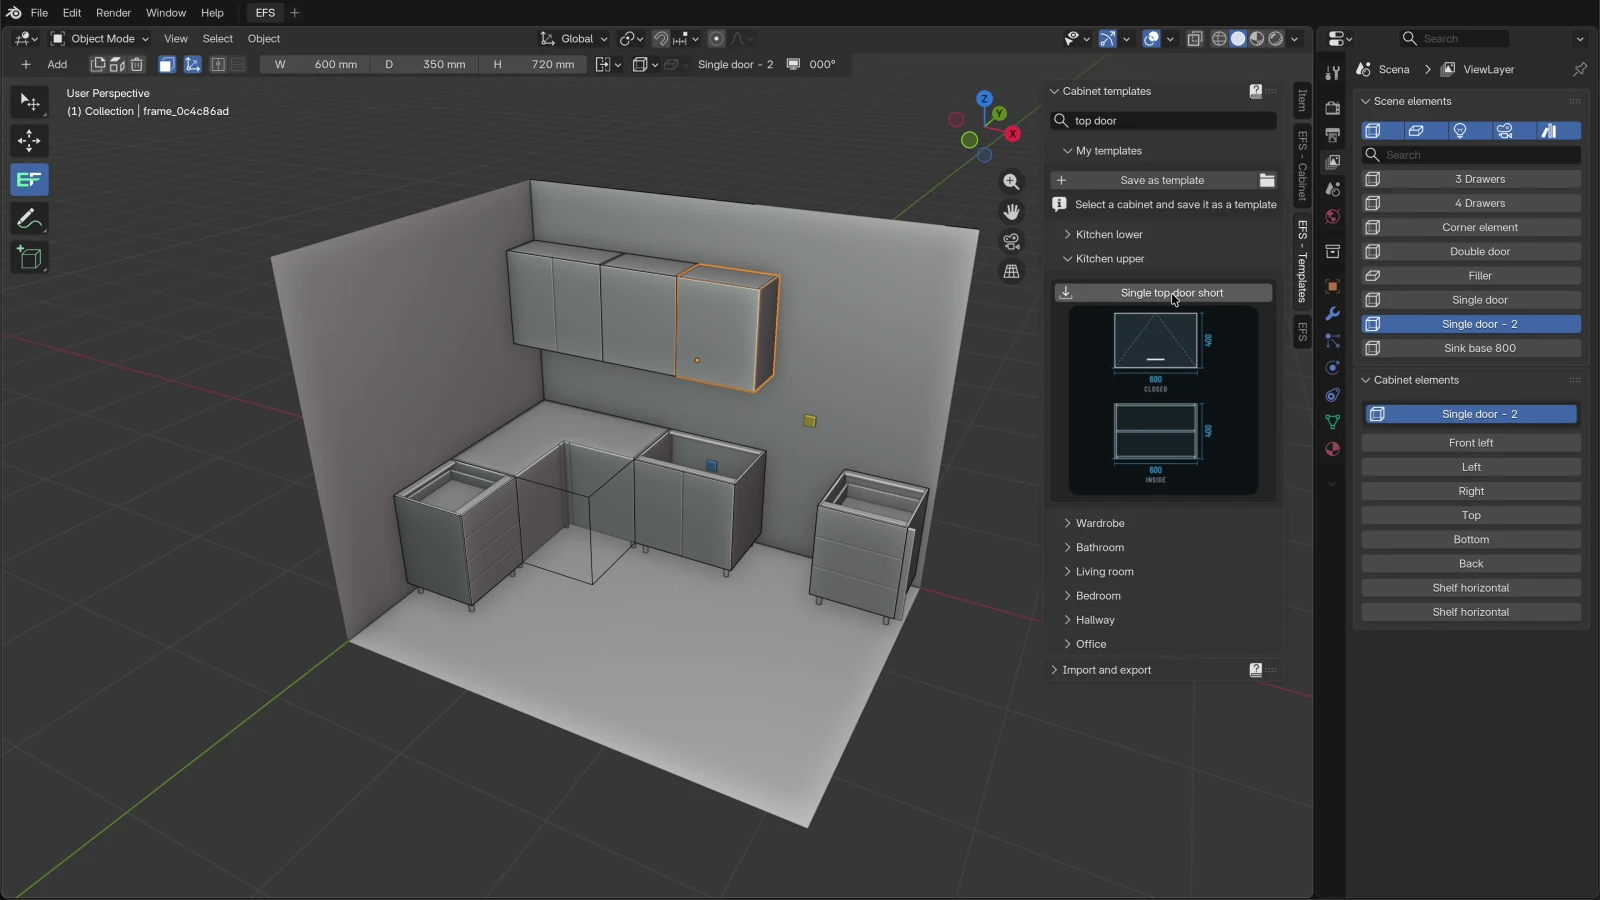
-
Search for
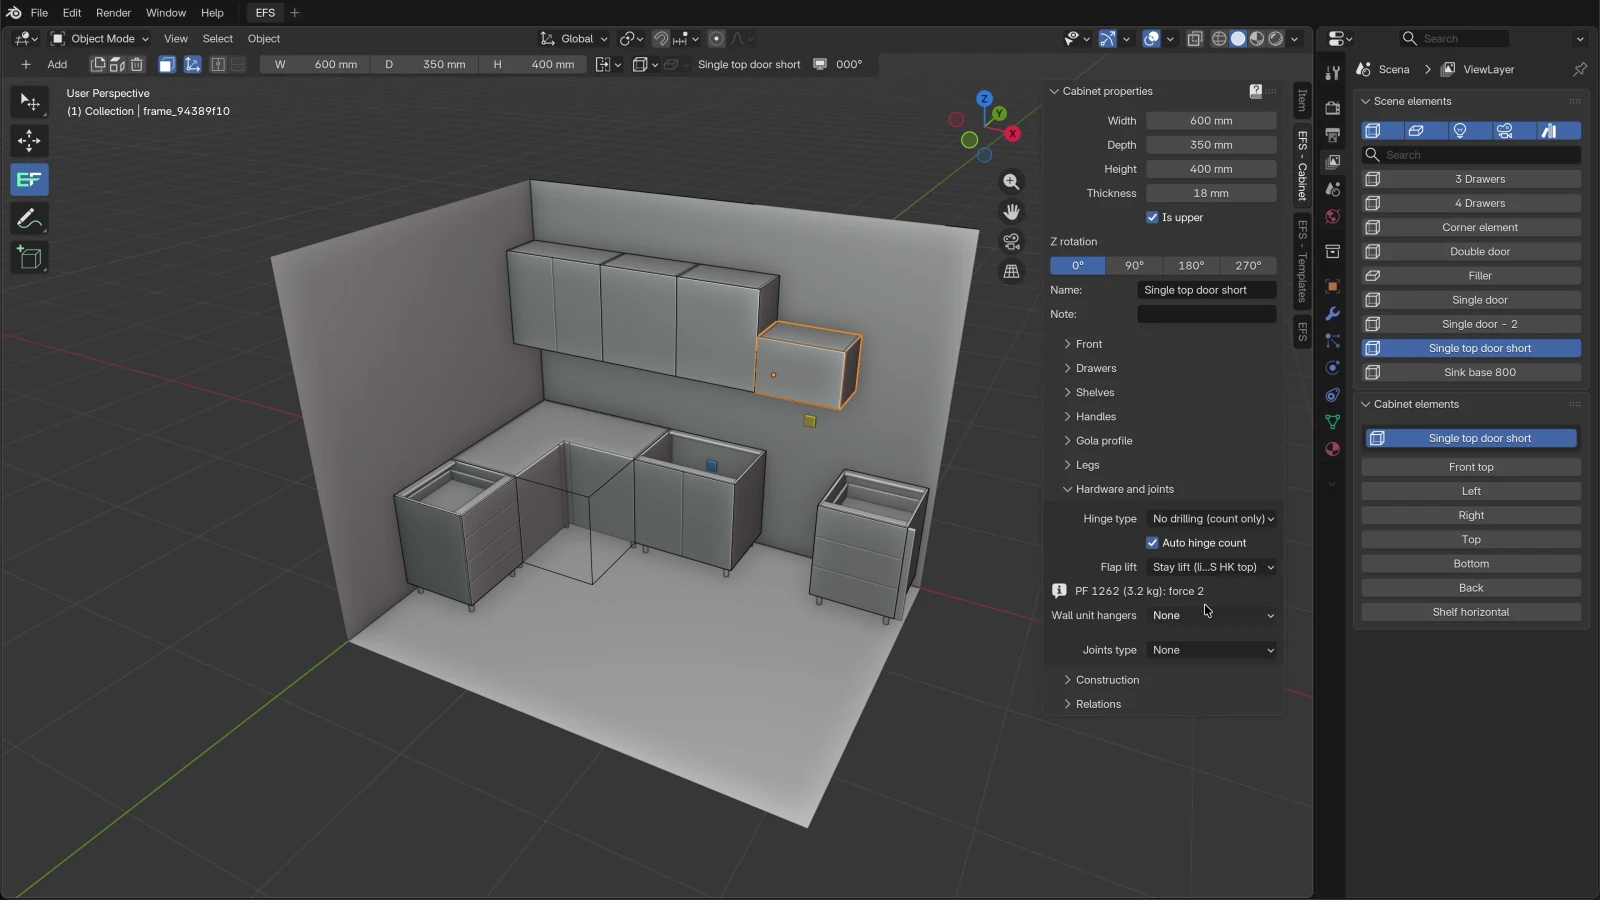
top doorand click Single top door short. This is a wall unit 400 mm high with a flap that opens upwards. See Flap with a lift system. -
Open the EFS - Cabinet tab and the Hardware and joints panel. In the Flap lift field, choose Stay lift (like AVENTOS HK top). The line PF 1262 (3.2 kg): force 2 appears below it.
-
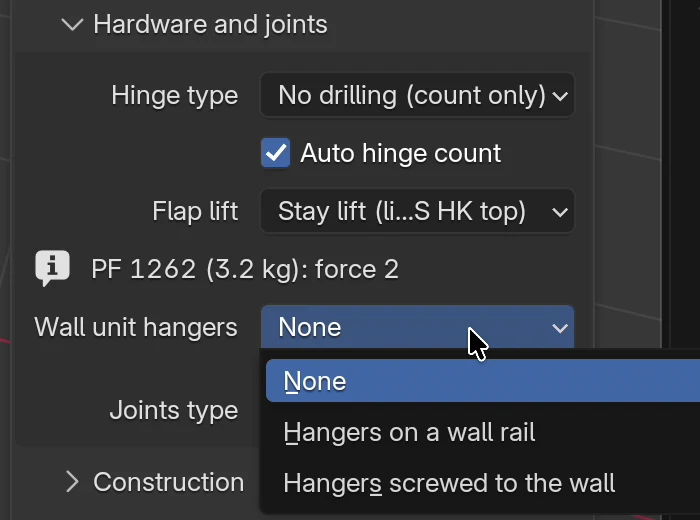
In the Wall unit hangers field, choose Hangers on a wall rail. See Wall unit hangers.
- Click on empty space and turn the view towards wall D, until the header shows 270°.
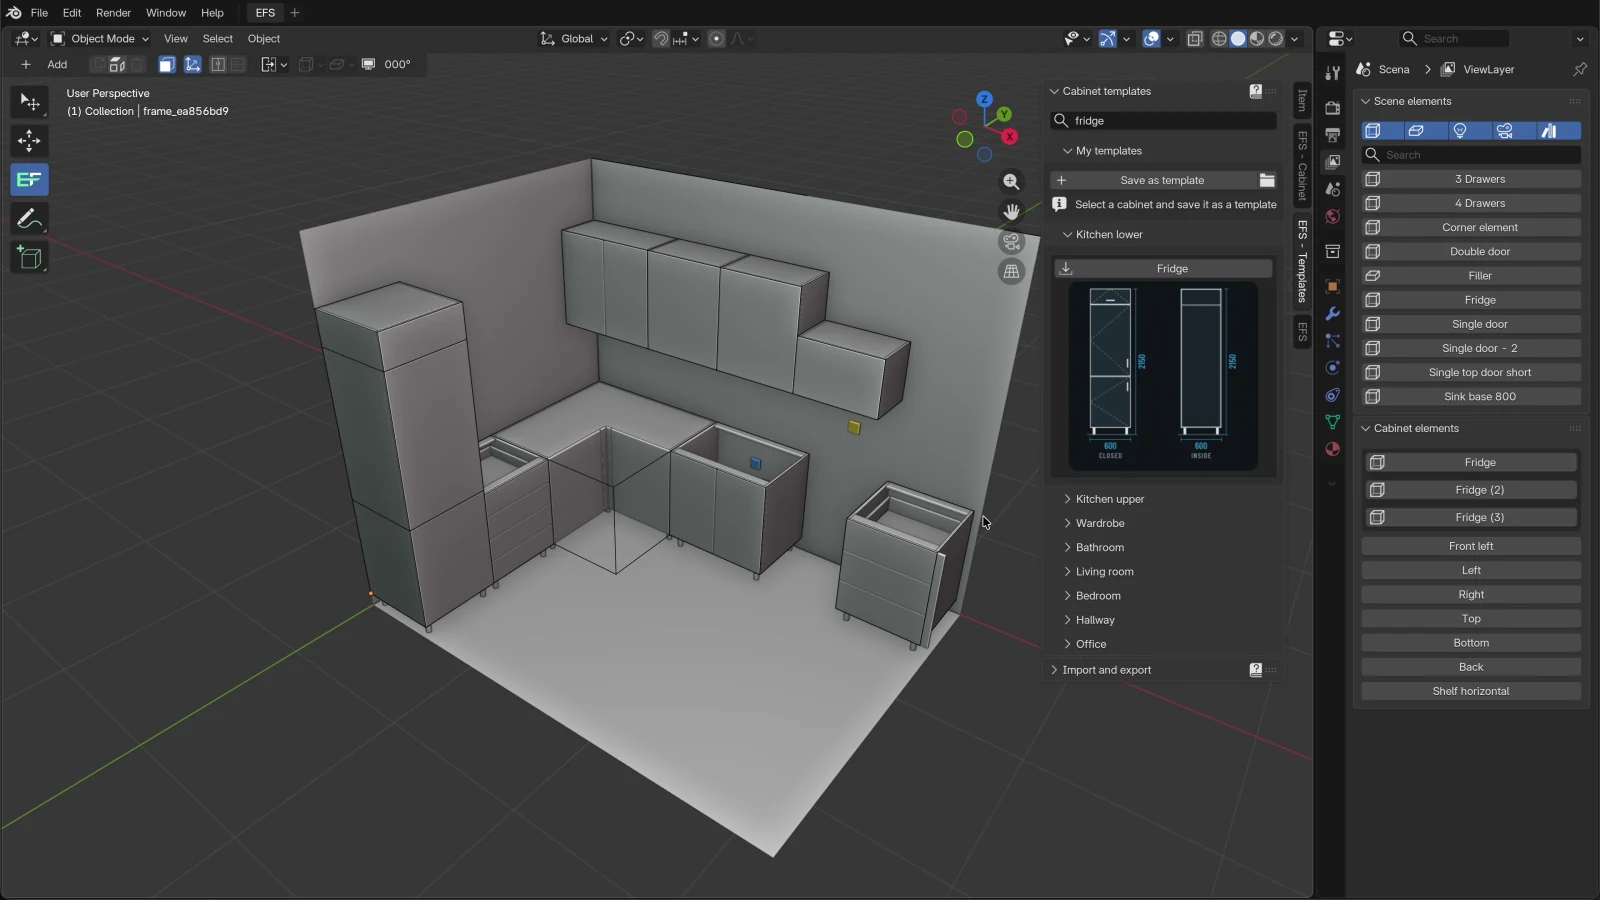
- In the EFS - Templates tab, expand Kitchen lower, search for
fridgeand click Fridge. The tall unit sits at the end of wall D, in the corner by wall C. See Tall units.
Wall unit height
All wall units in the project hang at the same height. You type this height once, in the EFS tab, Scene properties panel.
- In the EFS tab, click the title of the Scene properties panel to open it.
- Click the Upper elements height field, type the height in mm and press Enter.
All wall units in the project immediately move to the new height.
The Scene properties panel
| Option | What it does | Default | Values |
|---|---|---|---|
| Upper elements height | Height of the bottom of the wall unit carcasses above the floor. Applies to all wall units in the project. | 1430 mm | 1000–3000 mm |
| Positioning options | How a new cabinet is placed: Forward alignment, Sliding on X axis, Sliding on Y axis, Sliding on X and Y axis. The same as the drop-down in the header. See Positioning options. | Forward alignment | 4 options |
| Previous Camera, Next Camera | The previous or next camera of the project becomes active, and the view switches to the camera. | – | buttons, grey until the project has at least two cameras |
Note
Upper elements height is saved with the project. A new project gets it from My settings, if you have saved them (see My settings). Older projects, from the time when the default height was 1400 mm, keep the height their wall units stand at when you open them.
The wall unit top line
The Upper elements height field is the height of the bottom of the wall units. The top edge is the bottom plus the height of the cabinet. Wall units from templates are 720 mm high, so with the default height they all end at 1430 + 720 = 2150 mm. Tall units from templates end on the same line: 100 mm of legs and 2050 mm of carcass.
Heights in the kitchen from the video, from the bottom up:
| What | From the floor to | How |
|---|---|---|
| Legs of the base units | 100 mm | The templates stand on 100 mm legs. |
| Top of the base carcass | 820 mm | 100 + 720 mm |
| Top of the worktop | 858 mm | 820 + 38 mm (the worktop from the chapter The worktop) |
| Bottom of the wall units | 1430 mm | Upper elements height |
| Top of the 720 mm wall units | 2150 mm | 1430 + 720 mm |
| Top of the tall units | 2150 mm | 100 + 2050 mm |
That leaves 572 mm between the worktop and the wall units.
A different line: if the wall units should end at 2300 mm, type Upper elements height 2300 − 720 = 1580 mm. Then change the Height of the tall units to 2200 mm (2300 − 100 mm of legs) yourself, because they do not follow the field.
What changes with the height
When you change Upper elements height:
- All wall units in the project, including wall corner cabinets, move so that their bottom is at the new height.
- A wall unit lower or higher than 720 mm sits with its bottom at the new height. Its top is not on the line of the others.
- The fronts of all wall units go back to material group F 2.
- Base and tall units do not move.
- Hanging templates from other categories (bathroom, living room, bedroom, hallway, office) are not wall units. They keep their mount height.
Watch out
A wall unit you raised or lowered by hand (3) goes back to Upper elements height as soon as you change that field or press U. The same goes for the material group of the fronts: a front you moved to another group goes back to F 2. Set Upper elements height first, and only then move individual cabinets and change their front group.
Wall unit: the U key and the checkbox
Any cabinet can become a wall unit. A wall unit hangs at Upper elements height, and its fronts go to group F 2, so they can have a different decor from the base fronts.
A cabinet becomes a wall unit in two ways:
- select it and press U; the same U turns it back into a base unit;
- in the EFS - Cabinet tab, Cabinet properties panel, tick the Is upper checkbox.
What happens:
| Wall unit | Base unit | |
|---|---|---|
| Height from the floor | Bottom at Upper elements height | On the floor |
| Material group of the fronts and drawer fronts | F 2 | F 1 |
| The Wall unit hangers field in the Hardware and joints panel | Visible | Not visible |
| Placing new cabinets | Wall units look at wall units | Base units look at base units |
Rules:
- The Is upper checkbox is visible only while the cabinet has no legs. When you add legs to the cabinet, it stops being a wall unit.
- U does not remove legs. First take the legs off a cabinet that has them (L until it shows None), then press U.
- U works on all selected cabinets: they all become wall units or all base units, following the active cabinet. It does not work on the corner cabinet; the corner cabinet has its own Is upper checkbox in the Corner cabinet properties panel.
- The depth does not change. A cabinet added with C is 580 mm deep. Wall units from templates are 350 mm deep, so type Depth 350 mm for this one too.
- The handle stays where it was. Project hardware puts the handle of a wall unit on the opposite edge (the project's Top edge becomes the bottom edge of the wall unit), but only on new cabinets and when you click Apply to selected or Apply to all in the Project hardware panel. See Project hardware.
Tip
The fastest way to get a new wall unit is next to an existing one: click a wall unit and press C. The new cabinet comes next to it and takes over its height, depth, height from the floor and wall unit state. It does not get the legs from My settings (see My settings).
Wall units from templates
The Kitchen upper category has 13 templates. They are all 350 mm deep and come in as wall units. Thumbnails and dimensions are in the template list.
| Template height | Templates | Top at the default height |
|---|---|---|
| 720 mm | Double door, Single door, Open top shelves left edge, Open top shelves right edge, Top shelf vertical narrow, Corner element | 2150 mm |
| 400 mm | Double door short, Single door short, Single top door short | 1830 mm |
| 300 mm | Top shelf, Top shelf wide | 1730 mm |
| 1100 mm | Double door tall, Single door tall | 2530 mm |
Where a wall unit template sits
| Situation | Where it sits |
|---|---|
| A cabinet is selected (wall or base unit) | To its right, with the back in line, and if the right side is taken, to its left. Its bottom is at Upper elements height. A wall unit template next to a selected base unit therefore sits beside it, not above it. |
| Nothing is selected, view 000° | At the right end of the wall unit run, with its back to wall A. The first wall unit sits in the corner by wall D. |
| Nothing is selected, view 270° | With its back to wall D, in front of the wall unit that stands furthest forward. The wall units on wall A are 350 mm deep, so the first wall unit on wall D sits right in front of them. |
| View 090° or 180° | It follows the mouse until you drop it with a click. |
A template keeps its own height from the floor even when it comes next to the selected cabinet. If the selected wall unit was raised by hand, the template still sits with its bottom at Upper elements height. A cabinet from C takes over the height of the selected one.
A short wall unit on the top line
Short wall units sit with their bottom at Upper elements height, as in the video: the 400 mm flap unit ends at 1830 mm. If a short unit should end on the 2150 mm line (e.g. above the cooker hood), raise it:
- Click the short unit.
- Press 3, type the difference in height (for 400 mm: 720 − 400 =
320) and press Enter.
The cabinet now hangs from 1750 to 2150 mm. Raised like this, it stays until you change Upper elements height or press U (section What changes with the height).
You can align two wall units of different heights by the bottom with Align to active (see Align to active). It does not align them by the top.
Wall corner cabinet
The Corner element template in the Kitchen upper category is a wall corner cabinet of 900 × 900 × 720 mm, without legs. Its Front side is 568 × 568 mm, so the wings are 332 mm deep, 350 mm with the doors: flush with the fronts of the wall units. How to put a corner cabinet into a corner is described in Corner cabinet in the corner of the room.
The wall corner cabinet always stands at Upper elements height: if you move it up or down, EFS puts it straight back at that height. It has no Wall unit hangers field and gets no hangers in the hardware list.
Tall units
Tall units are in the Kitchen lower category, because they stand on the floor. EFS places them as base units: they look at base units and go to the end of the base run or next to the selected cabinet.
| Template | Dimensions (W × D × H) | Top | What it has |
|---|---|---|---|
| Fridge | 600 × 580 × 2050 mm | 2150 mm | Tall unit for an integrated fridge: two doors and a compartment flap at the top (three carcasses). |
| Oven high - drawers | 600 × 580 × 2050 mm | 2150 mm | Three drawers at the bottom, above them a 600 mm oven niche, a door at the top (two carcasses). |
| Oven high - single door | 600 × 580 × 2050 mm | 2150 mm | A door at the bottom, a 600 mm niche, a door at the top. |
| Oven high 3 Drawers 2 2 1 - gola | 600 × 580 × 2050 mm | 2150 mm | Drawers 2 2 1 at the bottom, a 600 mm niche, a door at the top, gola profile. |
| Pantry 600 | 600 × 580 × 2050 mm | 2150 mm | Two doors one above the other, five shelves. The lower door is as high as the fronts of the base units. |
| Oven mid | 600 × 580 × 1330 mm | 1430 mm | Three drawers, above them a 600 mm niche for an oven at eye level. The top is in line with the bottom of the wall units. |
| Oven | 600 × 580 × 720 mm | 820 mm | A niche for an integrated oven under the worktop and a low drawer below it (two carcasses). |
They all stand on 100 mm legs. The top at 2150 mm matches the top of the wall units only with the default Upper elements height of 1430 mm.
Fridge on wall D
As in the video:
- Click on empty space.
- Turn the view with the middle mouse button until the header shows 270°.
- In Kitchen lower, search for
fridgeand click Fridge.
The fridge unit turns its back to wall D and sits in front of the base unit that stands furthest forward. In the video this is the four-drawer cabinet, so the fridge unit takes up the last 600 mm of wall D, in the corner by wall C.
Tip
If wall D already has several cabinets, click the last of them and only then click Fridge. The fridge unit then comes next to the selected cabinet, and not by the rule for the 270° view, which looks at all base units in the project.
A tall unit built from several carcasses
The fridge, the tall ovens and the pantry are built from carcasses tied together as Relations. The main carcass carries the name of the template, and the others get a suffix, e.g. Fridge (2) and Fridge (3). They are all in the Cabinet elements list of the main carcass.
- When you move or turn the main carcass, the others go with it.
- When you change its width or depth, the others get the same dimension: in the template the Width and Depth checkboxes under Include in scaling are on.
- The compartment at the top of the fridge unit has its own flap. Click the compartment flap, then choose a Flap lift in the Hardware and joints panel, as for any flap.
- X on the main carcass also deletes the related carcasses.
How the relation works is described in the chapter Related cabinets in a run.
Flap with a lift system
A flap is a front hinged at the top. In the Front panel this is Type: Top opening. Among the templates this is Single top door short (600 × 350 × 400 mm), and outside the kitchen Wall unit with lift-up flap in the Living room category and Wall unit with flap in the Hallway category. The front types are described in How a cabinet is built.
The open flap is held by a lift system. EFS chooses its force by the power factor and puts it in the hardware list and the price.
Choose the lift
- Click the flap or any board of the cabinet with the flap.
- In the EFS - Cabinet tab, open the Hardware and joints panel.
-
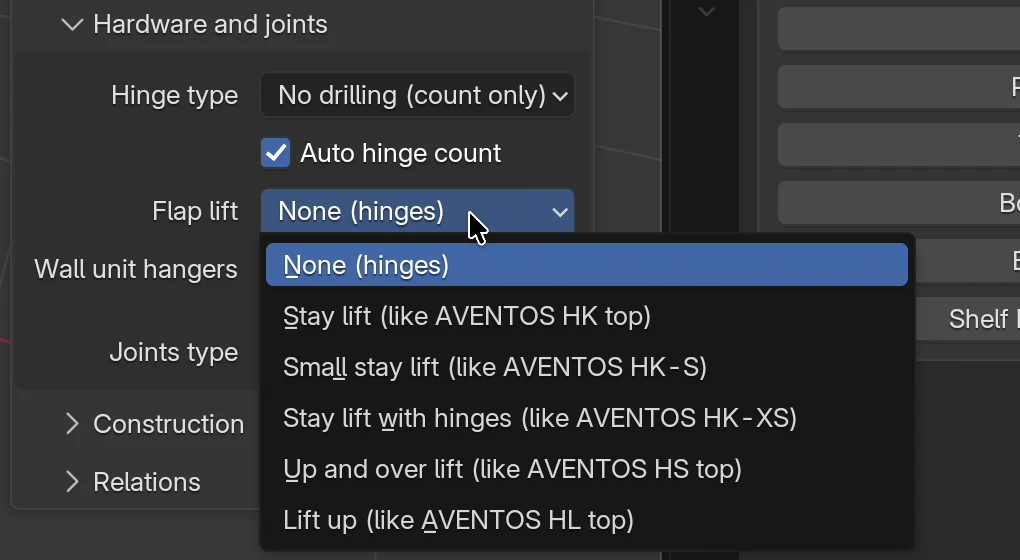
Open the Flap lift drop-down menu and choose a lift.
-
Read the line PF … (… kg): … under the field. At the end of the line is the lift force that EFS suggests.
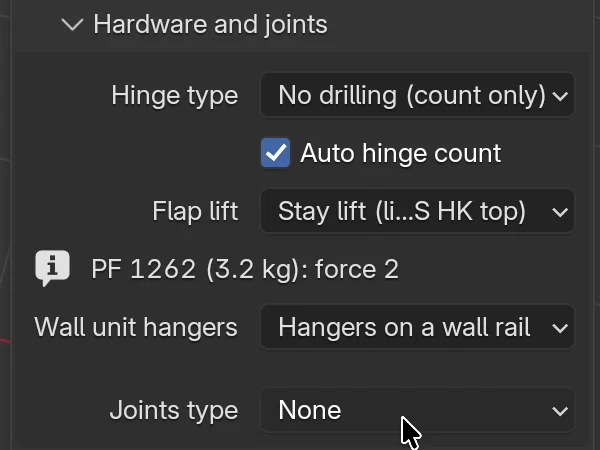
The Flap lift field appears only when the cabinet has a Top opening front. A Bottom opening flap has no lift: the hinges hold it.
Lifts
The lifts are in the EFS hardware catalogue. The names and ranges follow Blum AVENTOS as an example.
| Lift in the menu | Front height | Forces and power factor range | Hinges on the flap |
|---|---|---|---|
| None (hinges) | – | – | Yes |
| Stay lift (like AVENTOS HK top) | 180–600 mm | force 1: 400–1000, force 2: 750–1500, force 3: 1500–2600, force 4: 2400–5500 | No |
| Small stay lift (like AVENTOS HK-S) | 180–400 mm | force 1: 220–500, force 2: 400–1000, force 3: 960–2215 | No |
| Stay lift with hinges (like AVENTOS HK-XS) | 240–600 mm | force 1: 200–1000, force 2: 500–1500, force 3: 800–1800 | Yes |
| Up and over lift (like AVENTOS HS top) | 350–800 mm | force A: 500–1200, force B: 1100–2600, force C: 2400–5500 | No |
| Lift up (like AVENTOS HL top) | 300–580 mm | force 1: 500–1500, force 2: 1200–3000, force 3: 2600–5500 | No |
The default is None (hinges). A new cabinet and a template get the lift from the Project hardware panel, Flaps and wall units box (see Project hardware).
Watch out
The ranges in the catalogue are an example. Before ordering, check the force in the manufacturer's current catalogue.
Power factor
The power factor is the front height in mm times the front weight in kg. EFS works it out itself:
- It takes the dimensions of the flap: height, width and thickness.
- Weight = height × width × thickness × 750 kg/m³. If the cabinet has a handle (Bar handle or Knob), it adds 0.3 kg.
- Power factor = front height (mm) × weight (kg).
- It chooses the first lift force whose range contains the power factor.
Example from the video, a 600 × 400 mm cabinet with a flap without a handle:
| Step | Calculation | Result |
|---|---|---|
| Flap (Gap 2 mm) | 596 × 396 × 18 mm | |
| Weight | 0.596 × 0.396 × 0.018 m³ × 750 kg/m³ | 3.2 kg |
| Power factor | 396 mm × 3.19 kg | 1262 |
| Force | 1262 is in the range of force 2 (750–1500), and not in the range of force 1 (400–1000) | force 2 |
The panel shows this as PF 1262 (3.2 kg): force 2. With a handle the weight would be 3.5 kg and the power factor 1381, again force 2.
Rules:
- When the ranges of two forces overlap, EFS chooses the first, weaker one.
- EFS calculates with a density of 750 kg/m³ for every decor. For a heavier front (solid wood, glass, aluminium frame), check the force in the manufacturer's catalogue.
- When you change the dimensions of the cabinet, the thickness or gap of the front, or the handle, the power factor is recalculated.
- Read the power factor while the flap is closed. While it is open (O), EFS measures the open front and the number in the line is not correct.
The red line
The power factor line turns red when:
| Reason | What it says | What to do |
|---|---|---|
| No force has a range that contains the power factor | PF … (… kg): out of range | Choose another lift or change the size of the flap. |
| The height of the flap is outside the lift's range (e.g. more than 600 mm for Stay lift) | The force is shown, but the line is red | Choose a lift for that front height (table above) or change the height of the cabinet. |
A red line does not block the export. A lift that is out of range also goes into the hardware list, so you can easily spot it there.
Hinges with the lift
All lifts except Stay lift with hinges (like AVENTOS HK-XS) hold the flap by themselves. With them, EFS does not drill hinges in the flap and does not count them in the hardware list or the price. The Hinge type, Auto hinge count and Hinges fields stay in the panel, but have no effect on the flap.
With None (hinges) and Stay lift with hinges, the flap gets hinges from the Hinge type and Hinges fields, like a door.
EFS does not drill holes for the lift itself. Mount the lift using the manufacturer's template.
The lift in the hardware list and the price
| Where | What it says |
|---|---|
| Hardware list (the Hardware sheet in the cutting list Excel file, the hardware list in the PDF) | The name of the lift, e.g. Stay lift (like AVENTOS HK top), with the detail force 2, PF 1262, one set per flap. |
| Supplier order | The same line. Flaps with the same lift and the same detail are added up into one line. |
| Cost estimate and the quote | One set per flap, at the price from the price list. |
The hardware list is described in Cutting list and cut size, the order in The production package and the supplier order, and prices in A quote for the customer.
For advanced users: your own lift catalogue
The lifts are in the file lifts.json in the add-on's hardware folder. Put your own copy in the user_hardware folder in the EFS user data folder (where that folder is, see the chapter Install, licence and account). An entry with the same key (e.g. HK_TOP) replaces the built-in one, and a new key is added after the built-in ones.
The same file holds two numbers for the weight calculation: density (material density, default 750 kg/m³) and handle_weight (weight of a handle, default 0.3 kg). Each lift has front_height (front height range), devices (forces with a pf range), hinges (whether the flap needs hinges) and price_code (the code in the price list).
Codes in the price list, sheet Other: LIFT_HK_TOP, LIFT_HK_S, LIFT_HK_XS, LIFT_HS, LIFT_HL, per set. A change to the catalogue applies after you restart the program.
Wall unit hangers
Hangers are the hardware a wall unit hangs on the wall by. EFS does not draw or drill them, but counts them in the hardware list and the price.
- Click the wall unit.
- In the EFS - Cabinet tab, open the Hardware and joints panel.
- In the Wall unit hangers field, choose the type.
| Type | What goes into the hardware list per cabinet | Default |
|---|---|---|
| None | Nothing. | yes |
| Hangers on a wall rail | 2 × Wall cabinet hanger (detail adjustable) and 1 × Hanging rail as long as the cabinet, e.g. 600 mm | |
| Hangers screwed to the wall | 2 × Wall cabinet hanger (detail adjustable), no rail |
Rules:
- The field appears only on a wall unit. When you turn the cabinet back into a base unit, the hangers are not counted, even though the type stays set.
- Each cabinet gets its own rail, as long as its width. For a run of wall units of 800, 600 and 600 mm, the hardware list has one Hanging rail line for each cabinet, in total 1 × 800 mm and 2 × 600 mm.
- The wall corner cabinet and hanging cabinets that are not wall units (e.g. from the Bathroom category) have no field and get no hangers. Count the hangers for them yourself.
- A new cabinet and a template get the type from the Project hardware panel, Flaps and wall units box. You give hangers to the whole project at once there, with the Apply to all button, which writes all of the project hardware (see Project hardware).
In the price: the hanger per piece (code HANGER in the price list), and the rail per metre of cabinet length (code HANGING_RAIL_M). The same lines go into the supplier order.
Flap and hanger hardware for the whole project
You do not have to choose the flap lift and the hangers for each cabinet. In the EFS tab, Project hardware panel, the Flaps and wall units box has the same two fields: Flap lift and Wall unit hangers.
- New cabinets and templates get these values automatically.
- Apply to all writes the project hardware to all cabinets, and Apply to selected only to the selected ones. All the hardware from the panel is written (joints, hinges, drawer slides, handles…), not only these two fields.
- My settings saves them as the starting values for every new project (see My settings).
- Copy to selected cabinets transfers the flap lift in the Fronts group, and the hangers in the Hinges, slides and joints group (see Copy to selected cabinets).
Everything about the Project hardware panel is in the chapter Project hardware.
Common problems and solutions
The wall unit is not on the 2150 mm line. The cabinet is not 720 mm high, or Upper elements height has been changed. The line is Upper elements height plus the height of the cabinet. For a short unit, see A short wall unit on the top line.
The wall unit sat next to a base unit, not next to the wall units. A base unit was selected. Select the last wall unit and click the template again, or click on empty space and add it with the view at 000°.
The first wall unit sat in the corner, above the corner cabinet. With the view at 000°, the first wall unit goes into the corner of walls A and D. If you need it elsewhere, move it with 1 or first select the cabinet it should go next to.
A raised wall unit went back to its old height. Upper elements height was changed or U was pressed. Raise it again with 3.
The fronts of the wall unit went back to group F 2. Changing Upper elements height and U put the fronts of wall units back in F 2. Change the group again after you have set the height.
There is no Is upper checkbox. The cabinet has legs. Set Legs → Type: None or press L repeatedly until the legs disappear.
U does not work on the corner cabinet. The key works only on ordinary cabinets. For the corner cabinet, tick Is upper in the Corner cabinet properties panel.
The wall unit has legs in the air. U does not remove legs. Press L repeatedly until the legs disappear.
I can't see the Flap lift field. The cabinet has no Top opening flap. In the Front panel, choose Type: Top opening.
The power factor line is red. The power factor or the height of the flap is outside the lift's range. See The red line.
The power factor is too small and the line says out of range. The flap is open. Close it with O.
The flap has no hinges in the hardware list. The lift holds the flap by itself. Only Stay lift with hinges (like AVENTOS HK-XS) and None (hinges) have hinges.
I can't see the Wall unit hangers field. The cabinet is not a wall unit, or it is a corner cabinet. Tick Is upper or press U.
The fridge unit sat over another cabinet on wall D. The rule for the 270° view looks at all base units in the project. Press Ctrl+Z, click the last cabinet on wall D and add the fridge unit next to it.
The tall unit does not end on the wall unit line. Upper elements height is not 1430 mm. Change the Height of the tall units, because they do not follow the field.
Shortcuts in this chapter
| Key | Action |
|---|---|
| U | Upper / lower cabinet for the selected cabinets |
| C | New cabinet next to the selected one; next to a wall unit the new one is a wall unit too |
| 3 | Move along Z: type the distance in mm and confirm with Enter |
| 1 / 2 | Move along X / Y |
| L | Next legs (to None before U) |
| O | Open / close doors, flaps and drawers |
| X | Delete the cabinet, with its related carcasses |
| middle mouse button | Turn the view (000°, 090°, 180°, 270° in the header) |
| Ctrl+Z | Undo the last action |
All shortcuts are in the chapter Keyboard shortcuts.
Next
Next chapter: The worktop: cut-outs and the corner joint