Joints: dowels, confirmat, minifix
EFS joins the carcass with dowels, confirmats or minifix connectors. For every joint it drills holes in both boards: in the face of one and in the edge of the other. It counts the connectors for the hardware list, the cost estimate and the order. This chapter covers each joint type with its hole sizes, the spacing along a joint, cross boards and dividers, and the Project check messages.
Video: C02 Joints: dowels, confirmat, minifix
The same workflow in a video of a minute and a half.

Before you start
- Open a project with at least one cabinet. How a cabinet is put together is explained in the chapter How a cabinet is built.
- You choose the joint type in two places:
- for one cabinet in the EFS - Cabinet tab, Hardware and joints box;
- for the whole project in the EFS tab, Project hardware panel, Joints box, then Apply to all (see Project hardware).
- A new cabinet has Joints type: None, unless something else is chosen in Project hardware.
The workflow from the video
- Click a board of the cabinet. In the video it is an 800 mm sink unit with two cross boards.
- In the EFS - Cabinet tab, open the Hardware and joints box.
- In the Joints type field, choose Dowels. Below it are Dowel size 8 mm, Dowel count 2, Dowel length 30 mm and Face hole depth 0 mm.
- Press Alt+Z and zoom in on the joint between the left side panel and the bottom. The dowel hole in the face of the side panel is 12 mm deep, and the one in the edge of the bottom 20 mm.
- In the Joints type field, choose Confirmat. A Ø7 through hole goes through the side panel, and a Ø5 hole into the edge of the bottom. Below there is only Connectors per joint.
- Choose Minifix. The Ø15 housing goes into the top face of the bottom, and the bolt hole into the face of the side panel.
- Choose Minifix and dowels. Each minifix gets a dowel next to it. The number of connectors in one joint is in the Connectors per joint field.
- Press Alt+Z for the normal view. In the EFS tab, open Cost estimate: the connectors are in one row, for example 12 × Minifix 15.
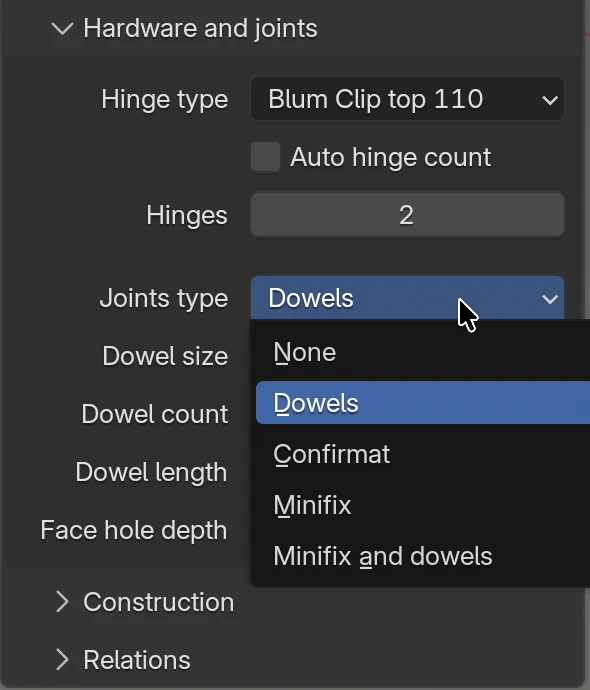
Joint types
| Joints type | What EFS drills at one joint | What goes into the hardware list | When |
|---|---|---|---|
| None | Nothing. | Nothing. | You join the carcass outside EFS. Project check counts such cabinets in the message N cabinets have no dowel joints. |
| Dowels | For each dowel, a hole in the face of one board and a hole in the edge of the other. | Dowel, for example Ø8×30 | Glued carcass. |
| Confirmat | A Ø7 through hole in the board whose face meets the joint, and a Ø5 hole in the edge of the other board. | Confirmat screw 7×50, Confirmat cover cap Ø12 | A fast joint without glue. The head shows on the outside. |
| Minifix | A Ø5 bolt hole in the face of one board, a Ø8 hole in the edge of the other and a Ø15 housing in its inner face. | Minifix housing Ø15, Minifix bolt Ø5×11 | A knock-down joint that doesn't show from the outside. |
| Minifix and dowels | As Minifix, plus a dowel next to each minifix. | The same as Minifix, and Dowel | A knock-down joint with a dowel for alignment. |
Rules:
- Joints type applies to all carcass joints of that cabinet: the side panels with the top and bottom boards, cross boards and fixed shelves, and the dividers.
- Every change of a field re-drills all joints of the cabinet at once.
- Dowels and holes are not boards: they don't go into the cutting list.
- A corner cabinet has no carcass joints.
Options
| Option | When it shows | What it does | Default | Values |
|---|---|---|---|---|
| Joints type | always | The joint type, table above. | None | None, Dowels, Confirmat, Minifix, Minifix and dowels |
| Dowel size | Dowels, Minifix and dowels | Diameter of the dowel and of both its holes. | 8 mm | 4–20 mm |
| Dowel count | Dowels | Number of dowels in one joint. | 2 | 1–10 |
| Dowel length | Dowels, Minifix and dowels | Length of the dowel. The face hole follows the board thickness, the edge hole takes the rest plus 2 mm for glue. | 30 mm | 16–100 mm |
| Face hole depth | Dowels, Minifix and dowels | Depth of the dowel hole in the board face. 0 means automatic: board thickness minus 6 mm, at most half the dowel. | 0 mm | 0–60 mm |
| Connectors per joint | Confirmat, Minifix, Minifix and dowels | Number of confirmats or minifixes in one joint. | 2 | 1–10 |
With Minifix and dowels there is no Dowel count field: each minifix gets one dowel. In the Project hardware panel the field shows, but with Minifix and dowels it isn't used.
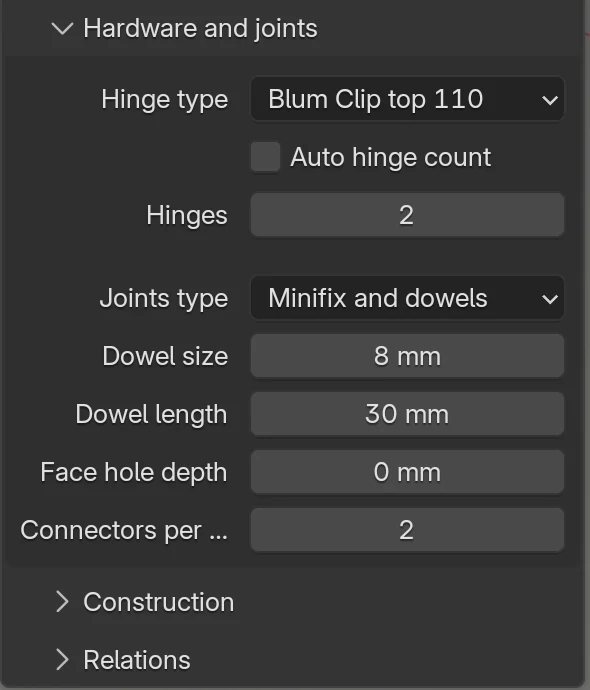
Which boards are joined
EFS joins carcass boards that touch (a gap of up to 2.5 mm). The board whose face meets the joint gets a face hole, and the other board an edge hole.
| Joint | Face hole | Edge hole |
|---|---|---|
| Side panel and top or bottom board, Inset joint | side panel | top or bottom board |
| Side panel and top or bottom board, Continuous joint | top or bottom board | side panel |
| Side panel and cross board | side panel | cross board |
| Side panel and fixed shelf | side panel | shelf |
| Divider and top board, bottom or cross board | top board, bottom or cross board | divider |
| Shelf between dividers | side panel or divider | shelf |
These have no joints:
- backs (a back in a groove is held by the groove; lay-on and rebated backs get screws in the hardware list);
- fronts and drawer boxes;
- adjustable shelves (Shelf supports: Adjustable…): they rest on support pins, see Adjustable shelves, System 32;
- boards set to None in the Construction box;
- the corner cabinet.
Spacing along a joint
The connectors (dowels, confirmats, minifixes) are spread along the length of the joint:
- The first and last are 50 mm from the ends of the joint, and the others at equal spacing between them.
- On a joint up to 100 mm long, for example on a 60 mm cross board, two connectors go at 20 % and 80 % of the length: 12 mm and 48 mm from the end.
- A single connector is in the middle of the joint.
Example: a cabinet 580 mm deep with 18 mm doors and a 3 mm lay-on back has a bottom 559 mm deep. Two dowels are 50 mm from the front and back ends of the bottom. Three dowels are at 50 mm from the front end, in the middle and 50 mm from the back end.
How many connectors a cabinet has:
| Cabinet | Joints | Connectors at 2 per joint |
|---|---|---|
| Full top and bottom board | 4 | 8 |
| Full top and bottom board and one fixed shelf | 6 | 12 |
| Bottom and two cross boards (Double cross boards) | 6 | 12 |
Every connector is counted in the hardware list: 12 dowels, or 12 minifix housings and 12 bolts.
Dowels
A dowel goes into the face of one board and into the edge of the other. Both holes have the diameter from the Dowel size field.
Hole depths:
- Face hole: with Face hole depth 0 it is the board thickness minus 6 mm, but at most half the dowel length. This leaves at least 6 mm of material under the hole (half the thickness for boards thinner than 12 mm).
- Edge hole: the rest of the dowel length plus 2 mm for glue.
- The thickness is measured on the board that gets the face hole (with an Inset joint that is the side panel).
| Board with the face hole | Dowel | Face hole | Edge hole |
|---|---|---|---|
| 16 mm | 30 mm | 10 mm | 22 mm |
| 18 mm | 30 mm | 12 mm | 20 mm |
| 19 mm | 30 mm | 13 mm | 19 mm |
| 25 mm | 30 mm | 15 mm | 17 mm |
| 18 mm | 35 mm | 12 mm | 25 mm |
| 18 mm | 55 mm, Face hole depth 9 mm | 9 mm | 48 mm |
A Face hole depth above 0 sets the face hole by hand. EFS doesn't let it go deeper than the dowel length minus 6 mm or shallower than 6 mm.
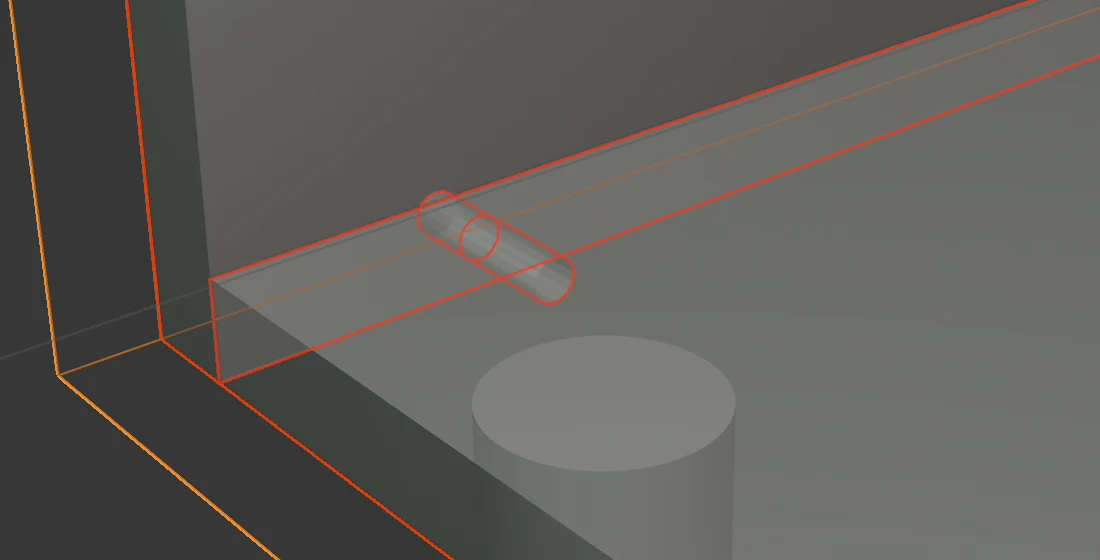
Watch out
A manual Face hole depth ignores the board thickness. With an 18 mm board and Face hole depth 16 mm, 2 mm remain under the hole, and at 18 mm the hole goes through the board. Project check reports this (see Project check messages). When you aren't sure, leave 0.
Confirmat
A confirmat is a 7 × 50 mm screw. It goes through the board whose face meets the joint into the edge of the other board.
- Board with its face at the joint (the side panel with an Inset joint): a Ø7 through hole, the full thickness. The screw head is on the outside, so a Ø12 cover cap also goes into the hardware list.
- Board with its edge at the joint (bottom or top board): a Ø5 hole in the edge, as deep as the screw reaches past the first board, plus 2 mm. With an 18 mm side panel that is 50 − 18 + 2 = 34 mm, and with a 16 mm one 36 mm.
- The number of confirmats per joint is in the Connectors per joint field.
- With a Continuous joint the Ø7 hole goes through the top board from above (through the bottom from below), and the Ø5 hole into the edge of the side panel.
- At a divider the Ø7 hole goes through the bottom from below and through the top board from above.
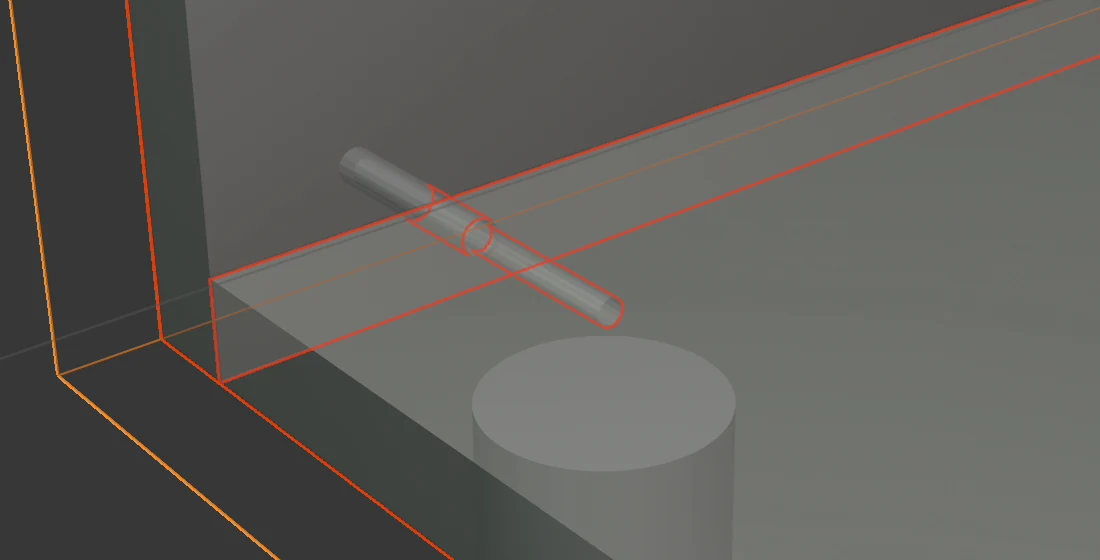
Tip
The confirmat head shows on the outside of the side panel. On a cabinet with no end panel or neighbouring cabinet next to it, choose Minifix.
Minifix
A minifix is a cam connector that doesn't show from the outside. A cabinet with minifixes can be taken apart and put back together.
- Board with its face at the joint (side panel): a Ø5 × 11 mm hole for the bolt, in the inner face.
- Board with its edge at the joint (bottom, top board, cross board): a Ø8 × 34 mm hole in the edge, from the joint towards the housing.
- Housing: a Ø15 × 12.5 mm hole in the inner face of the same board, centred 24 mm from the joint.
Where the housing is:
| Board | Face with the housing |
|---|---|
| Bottom, bottom cross board | top face |
| Top board, top cross board | bottom face |
| Fixed shelf | bottom face |
| Divider, cross board on edge | the face turned towards the middle of the cabinet |
| Side panel with a Continuous joint | inner face, 24 mm from the top or bottom board |
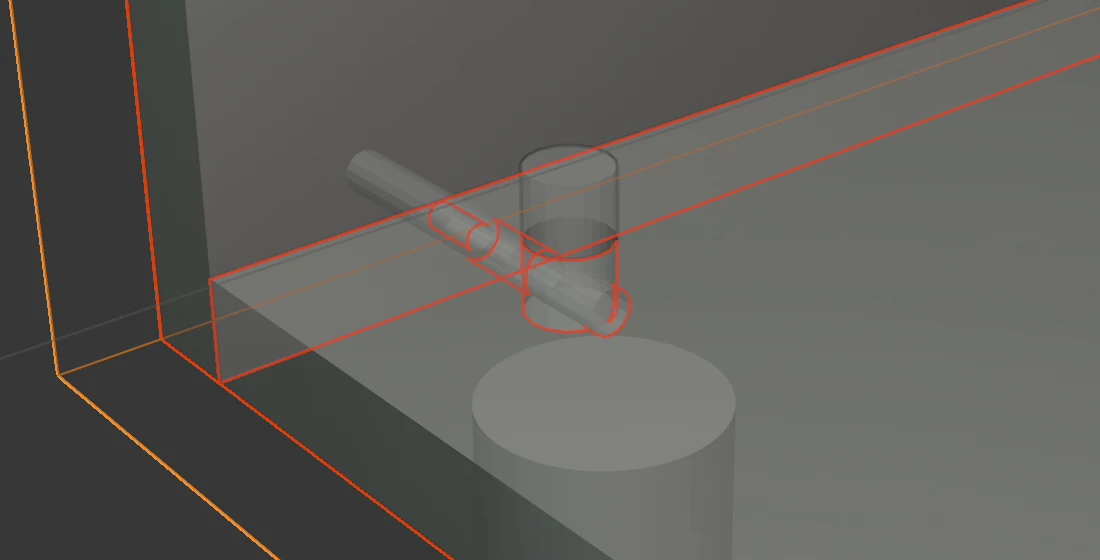
Note
A 12.5 mm deep housing in a board thinner than 15 mm leaves less than 2.5 mm of material. Project check then reports … leaves only … mm of material.
Minifix and dowels
With each minifix EFS adds a dowel for alignment.
- The minifix is the same as with Minifix.
- The dowel is 32 mm from the minifix, towards the middle of the joint. The dowel holes take their sizes from the Dowel size, Dowel length and Face hole depth fields, as with Dowels.
- A dowel that would be closer than 10 mm to the end of the joint is left out. That's why a 60 mm cross board with Connectors per joint 1 has no dowel.
- The hardware list has the minifixes and the dowels, per piece.
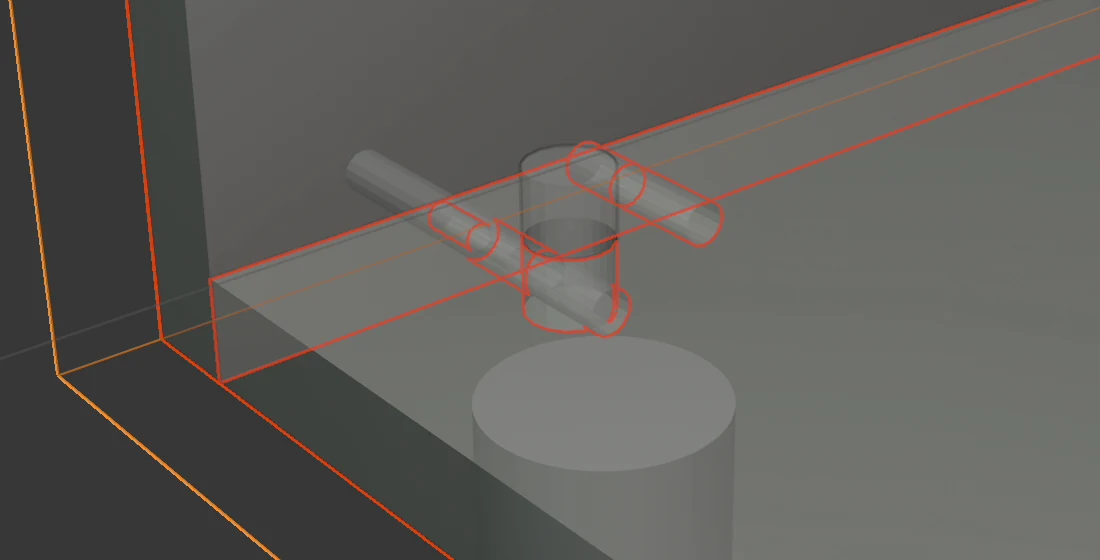
Watch out
On a 60 mm cross board the minifixes go at 12 mm and 48 mm, and the dowels 32 mm from them, at 44 mm and 16 mm. Each dowel is then 4 mm from the other minifix and the holes overlap. For a cabinet with cross boards choose Minifix or Dowels.
Cross boards and dividers
Cross boards (the top or bottom side with Double cross boards, Front cross board, Back cross board) are joined to the side panels with the same joint type as the rest of the carcass. See Cross boards instead of a top board.
- The face hole goes into the side panel, and the edge hole into the end of the cross board.
- A 60 mm cross board is a joint of up to 100 mm: the two connectors are 12 mm and 48 mm from the edge of the cross board.
- A cross board lying flat (Horizontal) gets the minifix housing in its bottom face (top cross board) or top face (bottom cross board). A cross board on edge (Vertical) gets the connectors along its height, and the housing in the face turned towards the middle of the cabinet.
Dividers (Add → Vertical shelf, Shift+V) are joined to the top board and the bottom, or to the cross boards.
- The face hole goes into the top board and the bottom, and the edge hole into the top and bottom edges of the divider.
- With dividers, fixed shelves are joined to the side panel or the divider on both sides of the compartment. The minifix housing is on the underside of the shelf.
Holes in the X-ray view
- Click a board of the cabinet.
- Press Alt+Z. The boards become see-through, and the holes show as cylinders.
- Selected boards and their holes have an orange outline. Click a board in the Cabinet elements list to select only that board.
- Open the doors with O if they are in the way.
- Press Alt+Z again for the normal view.
Holes in the exports
- Cutting list: dowels and holes are not boards and don't go into the cutting list. See Cutting list and cut size.
- PDF: with PDF: vector board drawings (Export → Settings panel, on by default) the page of each board has a Drilling legend table. Each row is one group of holes: Dowel, Confirmat or Minifix, with diameter and depth (Ø × depth; a through hole says thru), face (face A, face B, left edge, right edge, top edge, bottom edge), quantity and X/Y positions. The holes on the drawing are in colours: dowel blue, confirmat turquoise, minifix brown.
- DXF: face holes are on layers like
DRILL_D8_P12(Ø8, 12 mm deep) orDRILL_D7_THRU(Ø7 through). Edge holes are on layers likeEDGE_LEFT_D8_P20, only with DXF: edge drillings (on by default). Holes on the other side of the board go into a separate file with the suffix_B. See Drillings, DXF, MPR and CIX. - Assembly instructions (PDF): next to a board is the number of dowel holes in its face, for example 8x dowel. Confirmats and minifixes are not listed there. See Labels and assembly instructions.
Hardware list, cost estimate and order
The connectors are counted per cabinet and added up for the whole project.
| Joints type | Items in the hardware list |
|---|---|
| Dowels | Dowel Ø8×30 (diameter and length from the fields), one per dowel |
| Confirmat | Confirmat screw 7×50 and Confirmat cover cap Ø12, one of each per confirmat |
| Minifix | Minifix housing Ø15 and Minifix bolt Ø5×11, one of each per minifix |
| Minifix and dowels | As Minifix, plus Dowel per piece |
Where you see them:
- Hardware list: the Hardware list page in the PDF and the Hardware sheet in Excel, per cabinet and TOTAL. See Project hardware.
- Cost estimate (EFS tab): confirmats and minifixes as one row with the number of connectors and the price from the price list, for example 12 × Minifix 15. The row carries the name from the catalogue: Minifix 15 or Confirmat 7×50. Dowels have no price in the cost estimate.
- Supplier order (CSV + e-mail): the totals from the hardware list in the file
order_hardware.csvand in the e-mail text. See The production package and the supplier order.
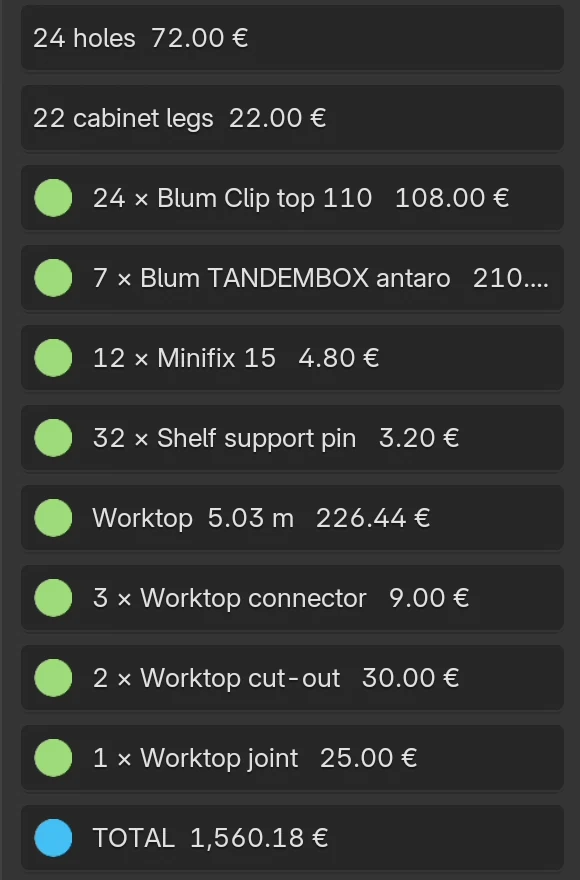
EFS looks up the connector price by the code from the catalogue (CONFIRMAT_7X50 or MINIFIX_15) in the Other sheet of the price list. A row without a price has a red dot and the code in brackets. See Nesting and board prices.
Project check messages
You run Project check in the EFS tab, Export panel. For joints it reports:
| Message | Type | What it means | What to do |
|---|---|---|---|
| Dowel hole Ø… in '…' (…) goes through the board. | error | The dowel hole in the board face is as deep as the board. | Set Face hole depth back to 0 or reduce it. |
| Hole Ø…×… in '…' (…) leaves only … mm of material. | warning | Less than 4 mm remains under a dowel hole, or less than 2.5 mm under a minifix hole. | Reduce Face hole depth, use a shorter dowel or a thicker board. |
| N cabinets have no dowel joints (Project hardware). | warning | N cabinets have Joints type: None. The message goes away with any joint type. | Choose a joint type in the cabinet or in Project hardware, then Apply to all. |
The arrow button next to a hole finding selects that board and zooms in on it. The error (the hole goes through the board) is also reported after Cutting list to Excel, Export DXF - all, Export quote (PDF), Export labels (PDF) and Supplier order (CSV + e-mail): Exported, but the project check found N errors (Project check). All the messages are described in Project hardware.
Confirmat and minifix sizes
For advanced users: your own connector sizes
The confirmat and minifix sizes are in the catalogue joints.json in the add-on's hardware folder. For your own sizes, create a user_hardware folder in the EFS user folder and save in it a joints.json with only the connector you change (see Your own hardware catalogue). After the change, restart the program.
| Field | What it is | Confirmat | Minifix |
|---|---|---|---|
length |
screw length | 50 mm | – |
head_diameter |
through hole in the face | 7 mm | – |
edge_diameter |
edge hole | 5 mm | 8 mm |
edge_extra |
how much longer the edge hole is than the screw | 2 mm | – |
edge_depth |
depth of the edge hole | – | 34 mm |
housing_diameter, housing_depth |
housing | – | 15 × 12.5 mm |
housing_from_edge |
housing centre from the joint | – | 24 mm |
bolt_diameter, bolt_depth |
bolt hole | – | 5 × 11 mm |
from_end |
first and last connector from the end of the joint | 50 mm | 50 mm |
dowel_from_connector |
dowel from the minifix (Minifix and dowels) | – | 32 mm |
price_code |
price code in the price list | CONFIRMAT_7X50 |
MINIFIX_15 |
items |
items in the hardware list | Confirmat screw, Confirmat cover cap | Minifix housing, Minifix bolt |
Example user_hardware/joints.json: a confirmat with the first and last connector 37 mm from the end of the joint and a Croatian name in the cost estimate:
{
  "CONFIRMAT": {
    "name": "Konfirmat 7×50",
    "length": 50,
    "head_diameter": 7,
    "edge_diameter": 5,
    "edge_extra": 2,
    "from_end": 37,
    "price_code": "CONFIRMAT_7X50",
    "items": [
      {"item": "Confirmat screw", "detail": "7×50"},
      {"item": "Confirmat cover cap", "detail": "Ø12"}
    ]
  }
}
Rules:
- An entry replaces the whole built-in entry with the same key (
CONFIRMATorMINIFIX), so fill in all the fields. - EFS skips an entry that lacks one of the size fields, and that joint type is then not drilled.
- Item names (
item) in English, as in the built-in catalogue, are translated into the interface language. Other names show as you type them. - You don't change dowels in the catalogue but in the cabinet's fields.
Common problems and solutions
I can't see dowels or holes. Press Alt+Z for the X-ray view. If they still aren't there, Joints type is None.
I changed Joints type in Project hardware, and the cabinets stayed the same. Project hardware applies to new cabinets. Click Apply to all (see Project hardware).
With Minifix and dowels there is no Dowel count field. Each minifix gets one dowel. You change the number of connectors in Connectors per joint.
The shelves have no dowels. The cabinet has Shelf supports: Adjustable…. Adjustable shelves rest on support pins and have no joints.
The back has no joints. The back is not joined with connectors. Lay-on and rebated backs get screws in the hardware list, and a back in a groove is held by the groove.
The corner cabinet has no joints. A corner cabinet doesn't get carcass joints.
The check reports that a dowel hole goes through the board. Face hole depth is equal to the board thickness or larger. Set it back to 0.
Confirmat heads show on the side panel. The confirmat goes through the side panel. On visible side panels choose Minifix.
Minifix and dowel holes overlap on the cross boards. This happens with Minifix and dowels on a 60 mm cross board. Choose Minifix or Dowels.
The cost estimate has no dowels. Dowels have no price in the cost estimate. The number of dowels is in the hardware list and in the order.
Shortcuts in this chapter
| Key | Action |
|---|---|
| N | Show / hide the sidebar with the tabs |
| Alt+Z | X-ray view: dowels and drillings show |
| O | Open / close doors and drawers of the selected cabinet |
| Shift+V | New vertical shelf (divider) in the selected cabinet |
| Ctrl+Z | Undo the last action |
All shortcuts are in the chapter Keyboard shortcuts.
Next
Next chapter: Adjustable shelves, System 32