Sliding doors
You add sliding doors to an existing wardrobe from the right-click menu: EFS removes its front and places doors in two tracks in front of the carcass, with a 30 mm overlap, in the decor and material group of the fronts. This chapter shows how the doors are added, how EFS calculates their sizes, what goes into the cutting list and the hardware list, and what to do when you later change the wardrobe's sizes.

Before you start
- Finish the wardrobe first: sizes, dividers, shelves, rail. How to build a wardrobe is in the chapter A wardrobe with compartments and a rail. In the video it is the Wardrobe, 2 doors, hanging rail template widened to 1800 mm, with a divider and four shelves.
- If the sliding doors need a decor, give the wardrobe's doors the decor before you add them. The sliding doors take the decor and material group of the front they replace. How to assign a decor is in the chapter Decors, edge tape and materials.
- Add the sliding doors last. They don't follow later changes to the wardrobe (see When you change the wardrobe).
The workflow from the video
- Click the wardrobe. When the wardrobe already has sliding doors, click its name in the Scene elements list (see Selecting the wardrobe behind the doors).
- Right-click, then Add to the cabinet → Sliding doors. The wardrobe's doors disappear, and there are two oak sliding doors in front of the carcass.
- Look at the wardrobe from above: the doors stand in two tracks, 25 mm one behind the other, and overlap by 30 mm.
- Click one door and open the EFS - Board tab. The door is an 18 mm board, in the decor and material group of the fronts.
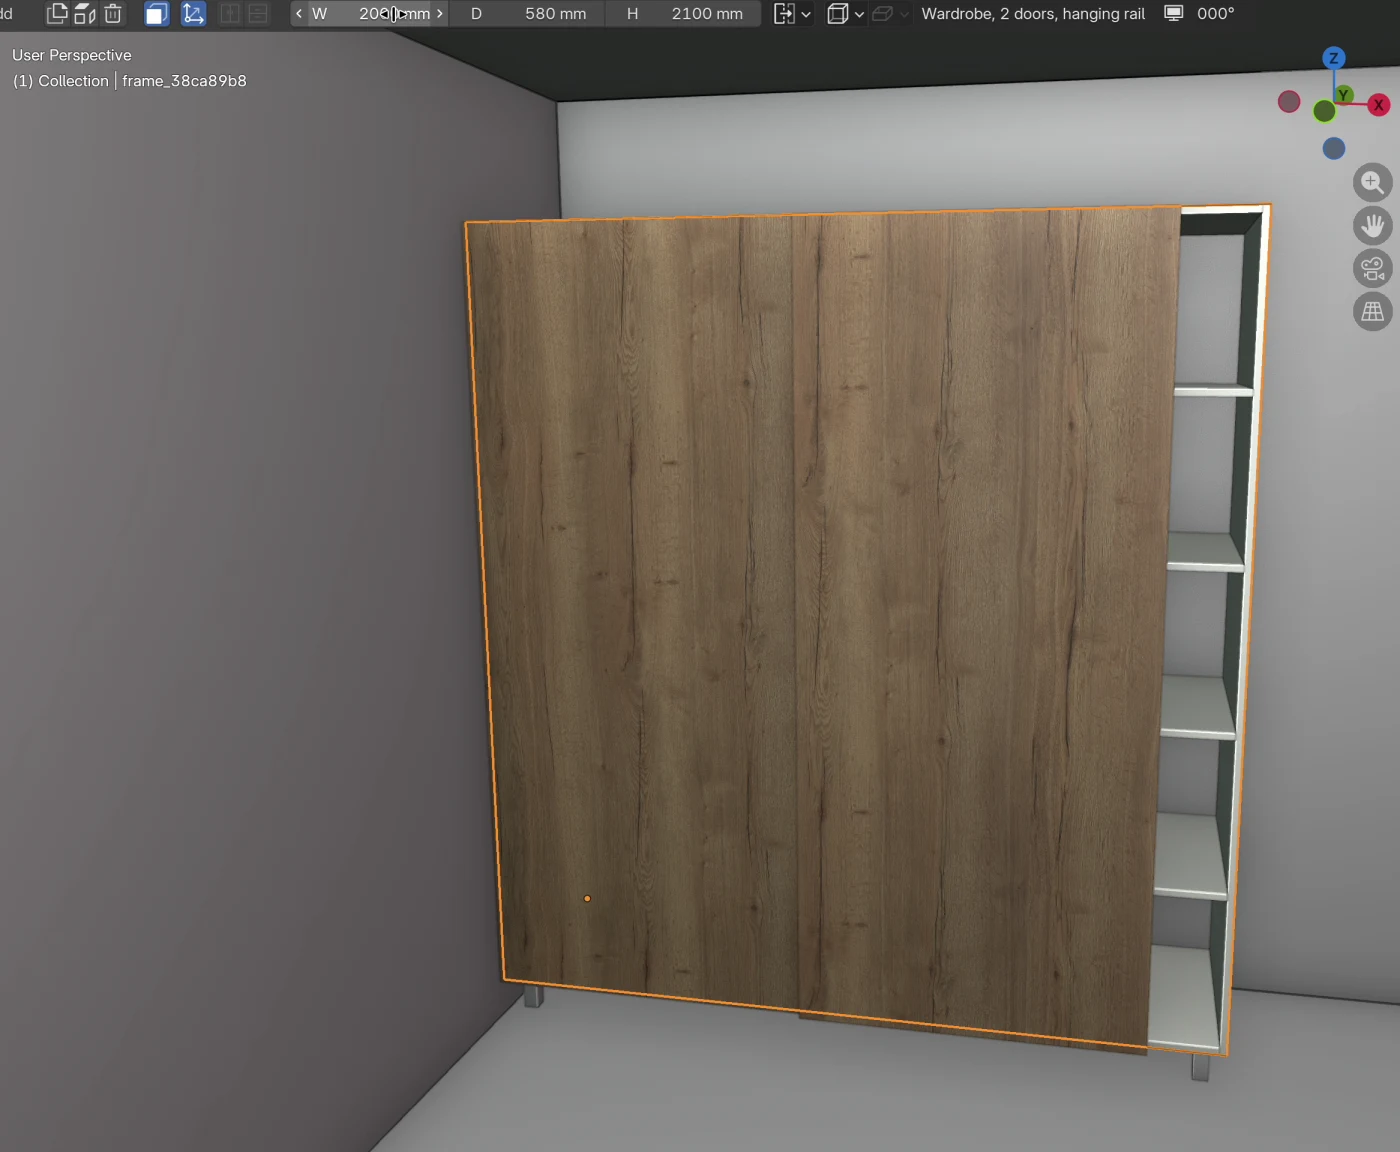
- Click the wardrobe in the Scene elements list. In the header, change the width from 1800 to 2000 mm. The doors stay the old ones, so the right part of the wardrobe is open.
- In the EFS tab, open the Export panel and click Project check. The program warns that the sliding doors are for 1800 mm, and the wardrobe is 2000 mm.
- Select the wardrobe and click Add to the cabinet → Sliding doors again. The new doors are as wide as the new wardrobe needs.
- In the EFS tab, open the Cost estimate panel. At the bottom of the list are the track set and the runner sets.
Adding sliding doors
- Select the wardrobe: click any of its boards or its name in the Scene elements list.
- Right-click. The menu applies to the selected cabinet, not to what is under the pointer (see The right-click menu).
- Move the pointer to Add to the cabinet.
- Click Sliding doors.
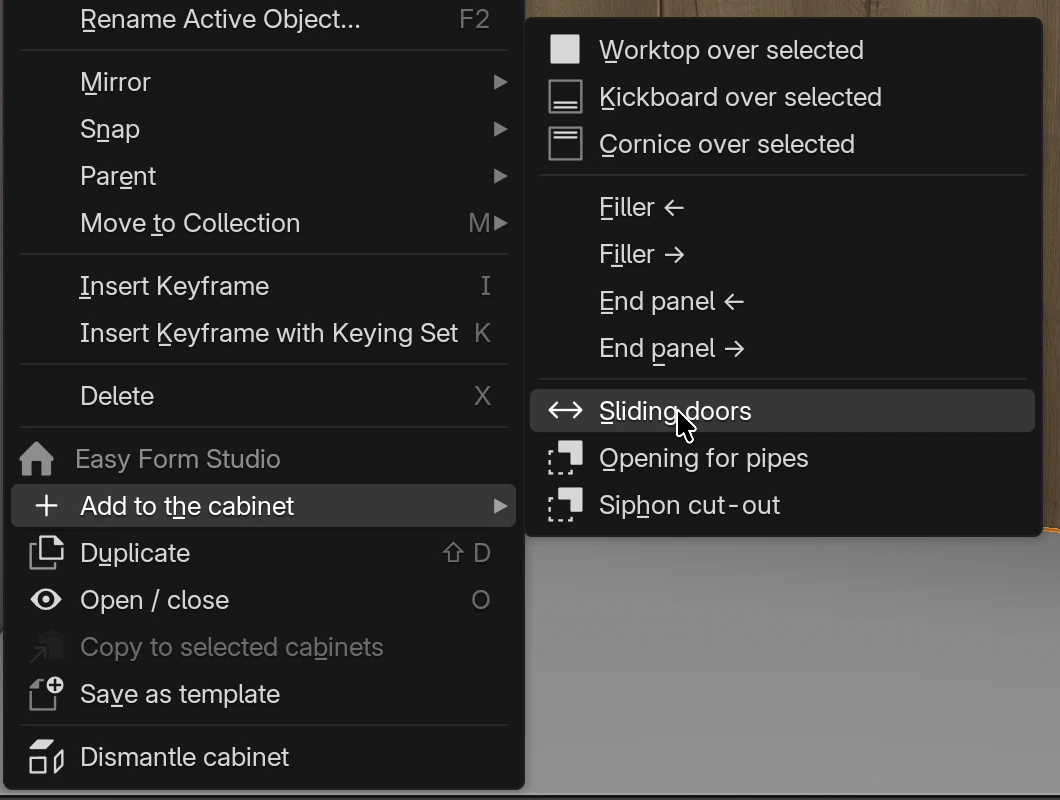
There is no window: the doors are added straight away, in two tracks. The default is two doors; for three or four see Options.
What EFS does itself
- The wardrobe's front Type becomes None. The doors disappear, and the side panels, the top and the bottom extend to the front edge, as on any cabinet without a front (see Front).
- Doors appear in front of the carcass. They are not boards of the wardrobe but free boards linked to the wardrobe. They are called Sliding door, Sliding door 2, Sliding door 3…
- The doors get the decor and material group of the doors they replace. See Decor, group and edge tape of the doors.
- The track set and the runner sets go into the wardrobe's hardware list. See Track set and runner set.
- After adding, the last door is selected.
- The doors are linked to the wardrobe: when you save the wardrobe as your own template, the doors go with it, and a new wardrobe from the template also gets the track set and the runner sets (see What goes into a template).
Door sizes
EFS calculates the door from the carcass width, from the outer edge of the left side panel to the outer edge of the right side panel:
door width = (carcass width + (number of doors − 1) × 30 mm) / number of doors
door height = carcass height − 6 mm
| Wardrobe | Doors | Door width | Door height |
|---|---|---|---|
| 1800 × 2100 mm (video) | 2 | (1800 + 30) / 2 = 915 mm | 2094 mm |
| 2000 × 2100 mm (video, after the change) | 2 | (2000 + 30) / 2 = 1015 mm | 2094 mm |
| 2400 × 2100 mm | 3 | (2400 + 60) / 3 = 820 mm | 2094 mm |
| 3000 × 2100 mm | 4 | (3000 + 90) / 4 = 772.5 mm | 2094 mm |
Together the doors cover exactly the carcass width: the first door starts at the left edge, the last ends at the right edge. The carcass height doesn't include the legs, so the doors start 3 mm above the bottom edge of the carcass, and the legs and the kickboard stay visible.
Tracks and overlap
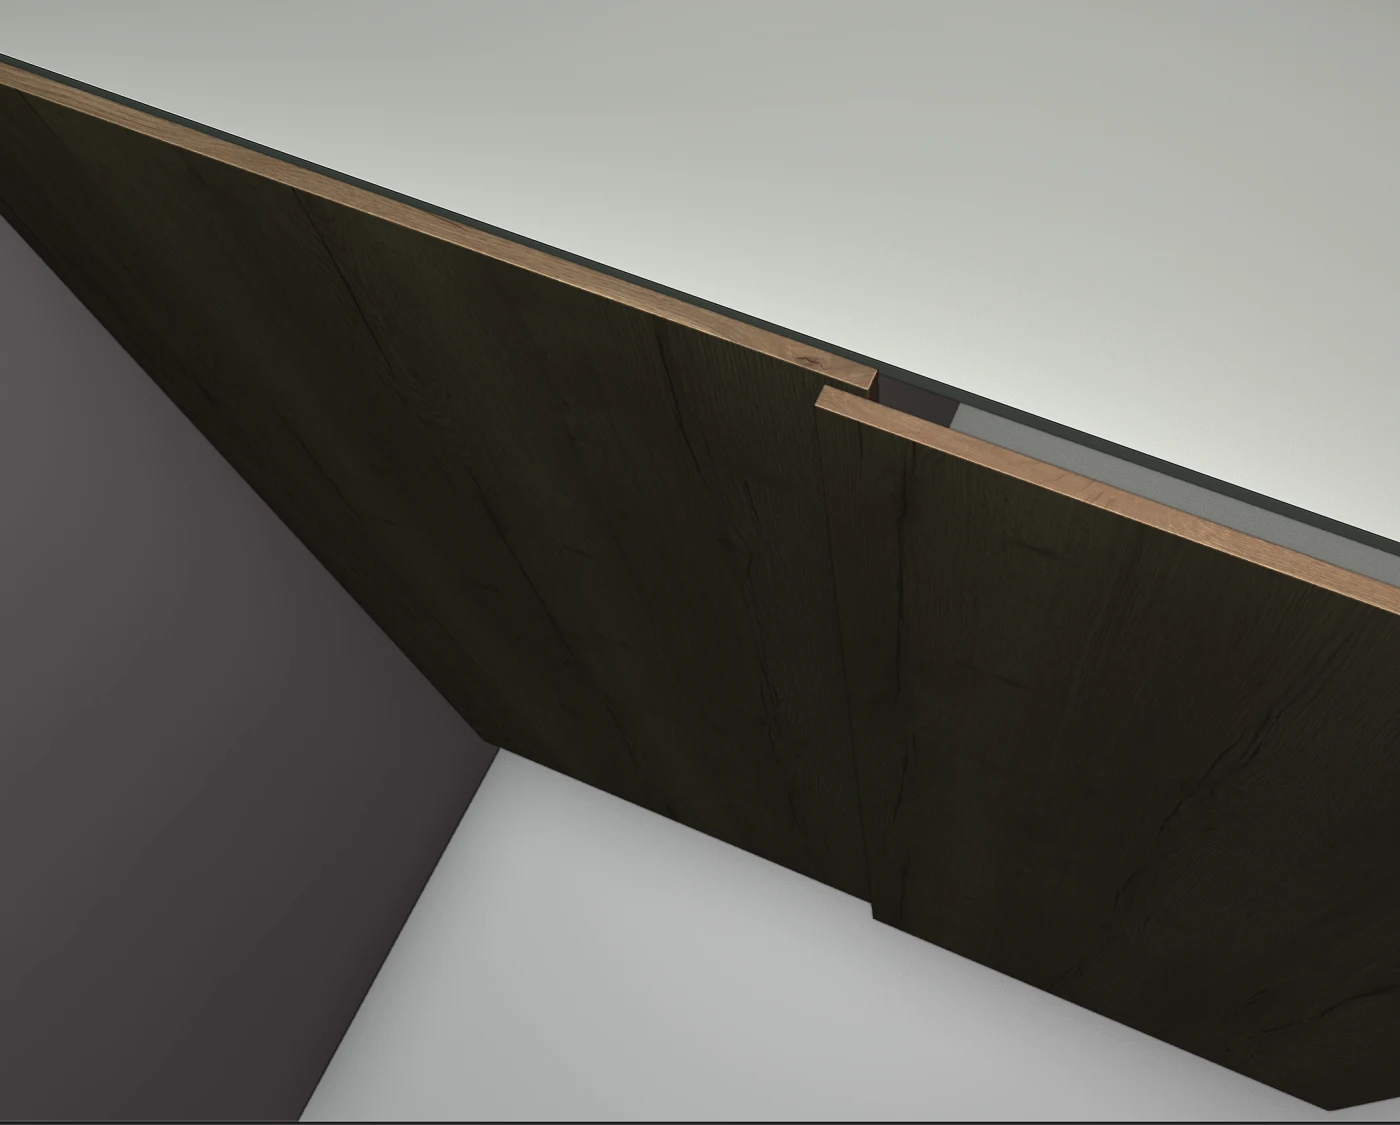
| Size | Value |
|---|---|
| From the front edge of the carcass to the back face of the door in the rear track | 5 mm |
| Between the back faces of the doors in the two tracks | 25 mm |
| Gap between the doors (25 mm − 18 mm) | 7 mm |
| Overlap of two neighbouring doors | 30 mm |
| Door thickness | 18 mm |
| How far the doors stick out in front of the carcass | 5 + 25 + 18 = 48 mm |
The doors alternate between the tracks from the left: the first door is in the rear track, the second in the front track, the third in the rear track again, the fourth in the front track. Every two neighbouring doors overlap by 30 mm.
Note
The wardrobe's Depth doesn't include the sliding doors. A 580 mm deep wardrobe with sliding doors takes up 628 mm from the wall. Allow for this at the room door and in passageways.
Options
| Option | What it does | Default | Values |
|---|---|---|---|
| Doors | Number of sliding doors. The program remembers the last number used until you close it. | 2 | 2–4 |
| Overlap | How much neighbouring doors overlap. Can't be changed. | 30 mm | 30 mm |
| Track spacing | Spacing between the two tracks. Can't be changed. | 25 mm | 25 mm |
| Door thickness | Can't be changed. | 18 mm | 18 mm |
The Doors field is not visible in the menu. You change it right after adding:
- Add the sliding doors.
- Keep the pointer over the 3D view and press F9 (or Edit → Adjust Last Operation…).
- In the Sliding doors pop-up, type the number in the Doors field.
EFS then builds the doors again with the new number. In the EasyFormStudio app the panel in the bottom left corner of the 3D view is turned off, so use F9. In plain Blender with the add-on, the same Sliding doors panel also sits in that corner until you do the next action.
Decor, group and edge tape of the doors
Click a door and open the EFS - Board tab. The door has the same fields as any board: Name, Note, Grain, Edging Tape and Material group (see The EFS - Board tab).
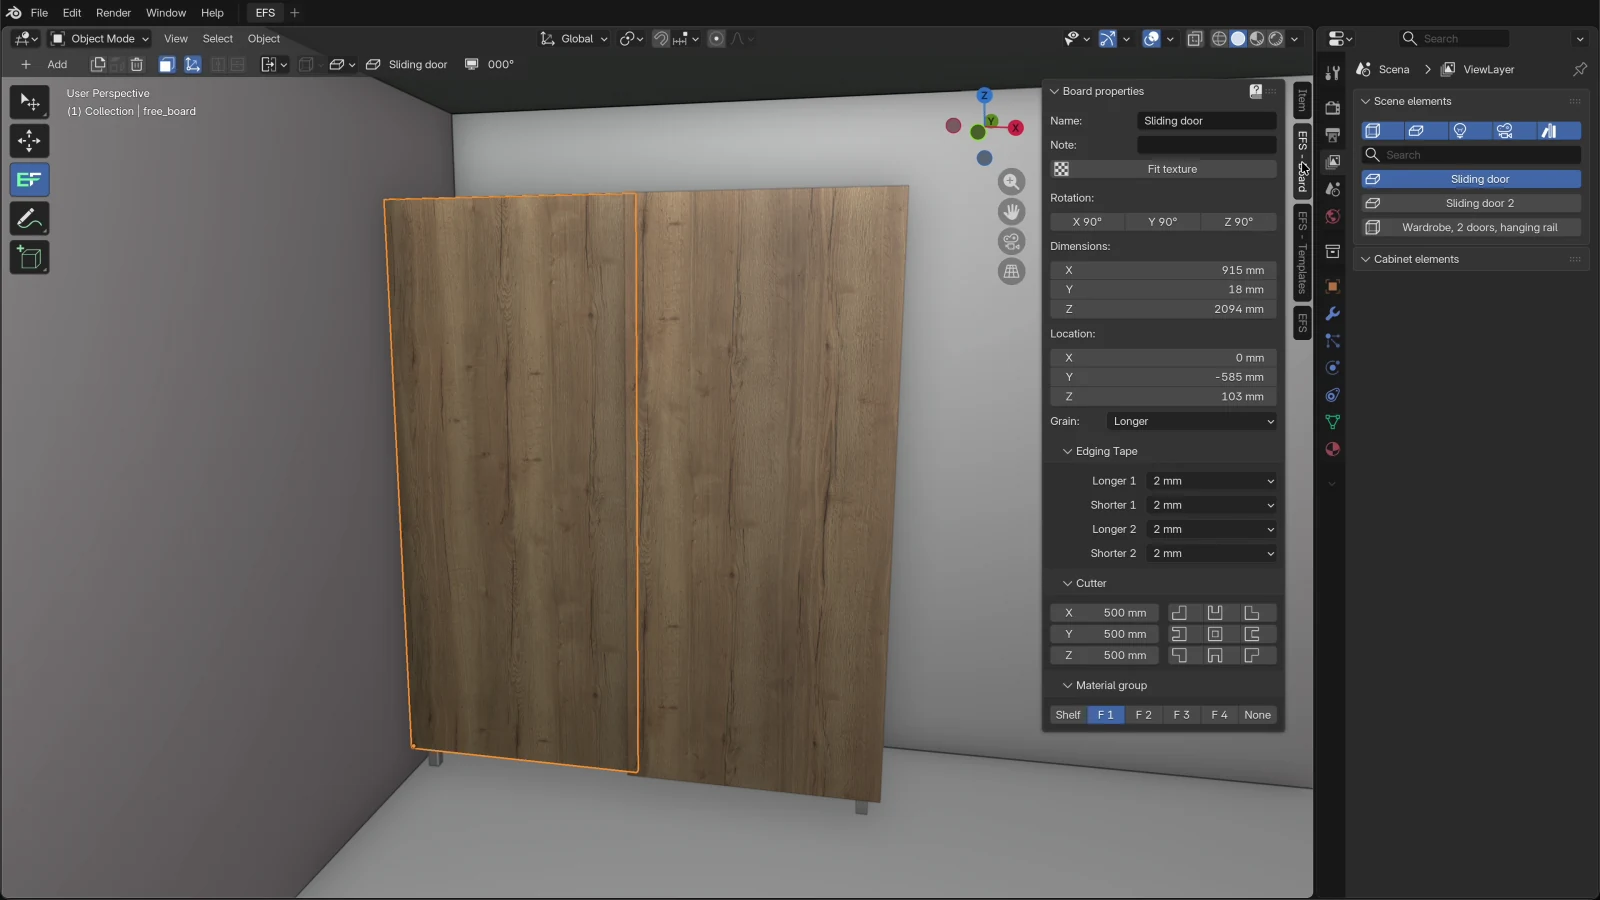
| Property | What the door gets |
|---|---|
| Decor | The decor of the wardrobe doors it replaces. If the wardrobe had no fronts, the default white material (Default white). When you add the doors again, the new doors get the decor of the old ones. |
| Material group | The group of the doors it replaces: F 1 by default, and F 2 on a wall unit. If the wardrobe had no fronts, F 1. |
| Edging Tape | 2 mm on all four edges, like any free board (see Default edge tape). |
| Grain | Longer: on a tall door the grain runs vertically. |
| Thickness | 18 mm. |
Rules:
- The doors are in a front group, so Select material for Front 1 in the Material assignment panel changes them too (see Material assignment).
- Edge tape, grain, name and note apply to that door. When you add the doors again, the new doors come with 2 mm edge tape, Longer and the names Sliding door, Sliding door 2…
- The doors are not in the wardrobe's Cabinet elements list. You see them in the Scene elements list, with the free board icon.
A sliding door in the cutting list
A door is a separate board in the cutting list, the cost estimate and the quote:
- the row is named after the door (Sliding door, Sliding door 2), not after the wardrobe, both in the board columns and in the cabinet columns;
- the material is the door's decor, thickness 18 mm;
- a 915 × 2094 mm door with 2 mm edge tape on all four edges has the finished size 2094 × 915 mm and the cut size 2090 × 911 mm (see Edge tape and cut size);
- Cost estimate counts the area and edge tape of the doors under the doors' decor.
Tip
To see in the cutting list which wardrobe a door belongs to, type the wardrobe's name in the Note field of each door (EFS - Board tab).
Watch out
Export selected to PDF and Export DXF - selected export only what is selected. When only the wardrobe is selected, the doors are not in the export. Before exporting, select the doors too: Shift + click on each door.
Inside the wardrobe
- Shift+F doesn't hide sliding doors: they are not the wardrobe's fronts but free boards.
- To see inside, click a door, Shift + click the other door and press H. The doors are hidden only in the view; they are still in the cutting list. Alt+H brings them back.
- O doesn't open sliding doors. A wardrobe with sliding doors has no front of its own, so Open / close in the right-click menu is grey, unless the wardrobe has drawers.
Watch out
On a wardrobe with sliding doors and no drawers, Blender takes over O and turns on proportional editing. The next move then drags the neighbouring objects too. Turn it off by pressing O again.
Track set and runner set
When a wardrobe has sliding doors, two hardware items go with it:
| Item | Detail | Quantity | Code in the price list | Price in the program's price list |
|---|---|---|---|---|
| Sliding door track set | carcass width in mm, e.g. 2000 mm | 1 per wardrobe | SLIDING_TRACK_M |
30 € per metre |
| Sliding door runner set | – | 1 per door | SLIDING_RUNNERS |
20 € per set |
The items are in these places:
- Cost estimate (EFS tab): the track set in metres, the runner sets in pieces, with the price;
- the customer quote (see A quote for the customer);
- the Hardware list page in the PDF and the Hardware sheet in the file from Cutting list to Excel;
- Supplier order (CSV + e-mail) (see The production package and the supplier order).
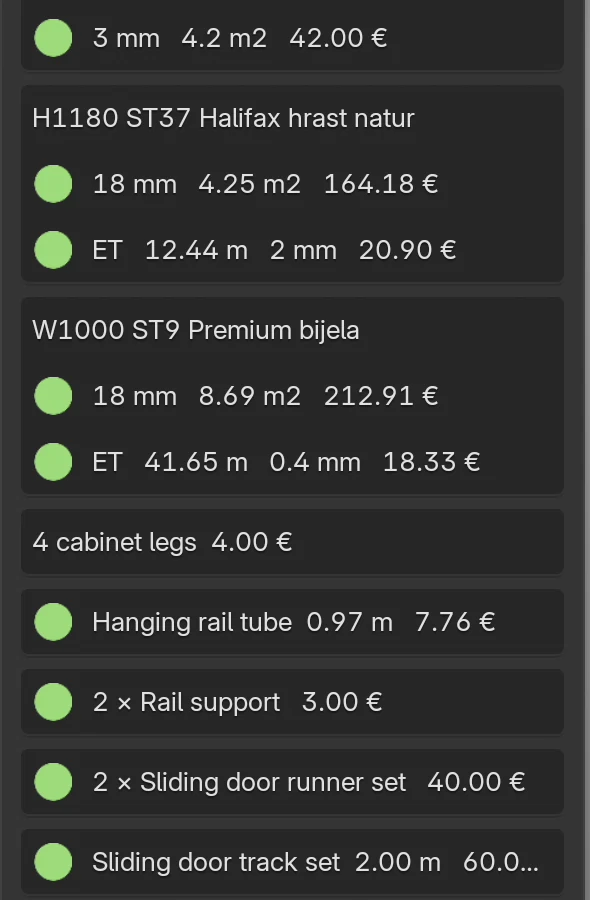
Rules:
- The length of the track set is the carcass width at the moment the doors are added. When you change the wardrobe's width, the length stays the old one until you add the doors again.
- When you delete the doors, both items disappear from the hardware list.
- You enter the prices in your price list, on the Other sheet, in the rows
SLIDING_TRACK_M(price per metre) andSLIDING_RUNNERS(price per set). See The Other worksheet. - A green dot next to an item means the price list has a price. A red dot and the code in brackets mean it doesn't: the item is not added to the total price (see Green and red dots).
When you change the wardrobe
The doors are free boards. When you change the wardrobe's sizes or move it, the doors stay as they were and where they were:
| Change to the wardrobe | What happens to the doors | Does Project check warn |
|---|---|---|
| Width | The doors stay the old ones: the wardrobe is open on one side or the doors stick out. | Yes |
| Height | The doors keep the old height. | No |
| Depth | The doors stay in the old place: either inside the carcass or away from it. | No |
| Move (1, 2, 3) | The doors stay in place. | No |
| Rotate (R) | The doors don't rotate. | No |
| Deleting the wardrobe (X) | The doors stay in the scene and in the cutting list. | No |
Project check
- In the EFS tab, open the Export panel.
- Click Project check.
- In the window, look for the message about the sliding doors.

The message reads: Sliding doors of '…' are for 1800 mm, the cabinet is 2000 mm: add them again. To the right of the message is the Show in the scene button: it selects the wardrobe and zooms the view to it. OK and Cancel close the window.
The check compares the carcass width with the width the doors were added for. A difference of up to 1 mm is not reported. It doesn't check height, depth, position or rotation. The message is a warning, not an error, so the export doesn't mention it. All the check's messages are described in the chapter The production package and the supplier order.
Adding them again
- Select the wardrobe (click in the Scene elements list).
- Right-click, Add to the cabinet → Sliding doors.
EFS deletes the old doors of that wardrobe and makes new ones, for the wardrobe's current sizes and position. The new doors get the decor and group of the old ones. The number of doors is the last one you used, 2 at the start of the session (see Options). The track set gets the new length, and the message in Project check disappears.
Tip
You can move a wardrobe with sliding doors together with the doors: click the wardrobe, Shift + click on each door, then move with the 1, 2 or 3 key. To rotate or change the sizes, add the doors again.
Selecting the wardrobe behind the doors
The doors cover the whole face of the wardrobe. A click in the view in front of the wardrobe therefore selects a door, not the wardrobe. Then:
- the header shows Sliding door, without the fields for the wardrobe's sizes;
- there is no EFS - Cabinet tab;
- the items in Add to the cabinet are grey, because a door is not a cabinet;
- right-click with the EFS tool doesn't open the menu.
You select the wardrobe like this:
- In the right-hand column, in the Scene elements list, click the wardrobe's name (in the video Wardrobe, 2 doors, hanging rail).
- The wardrobe is selected as a whole: the header shows its sizes, and the Cabinet elements list its boards.
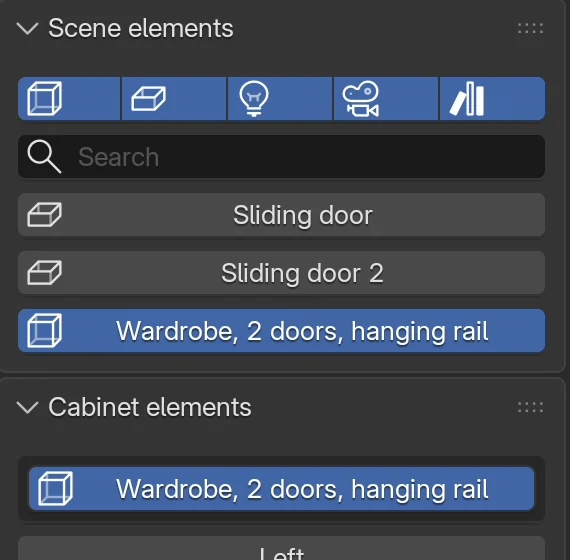
You can also click a side panel or the top of the wardrobe that shows behind the doors, or a board in the Cabinet elements list. More about selecting: Selecting: cabinet or board.
When the whole wardrobe is selected (click in the list), right-click opens Blender's object menu. The EFS items, Add to the cabinet among them, are at its bottom, under the heading Easy Form Studio.
Removing the sliding doors
Right after adding, press Ctrl+Z: the sliding doors disappear, and the wardrobe gets its doors back with their decor.
Later you delete the doors like boards:
- Click the first door, Shift + click on the others.
- Press X.
The wardrobe is left without a front. For ordinary doors, select the wardrobe and in the EFS - Cabinet tab, Front box, choose a Type, for example Two doors (or press F). The new doors come without a decor, because the wardrobe has no fronts to take it from. Give them a decor by dragging or by assigning it to the group (see Decors, edge tape and materials).
Watch out
X on the wardrobe deletes the wardrobe but not its sliding doors. They stay in the scene, in the cutting list and in the cost estimate, while the track set and the runner sets disappear. When you delete a wardrobe with sliding doors, delete the doors too.
Watch out
If you choose doors again for a wardrobe with sliding doors (F or Front → Type), the sliding doors stay in front of them. Delete the sliding doors first, then choose the doors.
Common problems and solutions
Sliding doors in the Add to the cabinet menu is grey. A door or another free board, a corner cabinet or nothing is selected, or you are in Edit Mode. Click the wardrobe's name in the Scene elements list. Leave Edit Mode with Tab.
Right-clicking the wardrobe doesn't open the menu. You clicked a door. Select the wardrobe in the Scene elements list, then right-click in the 3D view.
The doors are white. The wardrobe had no fronts when you added the doors. Give the doors a decor by dragging or by clicking Select material for Front 1 in the Material assignment panel.
The right part of the wardrobe is open or the doors stick out over the edge. You changed the wardrobe's width after adding the doors. Add the sliding doors again.
The doors float in front of the wardrobe or are inside the carcass. You changed the wardrobe's depth, moved it or rotated it. Add the sliding doors again.
The track set has the wrong length. The length is the wardrobe's width when the doors were added. Add the sliding doors again.
There is a red dot next to the track set or the runner set. The price list has no price for SLIDING_TRACK_M or SLIDING_RUNNERS. Enter it on the Other sheet of your price list.
The doors in the cutting list are not under the wardrobe's name. The doors are free boards and are in the list under their own name. Type the wardrobe's name in their Note.
The doors are missing from the PDF or DXF of the selection. Only the wardrobe is selected. Select the doors too (Shift + click) and export again.
The doors pass through the drawer fronts. The doors stand 5 mm in front of the carcass, and the fronts of outer drawers 18 mm in front of it. Give a wardrobe with sliding doors Inner drawers (see Drawers).
After O a move drags the neighbouring cabinets too. Blender's proportional editing has turned on. Press O again.
After deleting the wardrobe the doors are left behind. The doors are not deleted with the wardrobe. Select them and press X.
Shortcuts in this chapter
| Key | Action |
|---|---|
| right-click | Menu with Add to the cabinet → Sliding doors |
| F9 | Adjust the last action: the number of doors right after adding |
| Shift + click | Add a door to the selection |
| H | Hide the selected doors in the view |
| Alt+H | Show everything hidden |
| 1 2 3 | Move the selected wardrobe and doors along X, Y or Z |
| X | Delete the selected doors (or the wardrobe, without the doors) |
| Ctrl+Z | Undo: right after adding, brings back the old doors |
All shortcuts are in the chapter Keyboard shortcuts.
Next
Next chapter: Bathroom: siphon and pipes