The interface and your first cabinet
In this chapter you get to know the Easy Form Studio screen and make your first cabinet: you add it, change its size, turn it and move it. You will learn where each panel is, what each button in the header does and which keys speed up everyday work.
Video: A02 The interface and your first cabinet
The same workflow in a 3-minute video.

Show me in the program
The interactive tours Get to know EFS (3 min) and Your first cabinet (3 min) show you in the program where to click and what to type, step by step. In the EFS tab, open the Interactive tours panel and click Start next to the tour. The AI assistant also offers them when you ask how to do this.
Before you start
- Easy Form Studio is installed and the API key is entered (Install, licence and account).
- An empty project is open. When you start the EasyFormStudio app, an empty project is already open.
Screen layout
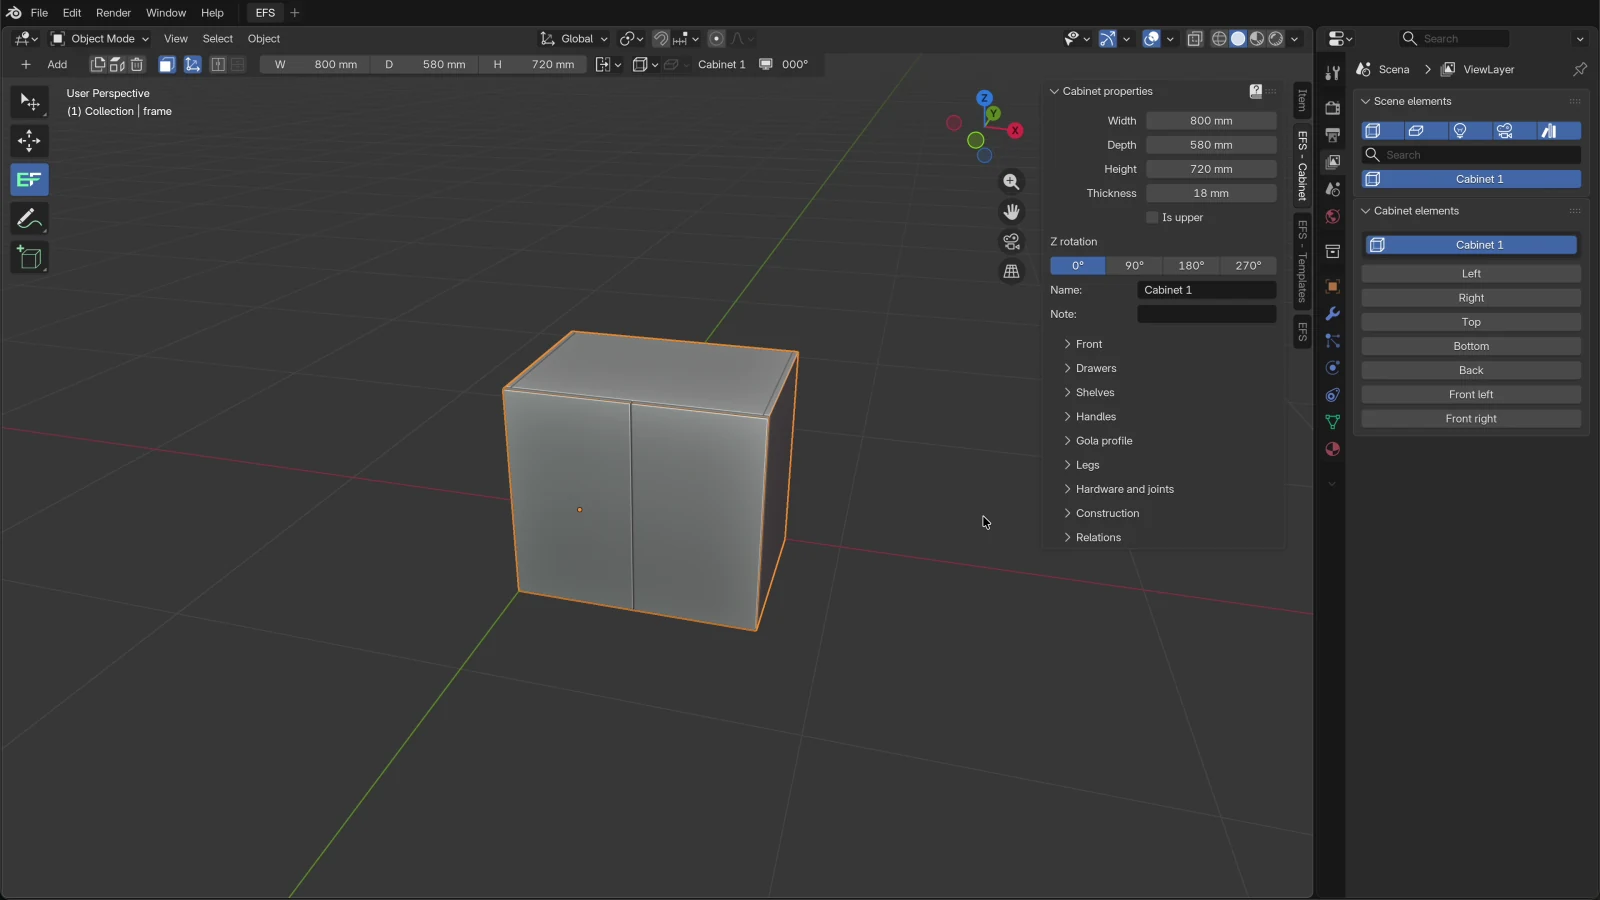
The screen has six parts:
- Top menu: File, Edit, Render, Window and Help, and to their right the EFS workspace tab.
- Toolbar along the left edge of the 3D view. For working with cabinets, the EFS tool is selected in it, the icon with the EF logo.
- EFS tool header: the row with the Add button above the 3D view. Above it is Blender's view header (Object Mode, View, Select, Object), which you do not need for working with cabinets.
- 3D view in the middle. At the top right is the navigation gizmo with the X (red), Y (green) and Z (blue) axes and buttons for zooming, panning the view, the camera and perspective.
- Sidebar on the right of the 3D view. Its tabs are on the right edge: EFS, EFS - Cabinet, EFS - Templates.
- Right-hand column with the Scene elements and Cabinet elements lists.
Note
At the top left of the 3D view, Blender shows its internal name of the selected object, e.g. frame or left. You see the EFS names (Cabinet 1, Left) in the EFS tool header and in the lists on the right.
The toolbar and the EFS tool
The toolbar holds, from top to bottom: select, move, the EFS tool, annotate and add cube. The app selects the EFS tool by itself when it opens. Keep it selected all the time: only with the EFS tool is the header with the Add button and the cabinet's sizes shown above the view.
With the EFS tool, the mouse works like this:
- clicking a board selects that board;
- clicking in empty space clears the selection;
- dragging with the left mouse button draws a selection box;
- right-clicking a board of a cabinet opens the cabinet menu (described in the chapter Working faster).
The EFS tool header

The buttons run from left to right. When you move the mouse over an icon, Blender shows its name.
| Button | What it does | When it is grey or missing |
|---|---|---|
| EFS API Key | Opens the key entry. | Shows only until the key is entered. |
| Add | The menu for adding cabinets, boards and templates (see A new cabinet). | Never. |
| Duplicate (two pages) | Makes a copy of the selected cabinet with all its settings and decors. The copy gets the next free name and is placed like a new cabinet when nothing is selected. If a free board is selected, it copies the board. Shift+D does the same. | When not exactly one object is selected. |
| Dismantle cabinet (exploded cube) | The cabinet stops being a cabinet: its boards become free boards with the cabinet's name in front of their own. The size, fronts and shelves can no longer be changed through the cabinet panels. It can be undone only with Ctrl+Z. | When no cabinet or board of a cabinet is selected. |
| Delete (bin) | Deletes the selected cabinets and free boards. X does the same. Details are in the section Deleting a cabinet. | When the project has objects but none is selected. |
| Hide fronts / Show fronts | Blue (on): the fronts are visible. A click hides all fronts in the project, the next click brings them back. | Never. |
| Measures (axes icon) | Turns the measures in the view on and off. M does the same. | Never. |
| Open doors | Opens and closes the doors of the selected cabinet and of the cabinets related to it, with a short animation. | When the selected cabinet has no fronts. |
| Open drawers | The same for drawers. | When the selected cabinet has no drawers. |
| Three size fields | Width, depth and height of the selected cabinet. Click a field and type a new size. | The fields do not show when no cabinet or board of a cabinet is selected. |
| Positioning options (drop-down button) | How a new cabinet is placed (see Where a new cabinet goes). | Never. |
| Cabinet properties (cube, drop-down button) | Quick panel: name, note, width, depth, height, position X, Y, Z, Z rotation and a button with the cabinet's name that selects the whole cabinet. | When not exactly one object of a cabinet is selected. |
| Board properties (drop-down button) | Quick panel of the selected board: name, note, grain direction, edge tape and material group (Decors, edge tape and materials). | When not exactly one board is selected. |
| Name | The name of the selected cabinet or board, e.g. Cabinet 1 or Left. | Empty when nothing is selected. |
| Screen icon and angle | The direction you are looking from: 000°, 090°, 180° or 270°. This is not the cabinet's rotation. | Always visible. |
For advanced users: what the view angle means
000° means you are looking from the front, along the Y axis (the back wall is in front of you). 270° means you are looking from the right, 180° from the back and 090° from the left. The angle changes as soon as you turn the view, and a new cabinet turns to face that angle.
The sidebar and its tabs
You open and close the sidebar with N while the mouse is over the 3D view. The app keeps it open. The tabs are on the right edge of the sidebar:
| Tab | When it shows | What is in it |
|---|---|---|
| EFS | Always. | Settings for the whole project (see The EFS tab). |
| EFS - Cabinet | When a cabinet or one of its boards is selected. | Everything about the selected cabinet (see The EFS - Cabinet tab). |
| EFS - Board | When a single board is selected. | The properties of that board: edge tape, grain, material group, cut-outs (Decors, edge tape and materials). |
| EFS - Templates | Always. | Ready-made cabinets by category, My templates and the cabinet Import and export (Templates and My templates). |
When an object is selected, the Item tab is also at the top of the sidebar (described below).
The Item tab
Item is Blender's tab with one panel, Transform. It holds the position, rotation, scale and dimensions of the selected object:
| Field | What it shows |
|---|---|
| Location X, Y, Z | The object's position. For a cabinet, this is the position of its back left bottom corner. |
| Rotation X, Y, Z | The turn around each axis; below it is the rotation mode (XYZ Euler). |
| Scale X, Y, Z | The object's scale. In Blender a cabinet is a stretched cube, so these numbers are not the cabinet's size. |
| Dimensions X, Y, Z | The object's outer dimensions. |
For EFS, this tab is useful only for checking and for the exact position of a cabinet. This is how EFS reacts to changes in it:
| What you change | The whole cabinet is selected | A board of the cabinet is selected |
|---|---|---|
| Location | The whole cabinet moves, with its related cabinets. The same as the X, Y, Z fields in the Cabinet properties drop-down button. | Only that board moves and leaves the cabinet. |
| Rotation | EFS restores the old rotation at once. You turn a cabinet with R or with the Z rotation buttons. | Only that board turns. |
| Scale, Dimensions | EFS takes the change as the new width, depth and height and rebuilds the boards, within the limits of 100–5000 mm. | Only that board is stretched, bypassing EFS. The cutting list takes the board's actual size, so the stretched size goes into it. |
Watch out
Do not change anything in the Item tab on the boards of a cabinet. On a cabinet, do not change Rotation, Scale or Dimensions: change the size in the header or in the EFS - Cabinet tab, and turn it with R. If you changed something by accident, press Ctrl+Z.
Note
A free board does not belong to a cabinet, so its size and position are changed with exactly these fields. The same values are also in the Board properties drop-down button in the header.
The right-hand column: Scene elements and Cabinet elements
The right-hand column is Blender's Properties editor, open on the View Layer tab. In it, EFS keeps two lists:
- Scene elements: cabinets, free boards, lights, cameras, Gola profiles, LED strips and handles in the project, sorted by name. Clicking a name selects that object.
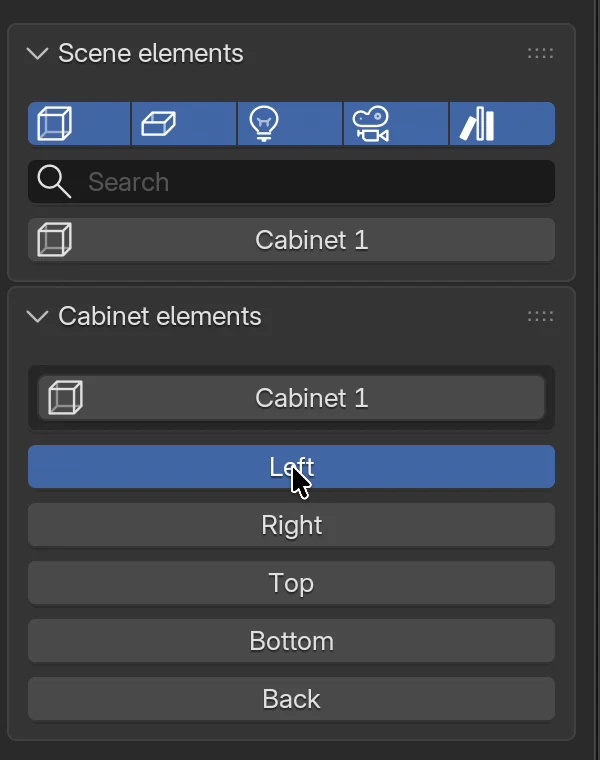
- Cabinet elements: when a cabinet or one of its boards is selected, this shows a button with the cabinet's name and the list of its boards (Left, Right, Top, Bottom, Back, fronts, shelves…). Clicking a board selects only that board.
Above the Scene elements list is a row of five icon buttons, from the left: cabinets (cube), free boards, lights (bulb), cameras and other (Gola profiles, LED strips, handles and other objects). A blue button means that kind of object is visible in the list and in the view. A click hides it from both the list and the 3D view, the next click brings it back. Below the buttons is a field for searching by name.
Note
Cabinets related to another cabinet (Relations) are not listed separately in Scene elements. You see them in the Cabinet elements list when you select the cabinet they are related to.
The EFS tab
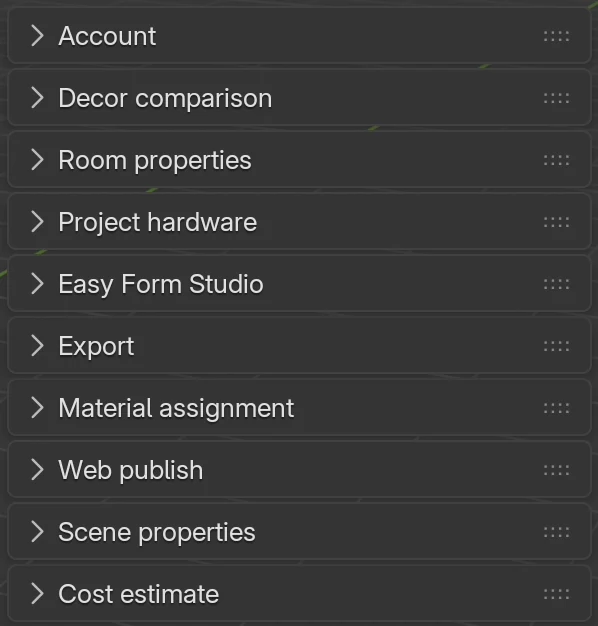
The EFS tab holds the settings for the whole project, not for a single cabinet. The panels are collapsed; clicking a title opens it. You can change the order of the panels by dragging the dots on the right of the title.
| Panel | What it is for | Details in the chapter |
|---|---|---|
| Account | Licence and subscription status, invoices, resending the key. Without an entered key, the API key panel is in its place. When the server rejects the saved key, the API key panel appears next to it. | Install, licence and account |
| First steps | Five interactive tours to begin with, and how many are done. It disappears when you finish them or close it with X. | Interactive tours |
| Interactive tours | Every tour that shows you in the program where to click and what to type, with Start and Repeat. | Interactive tours |
| Decor comparison | A PDF with the price of the same project in up to three combinations of front and carcass decors. | Comparing decors |
| Room properties | Walls, room size, columns and slopes, and in the Openings and installations box windows, doors, sockets and water. | Room, openings and installations |
| Project hardware | Joints, hinges, drawer runners, flap mechanisms, shelf supports and handles that new cabinets get, with Apply to all and Apply to selected. | Project hardware |
| Easy Form Studio | The Version 2.0.… line (program version), Check for update, Manual, Tutorials, How To, Keys (list of all shortcuts), Open log and My settings. | Working faster |
| Export | Project check, Production package, Cutting list to Excel, PDF, DXF, labels, assembly instructions, Customer render and the supplier order. | Cutting list and cut size, The production package and the supplier order |
| Material assignment | With one click gives the same decor from the project to all boards of one material group (shelves, front 1–4). | Decors, edge tape and materials |
| Web publish | Publishing the project to the web preview with a QR code, and deleting the publication from the web. | Web preview and QR |
| Scene properties | Upper elements height, Positioning options for a new cabinet, Previous Camera and Next Camera. | Wall units, tall units and flaps |
| Cost estimate | An estimate of the price of boards, edge tape, hardware and machining for the whole project, and in the Quote box the customer details and the quote export to PDF. | A quote for the customer, Nesting and board prices |
Help in the program
You can reach the manual from the program in four ways:
- Right-click any EFS button or field, then Online Manual. The section of the manual about that button or field opens, e.g. right-clicking Depth of the back opens the section Back.
- Faster: hold the mouse over the button or field and press F1. The same section opens.
- ? on the right of the header of the main panels opens the chapter about that panel.
- The Manual button in the Easy Form Studio panel opens the manual's home page.
The manual opens in the browser, in the language of the program's interface.
Interactive tours
An interactive tour takes you through one task in the program itself. It dims the screen except the part you work in, and the button or field you need blinks red. If the panel with it is closed, a hand blinks in that panel's header. A card next to the highlighted part says what to click or type. A step in which you have to do something moves on by itself once you have done it. The tour never changes or saves anything for you.
- When you start the program and haven't taken the basics tour yet, the Welcome to Easy Form Studio card opens. Show me the basics starts the Get to know EFS tour, and Not now closes the card until the next start. If you tick Don't show again, the card doesn't open any more.
- The Interactive tours panel in the EFS tab has all twelve tours, with their length and a check mark next to the finished ones. Start starts a tour, Repeat repeats a finished one, and the ? next to it opens the manual chapter. The tours of the quote, the production package and the web preview need an active trial or subscription.
- The First steps panel at the top of the EFS tab has five tours to begin with. It disappears when you finish them, and you can also close it with X in its header.
- When you ask the AI assistant how to do something, it can offer a tour with its answer: under the answer there is Interactive tour with a Start button. The tour doesn't start until you click.
- Manual chapters with a tour have a Show me in the program box.
During a tour:
| Key or click | What it does |
|---|---|
| Right or Enter | Next step. In a step in which you have to do something, use Skip step. |
| Left | Previous step. |
| Esc or × on the card | Closes the tour. |
| Open in the manual | Opens the chapter about that task. |
| A click outside the highlighted part | Does nothing, and the card shakes so you can see where it is. Orbiting with the middle mouse button and the wheel work everywhere. |
Finished tours are remembered on the computer, not in the project.
Tip
The tapping hand, the ring around the highlighted part and the confetti are switched off in the add-on preferences: Edit → Preferences… → Add-ons → Easy Form Studio → Tours without animation.
The EFS - Cabinet tab
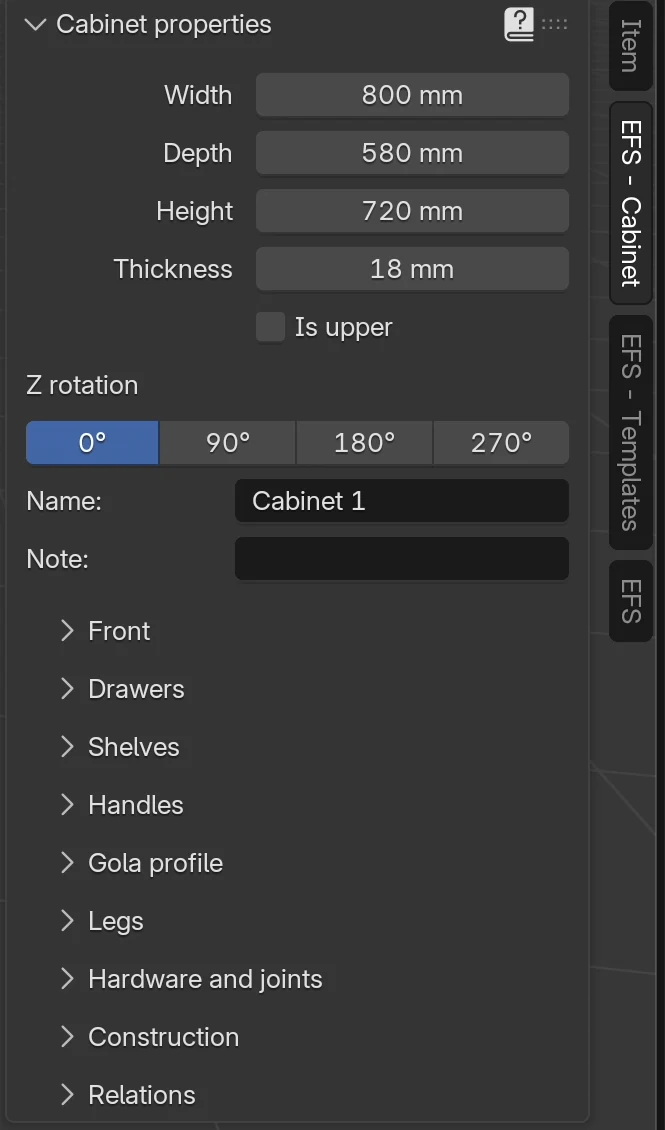
The EFS - Cabinet tab shows the selected cabinet. At the top is the Cabinet properties panel (described in the section Cabinet dimensions), and below it are collapsed boxes:
| Box | What you set in it |
|---|---|
| Front | Front type (no front, door left or right, two doors, flap), thickness, gap, overlaps, inset fronts. |
| Drawers | Drawer layout and number, the height of each drawer. |
| Shelves | Horizontal and vertical shelves and dividers. |
| Handles | The handles of this cabinet. |
| Gola profile | Cut-outs for the Gola profile. |
| Legs | Legs and their height. |
| Hardware and joints | Hinges, drawer runners and joints of this cabinet. |
| Construction | Sides, top, bottom and back: overlaid or inset, groove, rebate, thicknesses. |
| Relations | Cabinets to the left, right, above and below that move and change together with this one. |
The chapter How a cabinet is built goes through all the boxes in detail.
For a corner cabinet, the tab shows Corner cabinet properties with its own boxes (Base units and the corner).
A new cabinet
- Click Add in the EFS tool header.
- Click Cabinet.
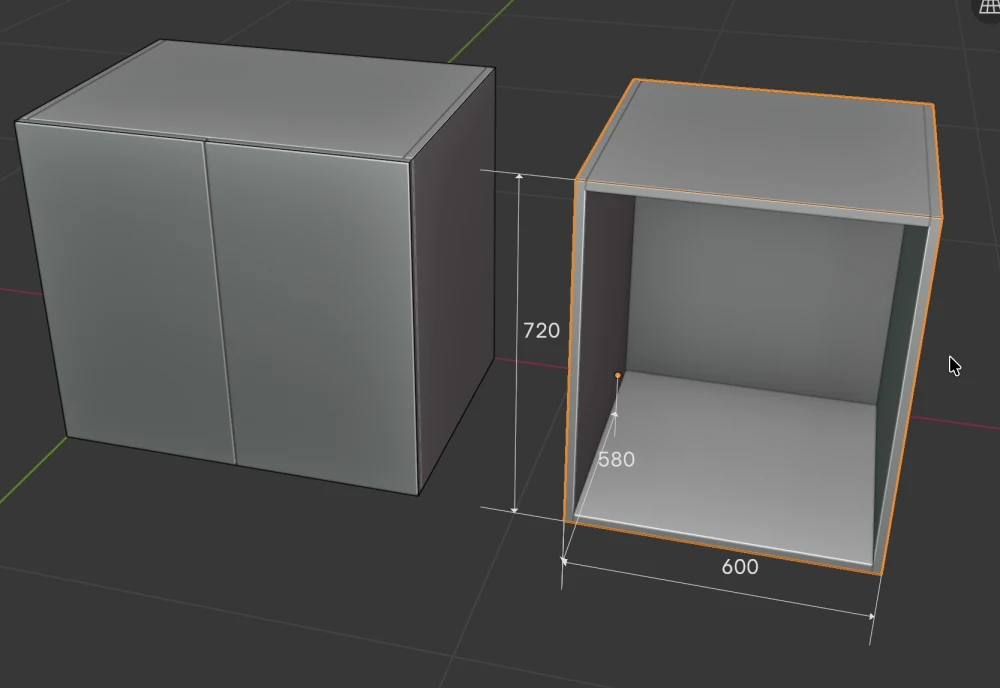
The cabinet appears at once, selected as a whole cabinet: 600 mm wide, 580 mm deep and 720 mm high, with side panels, top and bottom and a back, without a front. It is named Cabinet 1, the next one Cabinet 2, and so on.
You do the same with C while the mouse is over the 3D view.
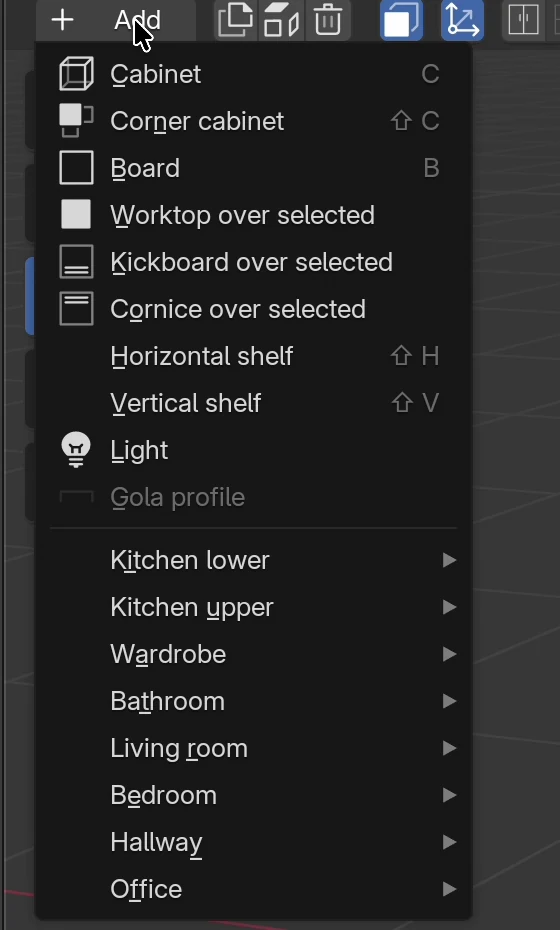
Items in the Add menu
| Item | What it adds | Key | When it is grey |
|---|---|---|---|
| Cabinet | A new cabinet 600 × 580 × 720 mm. | C | Never. |
| Corner cabinet | A corner cabinet 1200 × 1160 × 720 mm (Base units and the corner). | Shift+C | Never. |
| Board | A free board that belongs to no cabinet, by default 600 × 1400 × 18 mm. If a board of a cabinet is selected, EFS places it next to that cabinet. | B | Never. |
| Worktop over selected | A worktop over the selected base units (The worktop: cut-outs and the corner joint). | When no base unit is selected. | |
| Kickboard over selected | A kickboard in front of the legs of the selected base units (Kickboard, fillers, end panels and cornice). | When no cabinet is selected. Without selected cabinets it adds nothing. | |
| Cornice over selected | An 18 mm cornice on top of the selected cabinets. | When no cabinet is selected. Without selected cabinets it adds nothing. | |
| Horizontal shelf | A horizontal shelf in the selected cabinet. | Shift+H | When not exactly one cabinet or one of its boards is selected. |
| Vertical shelf | A vertical divider in the selected cabinet. | Shift+V | When not exactly one cabinet or one of its boards is selected. |
| Light | An LED strip under the selected object. | When not exactly one EFS object is selected. | |
| Gola profile | Gola profiles in the cut-outs of the selected cabinet. | When the selected cabinet has no cut-outs for a Gola profile. | |
| My templates | Your saved templates. | Shows only when you have at least one saved template. | |
| Kitchen lower, Kitchen upper, Wardrobe, Bathroom, Living room, Bedroom, Hallway, Office | Ready-made cabinets from templates (Templates and My templates). |
Tip
Shift+A also opens the same menu while the mouse is over the 3D view. That is Blender's Add menu; the EFS items are at the bottom, in the Easy Form Studio submenu. The Add button is faster because it shows only the EFS items straight away.
Default sizes and allowed ranges
| Size | Default | Range |
|---|---|---|
| Width | 600 mm | 100–5000 mm |
| Depth | 580 mm | 100–5000 mm |
| Height | 720 mm | 100–5000 mm |
| Carcass board thickness | 18 mm | up to 100 mm |
If you type a size outside the range, EFS lowers or raises it to the limit: 50 mm becomes 100 mm, and 6000 mm becomes 5000 mm.
Note
If you have saved My settings, a new cabinet does not start from 600 × 580 × 720 mm but from the size and construction of the cabinet the settings were saved from. A new cabinet also always gets the hardware from the Project hardware panel. See Working faster and Project hardware.
Where a new cabinet goes
Where a new cabinet appears depends on whether something is selected and on the direction you are looking from.
A cabinet (or one of its boards) is selected. The new cabinet goes against the right side of the selected one, with its back in the same plane. It takes the rotation, height, depth and height above the floor from the selected one; if the selected one is a wall unit, the new one becomes a wall unit too. The width stays at the default. If there is already a cabinet to the right of the selected one, the new one goes to the left. If both sides are taken, the new one is placed as if nothing were selected.
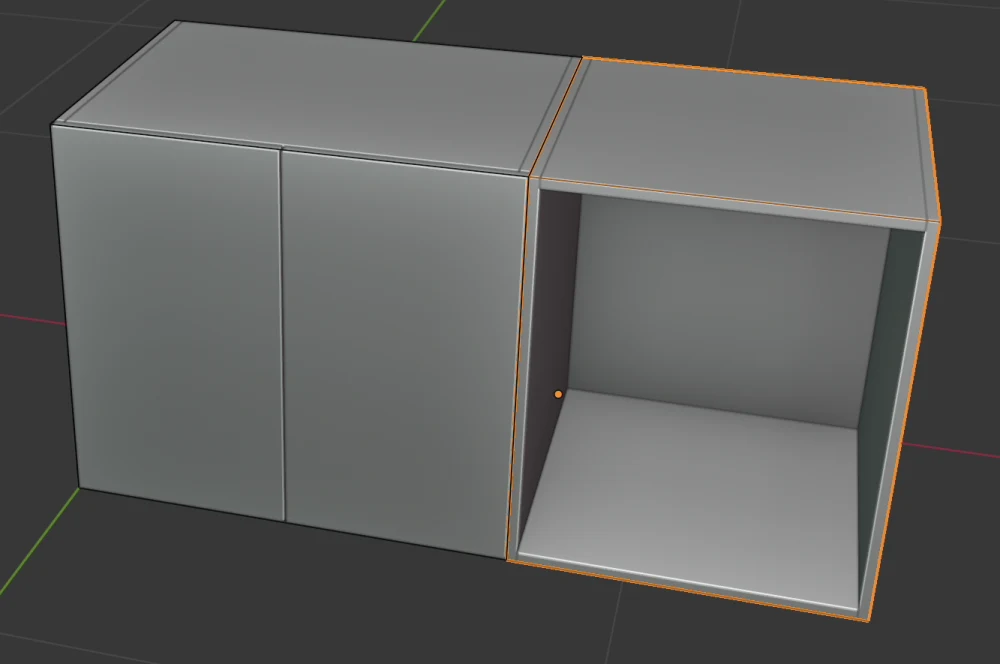
Nothing is selected. The new cabinet turns to face you, according to the view angle in the header:
| Angle in the header | Z rotation of the new cabinet | Where it appears |
|---|---|---|
| 000° (looking from the front) | 0° | To the right of the rightmost base unit in the project, with its back on the line Y = 0. In an empty project, at the origin. |
| 270° (looking from the right) | 270° | With its back on the line X = 0, at the end of the row of base units that is on your left. In an empty project, at the origin. |
| 090° (from the left) | 90° | The cabinet follows the mouse over the floor; left-click to place it. |
| 180° (from the back) | 180° | The same: it follows the mouse until you click. |
While the cabinet follows the mouse, a right-click or Esc stops the move and the cabinet stays at the origin.
Positioning options
The rules above apply to the default option Forward alignment. You change the option with the Positioning options drop-down button in the header or in the EFS → Scene properties panel.
| Option | What it does |
|---|---|
| Forward alignment (default) | The new cabinet goes next to the selected one or at the end of the row, as described above. |
| Sliding on X axis | The new cabinet follows the mouse along the X axis only; click to place it. The selected cabinet is ignored. |
| Sliding on Y axis | The same, along the Y axis only. |
| Sliding on X and Y axis | The new cabinet follows the mouse over the whole floor. |
Note
The add-on preferences have two more settings that change how a new cabinet behaves: Rotate cabinet based on view rotation on creation (on by default; off means the new cabinet is always at 0° and follows the mouse) and Relate a new cabinet to the selected one (off by default; on means the new cabinet becomes a related cabinet of the selected one). The add-on preferences are in Edit → Preferences… → Add-ons → Easy Form Studio.
Cabinet dimensions
You change the size of the selected cabinet in the EFS tool header:
- Select the cabinet (click its name in the Scene elements list or any of its boards in the view).
- Click the first size field in the header, the width (600 mm in the example).
- Type
800. - Press Enter.
The cabinet is rebuilt at 800 mm at once. The second field is the depth, the third the height.
The same sizes are also in the EFS - Cabinet tab, in the Cabinet properties panel, and in the Cabinet properties drop-down button in the header.
Tip
You type the number in millimetres, without the unit. You can also type a calculation in the field, e.g. 1200/2 or 600-18, and EFS enters the result.
What happens to the boards
- The boards are not stretched but rebuilt: the side panels, top and bottom, back and fronts get the new sizes, while the board thickness and the decors stay the same.
- Shelves, drawers, Gola cut-outs and back grooves follow the new size.
- The cabinet grows from its back left bottom corner: the width grows to the right, the depth towards the front, the height upwards. The left side, the back and the bottom stay in place. That corner is the orange dot in the view.
- If the cabinet is related to others and that size is ticked under Include in scaling in the Relations box, the related cabinets get the same size too (Base units and the corner).
Options of the Cabinet properties panel
| Option | What it does | Default | Values |
|---|---|---|---|
| Width | Outer width of the cabinet. | 600 mm | 100–5000 mm |
| Depth | Outer depth of the cabinet. | 580 mm | 100–5000 mm |
| Height | Outer height of the cabinet. | 720 mm | 100–5000 mm |
| Thickness | Thickness of the carcass boards. | 18 mm | up to 100 mm |
| Is upper | The cabinet becomes a wall unit: it rises to the Upper elements height from the Scene properties panel, and its fronts move to the front 2 material group (Wall units, tall units and flaps). Shows only when the cabinet has no legs. | off | on / off |
| Z rotation | Turns the cabinet: 0°, 90°, 180°, 270°. The blue button is the current rotation. | 0° or according to the view | 0°, 90°, 180°, 270° |
| Name | The cabinet's name in the lists, the header and the documentation. | Cabinet 1, Cabinet 2… | free text |
| Note | The cabinet's note; it goes into the cutting list (Cutting list and cut size). | empty | free text |
When several cabinets are selected, the panel shows the active one (the last selected) and offers to copy its settings to the others. This is in the chapter Working faster.
Selecting: cabinet or board
EFS tells the whole cabinet apart from a single board of the cabinet.
| What you want to select | How |
|---|---|
| The whole cabinet | Click its name in the Scene elements list, the button with its name at the top of the Cabinet elements list, or the button with its name in the Cabinet properties drop-down button. A new cabinet is selected as a whole straight away. |
| A single board | Click the board in the 3D view or its name in the Cabinet elements list. |
| Several cabinets | Shift + click, or drag a box with the mouse (Working faster). |
| Nothing | Click in empty space in the 3D view. |
When a board is selected, the header shows its name (e.g. Left), and the EFS - Board tab appears. The sizes in the header and the EFS - Cabinet tab still show the whole cabinet.
Watch out
The keys F, R, 1, 2, 3 and X always act on the whole cabinet, even when only one of its boards is selected. X on a side panel deletes the whole cabinet, not just the side panel. Shelves are the exception: X on a shelf deletes all shelves and dividers of that cabinet, and the cabinet stays.
Fronts: F and Shift+F
- Select the cabinet.
- Press F. The cabinet gets a door opening to the left.
- Press F once more: a door opening to the right.
- The third time: two doors.
- The fourth time: the cabinet is without a front again.
The fronts change in the order None → Left opening → Right opening → Two doors → None. When you go from two doors to None, EFS also turns Inset on or off: in the second round the fronts are inset in the carcass, in the third they are overlaid on the carcass again. Flaps and the other front settings are in the Front box (How a cabinet is built).
If several cabinets are selected, F gives them all the same front.
Hiding fronts. Shift+F hides all fronts in the project, so you can see inside the cabinets. The Show fronts button in the header brings them back. The button is blue while the fronts are visible.
Watch out
Hidden fronts do not go into the cutting list, the drawings, the cost estimate or the Cabinet elements list. Before every export, bring the fronts back with the button in the header.
Opening doors and drawers. The Open doors and Open drawers buttons in the header open the fronts of the selected cabinet with a short animation; a second click closes them. The O key opens or closes both the doors and the drawers of the selected cabinet at once.
Turning: R and Z rotation
- Select the cabinet.
- Press R. The cabinet turns 90° clockwise, seen from above.
- Each further R turns it another 90°: 0° → 90° → 180° → 270° → 0°.
For an exact angle, click one of the Z rotation buttons (0°, 90°, 180°, 270°) in the EFS - Cabinet tab or in the Cabinet properties drop-down button.
The cabinet turns around its back left bottom corner (the orange dot), so after turning it often needs to be moved. You cannot turn a cabinet by an angle that is not a multiple of 90°.
Note
R turns the cabinet only when one cabinet or one of its boards is selected. On other objects (light, camera, free board), R starts Blender's free rotation. If this happens by accident, press Esc or right-click.
Moving: 1, 2 and 3
You move a cabinet along one axis, by an exact distance:
- Select the cabinet.
- Press 1 to move along the X axis, 2 along the Y axis or 3 along the Z axis (up and down). These are the number keys above the letters, not the ones on the numeric keypad.
- The cabinet now follows the mouse along that axis only. Type
300. - Press Enter.
The cabinet moves exactly 300 mm. To move in the opposite direction, type -300. A right-click or Esc cancels the move and the cabinet stays where it was.
![Moving the second cabinet along the X axis: at the top of the view it says D: [300] = 30 cm (300.0 mm) global, and the cabinet is outlined in white](../../img/a02/pomak.webp)
While you move, Blender shows the typed value at the top of the view, e.g. D: [300] = 30 cm (300.0 mm). It is the same distance, only also shown in centimetres.
Axis directions when you look from the front (000°): X grows to the right, Y towards the back wall, Z upwards. The axis colours are the same as in the gizmo at the top right: X red, Y green, Z blue.
Tip
If a board of the cabinet is selected, 1, 2 and 3 move the whole cabinet. If several cabinets are selected, they all move together.
Tip
You can also type the exact position: the Cabinet properties drop-down button in the header has X, Y and Z fields. The position is the location of the cabinet's back left bottom corner.
Measures and views
Measures. M turns the measures (dimension lines) on and off, the same as the Measures button in the header. Measures show only on the selected cabinet (width, depth, height) or on the selected board.
View. You change the view with the mouse while it is over the 3D view:
| Action | How |
|---|---|
| Orbit the view | Hold the middle mouse button and move the mouse. |
| Pan the view | Hold Shift and the middle mouse button. |
| Zoom | The wheel. |
| Zoom to selected | W |
| Whole scene | E |
The buttons below the gizmo at the top right do the same: the magnifier zooms, the hand pans the view, and the grid switches between perspective and orthographic view.
Standard views. EFS does not add standard views of its own; you use Blender's:
- clicking an axis circle in the gizmo at the top right turns the view exactly along that axis (the Z circle gives the top view);
- on the numeric keypad: Num 1 front, Num 3 right, Num 7 top, Num 5 perspective or orthographic view;
- the View → Viewpoint menu in the view header.
Note
On a Mac with a trackpad: a two-finger drag orbits the view, with Shift it pans, and pinching zooms (a two-finger drag with Ctrl does the same).
Working with a project
A project is one .blend file. It holds all the cabinets, the room and the project settings (project hardware, quote details, export settings).
New project
- Open File → New (Ctrl+N).
- Choose EasyFormStudio. The General item opens Blender's basic screen layout, without the layout described in this chapter.
A new project takes the project part of My settings (project hardware, quote prices, export settings), if you have saved them (Working faster).
Saving
- Open File → Save (Ctrl+S).
- The first time, choose a folder and type a file name.
- Confirm.
Every later save goes into the same file. File → Save As… (Ctrl+Shift+S) saves the project under another name. Web publish works only once the project has been saved.
Opening
File → Open… (Ctrl+O), then choose the .blend file. When the project opens, EFS opens the Scene elements and Cabinet elements lists in the right-hand column.
Undo
Ctrl+Z undoes the last step, and Ctrl+Shift+Z redoes it. Edit → Undo and Edit → Redo do the same. You can also undo adding, deleting, dismantling, a size change, a front change and a turn. Turning the measures on and off is not an undo step.
Deleting a cabinet
- Select the cabinet or any of its boards.
- Press X or click Delete (the bin) in the header.
EFS does not ask for confirmation. The cabinet disappears with all its boards and legs. If you make a mistake, press Ctrl+Z.
| What is selected | What X deletes |
|---|---|
| A cabinet or one of its boards | The whole cabinet. |
| A shelf | All shelves and dividers of that cabinet. The cabinet stays. |
| A free board | That board. |
| Several objects | Everything selected, by the same rules. |
Watch out
If the cabinet has related cabinets (the Relations box: left, right, above, below), deleting it deletes them too.
Watch out
Do not delete with Del. That is Blender's delete: it deletes only the selected object, e.g. one board, and the rest of the cabinet stays. If this happens, press Ctrl+Z.
Common problems and solutions
A key does not work. The mouse is not over the 3D view. EFS keys work only while the mouse is over the view, not over the sidebar, the lists on the right or a field you are typing in. Move the mouse into the view and press the key again.
Keys work only with the EFS tool. In the add-on preferences (Edit → Preferences… → Add-ons → Easy Form Studio), EFS keys only with the EFS tool is on. Select the EFS tool in the toolbar or turn this setting off. Otherwise, EFS keys work in Object Mode with any tool.
The header has no Add button. Another tool is selected in the toolbar, or you are in Edit Mode (the top left of the view header says Edit Mode instead of Object Mode). If you are in Edit Mode, press Tab while the mouse is over the view. Then click the EFS tool in the toolbar.
The header has no size fields. Neither a cabinet nor one of its boards is selected. Click the cabinet in the Scene elements list.
A board is selected instead of the cabinet. A click in the view selects the board under the mouse. Sizes, F, R and moving still work on the whole cabinet. For the whole cabinet, click its name in the Scene elements list.
The new cabinet did not go next to the previous one. The previous cabinet was not selected (a click in empty space clears the selection), Positioning options is not set to Forward alignment, or both sides of the selected cabinet are taken. Select the cabinet and press C again.
The new cabinet follows the mouse. You are looking from the 090° or 180° direction, or sliding is chosen in Positioning options. Left-click to place it.
R does not turn the cabinet but spins it freely. Several cabinets are selected, or an object that is not a cabinet. Press Esc, select one cabinet and press R.
The size you typed changed by itself. The size is outside the 100–5000 mm range and EFS has set it to the limit.
The cabinet moved the wrong way. Type a negative value, e.g. -300, or undo the move with Ctrl+Z.
The fronts have disappeared. Shift+F was pressed. Click Show fronts in the header.
The measures do not show. Measures show only on the selected cabinet or board. Select the cabinet. If they still do not show, for example right after opening a project, press M; ignore whether the Measures button is blue or grey at that point.
The Scene elements and Cabinet elements lists have disappeared. Another tab is open in the right-hand column. Click the View Layer tab in the narrow column of icons along the left edge of the right-hand column.
The cabinet has lost a side panel. The board was deleted with Del. Press Ctrl+Z and delete with X.
The New project button in the Web publish panel does not open a new project. That button only separates the next web publication from the previous one. You open a new project in the File menu.
Shortcuts in this chapter
The keys work while the mouse is over the 3D view. You see all EFS keys in the EFS tab, Easy Form Studio panel, Keys button.
| Key | Action |
|---|---|
| N | Open or close the sidebar |
| C | New cabinet |
| Shift+C | New corner cabinet |
| B | New free board |
| Shift+H | New horizontal shelf in the selected cabinet |
| Shift+V | New vertical shelf in the selected cabinet |
| Shift+A | Blender's add menu, with the EFS items at the bottom |
| Shift+D | Duplicate the selected cabinet |
| X | Delete the selection |
| F | Next front |
| Shift+F | Hide fronts |
| O | Open or close doors and drawers |
| R | Turn the cabinet by 90° |
| 1 / 2 / 3 | Move along the X / Y / Z axis (type the distance, then Enter) |
| M | Measures on / off |
| W | Zoom to selected |
| E | Whole scene |
| middle mouse button | Orbit the view |
| Shift + middle mouse button | Pan the view |
| wheel | Zoom |
| Num 1 / Num 3 / Num 7 | Front / right / top view |
| Ctrl+Z / Ctrl+Shift+Z | Undo / redo a step |
| Ctrl+N | New project |
| Ctrl+O | Open a project |
| Ctrl+S | Save the project |
Next
Next chapter: How a cabinet is built