One-click render
Customer render is a photorealistic image of the project with decors and light. EFS sets up the camera, the light and the quality itself, and the image goes with the quote or into a message to the customer. In this chapter you will also learn how to set up your own cameras and lights, how to export an AR model for the iPhone and how to look at the project in Rendered mode.

Before you start
- The project is saved (File → Save). The image gets the name of the project file and goes into the same folder.
- The boards have decors assigned (Decors, edge tape and materials). Boards without a decor are white in the image.
- The fronts are visible. Hidden fronts (Shift+F) are not visible in the render either (see Hidden fronts).
- For an image from inside a room, make a room in the Room properties panel (Room, openings and installations). Without a room, EFS shoots the furniture from outside.
- The licence is active. When the trial or the subscription ends, the render and the AR model cannot be exported (When the free trial or the subscription ends).
The workflow from the video
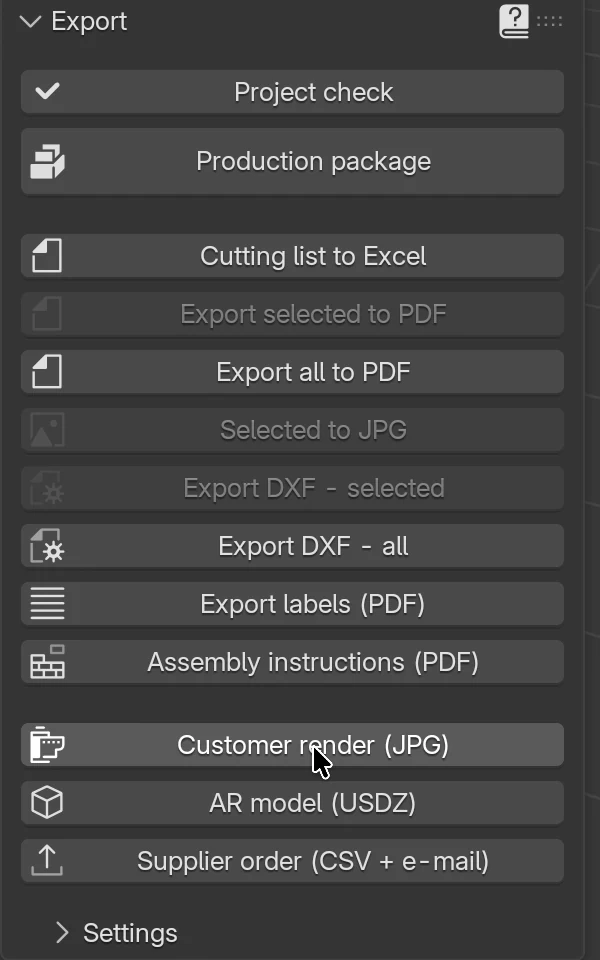
- In the EFS tab, open the Export panel.
-
Click Customer render (JPG).
-
A save window opens. The folder is the project folder, and the image name is the name of the project file, e.g.
Kuhinja Horvat.jpg. Change the folder or the name if you want.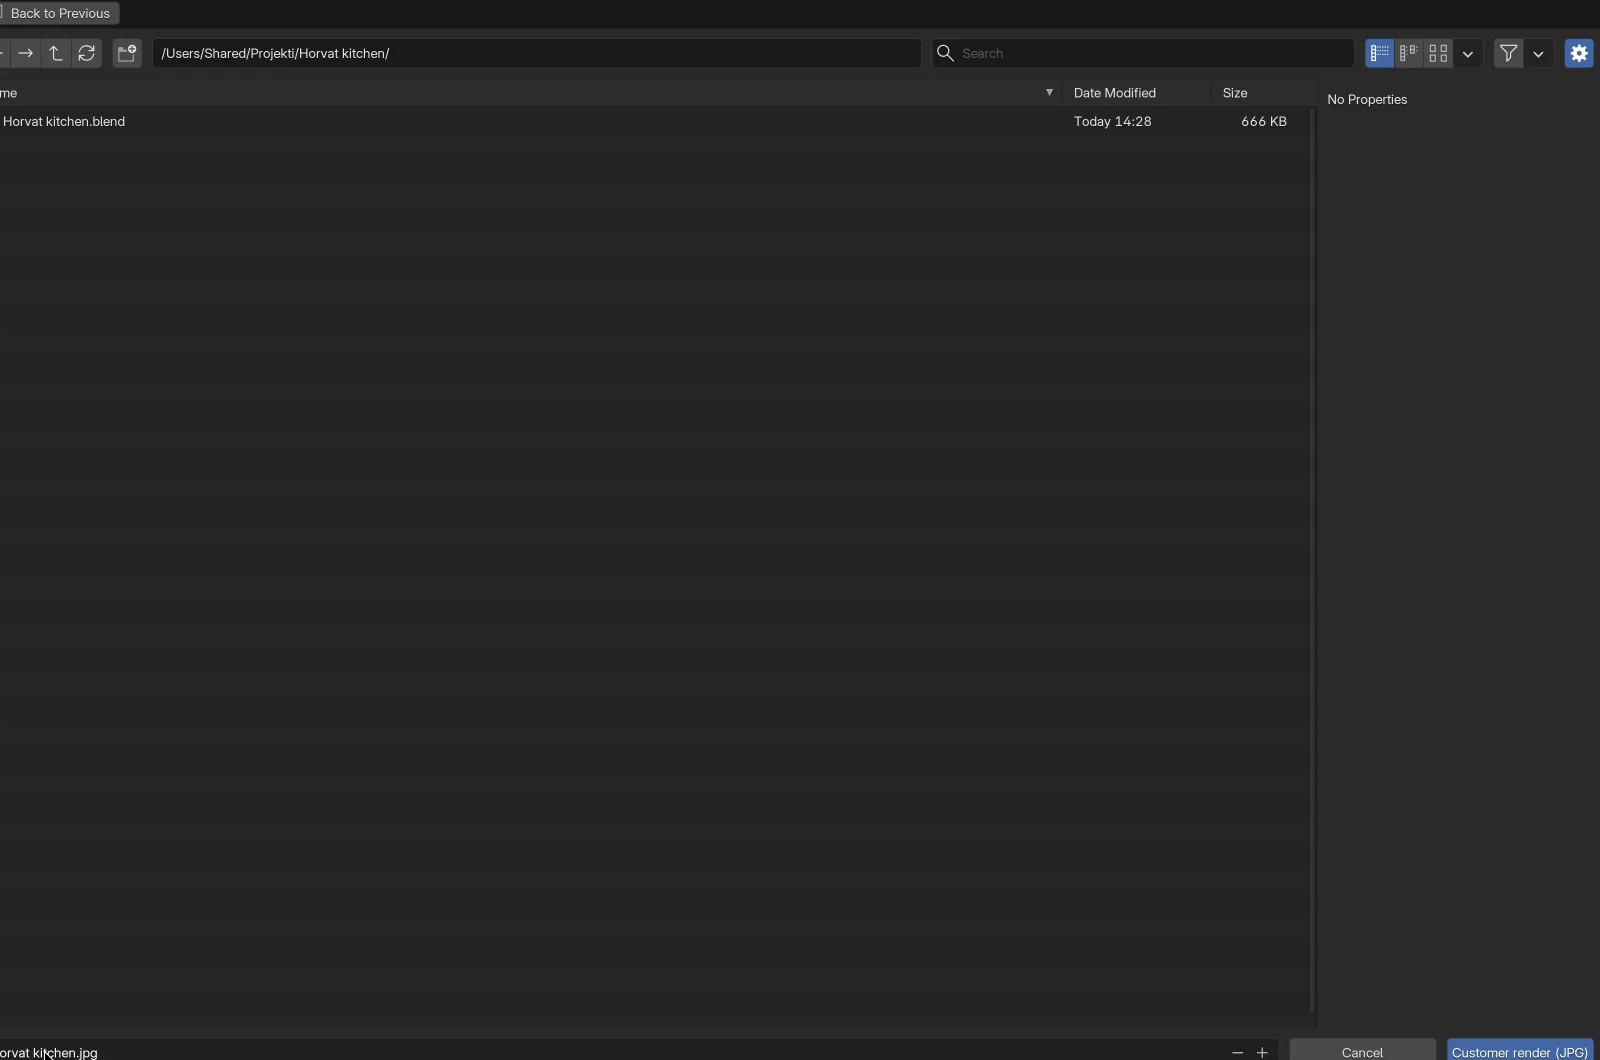
-
Click Customer render (JPG) at the bottom right.
-
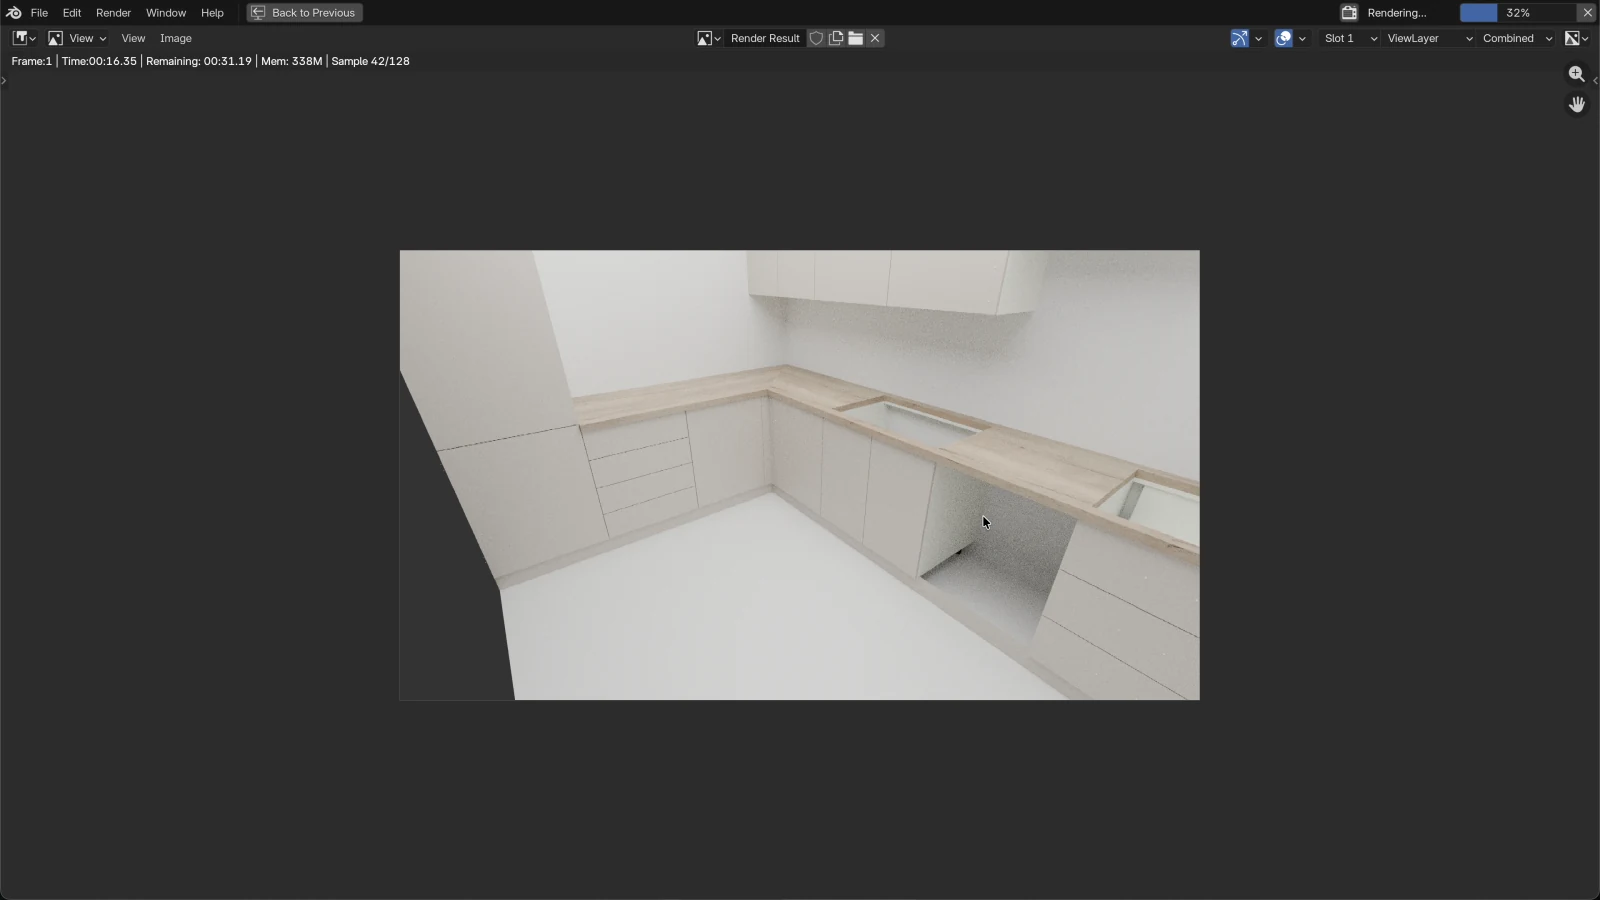
A window with the render opens. The image builds up gradually. The line above the image says how many samples are done (e.g. Sample 56/128) and how much time is left (Remaining), and the progress bar shows the percentage.
-
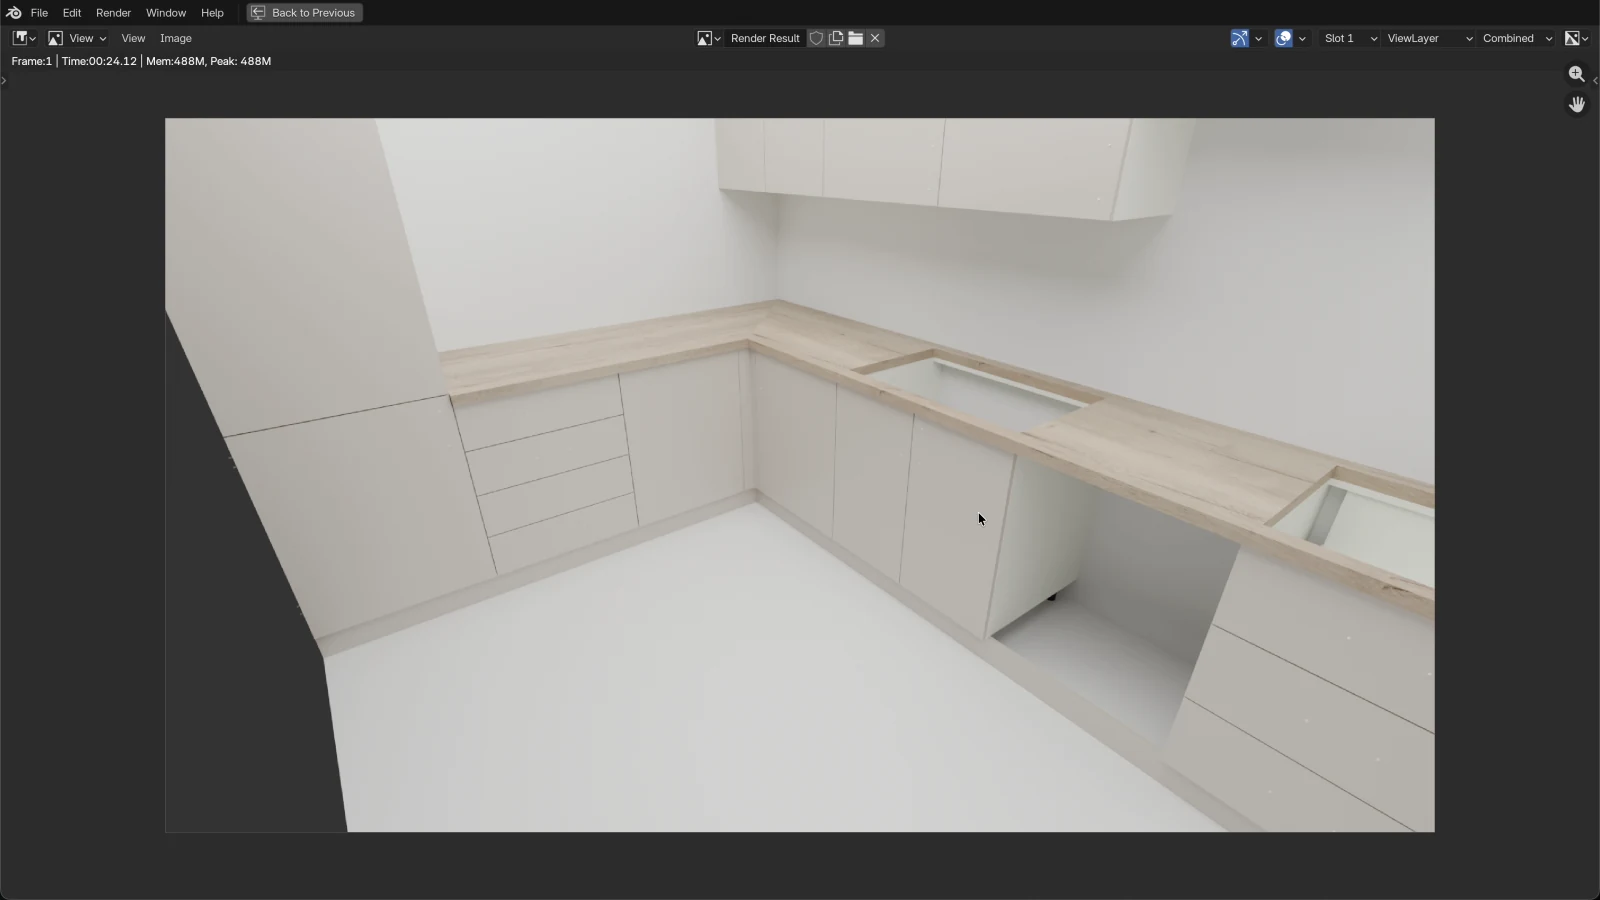
When it is done, the program reports Rendered 1 image(s) in 15 s. The image is already saved; you don't need to save it by hand.
-
Close the render window. The project is as it was before the render.
Note
By default the application opens the render in a new window. In the video the render opens over the whole program window, so you go back with the Back to Previous button at the top left. Where the render opens is set in Edit → Preferences... → Interface, field Render In.
What EFS sets up itself
For the render, EFS temporarily changes the project settings. After the render it puts everything back: the render engine, the resolution, the format, the active camera and the visibility of objects. The temporary camera and light are deleted.
| Setting | Value |
|---|---|
| Render engine | Cycles, a photorealistic render with light bouncing |
| Device | Graphics card: Metal on a Mac, NVIDIA (OptiX or CUDA), AMD (HIP) or Intel (oneAPI) on Windows and Linux. Without a graphics card, the processor, see Duration |
| Quality | 128 samples, adaptive sampling and denoising |
| Resolution | 1920 × 1080 pixels (Full HD, 16 : 9), 100 % |
| Format | JPG, quality 92 %, no transparent background |
| Camera | Every camera in the project. Without a camera: the automatic camera (see Camera) |
| Light | The lights in the project. A room without a light gets a temporary ceiling light (see Light) |
| Measures | Not visible |
| Installation marks | Water, drain, sockets and the other marks from Room properties are hidden. The room's windows and doors stay |
These values cannot be changed in EFS. Every click on Customer render (JPG) uses the same ones.
Camera
Automatic camera
When the project has no camera at all, EFS makes a temporary camera for the render:
| With a room | Without a room | |
|---|---|---|
| Where it stands | In the corner of the room opposite the furniture, 30 cm from both walls | Outside the furniture, in front, from the right and slightly from above |
| Height | 1.6 m above the floor (in a room lower than 1.9 m: 30 cm below the ceiling) | Depends on the distance |
| Where it looks | At the middle of the furniture, at 45 % of its height | At the middle of the furniture |
| Lens | 18 mm (wide-angle) | 32 mm |
| Distance | The corner of the room | 1.4 × the diagonal of the furniture, at least 1.5 m |
The furniture is every EFS object except the room, its openings and the installation marks.
The temporary camera disappears after the render and you cannot move it. If the framing doesn't suit you, set up your own camera.
Note
A room you made and then turned off with the Show room field still decides where the camera and the light go. The camera stands in the corner of the room, but there are no walls in the image.
Your own camera
A camera is a Blender object. You add it like this:
- Press Shift+A with the mouse over the 3D view and click Camera. The new camera is selected.
- Press Ctrl+Num 0 (View → Cameras → Set Active Object as Camera). The camera becomes active, and the view looks through it.
- Rotate the view with the middle mouse button. The view leaves the camera. Frame the shot you want in the image: rotate, pan (Shift and the middle button) and use the wheel.
- Press Ctrl+Alt+Num 0 (View → Align View → Align Active Camera to View). The camera jumps to the position of the view, and the view looks through the camera again.
- If the framing needs fixing, repeat steps 3 and 4.
In the view through the camera, a darker border shows what is outside the image. The frame has the image's aspect ratio, 16 : 9.
| Action | Key | Menu |
|---|---|---|
| View through the active camera and back | Num 0 | View → Cameras → Active Camera |
| The selected camera becomes active | Ctrl+Num 0 | View → Cameras → Set Active Object as Camera |
| Active camera to the current view | Ctrl+Alt+Num 0 | View → Align View → Align Active Camera to View |
Tip
A new camera has a 50 mm lens, which takes in little of a kitchen. For an interior, use 18 to 24 mm: select the camera, in the right-hand column click the camera tab (green camera) and in the Lens box change Focal Length. EFS's automatic camera in a room has 18 mm.
Tip
On a laptop without a numeric keypad, use the View menu. The camera button below the gizmo at the top right also switches the view through the camera and back.
Rules that apply to cameras:
- You move a camera and a light like a cabinet: keys 1, 2 and 3, type the distance and Enter (Moving: 1, 2 and 3).
- The camera must be inside the room. Outside it, the image shows only a wall.
- Rename a camera with F2 while it is selected. The camera's name goes into the image name when there are several cameras.
- Delete a camera like a cabinet: select it in the Scene elements list and press X.
Several cameras
With several cameras, EFS renders from each one, one after another. That way you get several shots for the customer with one click.
- Each image gets the camera's name:
Kuhinja Horvat - Kamera.jpg,Kuhinja Horvat - Kamera.001.jpgand so on. With one camera the name is justKuhinja Horvat.jpg. - The status bar at the bottom of the window says which image is being made, e.g. Customer render 2 of 3.
- Esc stops the render at once. The image being made is not saved, and the remaining cameras are skipped. Finished images stay saved. The program reports Render stopped after 1 of 3 image(s). The cross next to the progress bar does the same.
- All the cameras in the project are rendered, including the ones you hid with the cameras button above the Scene elements list. Delete a camera you don't want.
Previous Camera and Next Camera
In the EFS tab, Scene properties panel, are the Previous Camera and Next Camera buttons. Use them to check the framing of each camera before the render.
- Click Next Camera.
- The next camera by name becomes active, and the view switches to look through it. The program reports Switched to camera: and the camera's name.
- Click again for the next one. After the last comes the first. Previous Camera goes in the reverse order.
| Button | What it does | When it is greyed out |
|---|---|---|
| Previous Camera | The previous camera by name becomes active, the view looks through it | When the project has fewer than two cameras |
| Next Camera | The next camera by name becomes active, the view looks through it | When the project has fewer than two cameras |
The active camera does not choose what is rendered. Customer render always takes all the cameras.
Light
Temporary ceiling light
A closed room without a light would be black in the render. That is why EFS adds a temporary light for the render when both conditions are met:
- the project has a room;
- there is no light at all in the project.
The light is a surface 80 % of the floor's length and width (about two thirds of its area), 5 cm below the ceiling, facing down. Its power is 25 W per m² of its surface, about 125 W for a 3.2 × 2.4 m room. It is deleted after the render.
LED strips from the Add menu don't count as lights for this rule: a room with LED strips and no other lights still gets the ceiling light.
Watch out
As soon as there is any light in the project, EFS no longer adds the ceiling light. Your lights must then light the whole room, otherwise the image is dark.
Without a room, EFS adds no light. The furniture is then lit only by the background, so the image is dark. Turn the room on or add your own light.
Your own light
A light, like a camera, is a Blender object:
- Press Shift+A with the mouse over the 3D view.
- Click Light and then the type of light, e.g. Area. It is a surface that shines downwards, like a ceiling lamp.
- The light appears at the scene origin, on the floor in the back left corner of the room. Raise it: 3, type the distance, e.g.
2500, and press Enter. Move it along the X and Y axes with 1 and 2. - Change the power in the right-hand column, on the light tab (green bulb), field Power in watts.
| Type | How it shines |
|---|---|
| Point | A point that shines in all directions, like a bulb |
| Sun | Parallel rays from one direction, like the sun through a window |
| Spot | A cone of light, like a recessed downlight |
| Area | A glowing surface, soft shadows. Best for a kitchen |
Tip
The Shift+A menu has two Light items. The upper one is Blender's and adds a light for the render. The one in the Easy Form Studio submenu adds an LED strip (see the next section).
LED strip (Add → Light)
The Light item in the Add menu (in the EFS tool header) adds an LED strip under the selected board, most often under the wall units.
- Turn the view to the front, so that the angle in the header shows 000° (The EFS tool header).
- Click the Bottom of the wall unit.
- Click Add → Light.
- For the next cabinet, repeat steps 2 and 3. Each cabinet gets its own strip.
What the program does itself:
- The strip goes 4 mm below the lowest point of the selected board. It is as long as the board, less 4 mm.
- EFS sets the direction and length of the strip from the viewing direction, not from the cabinet's rotation. When you look from the front or the back, the strip runs along the board's width. When you look from the side (090° or 270°), the strip is turned and as long as the board's depth.
- In the Scene elements list the strip is called Led Strip, the next one Led Strip.001.
- The quote counts the length of all strips in metres, as the item LED strip (A quote for the customer).
- In the web preview the customer turns the strips on with the bulb button (Web preview and QR).
The item is greyed out when not exactly one EFS object is selected.
Watch out
Under a cabinet rotated by 90° or 270° (e.g. along a side wall) the strip can come out too short or crosswise. After adding it, look at the strip from below. If it is wrong, delete it (X).
Background
What is behind the furniture depends on the room:
- With a room the camera is inside, so behind the furniture are the room's walls, floor and ceiling, with the windows and doors.
- Without a room behind the furniture is the project's plain background. In a new project it is dark grey.
The background in the render is never transparent: a JPG is always solid.
You change the background colour in the right-hand column: click the World tab (red globe), then in the Surface box change Color. A lighter background also lights the furniture a little.
Resolution, duration and saving
Resolution
The image is always 1920 × 1080 pixels, landscape, in a 16 : 9 ratio. That is enough for a screen, an e-mail and a message, and also for an image across the full width of an A4 page. Another resolution or a portrait image cannot be set in EFS.
For advanced users: Blender's render
Blender's Render → Render Image (F12) works with the project settings from the right-hand column (the Render Properties and Output tabs), so you can set another resolution there. That render does none of what EFS sets up itself: it renders only the active camera, adds no camera or light, doesn't hide the installation marks and doesn't save the image. A new project has the EEVEE render engine, not Cycles. Save the image in the render window, Image → Save As....
Duration
The render of the kitchen from the video took 15 seconds on a Mac. Each camera is one image, so three cameras take about three times as long. While the render runs, the program works and you can look at the project.
For the render, EFS turns on the graphics card itself: Metal on a Mac, and NVIDIA (OptiX or CUDA), AMD (HIP) or Intel (oneAPI) on Windows and Linux. When the computer has no graphics card that Blender supports, the render runs on the processor and takes longer.
Where the image is
- The image is where you saved it in the save window. By default that is the project folder, with the name of the project file.
- With several cameras, the camera's name follows the name:
Kuhinja Horvat - Kamera.jpg. - If an image with the same name already exists, the name field in the save window is red. When you confirm, the old image is overwritten.
- You can save the same render once more, e.g. as a PNG: in the render window click Image → Save As....
Preview in Rendered mode
Before the render you can see roughly in the view how the image will look:
- In the right part of the 3D view header, click the fourth round button, Rendered. You do the same with Z and choosing Rendered.
- Press Num 0 for the view through the camera.
What you need to know about this display:
- The view uses a faster, approximate method (Blender's EEVEE). Customer render works with Cycles, so the image is truer: softer shadows and light bounced off the walls.
- Your lights and cameras are visible. The temporary ceiling light and the automatic camera are not in the view, because they exist only while the render runs. A closed room without your own lights therefore looks dark in the view, but not in the render.
- On a large project the view is slow. Go back to Solid for drawing, and check decors in Material Preview (Material preview in the viewport).
Hidden fronts
Fronts hidden with Shift+F are not visible in the render, in the AR model or in the web preview. This is intentional: hidden fronts go into no export at all.
- Before the render, click Show fronts in the EFS tool header.
- If you want to show the customer the inside, open the doors and drawers: select the cabinet and press O. Open doors and drawers stay open in the render too.
AR model (USDZ)
AR model (USDZ) is a 3D file for the iPhone and iPad. The customer opens it on the phone and, through the camera, places the furniture in their own space at full size. For this the iPhone uses its built-in AR Quick Look viewer; the customer needs no app.
Export
- In the EFS tab, open the Export panel.
- Click AR model (USDZ).
- In the save window, check the folder and the name. The default is the project folder and the name of the project file, e.g.
Kuhinja Horvat.usdz. - Click AR model (USDZ) at the bottom right. The program reports Export completed.
- Send the file to the customer by e-mail, message or AirDrop.
What goes into the model:
- every object that is visible in the render: cabinets, worktops, kickboard, fillers, LED strips, with decors;
- the room, if it is turned on;
- doors and drawers in the state they are in in the project, without animation.
Hidden fronts don't go into the model.
Tip
Before the export, turn the room off (Room properties → Show room). The customer then places only the furniture in their space, not the walls as well.
How the customer opens it
- On the iPhone or iPad, the customer taps the file in the e-mail, the message or the Files app.
- A 3D view of the furniture opens. They rotate it with a finger.
- At the top they switch to AR and point the camera at the floor.
- The furniture appears in the room. They move it with one finger and rotate it with two.
On Android and Windows, a USDZ does not open in AR. Send those customers the web preview (Web preview and QR).
Common problems and solutions
The image is dark. The project has no room and no light, or it has a light that is too weak, so EFS doesn't add its ceiling light. Turn the room on, delete the weak light or raise its Power.
The image shows only a wall. Your camera stands outside the room or behind a wall. Move it into the room (Your own camera).
The image is from a strange angle, and I didn't set up a camera. A camera was left in the project, e.g. from a project opened in Blender's General template. EFS then makes no automatic camera and renders from that one. Find the camera in the Scene elements list and delete it or adjust it.
There are no fronts in the image. The fronts are hidden with Shift+F. Click Show fronts in the header and render again.
The boards are white or pink. The boards have no decor, or the program can't find the decor images. See Common problems in the Decors chapter.
The program reports No cabinets in the scene. The project has no EFS object and no camera. Add a cabinet or a camera.
Clicking Customer render reports that export is disabled. The trial or the subscription has ended (Install, licence and account).
Previous Camera and Next Camera are greyed out. The project has fewer than two cameras.
The render opened over the whole window. The preferences have the render set to the whole window. Click Back to Previous at the top left.
The render takes a long time. The computer has no graphics card that Blender supports, so the render runs on the processor. See Duration.
The customer can't open the AR model. USDZ works on the iPhone and iPad. Send a customer with Android the link to the web preview.
Shortcuts in this chapter
| Key | Action |
|---|---|
| Z | Display mode, with Rendered to check the light |
| Shift+A | Blender's Add menu: Camera, Light |
| Num 0 | View through the active camera and back |
| Ctrl+Num 0 | The selected camera becomes active |
| Ctrl+Alt+Num 0 | Active camera to the current view |
| 1 2 3 | Move the camera or light along the X, Y or Z axis |
| F2 | Rename the selected camera |
| X | Delete the selected camera or light |
| Esc | Stop the render (the image being made is not saved) |
| Shift+F | Hide the fronts (bring them back before the render) |
| O | Open or close the doors and drawers of the selected cabinet |
Next
Next chapter: Web preview and QR