Project hardware
You choose the hardware once for the whole project: carcass joints, hinges, drawer slides, flap lifts, hangers, shelf supports and handles. New cabinets and templates get it automatically, and you change existing cabinets with the Apply to all or Apply to selected button. This chapter describes every field of the Project hardware panel, the holes EFS drills from the catalogue, the hardware list and the Project check messages.

Show me in the program
The interactive tour Project hardware (2 min) shows you in the program where to click and what to type, step by step. In the EFS tab, open the Interactive tours panel and click Start next to the tour. The AI assistant also offers it when you ask how to do this.
Before you start
- Open a project with cabinets. In the video it is the finished kitchen from the previous chapters (Base units and the corner to Kickboard, fillers, end panels and cornice).
- If the sidebar is not open, hold the mouse pointer over the 3D view and press N. The Project hardware panel is in the EFS tab.
- You can choose the hardware before you lay out the cabinets or afterwards. Cabinets you add after choosing get it automatically. Cabinets that already exist get it only when you click Apply to all or Apply to selected.
Workflow from the video
- In the EFS tab, click the title of the Project hardware panel. At the top it says New cabinets and templates get these settings.
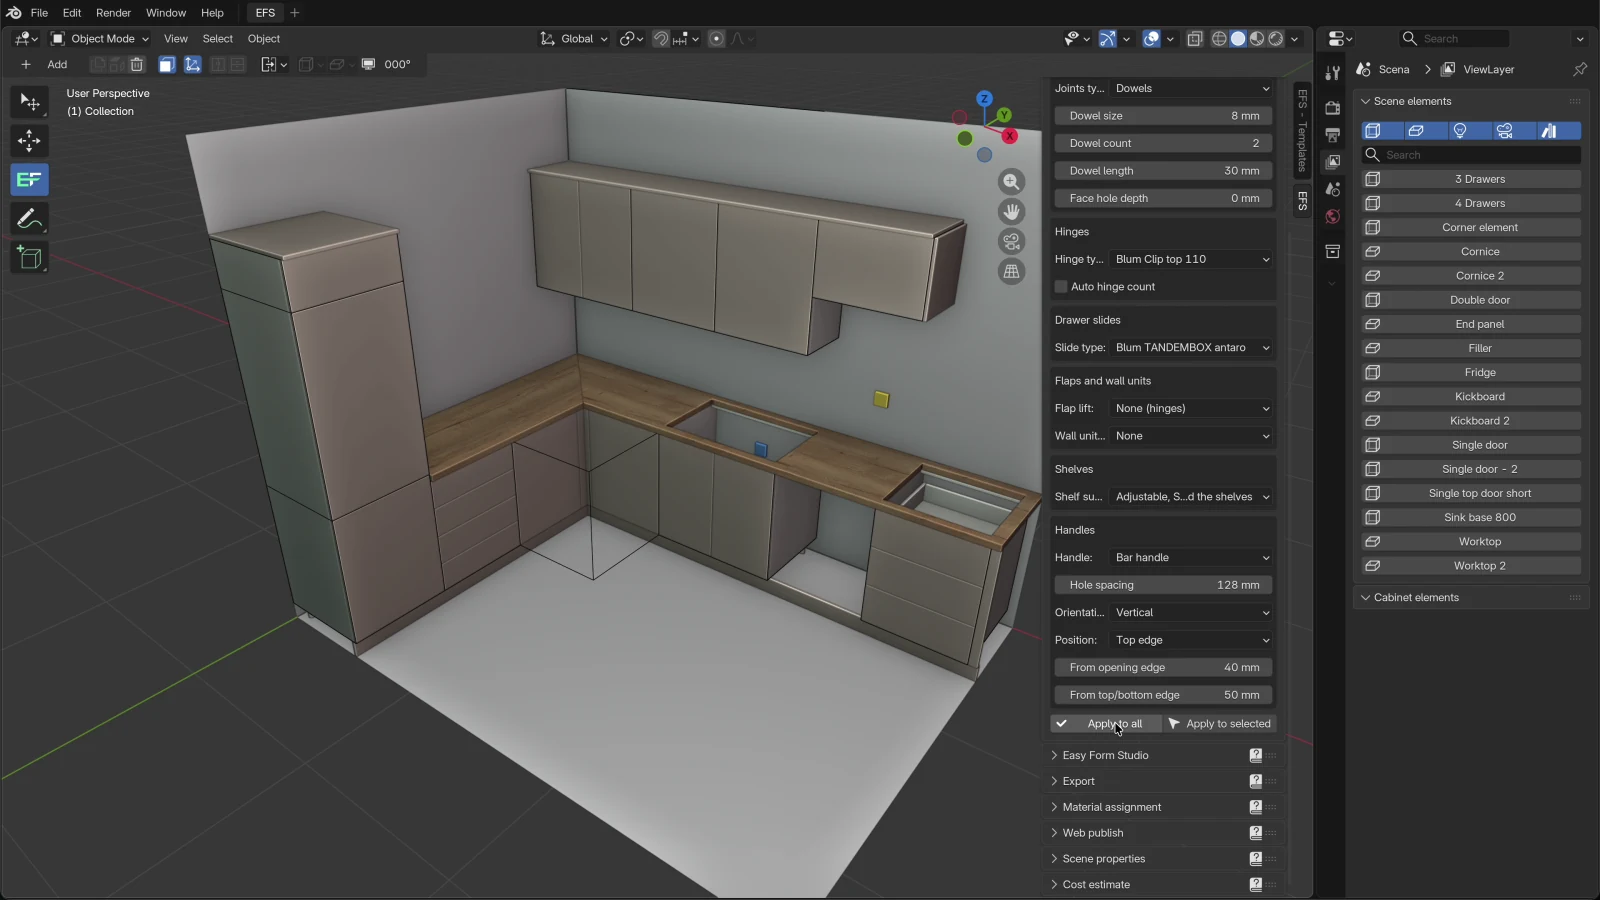
- In the Joints box, choose Joints type: Dowels. Below it Dowel size 8 mm, Dowel count 2, Dowel length 30 mm and Face hole depth 0 mm appear.
- In the Hinges box, choose Hinge type: Blum Clip top 110.
- In the Drawer slides box, choose Slide type: Blum TANDEMBOX antaro.
- In the Shelves box, choose Shelf supports: Adjustable, System 32 around the shelves.
- In the Handles box, choose Handle: Bar handle. Leave Hole spacing at 128 mm, Orientation at Vertical and Position at Top edge.
- Scroll the panel to the bottom with the mouse wheel and click Apply to all. The program reports Project hardware applied to 11 cabinets.
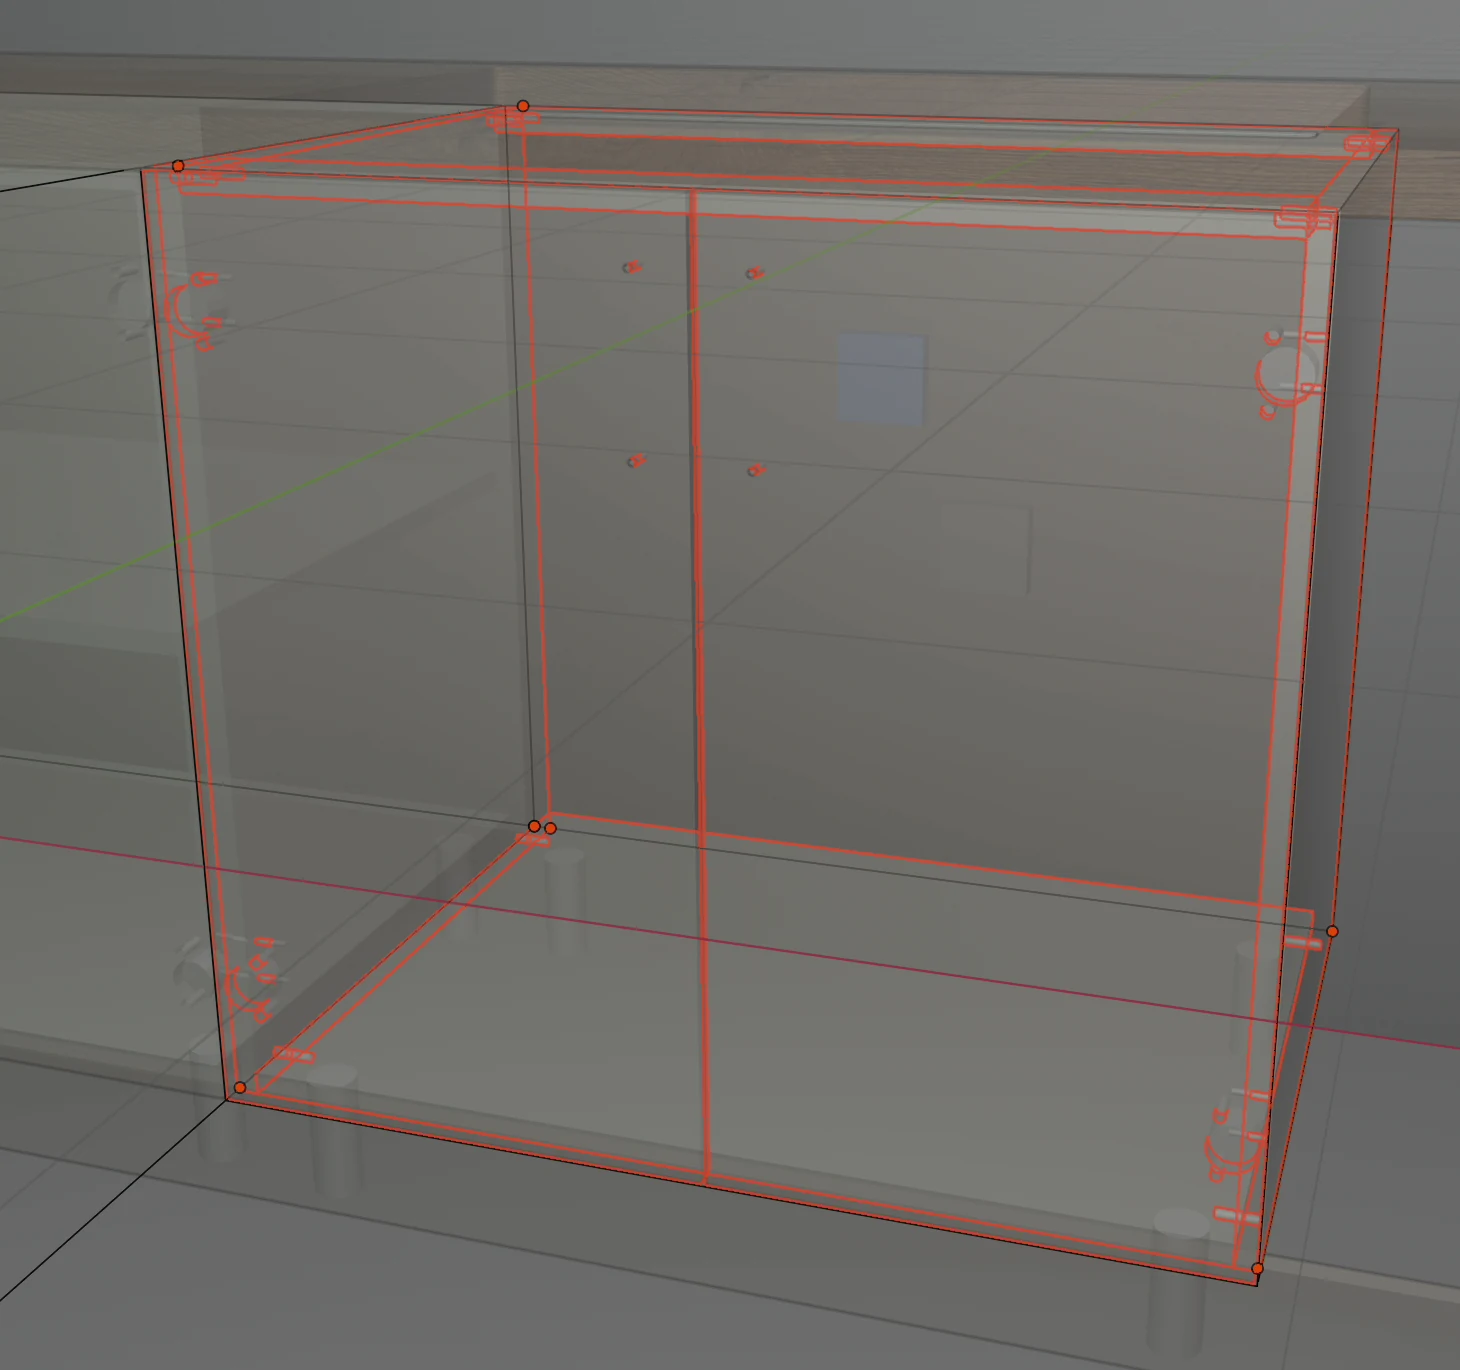
- Click a board of the sink unit and press Alt+Z. In the X-ray view you see the hinge cups on the doors, the mounting plates on the side panels and the handle holes. Alt+Z again returns the normal view.
- In the EFS tab, open the Export panel and click Project check. In the video the check finds one issue: Door 'Front left' hits '4 Drawers' when opened. Click the arrow button at the right end of the row: the door is selected and the view zooms in on it.
The Project hardware panel
The panel has six boxes: Joints, Hinges, Drawer slides, Flaps and wall units, Shelves and Handles. Below them are the Apply to all and Apply to selected buttons.
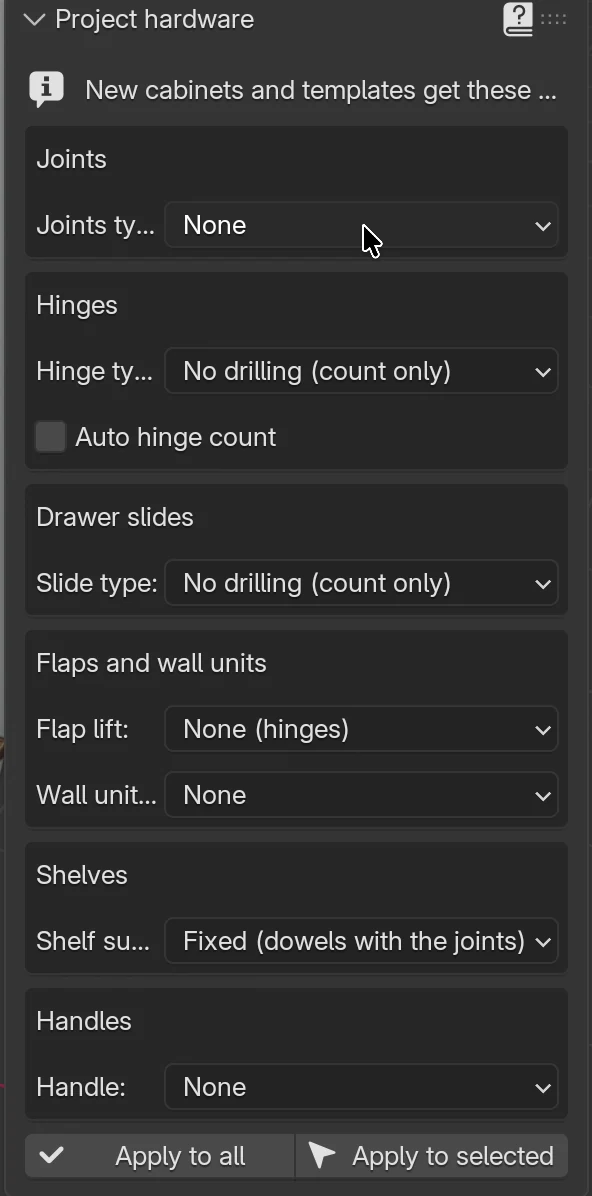
Panel rules:
- Changing a field does not change any existing cabinet. The fields apply to cabinets and templates you add later. You change existing cabinets with the Apply to all and Apply to selected buttons.
- With the default values EFS drills nothing; it only counts hinges and drawers.
- Project hardware is saved with the project (
.blend). To start every new project with your hardware, save it in My settings (see Working faster). - Some fields are shown only with a particular choice above them. The condition is in the Shown when column.
- In Edit Mode the panel is not there. Press Tab to leave it.
Options
| Box | Option | Shown when | What it does | Default | Values |
|---|---|---|---|---|---|
| Joints | Joints type | always | How the carcass boards are joined: which holes are drilled and what goes into the hardware list. See Carcass joints. | None | None, Dowels, Confirmat, Minifix, Minifix and dowels |
| Connectors per joint | Confirmat, Minifix, Minifix and dowels | Number of confirmats or minifixes in one joint. | 2 | 1–10 | |
| Dowel size | Dowels, Minifix and dowels | Diameter of the dowel and of its holes. | 8 mm | 4–20 mm | |
| Dowel count | Dowels, Minifix and dowels | Number of dowels per joint. Not used with Minifix and dowels: each minifix gets one dowel. | 2 | 1–10 | |
| Dowel length | Dowels, Minifix and dowels | Length of the dowel. The hole in the edge takes the rest of the dowel plus 2 mm for glue. | 30 mm | 16–100 mm | |
| Face hole depth | Dowels, Minifix and dowels | Depth of the dowel hole in the face of the board. 0 means automatic: board thickness minus 6 mm, at most half the dowel. | 0 mm | 0–60 mm | |
| Hinges | Hinge type | always | Hinge from the catalogue. A catalogue hinge drills the cup, the cup screws and the mounting plate. See Hinges. | No drilling (count only) | No drilling (count only), Generic clip-on 35 mm, Blum Clip top 110, Hettich Sensys 110 and your own catalogue hinges |
| Auto hinge count | always | Number of hinges by the length of the hinged edge. See Hinge count. | off | on, off | |
| Drawer slides | Slide type | always | Slide or box system from the catalogue. Chooses the length by the depth and drills the side panels. See Drawer slides. | No drilling (count only) | No drilling (count only), Ball-bearing side mount, Blum TANDEMBOX antaro, Blum LEGRABOX pure, Blum MERIVOBOX and your own catalogue slides |
| Flaps and wall units | Flap lift | always | Lift mechanism for a Top opening flap. See Flaps and wall units. | None (hinges) | None (hinges), Stay lift (like AVENTOS HK top), Small stay lift (like AVENTOS HK-S), Stay lift with hinges (like AVENTOS HK-XS), Up and over lift (like AVENTOS HS top), Lift up (like AVENTOS HL top) |
| Wall unit hangers | always | Hangers for the wall unit and a hanging rail as long as the cabinet. | None | None, Hangers on a wall rail, Hangers screwed to the wall | |
| Shelves | Shelf supports | always | Fixed shelves on joints or adjustable shelves on pins. See Shelf supports. | Fixed (dowels with the joints) | Fixed (dowels with the joints); Adjustable, System 32 full rows; Adjustable, System 32 around the shelves |
| Handles | Handle | always | Drilling for handles, or push to open. See Handles and push to open. | None | None, Bar handle, Knob, Push to open |
| Hole spacing | Bar handle, Knob | Distance between the two holes of a bar handle. A knob does not use it. | 128 mm | 16–1200 mm | |
| Orientation | Bar handle, Knob | Bar handle on doors vertical or horizontal. On flaps and drawers it is always horizontal. A knob does not use it. | Vertical | Vertical, Horizontal | |
| Position | Bar handle, Knob | Height of the handle on base unit doors. A wall unit gets the opposite edge. | Top edge | Top edge, Bottom edge, Mid height | |
| From opening edge | Bar handle, Knob | From the door edge on the opening side to the centre of the handle (or to the nearer hole of a horizontal bar). | 40 mm | 10–500 mm | |
| From top/bottom edge | Bar handle, Knob | From the top or bottom edge of the door to the centre of the handle (or to the nearer hole of a vertical bar). | 50 mm | 10–1000 mm |
Note
The number of hinges per door (the Hinges field) is not in Project hardware. A new cabinet has 2 hinges per door. To give tall doors 3 to 5 hinges, switch on Auto hinge count.
Tip
Switch on Auto hinge count in Project hardware before you lay out the tall units. That way you don't have to remember which cabinet needs more hinges.
Apply to all and Apply to selected
The buttons are at the bottom of the panel. If the panel does not fit on the screen, scroll it to the bottom with the mouse wheel.
- Set the fields of the Project hardware panel.
- For the whole project, click Apply to all.
- For some of the cabinets: select them (click a board, Shift + click for the next cabinet) and click Apply to selected.
The program reports Project hardware applied to N cabinets.
| Button | Which cabinets it changes |
|---|---|
| Apply to all | All cabinets and corner cabinets in the project. |
| Apply to selected | The cabinets that any selected board belongs to. Selecting one board of a cabinet is enough. |
What EFS does:
- It writes all the panel's fields into the cabinet: joint and dowels, hinge type, Auto hinge count, slide, flap lift, hangers, shelf supports and all the handle fields. The Hinges field (number of hinges per door) stays as it was in the cabinet.
- A corner cabinet gets only Hinge type and the handle fields. It has no joints, slides or shelf supports.
- A wall unit gets the opposite handle Position: the project's Top edge becomes Bottom edge on the wall unit, and the other way round. Mid height stays. That way the handles on both base and wall units are next to the worktop.
- It drills the hinges, slides, handles, dowels and connectors again straight away.
- When the slide or the shelf supports change, it rebuilds the cabinet, as if you had changed the field in the EFS - Cabinet tab. Adjustable shelves snap to the 32 mm grid. Box drawers get a bottom and back by the formula. Drawers that move from a box system to another slide, or to No drilling (count only), get wooden sides and the correct sizes in the cutting list.
- The number in the message counts only the cabinets that changed. A cabinet that already has the same hardware is not counted, so a second click reports 0.
- There is no confirmation window. If you change your mind, press Ctrl+Z.
Watch out
Apply to all overwrites hardware you set on a cabinet yourself, for example a knob instead of a bar or a different slide. If one cabinet needs different hardware, first click Apply to all, then set that cabinet in the Hardware and joints box. Or select only the cabinets you are changing and click Apply to selected.
Watch out
A cabinet that becomes a wall unit with U does not change its handle position by itself. If it got Top edge while it was a base unit, its handles are on the top edge of the door, high above the worktop. Select it and click Apply to selected: the handle moves to the bottom edge.
What new cabinets and templates get
| How the cabinet is created | What it gets from Project hardware |
|---|---|
| Add → Cabinet, C | All hardware and joints. |
| A new cabinet next to a selected wall unit | All hardware and joints, with the handle on the opposite edge (it becomes a wall unit). |
| Add → Corner cabinet, Shift+C | Hinge type and the handle fields. |
| Built-in templates from the EFS - Templates tab | All hardware and joints, also for the carcasses linked to the main one. Wall units get the handle on the opposite edge. |
| My templates and importing a cabinet from JSON | Nothing: they keep the hardware they were saved with. See Templates and My templates. |
| Duplicate the cabinet (Shift+D) | Nothing: the copy has the original's hardware. |
Project hardware and the Hardware and joints box
Project hardware holds the starting values. What EFS actually drills is set in each cabinet, in the EFS - Cabinet tab. A change on a cabinet applies only to that cabinet and drills its holes again straight away. The chapter How a cabinet is built describes the cabinet's fields.
| Box in Project hardware | The same field on the cabinet | When the field on the cabinet is shown |
|---|---|---|
| Joints | Hardware and joints → Joints type and the fields below it | always |
| Hinges | Hardware and joints → Hinge type, Auto hinge count, and with auto off also Hinges | the cabinet has a door or a flap |
| Drawer slides | Hardware and joints → Slide type | the cabinet has drawers |
| Flaps and wall units | Hardware and joints → Flap lift | the cabinet has a Top opening flap |
| Hardware and joints → Wall unit hangers | Is upper is ticked | |
| Shelves | Shelves → Shelf supports | the cabinet has a horizontal shelf |
| Handles | the Handles box | always; the fields depend on the fronts (see Handles) |
A corner cabinet has Hinge type and Hinges in the Front side box, and the handles in the Handles box (see Corner cabinet).
Tip
When one cabinet serves as the model, pass its hardware to the others with Copy to selected cabinets, groups Hinges, slides and joints and Handles. This route also passes on the number of hinges per door. See Working faster.
Hinges
A catalogue hinge drills the cup and the cup screws in the door, and the holes for the mounting plate in the side panel. No drilling (count only) drills nothing; it only counts the hinges for the hardware list and the price.
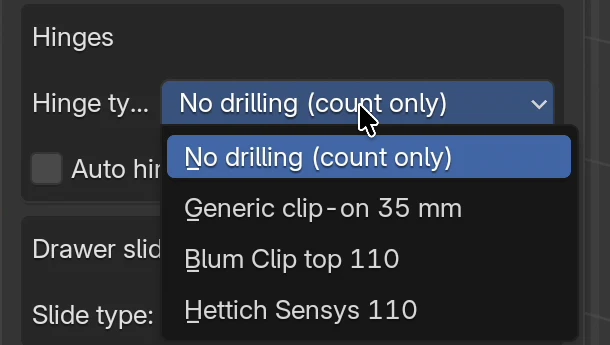
Hinge catalogue
| Hinge | Cup | Cup screws | Mounting plate | In the hardware list per hinge |
|---|---|---|---|---|
| No drilling (count only) | – | – | – | Hinge |
| Generic clip-on 35 mm | Ø35 × 13 mm, centre 21.5 mm from the door edge | not drilled | 2 holes Ø5 × 13 mm | Hinge, 2 × Euro screw 6.3×13, 2 × Chipboard screw 3.5×15 |
| Blum Clip top 110 | Ø35 × 13 mm, centre 21.5 mm from the door edge | 2 holes Ø8 × 11.5 mm | 2 holes Ø5 × 13 mm | Hinge, 2 × Euro screw 6.3×13 |
| Hettich Sensys 110 | Ø35 × 13 mm, centre 22 mm from the door edge | 2 holes Ø8 × 11.5 mm | 2 holes Ø5 × 13 mm | Hinge, 2 × Euro screw 6.3×13 |
Blum and Hettich have a cup with press-in dowels, so there are no screws for the cup in the hardware list.
Where EFS drills
- Cup: in the inner face of the door, along the hinged edge. The centre is 21.5 mm from the edge (Hettich 22 mm).
- Cup screws: two holes, 22.5 mm above and below the cup centre (45 mm apart), 9.5 mm further from the door edge than the cup.
- Plate: two holes in the inner face of the side panel on the hinge side, 37 mm from the front edge of the side panel, 16 mm above and below the hinge height (32 mm apart).
- Height: the first and last hinge are 96 mm from the bottom and top edge of the door. The others are evenly spaced between them. A single hinge is in the middle of the door. Doors lower than 222 mm get their hinges evenly spaced over the full height.
Rules:
- EFS drills hinges on doors (Left opening, Right opening, Two doors) and on the corner cabinet's door. Flaps (Top opening, Bottom opening) get hinges only in the hardware list, without holes. Fit flap hinges using the manufacturer's template.
- If the side panel on the hinge side is set to None, there are no holes for the plate.
- If a plate would land on a horizontal shelf, EFS moves the whole hinge 32 mm up or down, then 64, then 96 mm, until it finds a free spot at least 20 mm from the door edge. The cabinet's Hardware and joints box then shows how many hinges were moved (… hinges moved to avoid shelves).
- Corner cabinet: the hinges are at the end of the door next to the outer side panel (Left side 1 or Right side 1), and the plates on its inner face, 37 mm from the front edge. The handle is at the other end of the door, next to the corner joint.
- In the cutting list, doors have the number and side in the Hinges column, for example 2 hinges on longer side. The door page in the PDF also shows the hinge, for example 2 hinges on longer side — Blum Clip top 110, cup distance 21.5 mm. The number after cup distance is the distance from the door edge to the cup centre. The edge of the cup is then 4 mm from the door edge (Hettich 4.5 mm).
Hinge count
The number of hinges is set by the Hinges field in the cabinet (default 2, from 0 to 6), per door or flap. When you switch on Auto hinge count, the Hinges field disappears and the number depends on the length of the hinged edge:
| Hinged edge | Number of hinges |
|---|---|
| up to 900 mm | 2 |
| from 901 to 1600 mm | 3 |
| from 1601 to 2000 mm | 4 |
| more than 2000 mm | 5 |
- On a door the hinged edge is the door height; on a flap it is the flap width.
- A Top opening flap with a lift that needs no hinges has 0 hinges. Hinges stay only with Stay lift with hinges (like AVENTOS HK-XS) and with None (hinges).
- A corner cabinet takes the number from its own Hinges field (Front side box). Auto hinge count does not affect it.
Drawer slides
A catalogue slide chooses the nominal length by the drawer depth and drills the screw holes in both side panels. A box system also changes the drawer box: the metal sides leave the cutting list, and the bottom and back get sizes by the manufacturer's formula.
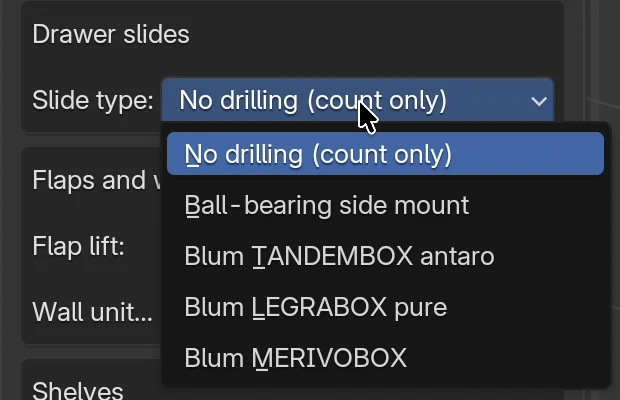
Slide catalogue
| Slide | Mounting | Nominal lengths | Drawer box |
|---|---|---|---|
| No drilling (count only) | – | – | wooden, as built |
| Ball-bearing side mount | at mid-height of the drawer box side | 250–600 mm, every 50 mm | wooden |
| Blum TANDEMBOX antaro | under the box, holes 12 mm above the bottom edge of the side | 270, 300–650 mm, every 50 mm | box system |
| Blum LEGRABOX pure | under the box, holes 10 mm above the bottom edge of the side | 270, 300–650 mm | box system |
| Blum MERIVOBOX | under the box, holes 11 mm above the bottom edge of the side | 270, 300–650 mm | box system |
Slide length
- Ball-bearing slide: the longest nominal length that fits the depth of the drawer box side. A drawer with 549 mm sides gets a 500 mm slide.
- Box system: the longest nominal length (NL) that fits the inside depth of the cabinet, from the front edge of the side panel to the front face of the back, less 3 mm (LEGRABOX: 10 mm). A back in a groove or rebate reduces the inside depth.
- If not even the shortest length fits, EFS drills no holes, and a box drawer stays wooden.
Example: cabinet 600 × 580 × 720 mm, 18 mm boards, drawers with 18 mm thick fronts, Blum TANDEMBOX antaro:
| Back | Inside depth | Nominal length |
|---|---|---|
| Lay-on, 3 mm | 559 mm | 550 mm |
| Grooved, Engagement 14 mm, 3 mm | 562 − 17 = 545 mm | 500 mm |
Slide holes
- Holes Ø4 × 12 mm in the inner face of the left and right side panels, for each drawer.
- The first hole is 37 mm from the front edge of the side panel, the next ones every 128 mm, as long as the hole is at least 15 mm before the end of the slide. A 500 or 550 mm slide has holes at 37, 165, 293 and 421 mm: four per side.
- The hardware list gets a Chipboard screw 4×16, one per hole. A drawer with a 500 mm slide needs 8 screws.
Box systems: TANDEMBOX, LEGRABOX, MERIVOBOX
With a box system the metal drawer sides are a bought-in part. EFS removes them from the cutting list and the cost estimate; they stay visible in the 3D view. The drawer bottom and back are 16 mm boards, sized by the manufacturer's formula. LW is the inside width between the side panels, NL the nominal length of the slide.
| System | Bottom width | Bottom depth | Back width |
|---|---|---|---|
| Blum TANDEMBOX antaro | LW − 75 mm | NL − 24 mm | LW − 87 mm |
| Blum LEGRABOX pure | LW − 35 mm | NL − 10 mm | LW − 38 mm |
| Blum MERIVOBOX | LW − 51 mm | NL − 26 mm | LW − 51 mm |
The back height is set by the height variant of the box system. EFS chooses the highest variant whose side fits behind the drawer front: the side must be at least 4 mm lower than the front. If not even the lowest fits, it takes the lowest.
| System | Variant: side height / back height |
|---|---|
| Blum TANDEMBOX antaro | N 68.5 / 69 mm, M 83 / 84 mm, K 115 / 116 mm, C 187 / 167 mm, D 224 / 199 mm |
| Blum LEGRABOX pure | N 66.5 / 39 mm, M 90.5 / 63 mm, K 128.5 / 101 mm, C 177 / 148 mm, F 241 / 212 mm |
| Blum MERIVOBOX | N 68.5 / 60.5 mm, M 91 / 83 mm, K 129 / 121 mm, E 192 / 184 mm |
Example: cabinet 600 × 580 × 720 mm with 18 mm side panels, a 3 mm lay-on back and three outer drawers, Blum TANDEMBOX antaro:
- LW is 564 mm, NL 550 mm.
- Bottom (width × depth × thickness): 489 × 526 × 16 mm.
- The drawer front is 236 mm high, so variant D fits (side 224 mm). Back (width × height × thickness): 477 × 199 × 16 mm.
- In the hardware list: Drawer slide set Blum TANDEMBOX antaro D 550, 3 pieces.
Rules:
- The Inner thickness, Inner height ratio, Inner side gap and Back gap fields (Drawers box) do not change the bottom and back of a box drawer. The formula gives the sizes.
- The drawer front stays as it is. See Drawers.
- When you give a cabinet a slide that is not a box system again, in the Hardware and joints box or with Apply to all or Apply to selected, the wooden box with sides comes back.
Flaps and wall units
This box has two fields. Both are only counted: EFS drills nothing for them.
- Flap lift applies to a Top opening flap. EFS calculates the power factor (front height in mm times front weight in kg) and chooses the strength of the lift. In the cabinet's Hardware and joints box, the power factor, front weight and chosen strength are shown below the field. The row is red when no strength fits or the flap height is outside the lift's range. The lift goes into the hardware list, with its strength and power factor. The details are in the chapter Wall units, tall units and flaps.
- Wall unit hangers apply only to cabinets with Is upper ticked. Each one gets 2 hangers (Wall cabinet hanger, adjustable). With Hangers on a wall rail a Hanging rail as long as the cabinet is added too.
Shelf supports
Shelf supports sets how the horizontal shelves are held.
| Choice | What EFS does |
|---|---|
| Fixed (dowels with the joints) | The shelves are joined to the side panels like the top and bottom, with the joint type from the Joints box. |
| Adjustable, System 32 full rows | The shelves have no joints. Both side panels get two rows of Ø5 × 12 mm holes at 32 mm spacing, 37 mm from the front edge and 37 mm in front of the back, from 40 mm above the bottom to 40 mm below the top. |
| Adjustable, System 32 around the shelves | The same, but only 3 holes above and below each shelf. |
With adjustable shelves the lowest shelf stays where it is and the others snap to the 32 mm grid, also when you switch them on with Apply to all or Apply to selected. Each shelf gets 4 × Shelf support pin in the hardware list. A hole that would land on a hinge plate hole or a slide hole is skipped. The details are in the chapter Adjustable shelves, System 32.
Handles and push to open
A bar handle and a knob drill Ø5 mm through holes in the front. Push to open drills nothing; it counts Push latch items. The handle fields for a single cabinet are described in How a cabinet is built.
Where EFS drills handles
| Front | Bar handle | Knob |
|---|---|---|
| Door, Vertical, Top edge | Upper hole From top/bottom edge below the top edge, lower hole Hole spacing lower. Both are From opening edge from the edge on the opening side. | From opening edge from the opening edge, From top/bottom edge below the top edge. |
| Door, Vertical, Bottom edge | Lower hole From top/bottom edge above the bottom edge, upper hole Hole spacing higher. | The same, from the bottom edge. |
| Door, Mid height | Vertical bar at mid-height. | At mid-height. |
| Door, Horizontal | First hole From opening edge from the opening edge, second Hole spacing further towards the hinges. Position sets the height. | – |
| Flap | Horizontal, in the middle of the width, From top/bottom edge from the edge that opens: for Top opening from the bottom edge, for Bottom opening from the top edge. | The same place, one hole. |
| Drawer front | Horizontal, in the middle of the front's width and height. | In the middle of the front. |
With the same fields the holes are in the same places on all doors. On a wall unit the handle goes to the opposite edge (see Apply to all and Apply to selected).
Rules:
- A hole that does not fit on the front (closer than 4.5 mm to the edge) is skipped.
- Handle holes are visible on the fronts even without the X-ray view.
- Every door, flap and drawer front gets one handle.
Handles in the hardware list
| Item | Detail | Quantity |
|---|---|---|
| Handle | Bar 128 (hole spacing) or Knob | 1 per door, flap and drawer front |
| Handle screw | M4 and the length, for example M4×25 | 2 per bar, 1 per knob |
EFS chooses the screw length from the series 20, 22, 25, 30, 35, 40 and 45 mm: the shortest screw that is at least 6 mm longer than the front thickness. For an 18 mm front that is M4×25, for a 16 mm front M4×22.
Push to open
- The fronts have no handle holes.
- Every door, flap and drawer front gets one Push latch in the hardware list and in the cost estimate.
- A corner cabinet gets push latches in the hardware list, but not in the cost estimate.
Carcass joints
The Joints box chooses how the side panels are joined to the top and bottom, the rails, fixed shelves and dividers. Dowels drill a hole in the face of one board and in the edge of the other. Confirmat drills a Ø7 through hole and a Ø5 hole in the edge. Minifix drills a Ø15 housing from the inside, so it is not visible from outside. Minifix and dowels adds a dowel next to each minifix.
A corner cabinet has no carcass joints. The holes, their layout per joint and depths are described in the chapter Joints: dowels, confirmat, minifix.
Holes in the X-ray view
- Click a board of a cabinet.
- Press Alt+Z. The boards become transparent and you see the cylinders of all the holes: hinge cups and screws on the doors, plates on the side panels, holes for slides, handles, shelf supports and dowels.
- The selected boards and their holes are outlined in orange.
- Press Alt+Z again for the normal view.
Tip
Open the doors with O to see the cups and plates without the front overlapping them.
Hardware list
The hardware list counts everything that is not a board: catalogue hardware and the small fittings it needs. It is counted per cabinet, with the totals at the end.
What goes into the list
| Item | Detail | Quantity | When |
|---|---|---|---|
| Hinge | hinge name | by the number of hinges on all doors and flaps | the cabinet has a door or a flap |
| Euro screw | 6.3×13 | 2 per hinge | catalogue hinge |
| Chipboard screw | 3.5×15 | 2 per hinge | Generic clip-on 35 mm |
| Drawer slide set | name and nominal length, for box systems also the variant | 1 per drawer | the cabinet has drawers |
| Chipboard screw | 4×16 | 1 per slide hole | catalogue slide |
| Dowel | diameter × length, for example Ø8×30 | per piece | Dowels or Minifix and dowels |
| Confirmat screw, Confirmat cover cap | 7×50, Ø12 | 1 per confirmat | Confirmat |
| Minifix housing, Minifix bolt | Ø15, Ø5×11 | 1 per minifix | Minifix, Minifix and dowels |
| Shelf support pin | Ø5 | 4 per shelf | adjustable shelves |
| Handle, Handle screw | see Handles in the hardware list | bar handle or knob | |
| Push latch | – | 1 per front | Push to open |
| name of the flap lift | strength and power factor | 1 per flap | flap lift |
| Wall cabinet hanger | adjustable | 2 per cabinet | wall unit with hangers |
| Hanging rail | length in mm | 1 per cabinet | Hangers on a wall rail |
| Cabinet leg | round or square | 4 per cabinet | the cabinet has legs |
| Chipboard screw | 4×16 | 4 per leg | the cabinet has legs |
| Kickboard clip | – | 2 per cabinet with legs | there is a kickboard from Kickboard over selected in front of the cabinet |
| Chipboard screw | 3.5×16 | 1 for every 150 mm of the back's perimeter | back Lay-on or Rebated |
| Gola profile | cabinet width in mm | 1 per groove | the cabinet has a gola groove |
The list also holds the worktop with its cut-outs and connectors, LED strips, clothes rails and sliding doors. Their own chapters describe them.
Note
In the hardware list a corner cabinet has 4 legs, although it stands on 6 (7 with a cut-out). For a corner cabinet, add the legs to the order by hand.
Where you see the list
| Place | What it shows |
|---|---|
| PDF (Export all to PDF, Export selected to PDF) | A Hardware list page with the columns Cabinet, Item, Detail and Quantity: first per cabinet, at the end TOTAL. Export selected to PDF counts only the selected cabinets. |
| Excel (Cutting list to Excel) | The Hardware sheet, with the same columns. |
| Supplier order (CSV + e-mail) | The file order_hardware.csv with the totals (Item, Detail, Qty) and the HARDWARE: paragraph in the e-mail text. See The production package and the supplier order. |
| Cost estimate (EFS tab) | Hinges, slide sets, shelf support pins, confirmats and minifixes, flap lifts, hangers, the hanging rail and push latches, with the price from the price list. See A quote for the customer. |
Dowels, screws and handles have no price in the cost estimate. Catalogue items look up their price in the price list by code. When the price is found there is a green dot next to the item; when it is not, a red dot and the code in brackets. Hinges with No drilling (count only) and drawers with the No drilling (count only) slide have their own rows (… hinges, … drawers) with the price from the general part of the price list. On top of that, one drilling is charged for each hinge (the … holes row).
Project check
The project check looks for errors in the project before export, among them cabinets without drillings.
- In the EFS tab, open the Export panel.
- Click Project check.
- If everything is in order, the program reports No problems found.
- Otherwise the Project check window opens with the findings. A finding about a particular object has an arrow button (Show in the scene). A click selects that object and the view zooms in on it. The window stays open.
- OK closes the window and reports N problems found. Cancel or Esc only closes it.

The window shows at most 40 findings. The ... +N row counts the rest. Fix the first findings and run the check again.
Hardware messages
| Message | Type | What it means | What to do |
|---|---|---|---|
| Door '…' hits '…' when opened. | warning | The door opened to 90° reaches into a neighbouring cabinet, a wall or another room object by more than 3 mm. | Add a filler between the cabinets (see Kickboard, fillers, end panels and cornice), change the opening side or move the cabinet. |
| Door '…' (…) has no hinges. | warning | The door has Hinges 0. | Type the number of hinges or switch on Auto hinge count. |
| N cabinets have doors without hinge drillings (Project hardware). | warning | N cabinets have a door or flap, and their Hinge type is No drilling (count only). Corner cabinets are not counted. | Choose a hinge in Project hardware and click Apply to all. |
| N cabinets have drawers without slide drillings (Project hardware). | warning | N cabinets have drawers with the No drilling (count only) slide. | Choose a slide and click Apply to all. |
| N cabinets have no dowel joints (Project hardware). | warning | N cabinets have Joints type: None. The message goes away with any joint type, not only with dowels. | Choose a joint type and click Apply to all. |
| Dowel hole Ø… in '…' (…) goes through the board. | error | The dowel hole in the face of the board is as deep as the board. Most often Face hole depth is too large. | Set Face hole depth back to 0 (automatic) or reduce it. |
| Hole Ø…×… in '…' (…) leaves only … mm of material. | warning | Under a hole in the face less than 4 mm (dowel) or 2.5 mm (other holes) remains. For example a 13 mm cup in a 15 mm front leaves 2 mm. | Use a thicker board, a shallower dowel hole (Face hole depth) or a hinge with a shallower cup. |
| Shelf '…' (…) does not rest on its pins: reduce its front or back recess. | warning | An adjustable shelf does not reach the front or back row of holes. | Reduce the shelf's Front recess or Back recess. See Adjustable shelves, System 32. |
The check also reports overlapping cabinets, materials without a price, sliding doors made for a different width and two cabinets with the same name. Those messages are described in The production package and the supplier order.
Rules:
- An error is marked with a warning icon, the other messages with an info icon.
- After Cutting list to Excel, Export DXF - all, Export quote (PDF), Export labels (PDF) and Supplier order (CSV + e-mail) EFS runs the check by itself. If it finds errors (overlapping cabinets or a dowel going through a board), it reports Exported, but the project check found N errors (Project check). It does not report warnings then.
- The Production package writes all findings to the file
…_check.txtnext to the other exports.
Tip
Run the Project check before every export for production. The three (Project hardware) messages tell you at once whether all cabinets got hinges, slides and joints.
Your own hardware catalogue
The hardware catalogues are JSON files in the add-on's hardware folder. You add your own hinges, slides and other hardware to your own copy of the catalogue. Updating the add-on does not touch it.
For advanced users: how to add your own hinge or slide
- Open the EFS user folder (see Where your data is).
- In it, create a folder named
user_hardware. - Save a file there with the same name as the built-in catalogue, and write only your own entries in it.
- Close and restart the program. The catalogue is read once, the first time it is used.
| File | What it holds |
|---|---|
hinges.json |
hinges |
slides.json |
slides and box systems |
joints.json |
confirmat and minifix sizes |
shelf_supports.json |
shelf supports |
lifts.json |
flap lifts |
hangers.json |
wall unit hangers |
fasteners.json |
screws for legs, backs and handles, kickboard clips, handle hole diameter |
worktop_cutouts.json |
cut-outs for the sink and the hob |
Rules:
- An entry with the same key as a built-in one replaces the built-in one. A new key is added to the menu after the built-in ones. Projects that are already saved keep their choice.
- In
fasteners.jsonthe fields you write replace the built-in ones; the others stay. - Sizes are in mm, from the manufacturer's data sheet.
- A hinge with
"drilling": truemust havecup_diameter,cup_depth,cup_center_from_edge,plate_from_front,plate_hole_spacing,plate_hole_diameter,plate_hole_depthandend_offset. A slide must havelengths,hole_diameter,hole_depth,first_hole_from_front,hole_stepandrear_margin. EFS skips an entry that lacks any of these sizes and does not show it in the menu. joints.jsonchanges the sizes of the existing types (CONFIRMAT,MINIFIX). It does not add new joint types.- The name (
name) is shown in the menu as you write it. price_codeis the price code. Write it in the first column of the Other sheet in your price list (user_prices.xlsx), and the price in the third. See Nesting and board prices.
An example user_hardware/hinges.json with a hinge whose cup is 12 mm deep and its centre 22.5 mm from the edge:
{
  "MY_HINGE": {
    "name": "My hinge 110",
    "drilling": true,
    "cup_diameter": 35,
    "cup_depth": 12,
    "cup_center_from_edge": 22.5,
    "screw_spacing": 45,
    "screw_from_cup": 9.5,
    "screw_diameter": 8,
    "screw_depth": 11.5,
    "plate_from_front": 37,
    "plate_hole_spacing": 32,
    "plate_hole_diameter": 5,
    "plate_hole_depth": 13,
    "end_offset": 96,
    "price_code": "HINGE_MY",
    "plate_fastener": {"item": "Euro screw", "detail": "6.3×13", "per_hinge": 2}
  }
}
Without screw_spacing EFS does not drill holes for the cup screws. For an under-box slide, write "mount": "bottom" and bottom_offset (height of the holes above the bottom edge of the side). For a box system, add a box_system block modelled on the built-in TANDEMBOX in hardware/slides.json.
Common problems and solutions
I changed Project hardware, but the cabinets stayed the same. The panel's fields apply to new cabinets. Click Apply to all, or select the cabinets and click Apply to selected.
After Apply to all one cabinet lost its own hardware. The button overwrites all hardware fields in every cabinet. Press Ctrl+Z, or set that cabinet's hardware again in the Hardware and joints box.
Apply to selected reports 0 cabinets. Nothing is selected, or the selected cabinets already have that hardware.
Tall doors have only 2 hinges. The number of hinges is not part of Project hardware. Switch on Auto hinge count and click Apply to all, or type Hinges on the cabinet.
On a wall unit the handle is on the top edge. The cabinet became a wall unit with U after it got its hardware. Select it and click Apply to selected.
A flap has no hinge holes. EFS does not drill hinges on flaps. Flap hinges are in the hardware list and are fitted using the manufacturer's template.
The side panel has no holes for the plate. The side panel on the hinge side is set to None, or Hinge type is No drilling (count only).
I can't see Slide type on the cabinet. The cabinet has no drawers. The field is shown only once you choose the drawer type and number.
I can't see Wall unit hangers on the cabinet. The cabinet is not a wall unit. Tick Is upper or press U.
A box drawer stayed wooden, and the slide has no length in the hardware list. The cabinet is too shallow: not even the shortest nominal length (270 mm) fits in the inside depth. Make the cabinet deeper or choose a different slide.
The cutting list has no drawer sides. The cabinet has a box system. You buy the metal sides with the slide, so only the bottom and back of the drawer box are in the cutting list.
The corner cabinet got no joints or slides. From Project hardware a corner cabinet takes only the hinge and the handle.
The check reports cabinets with no dowel joints, but I join with screws. The message means the cabinet has no joint type at all. Choose Confirmat or another type, or ignore the message if you join the carcasses outside EFS.
My catalogue hinge does not show in the menu. Check the folder name (user_hardware) and file name (hinges.json), the commas and quotes in the JSON and the required sizes. Restart the program after any change.
Shortcuts in this chapter
| Key | Action |
|---|---|
| N | Show / hide the sidebar with the tabs |
| Alt+Z | X-ray view: shows the holes for hinges, slides, handles and dowels |
| O | Open / close doors and drawers of the selected cabinet |
| U | Upper / lower cabinet (does not change the handle position by itself) |
| Ctrl+Z | Undo the last action, for example Apply to all |
All shortcuts are in the chapter Keyboard shortcuts.
Next
Next chapter: Room documentation for the fitters