Base units and the corner
In this chapter you build the base run of the kitchen in the room from chapter B01: a corner cabinet in the corner, the sink unit, a space for the dishwasher, drawers under the hob, a filler to the wall and the run continuing on a second wall. You will learn where EFS places a new cabinet, how to put the corner cabinet into any corner, how to fill a gap with a filler or a cabinet, and how to relate and align the cabinets in a run.
Video: B02 Base units and the corner
The same workflow in a video of a minute and a half.

Before you start
- Open the project with the room from the chapter Room, openings and installations. In the video the room is 3232 × 2400 mm, with water and a drain on wall A and a 400 V connection for the hob.
- The walls are A (back), B (right), C (front) and D (left), as seen when the header shows 000°. The back left corner of the room, between walls A and D, is the scene origin.
- In the toolbar on the left, have the EFS tool selected.
- In the header, in the Positioning options drop-down, have Forward alignment selected. This is the default.
- Open the EFS - Templates tab and expand the Kitchen lower category. How to search for and place templates is described in the chapter Templates and My templates.
The workflow from the video
- Click on empty space so that nothing is selected. Look from the front: the header shows 000°.
-
In the search field of the EFS - Templates tab, type
corner, press Enter and click Corner element. The cabinet sits in the corner between walls A and D. See Corner cabinet in the corner of the room.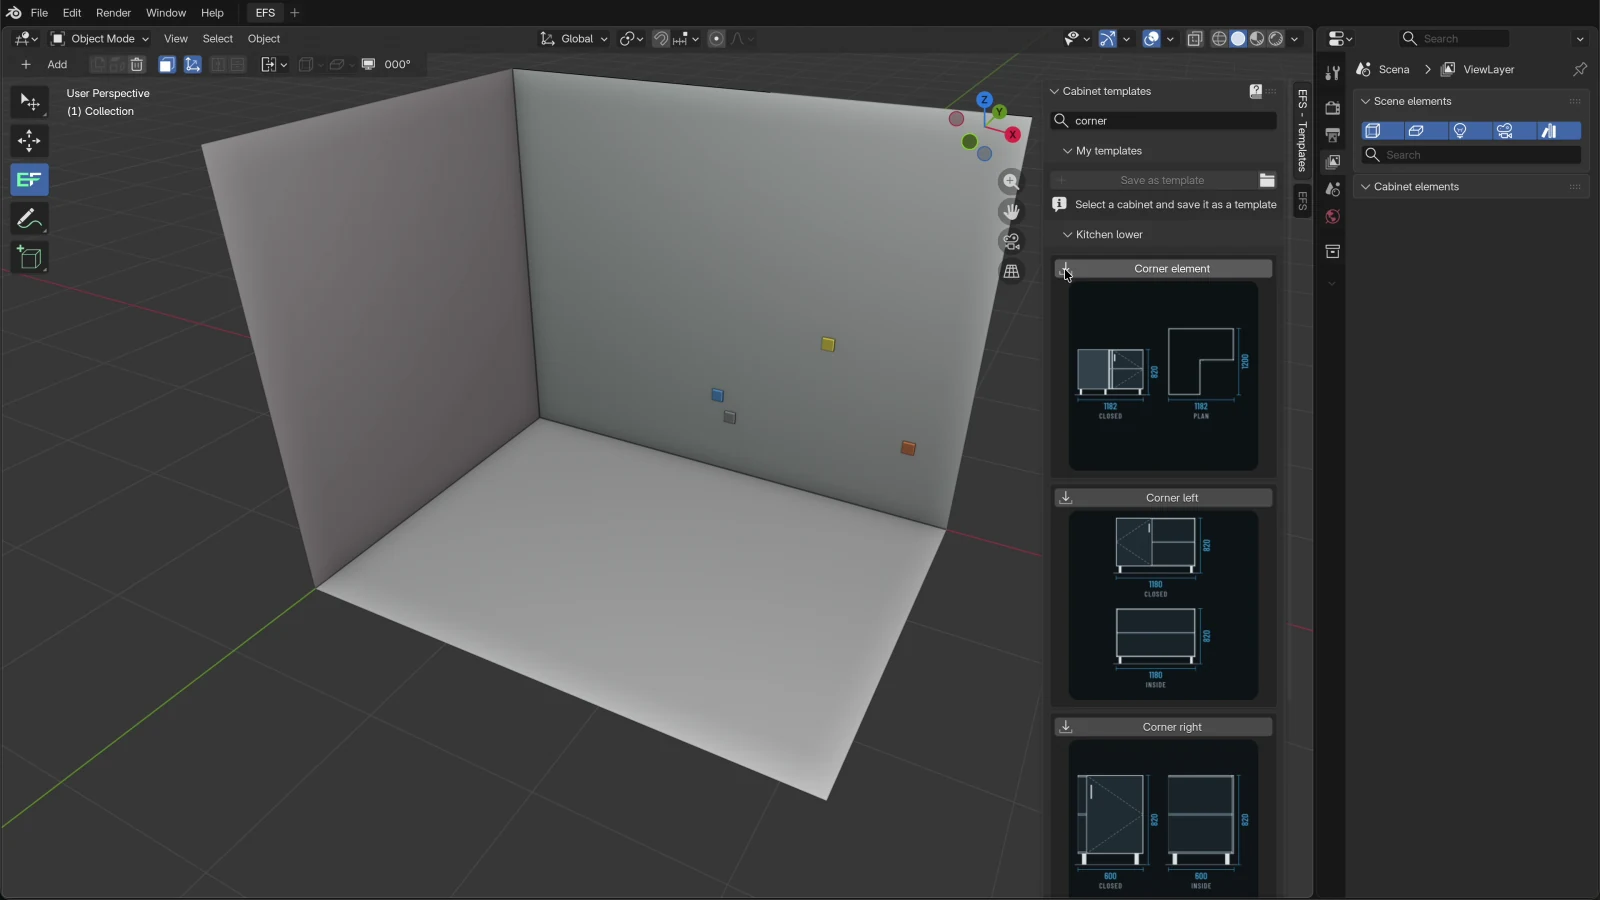
-
With the corner cabinet selected, search for
sinkand click Sink base 800. The sink unit comes right next to the corner cabinet, on its right, on wall A. See Where a new cabinet sits.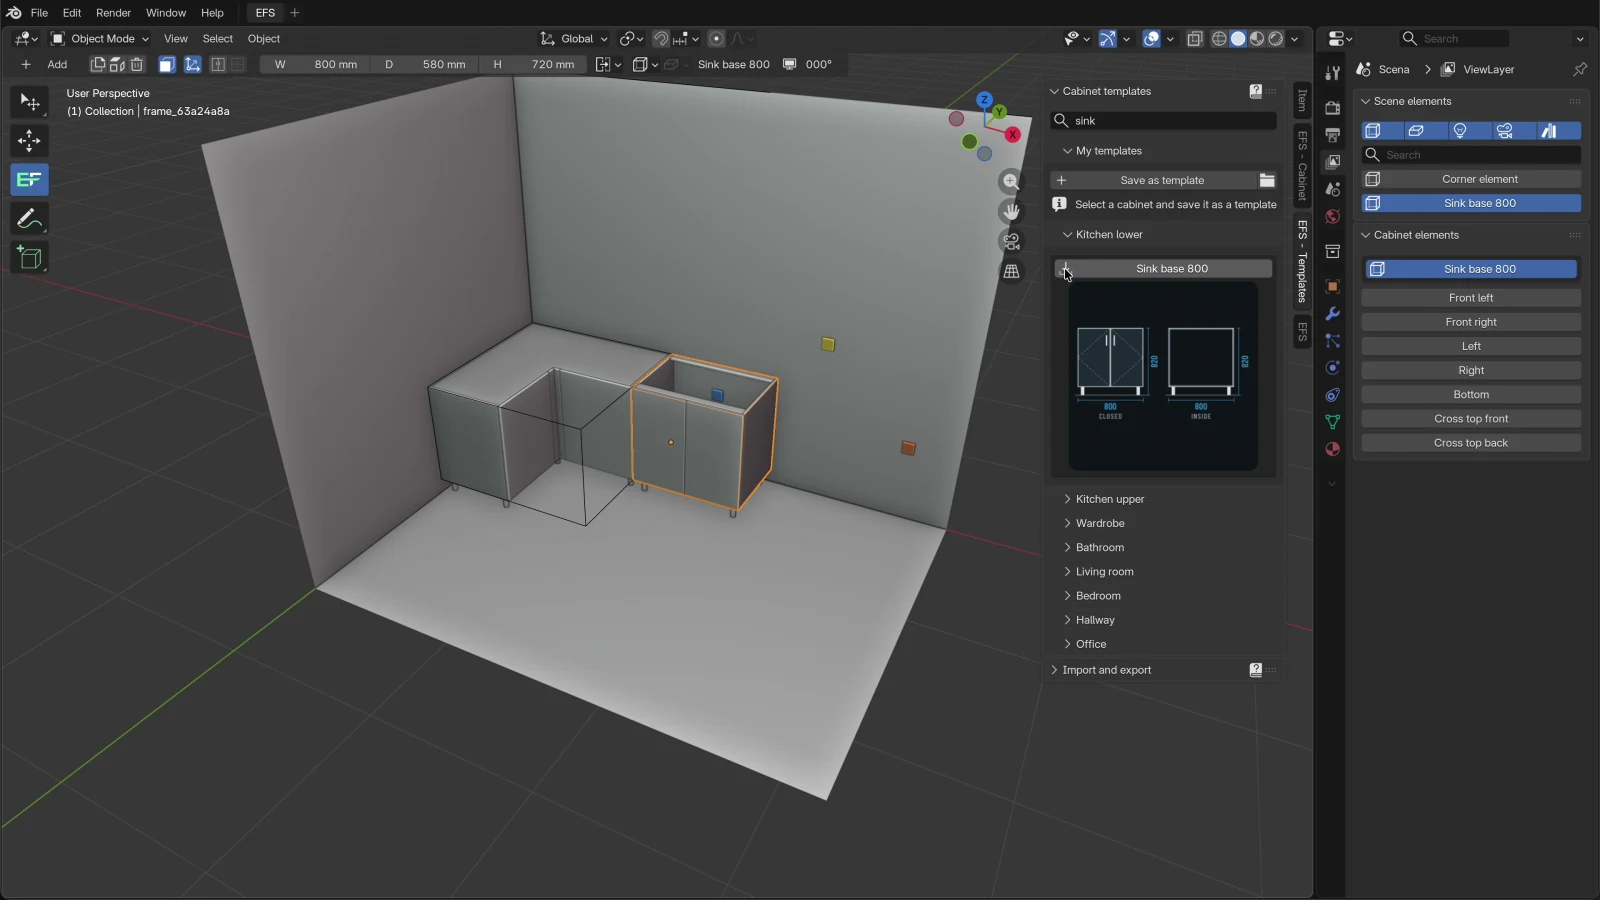
-
With the sink unit selected, search for
3 drawersand click 3 Drawers. The cabinet comes to the right of the sink unit. -
Press 1, type
600and press Enter. The drawers move 600 mm to the right. Between the sink unit and the drawers there is now space for the dishwasher. See Space for the dishwasher.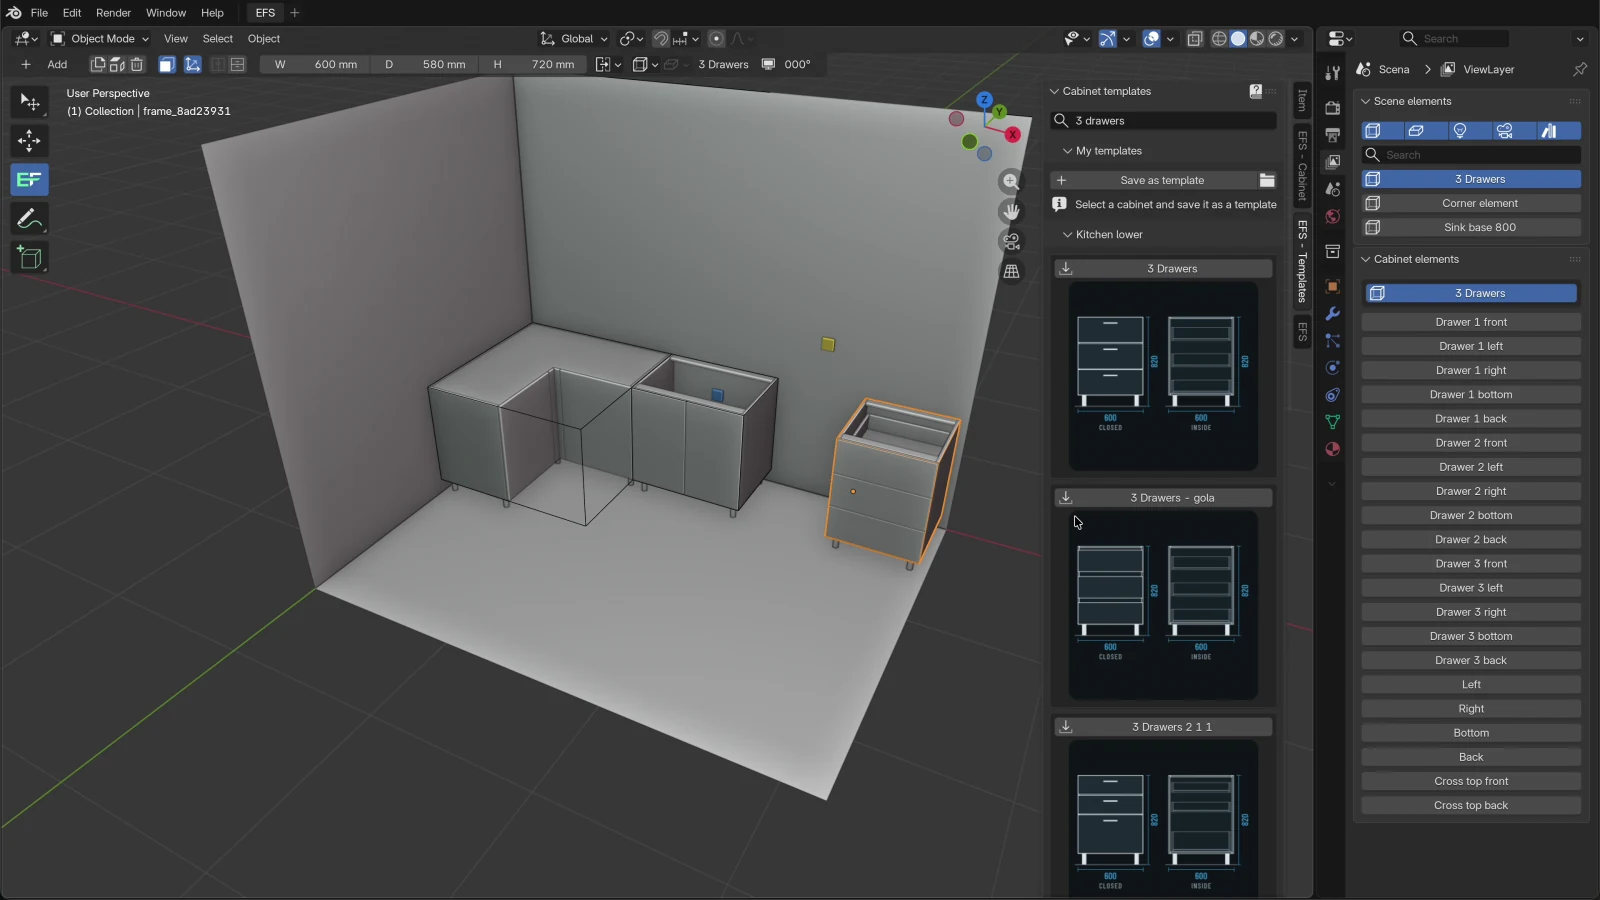
-
The run now ends 50 mm from wall B. With the drawer cabinet selected, right-click, then Add to the cabinet → Filler →. A 50 mm filler closes the gap to the wall, in the front decor. See Filler to the wall.
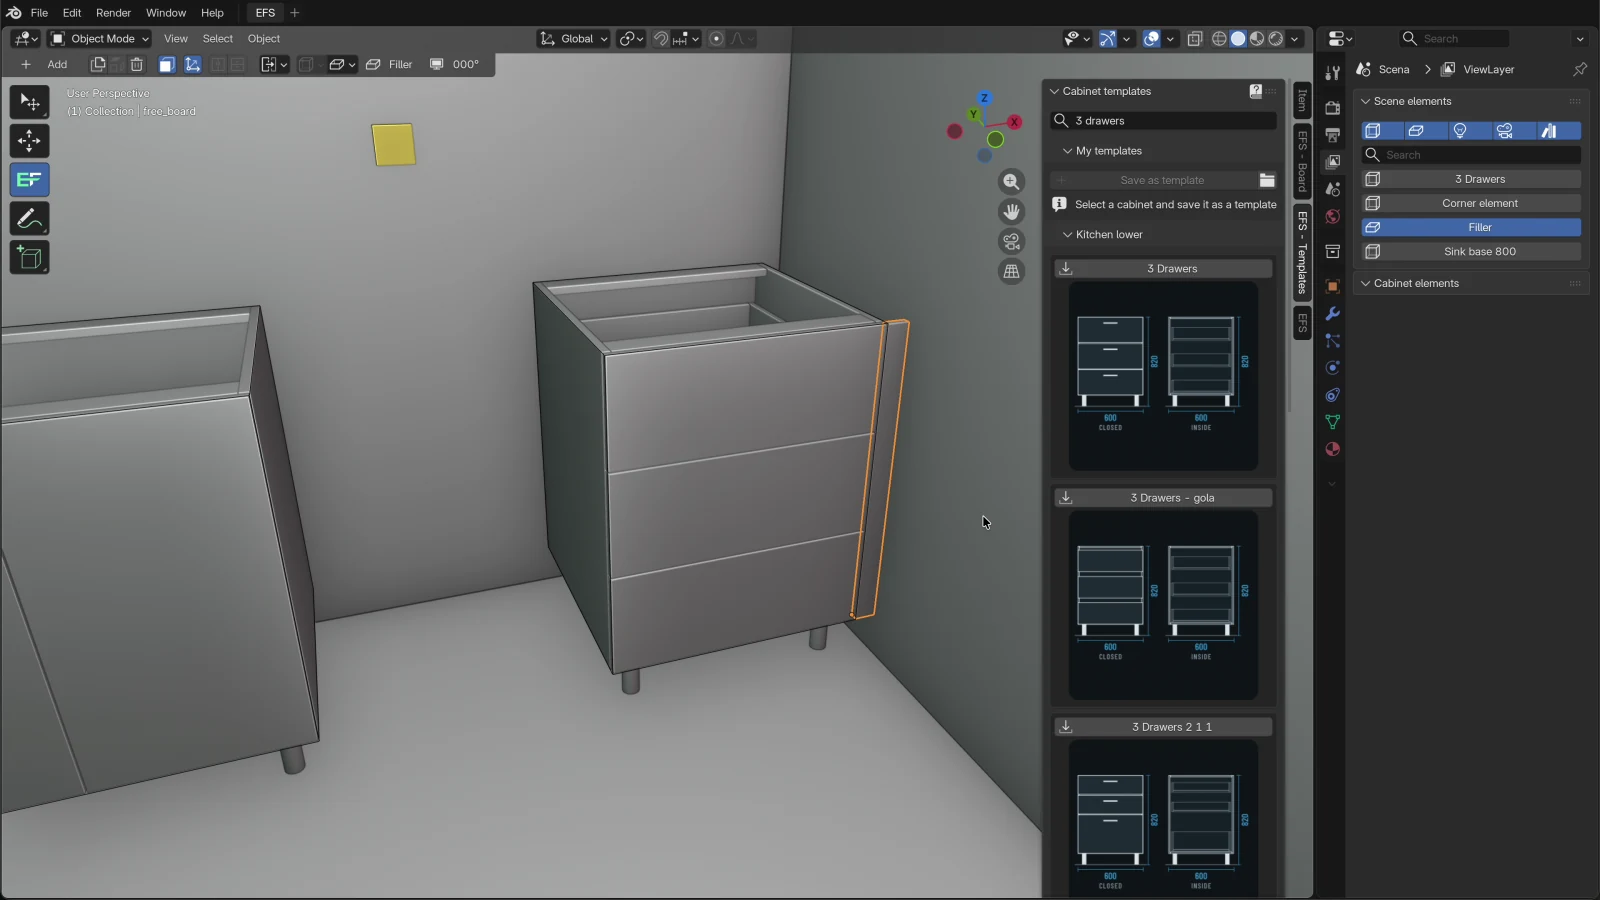
-
Click on empty space. Turn the view with the middle mouse button towards wall D, until the header shows 270°.

-
Search for
4 drawersand click 4 Drawers. The cabinet turns its back to wall D and sits right in front of the corner cabinet's wing.
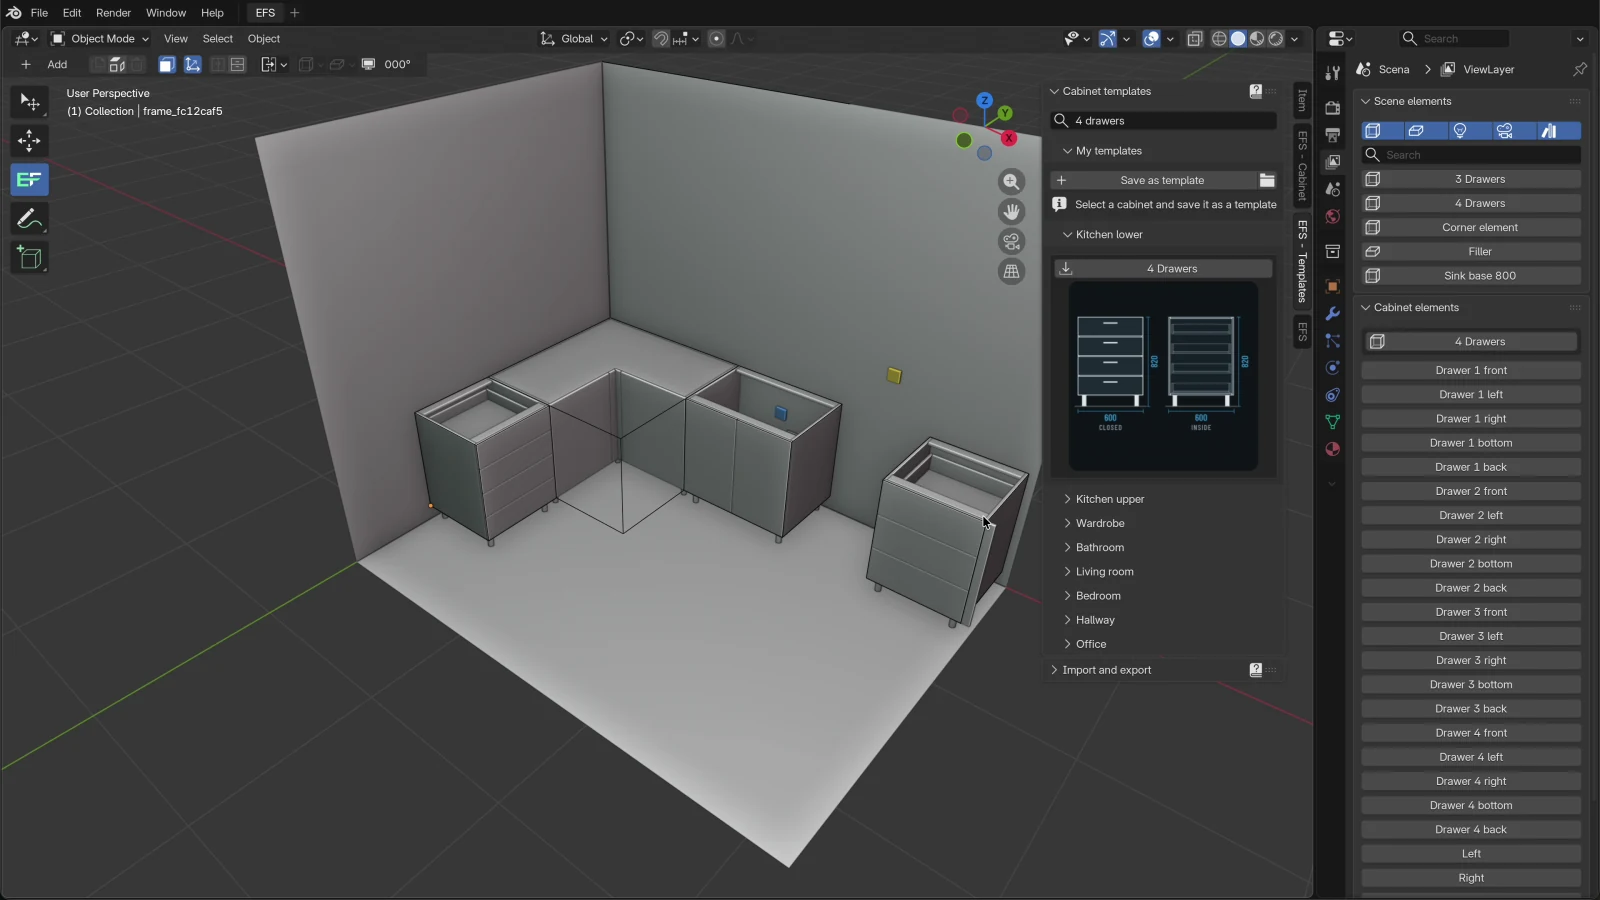
The finished run on wall A, from wall D towards wall B:
| Cabinet | From | To | Note |
|---|---|---|---|
| Corner element | 0 mm | 1182 mm | The wing along wall D is 1200 mm long. |
| Sink base 800 | 1182 mm | 1982 mm | Under the water and drain drawn in chapter B01. |
| Space for the dishwasher | 1982 mm | 2582 mm | Empty, 600 mm. |
| 3 Drawers | 2582 mm | 3182 mm | Under the hob, in front of the 400 V connection. |
| Filler | 3182 mm | 3232 mm | To wall B. |
On wall D the 4 Drawers cabinet takes up 600 mm right in front of the corner cabinet's wing, from 1200 to 1800 mm measured from wall A.
From here on you change every cabinet in the run like any other cabinet: dimensions, fronts, drawers, legs and hardware. See How a cabinet is built.
Where a new cabinet sits
When you add a cabinet (C, Add → Cabinet) or a template, EFS chooses the place itself. It looks at two things: whether a cabinet is selected and which direction you are looking from. The general rules are in the chapters The interface and your first cabinet and Templates and My templates. Here are the same rules on a kitchen example.
View rotation and the walls
The view rotation is shown at the right end of the EFS tool header. A new cabinet turns its back to the wall you are looking at.
| In the header | You are looking at | Z rotation of the new cabinet | When nothing is selected |
|---|---|---|---|
| 000° | wall A | 0° | Back to wall A, at the right end of the run. The first cabinet sits in the corner between walls A and D. |
| 090° | wall B | 90° | The cabinet follows the mouse. Click to drop it. |
| 180° | wall C | 180° | The cabinet follows the mouse. Click to drop it. |
| 270° | wall D | 270° | Back to wall D, right in front of the cabinet that stands furthest forward. |
You turn the view with the middle mouse button. The angle in the header snaps to the nearest of the four directions, so the view does not have to be exactly square to the wall.
Rules for 000° and 270°:
- A base unit looks only at base units, and a wall unit only at wall units. Tall units from templates (fridge, oven, pantry) are base units.
- The right end of the run is the rightmost point of all base units in the project, including the corner cabinet. Free boards do not count: the new cabinet sits over a filler at the end of the run.
- For 270° EFS looks at all base units in the project, not only those on wall D. The new cabinet sits in front of the one closest to wall C.
- If the project has no cabinet of the same kind yet, a new one at 000° sits at the origin, in the corner between walls A and D. At 270° it sits behind wall A, outside the room.
Tip
The rules "at the right end" and "in front of the one furthest forward" work well for an L-shaped kitchen on walls A and D, as in the video. For other walls and for a second row on the same wall, add the cabinet while its neighbour is selected (section below).
A new cabinet next to the selected one
With the default option Forward alignment, a new cabinet goes next to the selected cabinet:
- Click any board of the cabinet the new one should go next to.
- Press C or click a template.
What EFS does:
- The new cabinet comes to the right side of the selected one, with its back in the same line. Right is right as you look at the fronts of that cabinet, so the rule works on every wall.
- If there is already a cabinet on the right, the new one comes to the left side.
- If both sides are taken, the new one is placed as if nothing were selected.
- The new cabinet gets the Z rotation of the selected one.
- A new cabinet from C also gets the height, depth and height from the floor of the selected one. If the selected one is a wall unit, the new one becomes a wall unit too. The width is the default or comes from My settings.
- A template keeps its own dimensions and its own height from the floor.
Taken means that the new cabinet would overlap another cabinet or a corner cabinet. Free boards (filler, worktop) do not count. The corner cabinet takes up the whole rectangle of its dimensions, so nothing fits next to it, not even in the inner corner of the L.
Watch out
The corner cabinet cannot be that selected neighbour. While the corner cabinet (or one of its boards) is selected, a new cabinet is placed as if nothing were selected. In the video the sink unit sat next to the corner cabinet because the corner cabinet was the only base unit on wall A, so its right end was also the end of the run.
Positioning options
The options are in the Positioning options drop-down in the header and in the EFS tab, Scene properties panel. They are described in The interface and your first cabinet.
| Option | For a kitchen run |
|---|---|
| Forward alignment (default) | The new cabinet comes next to the selected one or at the end of the run. Keep this option for building a run. |
| Sliding on X axis | The new cabinet ignores the selected one. At 000° and 270° it follows the mouse along the X axis until you drop it with a click. |
| Sliding on Y axis | The same, along the Y axis. |
| Sliding on X and Y axis | The same, over the whole floor. |
In the add-on preferences (Edit → Preferences… → Add-ons, the Easy Form Studio row), two settings change the same behaviour:
| Setting | Default | What it does |
|---|---|---|
| Rotate cabinet based on view rotation on creation | on | Off: a new cabinet that does not go next to the selected one stays at 0° and follows the mouse until you drop it. |
| Relate a new cabinet to the selected one | off | On: a cabinet added with C next to the selected one becomes its left or right related cabinet. Does not apply to templates. See Related cabinets in a run. |
An exact gap with keys 1 and 2
The keys 1, 2 and 3 move a cabinet along the X, Y and Z axes of the room, not along its run:
| Wall | The run goes along axis | Key for a move along the wall | Plus is towards wall |
|---|---|---|---|
| A | X | 1 | B |
| B | Y | 2 | A |
| C | X | 1 | B |
| D | Y | 2 | A |
Example from the video: you move a cabinet on wall A 600 mm towards wall B with 1, 600, Enter. On wall D the same move towards wall C is 2, -600, Enter.
If several cabinets are selected, they all move together. That is how you move a whole run. More in the chapter The interface and your first cabinet.
Corner cabinet in the corner of the room
The corner cabinet is an L-shaped cabinet with two doors. Its boards and all the fields of the tab are described in How a cabinet is built. Here is how to put it into a corner and join it to the run on both walls.
You get a corner cabinet in two ways:
| Way | Dimensions | Legs | Front side (Width × Depth) |
|---|---|---|---|
| The Corner element template (Kitchen lower) | 1182 × 1200 × 720 mm | 100 mm | 620 × 638 mm |
| Add → Corner cabinet or Shift+C | 1200 × 1160 × 720 mm | no legs | 638 × 598 mm |
Both variants have wings 562 mm deep, so their doors are flush with the fronts of neighbours 580 mm deep.
Corner cabinet in corner A and D
The corner between walls A and D is the scene origin. This is the simplest corner:
- Click on empty space.
- Turn the view so that the header shows 000°.
- Click the Corner element template or press Shift+C.
The corner cabinet gets a Z rotation of 0°. If it is the first base unit in the project, it sits at the origin: its Width runs along wall A, and its Depth along wall D.
Watch out
Place the corner cabinet first. If wall A already has base units, the corner cabinet sits at the right end of that run, not in the corner. Then move it with 1 or type its position (section Corner cabinet in another corner).
The wings and the front plane
The corner cabinet has two wings. The run on each wall continues at the end of the wing along that wall.
| Wing | Its length | Its depth (carcass) | Door on the wing |
|---|---|---|---|
| Along wall A | Width | Depth − Front side: Depth | Front right |
| Along wall D | Depth | Width − Front side: Width | Front left |
The door stands in front of the wing's carcass, so the wing with its door is as deep as the carcass plus Thickness. For the template: 1200 − 638 = 562 mm, 580 mm with the door. The same for the other wing: 1182 − 620 = 562 mm, 580 mm with the door. Base units from templates are 580 mm deep, so all fronts are in the same plane.
The template's doors are 556 mm wide. How EFS works out the doors is described in the chapter How a cabinet is built.
Watch out
When you change the corner cabinet's Width, the wing along wall D becomes deeper or shallower by the same amount. Change Front side: Width by the same amount too. The same goes for Depth and Front side: Depth. Example: you extend the template corner cabinet along wall A to 1282 mm. Also type Front side: Width 720 mm, so that the wing along wall D stays 562 mm deep.
The run on both walls
With the corner cabinet in corner A and D, the run continues by itself, as in the video:
- Wall A. View 000°. Add the first cabinet while nothing is selected or while the corner cabinet is selected: it sits at the right end of the run, which is the end of the wing along wall A. Add each next one while the previous one is selected.
- Wall D. Click on empty space and turn the view to 270°. The first cabinet sits with its back to wall D, right in front of the corner cabinet's wing. Add each next one while the previous one is selected: to its right is the corner cabinet, so the new one goes to the left, towards wall C.
Tip
On wall D, keep the last cabinet of the run selected and add the next one next to it. The 270° rule without a selection looks at all base units in the project, so the new cabinet may not sit where you expect.
Corner cabinet in another corner
In the other corners you turn the corner cabinet and type its position:
- Add the corner cabinet while nothing is selected.
- In the EFS - Cabinet tab, Corner cabinet properties panel, click the Z rotation from the table below. R does the same, one step at a time.
- In the header, open the Cabinet properties drop-down and type X and Y from the table. The position is the back left bottom corner of the cabinet, and it does not move when the cabinet turns.
| Room corner | Z rotation | X | Y | Width runs along wall | Depth runs along wall |
|---|---|---|---|---|---|
| A and D (back left) | 0° | 0 | 0 | A | D |
| A and B (back right) | 90° | room width | 0 | B | A |
| B and C (front right) | 180° | room width | −room depth | C | B |
| C and D (front left) | 270° | 0 | −room depth | D | C |
The values apply while the room stays where EFS created it, with its back left corner at the origin. Example for the room from the video (3232 × 2400 mm), corner A and B: Z rotation 90°, X 3232, Y 0.
Cabinets along the wing in these corners do not sit there by themselves. Place the first cabinet along each wing with 1 and 2 (or type its position), and add the next ones while the previous one is selected.
Tip
For corner A and B, first build the run on wall A, from wall D towards wall B, and place the corner cabinet last. If a gap remains between the run and the wing, change the corner cabinet's Depth (and Front side: Depth by the same amount) to close it.
What the corner cabinet does not do in a run
| What | Corner cabinet |
|---|---|
| New cabinet next to the selected one | It is not an anchor. While it is selected, a new cabinet is placed as if nothing were selected. |
| Relations | It cannot be related. It has no Relations panel and is not offered in the fields of other cabinets. |
| Fill the gap, Align to active, Relate to the selected cabinet | It does not count. The buttons look only at ordinary cabinets. |
| Copy to selected cabinets | It neither copies nor receives settings. |
| Keys F, D, Shift+T, U | They do not work. L and R work. |
| Project hardware | Gives it only hinges and handles. |
| My settings | Are not applied. |
Blind corner: Corner left and Corner right
Instead of the L-shaped corner cabinet, you can solve the corner with a blind corner. The Kitchen lower category has the templates Corner left (1180 × 580 × 720 mm, door on the left, blind part on the right) and Corner right (600 × 580 × 720 mm, door on the right, no left side panel). The description of both templates says: the corner needs a 60 mm filler, so that the doors and handles clear the adjoining run. Thumbnails and dimensions are in the template list.
A blind corner cabinet is an ordinary cabinet: it goes next to the selected one, and it can be related, used with Fill the gap and aligned.
Space for the dishwasher
EFS has no template for an integrated dishwasher. Its space is an empty gap in the run, usually 600 mm.
A gap with key 1
- Add the cabinet that comes after the dishwasher next to the cabinet before it. In the video this is 3 Drawers next to the sink unit.
- With the new cabinet selected, press 1 (on wall B or D, 2).
- Type
600and press Enter.
The cabinet moves by 600 mm. Add the next cabinet while this one is selected, so that the run continues from it.
Watch out
Do not click Fill the gap on the dishwasher space. EFS would fill a 600 mm gap with a cabinet 600 mm wide.
Tip
To keep the dishwasher gap the same when you move the sink unit, relate the drawers to the sink unit and type Right offset 600 mm. See Related cabinets in a run.
A worktop over the selected cabinets runs from the first to the last selected cabinet, so it also covers the dishwasher gap. See The worktop: cut-outs and the corner joint.
Filler to the wall
A run rarely ends exactly at the wall. A filler closes the rest:
- Click the cabinet at the end of the run.
- Right-click and open Add to the cabinet.
- Click Filler → for the right side or Filler ← for the left. The side is as seen from the front, facing the fronts.
The filler is a free board 50 mm wide, beside the cabinet, flush with the fronts and as high as the fronts. It gets the decor and material group of that cabinet's fronts. In the video a 50 mm filler closes the gap from the drawers to wall B.
Other widths, end panels and the kickboard are described in Kickboard, fillers, end panels and cornice. The right-click menu is described in Working faster.
Fill the gap
Fill the gap fills the gap between two cabinets of the same run: with a filler if the gap is narrow, and with a cabinet of the exact width if it is wide.
- Click the first cabinet.
- Hold Shift and click the second cabinet.
- In the EFS - Cabinet tab, at the top of the Cabinet properties panel, click Fill the gap.
The button is in the box with the message 2 cabinets selected: the fields show the active one and appears only when exactly two ordinary cabinets are selected.
| Gap | What EFS adds | Message |
|---|---|---|
| less than 20 mm | Nothing. | The gap is … mm: too narrow to fill |
| 20 to 149 mm | A filler: a free board Filler as wide as the gap and 18 mm thick, as high as the carcass of the left cabinet (without legs), with its front side flush with the fronts. | Filler … mm |
| 150 mm and more | A new cabinet of exactly that width, next to the left cabinet. It gets the left cabinet's Z rotation, height, depth, height from the floor and back line, and the rest from My settings. It has no front. | Cabinet … mm wide |
Rules:
- The gap is measured along the run of the active cabinet. The left cabinet is the one that comes first in the run from the left, seen from the front.
- Both cabinets must be in the same run: on the same wall and with the same Z rotation. EFS does not check this.
- The new cabinet from Fill the gap is an ordinary cabinet. Add fronts and drawers to it with F and D or in the EFS - Cabinet tab.
- The corner cabinet does not count. With a corner cabinet and one ordinary cabinet selected, the button does not appear.
Tip
Before Fill the gap, turn the view towards the wall of the run (000° on wall A). The new cabinet is first placed like any new cabinet. If there is no room for a cabinet of the default width on either side of the left cabinet, the new cabinet turns towards the view direction, not towards the run.
Filler from the right-click menu or from Fill the gap
Both fillers are free boards named Filler, Filler 2… They differ:
| Add to the cabinet → Filler ←/→ | Fill the gap (gap 20–149 mm) | |
|---|---|---|
| Where | Beside the left or right side of one cabinet | Between two selected cabinets |
| Width | 50 mm | Exactly the gap |
| Height | As the cabinet's fronts | As the left cabinet's carcass |
| Thickness | As the cabinet's fronts | 18 mm |
| Decor and material group | As the cabinet's fronts | The default white decor, group F 3 (as worktops) |
| Edge tape | The default edge tape of a free board: 2 mm on all four edges | The same |
Watch out
The filler from Fill the gap is in group F 3, so it gets the worktop decor when you assign a decor to group F 3. If it should be in the front decor, click it and in the EFS - Board tab change its group to F 1 (see Change the group of one board).
Related cabinets in a run
A related cabinet is a neighbour tied to a cabinet on the left, on the right, above or below. When you move, turn or change the cabinet, EFS puts the neighbour back next to it. The fields of the panel are described in How a cabinet is built, and relating cabinets in Working faster. Here is how the relation works in a kitchen run.
Relate two cabinets
Example: you relate the drawers after the dishwasher to the sink unit, so that the 600 mm gap stays when you move the sink unit.
- Click the drawer cabinet.
- Hold Shift and click the sink unit. The sink unit is the active, main cabinet.
- In the EFS - Cabinet tab, at the top of the Cabinet properties panel, click Relate to the selected cabinet. The same button is also in the Relations panel. The program reports Related on the right: the drawers are now entered in the sink unit's Right field.
- The drawers immediately move up against the sink unit, because Right offset is 0 mm. Open the Relations panel and type
600in Right offset. The drawers go back to 600 mm.
Under the sink unit's Width field, Joint width now shows 2000 mm: the sink unit 800 mm, the offset 600 mm and the drawers 600 mm.
EFS chooses the side by where the other cabinet stands, seen along the run of the active cabinet:
| Where the other cabinet stands | The field EFS enters it in |
|---|---|
| Entirely to the right of the active one | Right |
| Entirely to the left of the active one | Left |
| Overlaps along the run, and its bottom is at the top of the active one or higher | Above |
| Otherwise | Below |
If that field already held a cabinet, the new one replaces it without asking.
How the neighbour stands next to the cabinet
EFS places the neighbour relative to the main cabinet, every time the main cabinet moves or changes:
| Field | Where the neighbour stands |
|---|---|
| Right | Beside the right side of the main cabinet, Right offset away. Backs in line, same height from the floor. |
| Left | Beside the left side of the main cabinet, Left offset away. Backs in line, same height from the floor. |
| Above | On top of the main cabinet, Above offset above it. Same back left corner. |
| Below | Under the bottom of the main cabinet, Below offset lower. Same back left corner. |
Offsets:
| Field | What it does | Default | Values |
|---|---|---|---|
| Left offset, Right offset | Gap between the side of the main cabinet and the neighbour. A positive value moves them apart, a negative one makes them overlap. | 0 mm | −5000 to 5000 mm |
| Above offset, Below offset | Gap in height. A negative offset puts the neighbour inside the main cabinet. | 0 mm | −5000 to 5000 mm |
The multi-carcass templates are an example of a negative offset. In the Fridge template the compartment at the top is Above with Above offset −234 mm, and the lower carcass is Below with Below offset −758 mm. That is why both sit inside the tall carcass.
Watch out
A related neighbour always has the same height from the floor and the same back line as the main cabinet. Do not relate a wall unit to a base unit: related on the left or right, the wall unit drops to the height of the base unit. Related Above, it sits on the base unit, unless you type an Above offset.
Include in scaling
Under the fields are three checkboxes: Width, Depth and Height. They are off by default.
| Checkbox | When you change this dimension on the main cabinet |
|---|---|
| Width | All its related cabinets (left, right, above, below) get the same width. |
| Depth | All of them get the same depth. |
| Height | All of them get the same height. |
In a run you usually need Depth and Height: you change the height of the sink unit, and the drawers next to it get the same height. Width in a run gives all neighbours the same width as the main cabinet, so turn it on only when you want that. In the multi-carcass templates (fridge, oven, pantry) Width and Depth are on, so that the carcasses stacked on top of each other change together.
The checkboxes apply only to a change on the main cabinet. Changing a dimension on the neighbour does not change the main cabinet.
Only the direct neighbour follows
The relation works only between a cabinet and the cabinets entered in its fields. It is not passed on further down the row. This is intentional: a chain would change cabinets you did not touch.
Example: the sink unit has the drawers on its right, and the drawers have the next cabinet on their right.
- When you move the sink unit, the drawers go with it. The next cabinet stays where it was.
- When you change the height of the sink unit, and the Height checkbox under Include in scaling is on only on the sink unit, the drawers get the new height. The next cabinet does not.
You move the whole run by selecting all its cabinets (Shift + click) and pressing 1 or 2.
What else the relation does
- Turning the main cabinet (R or Z rotation) also turns its related cabinets.
- You can also move the neighbour yourself. As soon as the main cabinet moves or changes, the neighbour goes back to its place next to it. For a permanent gap, type an offset.
- O and the Open doors and Open drawers buttons also open the fronts of directly related cabinets.
- Save as template saves the cabinet together with its related cabinets (see Templates and My templates).
- Show IDs in the Relations panel writes the internal names of the cabinets in the view, e.g.
frame.001orframe_4dbfe6d3. By these names you choose a cabinet in the Left, Right, Above and Below fields. - Project check does not report an overlap between related cabinets, because a carcass inside a carcass overlaps on purpose.
Watch out
Deleting a cabinet (X) also deletes the cabinets entered in its Relations. This is intentional. If you want to keep the neighbour, empty the field first. See Deleting a cabinet.
Align to active
Align to active brings the selected cabinets to the same height from the floor and the same back line as the active cabinet. Use it when a cabinet was moved by hand or placed with the mouse.
- Click the cabinets you are aligning, with Shift + click.
- Hold Shift and click last the cabinet you are aligning to. It is the active one.
- In the EFS - Cabinet tab, at the top of the Cabinet properties panel, click Align to active.
| What | Does it change? |
|---|---|
| Height from the floor (bottom of the carcass) | Yes, for all selected cabinets. |
| Back line | Yes, but only for cabinets with the same Z rotation as the active one. |
| Position along the run | No. |
| Dimensions, legs, fronts | No. |
The button appears when at least two ordinary cabinets are selected. The corner cabinet does not count.
Watch out
Align to active does not change the legs. A cabinet without legs aligned to a cabinet on 100 mm legs rises 100 mm off the floor and hangs in the air. Make the legs the same first (L), then align.
The bottom of the carcass is aligned, not the top. This way you align wall units of different heights by the bottom, not by the top. See Wall units, tall units and flaps.
Check the run
Before exporting, run Project check (EFS tab, Export panel). For the base run it reports:
- cabinets that overlap, with the message '…' and '…' overlap (… mm).;
- doors that hit a neighbour or a wall when opened, with the message Door '…' hits '…' when opened.
The button next to the message selects that cabinet in the scene and zooms the view in on it. More in the chapter The production package and the supplier order.
Common problems and solutions
The sink unit sat at the end of the run, not next to the corner cabinet. The corner cabinet cannot be an anchor, so the new cabinet sat at the right end of the base run. Select the cabinet the sink unit should go next to and add it again, or move it with 1.
The corner cabinet did not sit in the corner. Wall A already had base units, so it sat at the end of the run. Type its position X 0 and Y 0 in the Cabinet properties drop-down, or place it first.
The corner cabinet faces the wrong way. The Z rotation depends on the view rotation when you add it. In the Corner cabinet properties panel, click the rotation from the table in Corner cabinet in another corner and type the position again.
The corner cabinet's fronts are not flush with the neighbours. The wing is not 562 mm deep. Match Front side: Width and Front side: Depth to the dimensions of the cabinet (section The wings and the front plane).
A cabinet for wall D sat behind wall A, outside the room. The project had no base unit yet, and the view was 270°. Move it with 2 or add it next to a selected cabinet.
A cabinet on wall D sat over another cabinet. The 270° rule without a selection looks at all base units in the project. Press Ctrl+Z, select the last cabinet on wall D and add the new one next to it.
The new cabinet sat on the left instead of the right. To the right of the selected one there is already a cabinet or the corner cabinet. Move it with 1 or 2, or select the cabinet at the other end of the run.
1 moves the cabinet away from the wall. The cabinet stands on wall B or D, where the run goes along the Y axis. Press Esc and use 2.
Fill the gap does not appear. Not exactly two ordinary cabinets are selected. The corner cabinet does not count.
Fill the gap reports that the gap is too narrow. The gap is less than 20 mm. Close such a gap by moving a cabinet.
Fill the gap added a cabinet instead of a filler. The gap is 150 mm or more. Press Ctrl+Z and move the cabinet so that the gap is smaller, or add a filler with a right-click.
The filler is white, but the fronts have a decor. The filler from Fill the gap is in group F 3. Change its group to F 1 in the EFS - Board tab.
After relating, the neighbour jumped up against the cabinet. The offset is 0 mm. Type the gap in Left offset or Right offset.
I moved a related cabinet, and it went back. A related cabinet follows the main one. For a different gap, change the offset in the Relations panel of the main cabinet.
I moved the first cabinet, and the third one in the run stayed in place. The relation works only on direct neighbours. Select the whole run and move it together.
I changed the width, and the neighbour's width changed too. Width is on under Include in scaling. Turn it off and set the neighbour's width back.
I deleted a cabinet, and the neighbour disappeared too. The neighbour was entered in the Relations of the deleted cabinet. Press Ctrl+Z, empty the field and delete again.
Align to active lifted the cabinet into the air. The active cabinet has legs, and the aligned one does not. Press Ctrl+Z, make the legs the same and align again.
Shortcuts in this chapter
| Key | Action |
|---|---|
| C | New cabinet, next to the selected one or at the end of the run |
| Shift+C | New corner cabinet |
| 1 / 2 / 3 | Move along X / Y / Z: type the distance in mm and confirm with Enter |
| R | Turn the cabinet by 90° |
| L | Next legs |
| O | Open / close doors and drawers, also of related cabinets |
| X | Delete the cabinet, with its related cabinets |
| Shift + click | Add a cabinet to the selection; the last one clicked is active |
| right-click | Cabinet menu: Add to the cabinet → Filler ←/→ |
| middle mouse button | Turn the view (direction in the header: 000°, 090°, 180°, 270°) |
| Esc | Cancel the move |
| Ctrl+Z | Undo the last action |
All shortcuts are in the chapter Keyboard shortcuts.
Next
Next chapter: Wall units, tall units and flaps